Posted on 27 Comments

Let’s Explore v4.3 – Page Setup Panel

It’s new! The new v4.3 software has been released and there are a few changes to how things look in the software. With the release of the new Cameo 4, a new software update had to be released in order for the Cameo 4 to be recognized in the software.

Today we are going to take a look at what the Page Setup Panel – Tab 1 looks like now in v4.3 software. If you have an older software version prior to v4.3, check out this post HERELet’s Explore v4 – Page Setup Panel – Page Size and Cutting Mat.

How do I know what software version I have?

First, let’s see what software version you are using.

On a PC, in the top left corner, click on Help > About Silhouette.

Software version

On a MAC, navigate to the top left menu, click on Silhouette Studio, and then click on About Silhouette.

MAC About Silhouette copy
(Thanks Libby Ashcraft for this MAC screenshot!)

This little window tells us a lot of information and is handy to have when troubleshooting an issue a user is having.

About Silhouette info copy

It tells me that I am using version 4.3.353 (currently a Beta version) and that I have Silhouette Studio Business Edition (ssbe) active on my computer.

Now, you may ask why I am using a Beta version? Well, I am part of the Silhouette Beta testing group and test the software releases that may have bug fixes or if I find bugs I can report those to the folks who need to know.
Do I recommend the Beta for the average user? NO
I only recommend the Beta version if someone is having an issue I know is resolved by updating to the Beta version or if you are very familiar with the software. The Beta version is a TEST version and with that can come unknown bugs.
The main thing I want you to find here is where to find your software version information.

Now that you know that information, you can tell if you are on a version prior to v4.2 or if you have a v4.3 software.

So let’s take a look at the differences between the Page Setup Panel – Tab 1 in v4.2 versus v4.3.

Page Setup Panel difference copy

So if you are a v4.2 or prior user, you will want to look at this post HERE for the Page Setup Panel look that matches your software.

If you are a v4.3 software user or just curious what v4.3 holds, keep reading as we go through the entire panel.

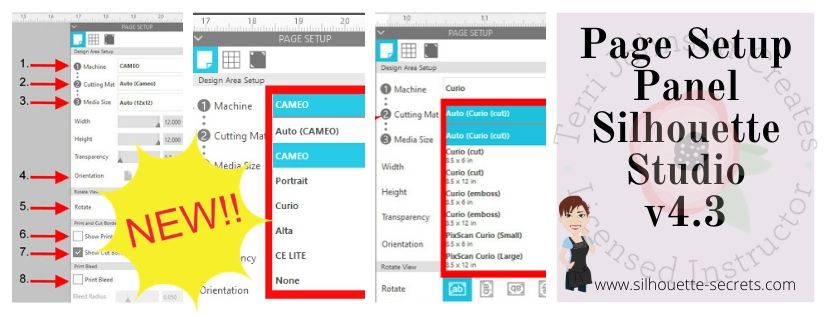
The Page Setup Panel is found in the top right corner of the Silhouette software and is one of the most important panels to get started designing.

Page Setup Panel Tab 1 copy

Let’s take a look at what each of these sections tells us.

Page Setup Panel details copy
  1. Machine – Select the machine that you want to design with. Now you can choose between a Cameo, Portrait, Curio, Alta, CE Lite, or none for the designated machine.
    Machine option copy
    This is great for Silhouette owners who may want to design on a Curio mat when they are not connected to the machine.
    It will allow the Curio mat to come up on the design page so a user can then design within that Curio mat versus having to go plug their machine in for it to be recognized.
    Curio mat copy.jpg
    This is the biggest reason for the Page Setup Panel change.
    However, something to note is that while you can select the machine to design with, you would still need to have plugged in a Curio and it be recognized by the software to unlock the Curio features such as the Emboss Panel.
  2. Cutting Mat – Choose the cutting mat size depending on what you are using.
    Each machine type selected will have a variety of options.
    Here are the Cameo options:
    Cutting mat copy

    Here are the Curio options:
    Curio cutting mat option copy

    Each drop down list will vary depending on what you have chosen in the #1 area.

  3. Media Size – this was previously known as page size and now has been changed to media as the materials you can use in your Silhouette has expanded. In the drop down are several preset sizes for the most common media sizes.
    Media Size copy

    Choosing a specific media size will adjust the media size on the screen and you will see a white “page” show up on the screen depending on the size chosen. White will appear for the media size if the transparency is at 0% – see below*
    Media Size white copy
    In the photo above, I have selected the Machine: Cameo, Cutting Mat: Auto (Cameo), and Media Size: Letter. Notice that the white has adjusted to match the Letter size paper of 8.5″ wide by 11″ height.

    Under this Media size section, you can also select a custom size by entering the dimensions into the Width and Height section.

    Custom width height copy
    Note: the width of the Media Size cannot be set larger than 12″ since the Silhouette Cameo cannot cut wider than 12″.
    If you try to adjust the width larger than 12″, it will revert it back to 12″.
    If you want to design with a page size larger than 12″, change the Cutting Mat to none & then you will be able to adjust the Media size larger than 12″ wide.

    Transparency – adjust the transparency of the media size you have selected. At 0% it shows as a solid white media on the screen. As you increase the transparency the white disappears and you will see the grid spacing of the cutting mat appear.

    This was formerly called “Reveal” under the cutting mat section.
    Transparency copy

  4. Orientation – change the orientation of the page to Portrait or Landscape orientation
  5. Rotate View – change the orientation of the entire design mat on the Silhouette software. This only rotates the view of the mat on the screen.
    Keep in mind that the black arrow is always the “top” of the mat or the “top” of the media. This is the first part of the media that is loaded into the machine.
    Rotate View copy

    Here is the view rotated to 270 degrees. No matter where the black arrow is pointing on the screen, that is always the top of the mat or media that is loaded into the machine.
    This is something to keep in mind when you are placing your design and media on the cutting mat.
    Rotate View 270 copy

  6. Show Print Border – check the box next this option to turn the Print Border on. It will show as a gray border on the screen and is set according to what printer is recognized by the computer
    Show Print Border copy
    The print border should have no affect on the cutting space, it shows what the printer margins are set to for the printer that is set up on your computer.
    If the gray lines are showing at a smaller size, most likely the print size has been changed in the Printer Setup within the software or within the Printer setup on the computer.
    Check under File > Print Page Setup for more details on the printer page size.
    Print Page Setup copy
  7. Show Cut Border – check this box to show the maximum cut border that you have to work with. A red cut border will appear around the media size you have selected.
    Show Cut Border copy

    There are 2 options for the cut border in the software. There is the Cut to Edge of Page, which is what I have my software set at as shown above. This option can be found under the Preferences options > Defaults tab in the software.
    Preferences copy

    Or there is the default, which places the cut border just a bit within the edges of the media size.

    Show Cut Border default copy
    It is all a matter of personal preference in how you have the software set up.

    I always have my Show Cut border checked, especially when doing a Print and Cut project.
  8. Print Bleed – this option can be selected for when a project is being printed through your printer to be cut. The Bleed radius can be adjusted in this section too.
    Print Bleed1 copy
    It will give the colors a bleed area (similar to an offset) around the design that is being printed. This is to help avoiding a white border around the design when it is cut.
    Print Bleed copy
    In this photo you can see that with the Print Bleed option chosen it bleeds the color out from the edges of the design.
    Print bleed final
    Here you can see the print bleed excess once the design is peeled away.

    Something to note about Print Bleed is that it does NOT show the bleed on the design screen. The bleed is only present when you have this option selected and print onto the material.

And there you have the new v4.3 Page Setup Panel. Now, if you made it all the way through the post and are scratching your head as to why your Page Setup Panel does not look this way. It could be that you are not yet on the v4.3 software version.
Check out this post HERE to see if that looks more like what you are seeing.

The next question you may be asking is – Why does it have to change?

Well, whether we like it or not, change can be good. New features, new machines, new techniques! It is a never ending learning process and I for one am grateful that the Silhouette company looks for ways to improve on things.

Check out the “Let’s Explore v4” section on the blog for more Silhouette software explanations HERE.
Header PDF file

I would love to see your projects & I know others in my group do too! Feel free to post on my Facebook group at Silhouette Secrets with EllyMae.

Save this post for future reference by pinning the image below.

Enjoy!

SS Logo snip it

**This post may contain affiliate links. What that means is that I may receive compensation if you purchase through the links I have provided. The price you pay for the product or service is not higher but I may get compensated for sharing.

Posted on 7 Comments

All Things Silhouette – 2019 November Highlights

It is always a bittersweet feeling after a weekend teaching at an event. We just wrapped up the All Things Silhouette November 2019 Conference and it was fantastic!

What is the All Things Silhouette Conference about? 

It’s about the people! The people who are all gathered together with the common interest of “Silhouette” in common.

We come together, we laugh, we learn, we connect, we share, and we laugh some more!

IMG_20191108_210747493 copy

We all work hard for months before the conference, during the conference, and yes even after the conference! It takes a great team to make all the pieces of the puzzle fit into place.

And it all started with this lady right here! Terri Johnson Creates is the vision & working power behind the All Things Silhouette Conference, TJC Licensed Instructor Program, and many other Silhouette related events.

IMG_20191109_081242523

While I have worked side-by-side with her for a couple years now, it is rare that we remember to take a photo during the event. That has to be the hardest thing for me to remember to do at an event is to take photos.

Check out the upcoming 2020 events that are planned on the Terri Johnson Creates website HERE.

The All Things Silhouette Conference brings together the top of the Silhouette Industry leaders who share their knowledge, techniques, testing, and skills with the conference attendees. Here are a few of us at the end of the conference. Again, photos of the entire group are rare. We are rarely in the same place at the same time the entire weekend.

FB_IMG_1573469140739
(left to right: Terri Johnson Creates, Libby Ashcraft, Sarah Cannon (Silhouette), EllyMae Habets (Silhouette Secrets+), Kelly Wayment (Finding Time to Create), Cindy Eckhoff (Smart Silhouette), Julie Huggins (Sew Craft N’Spired), Kathryn Geddy, Amy Robinson (Silhouette Design Store Designer), Lori Whitlock (Silhouette Design Store Designer), Mags Bonham, Cindy Pope

The connections that are made at the Silhouette events are priceless!

During this ATS event, I taught several classes using the Silhouette Curio.

If you are a Curio owner, you may have realized by now that it can create really cool projects. However, it can take some time to create those and those projects are not always possible to achieve in the hour & 15 minute class time during the regular ATS weekend. From feedback provided by the attendees, a Friday pre-ATS event has been added. This is an add-on to the regular ATS package called the Ultimate Experience.

This is the 2nd time I’ve taught a Curio Boot Camp session. It is very popular and sells out quickly once it’s posted. While it is posted as a 3 hour class, you just never know what will pop up in class and we did go over in time, but everyone was so involved in creating their own designs that you could hear a pin drop in the class. I don’t think they wanted to leave even after their project finished etching.

Curio Boot Camp project

This is a 4″ x 6″ acrylic panel from Craft Chameleon that is etched with the Silhouette Curio. This design is the Sunflower Heart Mandala by Jennifer Wambach in the Silhouette Design Store.
Thank you to both Craft Chameleon and Jennifer Wambach for sponsoring this class!

During the regular ATS weekend I taught the Basic Acrylic Etching class and I showed them how to set up the design to be etched. This design was created in the Silhouette software using basic shapes – check out this post on Drawing Tools to see how you can create your own snowflake too.

Sil_Secrets_Basic Etch

And then a little change of pace. We used the Foil Quill on a faux leather Traveler’s Notebook using the Silhouette Curio. I love the Curio because when you load the base properly, the cutting mat lines up exactly with the cutting mat on your Silhouette software screen. This means that you can place the design on your design screen and then place your materials in the same place on the cutting mat and it will line up.
Check out this The Curio – Getting Started for more information on the Curio.

Sil_Secrets_Foil Compasspic copy

Thank you to Lori Whitlock for providing the Compass design for this class.
It was a big hit!

Collage Travelers Journal copy

And then the final class I taught was a 2 hour class on Saturday evening. We created an etched snowflake home decor project on a 5″ acrylic disc using the Silhouette Curio.

Sil_Secrets_Etchedhomedecor

Thank you to our class sponsors:
Craft Chameleon for the 5″ acrylic disc and Diamond Tip Reamer
H & H Sign Supply for the Glass Etched Vinyl & Oratape Transfer Tape
Snapdragon Snippets in the Silhouette Design Store for the Snowflake Poem Design #72245

Unfortunately, due to some computer issues and things out of our control, we did not get to etch these ornaments in the Basic Acrylic Etching class. While we never like to see it happen, sometimes it does. And, I did not want them to leave empty handed, so I told them all to stop at the registration desk and pick up an etched ornament the next day.

IMG_20191110_073623821 copy

After my last class of the day on Saturday night, I utilized the Curio classroom and connected to 6 machines to etch the 30 ornaments. With the Silhouette Studio Business Edition upgrade, you can use multiple machines at a time. I really was not sure how many machines I would be able to use at once, especially when you are using an etch design as it can be a larger data file. It was either going to be a success or a fail. But, my computer easily ran the 6 Curios etching at the same time. Check out this post on Using Multiple Machines to see how to switch between machines in the software.

Next time, I’ll see how many I can really hook up to my computer and run. There is no limit to the number of machines that can be used with the Business Edition upgrade, except what your computer can handle. This will be dependent on your computer specifications and the number of usb ports you have available to connect to. If you have too many machines going it could max out your computer processing power and that could mean anything from a lag to a crash. But, you never know until you try something out.

And when I wasn’t teaching the class, I was helping out in the classes and every single one I learn something new in. I wish I could clone myself to be in them all.

I had a moment to jump on a Curio machine and complete this design on a Embossable Foil that Kelly Wayment with Finding Time to Create was teaching in the Basic Curio class. I had never used Embossable Foil before & I love it!
I’ve added this to my Black Friday shopping list – stay tuned for that announcement!

IMG_20191109_114859823 copy

It is absolutely amazing what these Silhouette machines are capable of! And I am so grateful for all the blessings that being a Silhouette owner has brought into my life. Now, that may sound odd but, as I started this post out – it is all about the people. Through the commonality of Silhouette I have met so many people who mean so much to me.

My biggest fault at these events is not getting enough photos, especially when I’m teaching. But here are a few I was able to snap.

Courtesy of Cindy Chapko a fellow TJC Licensed Instructor in Arkansas

IMG_20191110_075936352

A shirt made by Jane McClure. This reminds me of our recent trip to Salt Lake City, UT for the Cameo 4 launch except we were all in a mini van. Check out this post on the Silhouette Home Office Tour HERE.

IMG_20191110_082145384

Here is the backside of the shirts that Jane and her group made. These are amazing!

Dee and I had to do a couple retakes to show off her newly etched bracelet that she created in a Curio class with Mags Bonham. By the 3rd photo, no one looked like they were getting punched. We had some good laughs though!

IMG_20191110_135736347

And my hair made it on another shirt! Looks like it’s time for a little color for me.

FB_IMG_1573277476610

It was a fabulous weekend and each All Things Silhouette Conference keeps getting better and better! I was writing down class ideas before the weekend was even over!

Make sure to get signed up for the November 2020 All Things Silhouette Conference as soon as registration opens. It will fill quickly with only 1 conference next year. Sign up to be notified on Terri Johnson Creates blog HERE.

While the weekend is always physically exhausting because we are on the go, it is also creatively renewing. All the creative energy, the Silhouette love, the knowledge floating around, the ideas & techniques shared…. it renews & refreshes you in a way that is so hard to put into words.

It gets your wheels spinning and ideas flowing. And I typically hit the ground running or most times while the airplane wheels are still in the air, I’m typing away on my phone jotting down more ideas.

While I tell myself I am going to take a break after each event, I feel recharged after and don’t want those ideas to run away.

On with the research and testing for the next event.
Can’t wait to share the final projects with you all!

Now, while we have to wait a whole year for the next All Things Silhouette Conference, that doesn’t mean you cannot get inspired or spread inspiration to others.

I would love to see your projects & I know others in my group do too! Feel free to post on my Facebook group at Silhouette Secrets with EllyMae.

Enjoy!

SS_Signature copySS Logo snip it

**This post may contain affiliate links. What that means is that I may receive compensation if you purchase through the links I have provided. The price you pay for the product or service is not higher but I may get compensated for sharing.

Posted on Leave a comment

Acrylic Etching at ATS – November 2019

I’ve just arrived home from the November All Things Silhouette Conference for 2019 and so many ideas are hitting me. I am making notes for when I get a chance to start creating again.

I wanted to share a project I created and put in the Silhouette Showcase room at the conference.

This is an acrylic etched with the Silhouette Curio. It is a lighted base that can be found at Craft Chameleon and the acrylic is specifically sized for the base.
This is one of my favorite ones that I have etched for the base.

eZy_watermark_12-11-2019_03-23-14

Acrylic light base by Craft Chameleon found HERE

SilSecrets_lightedbase copy

There are several different acrylic shapes that fit in the lighted bases and also Curio Templates for all those shapes.
I LOVE the Curio templates to help hold my blanks in place!

Thank you to Craft Chameleon for allowing me “test” this one out for them to share with everyone at the ATS – Showcase.

I couldn’t stop there though. I etched 150 of the 15/16″ acrylic discs and gave those out to the attendees of all the Ultimate ATS attendees for the Friday classes in their goody bags.

SilSecrets_acrylic charm

For these I added a wine charm to the bag but they could also add it to a key chain or other type of hardware too!

I had a few extras and turned mine into a pair of earrings that I wore this weekend too!

SilSecrets_earrings

And yes, there is a Curio template for these charms too! I was able to etch 10 charms at a time.

And I want to share this with all of you because I think it is so neat.
I was able to use my Business Edition software to connect to 6 different Curio machines to etch 30 snowflake ornaments during the conference.
It’s a long story on why but where else do you get access to a room full of Curios.
Next time, I’ll try even more!

Are you just getting started with the Curio? I recommend starting with the Silhouette metal etching sheets and practicing first.
Here is a step by step tutorial on how I do that – Beginner Curio Etching Metal.

beginner curio Etching metal header copy

Want to learn how to etch on acrylic? I just recently launched an online class on my Teachable site to show you how.
Check it out HERE along with my other classes that are available.

SilSecrets Curio Etching copy

Or if that is not enough, come join us for a full weekend of Curio projects on May 1-3, 2020 at the Curio Retreat in Woodbridge, VA!
Grab your seat quick as we are already over 50% full!

SilSecrets_Curioworkshop.jpg

I would love to see your projects feel free to post on my Facebook group at Silhouette Secrets with EllyMae.

Enjoy!

SS_Signature copySS Logo snip it

**This post may contain affiliate links. What that means is that I may receive compensation if you purchase through the links I have provided. The price you pay for the product or service is not higher but I may get compensated for sharing.


Posted on 13 Comments

Silhouette Rotary Blade – First cuts

Silhouette Secrets+ with EllyMae

If you’ve been curious about how the Silhouette Rotary Blade works, you’re not alone! I recently made my first cuts using the Rotary Blade, and I’m excited to share the results. This specialty tool is designed to glide through soft, fibrous materials like felt, fabric, and crepe paper—without needing a backing or stabilizer. In this post, I’ll walk you through how the Rotary Blade works in Silhouette Studio, the key tips I discovered along the way, and how you can get clean, beautiful cuts right from the start. Whether you’re cutting fabric for appliqué or crafting adorable felt stuffies, this tool opens up a whole new world of creative possibilities!

On October 18, 2019 a package showed up in my mail box. My kids were excited, I was excited – we were all excited. While their excitement quickly wore off, mine has not.

Four Silhouette Cameo 4 tools packaged on a wooden surface, including a Punch Tool, Rotary Blade, 2 mm Kraft Blade, and Pen Holder.

Affiliate links may be present in the following blog post and as an Amazon Associate, I earn from qualifying purchases.

The new tools for the Cameo 4 had arrived. After attending the Silhouette Summit in May and learning about the new Cameo 4 release and the new tools to go with it, they are finally here.

Updated 6-15-25 – the Silhouette Rotary blade is compatible with the Silhouette Cameo 4 models, Cameo 5 models, and Curio 2.

From left to right they are: The Punch Tool, Rotary blade, 2 mm Kraft blade (Cameo 3 or 4), and the Pen Holder. The 3 mm Kraft blade was not in my box, but will be coming soon.

Today I’m going to show you my first cut with the Cameo 4 – Rotary blade.
It is a pretty simple cut.

Last week while I was finishing the prep for my Foil Quill on a Traveler’s Notebook class for the upcoming All Things Silhouette Conference, I was having a heck of a time getting the same foil results as I had with my original demo. I ended up having several traveler’s notebooks that were “sacrificed” in the testing process.
What was I going to do with all these “failed” tests?

A pink faux leather notebook cover featuring gold foil compass designs and the word 'Test' repeated vertically.

My fabric selection is very minimal, so I just grabbed the first one I found.

A faux leather traveler's notebook with a compass design, resting on a colorful fabric patterned with wine bottles, beside a Silhouette cutting machine.

And no joke, it was the first one I saw. This is leftover from a gift making session a few years back where I tried my hand at fabric key fobs.

Why not cover the journal as a test?
Cut this thin cotton fabric with the rotary blade and test it out. Perfect!

I measured out how big the traveler’s notebook was and then drew a rounded rectangle in the Silhouette software. I added a little bit to the measurements to allow for some overlap around the edges of the cover. In hindsight, I should have allowed a bit more.

So the first thing I want to mention is that when you get the Cameo 4 Rotary Blade, you want to twist the bottom to expose the blade. This is a safety feature so the blade is not exposed right out of the package.
And it won’t cut very well at all if you don’t twist the bottom to expose the blade. You’ll have to trust me on that one.

Close-up of a hand holding a white rotary blade tool for the Cameo 4, with a cutting mat in the background.

Once you install the Rotary blade in the Cameo 4 Tool 2, the software will recognize the tool has been installed with the new Tool Recognition and will give you the cut options for that tool.

Next, when you use the Cameo 4 Rotary blade, you will notice that you have these extra lines on your design mat when you go to the Send tab. This is so the rotary blade can orientate the blade to the correct position to cut the design out.

Journal cover copy

It is just like a hand held rotary blade and rolls across the material to cut.

A close-up of a Cameo 4 cutting machine with its tool holder, displaying a colorful fabric featuring wine bottle designs laid on a wooden surface.

Now, my design is a very simple rounded rectangle.

A close-up of a cutting mat with a piece of fabric featuring wine bottle patterns, positioned in front of a Silhouette Cameo cutting machine.

While it may be simple, it is a great way to test out the blade to see if it will cut this thin cotton fabric.

And success! There were a few threads that needed to be clipped around the edge, but I’m good with that. And it is improving. There are software updates coming that are improving the cut settings and allowing more possibilities to customize those settings because we all know that not all materials are created equal. As I found with Foil Quill foil, even in the same brand of items, not all will perform the same. The Gold Finch 4″ x 6″ sheets did not foil the same way as the foil that was included in the Foil Quill bundle or like the large roll of gold color did.

Now, I was so excited to test this blade out, that I didn’t really think how I was going to apply this piece of fabric to my traveler’s notebook, which is like a faux leather on the outside. So I reached out to my friend Libby for her advice. It was pretty much the answer I had thought – Heat & Bond or Fusible Stabilizer, but confirmation from a fabric user is always better.

Yes, it would have been much easier to put the Fusible Ez-Steam on the fabric and then cut it, it would have even cut with a regular blade since I had such a simple shape. But, it was a test to see how it would cut with the rotary blade and it was a success!

I can’t be the only one that has these hindsight moments on how to make the project easier….. after the first one is done. Or gets excited and just jumps in before thinking the project all the way through.

I ironed the fabric to get it nice and smooth. Then I peeled the paper backing off the Fuzible Ez-Steam and applied it to the backside of the fabric.

An iron is positioned beside a piece of fabric with a protective paper backing, set on a blue ironing board.

Then I placed the fabric on top of the travelers notebook and carefully ironed it on.

A close-up of a hand holding a small fabric cut piece with a backing, placed over a notebook cover that reads '1st Test' in gold lettering.

After I ironed the outside, I flipped it over and then carefully folded the edges over and ironed those down to the inside. The inside of the notebook is a paper material, so I didn’t hold the iron in the same place very long.

A fabric-covered traveler's notebook with a black backing, pinned edges, and an iron in the background.

You can see in the bottom right corner that the edge was a little bit small, this is where I would adjust for the next one and make it a little bigger for a little more edge allowance.

I poked holes through the fabric to thread and threaded the elastic cord back in the holes, added my notebooks back in, and have covered this “test” subject from my failed Foil Quill project.

A traveler's notebook covered in fabric featuring various wine bottle designs, resting on a wooden surface, with a seam ripper and a weeding tool beside it.

Of course, I couldn’t leave it at just that. I had to add a charm made from an 15/16″ acrylic circle and etched with the Silhouette Curio 1.

A traveler's notebook covered with fabric featuring various wine bottles and tags, accompanied by a charm that reads 'live love WINE'.

Can you see yourself using the Silhouette Rotary Blade in any future projects?

Next up on the testing list is leather, faux leather, more fabric or whatever I can find.
I can’t wait to share that too!

Additional Resources:

Save this for future reference by pinning the image below.

Silhouette Rotary Blade against a colorful background, showcasing its design and features.

Enjoy !

THANK YOU for your support! How can you help? Click HERE & buy a coffee.
Every little bit helps with the cost of running the site.

Silhouette Classes

Never stop learning! Let me help you take the anxiety out of learning with Silhouette and get to creating faster! My Silhouette classes are heavily focused on software, so you can take the skills & techniques taught and apply them to many future projects!

Silhouette step-by-step Classes by Silhouette Secrets+

Silhouette Secrets+ with EllyMae
**This post may contain affiliate links. What that means is that I may receive compensation if you purchase through the links I have provided. The price you pay for the product or service is not higher but I may get compensated for sharing.

Posted on Leave a comment

Designing in Silhouette – Split Name Shirts

Today I’m going to share some shirts I made a few weeks back.

Sil_Secrets_softball5 copy

Some times it just feels good to sit down and make a few projects just because.

My daughter started on a new softball team this Fall season and I needed a few shirts. Red is not usually in my wardrobe, so new shirts were in need of some sprucing up. Libby Ashcraft with Libby’s Loft had just posted a Retro Words tutorial and it was one of those must-do projects. It is also extremely popular right now and the method she shows can be done with any bold font that you choose.

Sil_Secrets_softball1 copy

Check out Libby’s tutorial HERE on how to create this Retro Words.

I love that it uses several tools in the software such as: Offset, Guides, Knife tool, Align tool, Replicate Panel, Cut by Fill Color, and more.
Click on each of the words above for more information on that tool.

Sil_Secrets_softball6 copy

And I couldn’t just create my coaches shirts that were naked on the back, so it was perfect timing that these designs hit the Silhouette Design Store at the same time I was creating this project.

Sil_Secrets_softball4 copy

Don’t Stop When You’re Tired by Lori Whitlock – Design #302756
I did change the #Football to #Softball and it worked perfectly!

Sil_Secrets_softball3 copy

It’s How Big You Play by Lori Whitlock – Design #302758

And the favorite by everyone this season was this one.

Sil_Secrets_softball2 copy

If At First You Don’t Succeed by Lori Whitlock – Design #302764

The coaches and parents sure loved these shirts and I received a lot of compliments on them.

Sometimes, you just have to put everything else aside and just make a few projects for yourself! I hope that you have some time to play with your Silhouette machine soon!

Have you created this effect for yourself or others?

I would love to see your projects feel free to post on my Facebook group at Silhouette Secrets with EllyMae.

Enjoy!

SS_Signature copySS Logo snip it

**This post may contain affiliate links. What that means is that I may receive compensation if you purchase through the links I have provided. The price you pay for the product or service is not higher but I may get compensated for sharing.

Posted on 2 Comments

New! Silhouette Online Classes

I get a lot of requests to put my classes online. And it’s been a work-in-progress and a learning experience too!

I currently have 7 Silhouette classes available online on my Teachable site. These have been developed in response to requests by my students and followers.

Silhouette online classes

These classes are created in the Silhouette Studio v4 software and include all my tips, tricks, and supply lists to complete each class. All of the classes are created using the same class content that I use when teaching a hands-on, in-person lesson and have as little video editing as possible, in order for you to get the full class effect.
You don’t want to hear me bumble over one tongue-twisting word 10 times, watch the Curio etch for 40 minutes, or see the frustration of a mic not working, so there are some areas that are edited or the speed increased (etching).

What are the online video classes available?

1. Basic Acrylic Etching with the Silhouette Curio

SilSecrets Curio Etching copy

This is a 1 hour video class that is step-by-step in setting up a design, setting up the Curio, and etching on acrylic using the Silhouette Curio.

The Silhouette Curio is an amazing machine that can accommodate thicker materials and works great for etching on metal and acrylic.
If you are just getting started or have an interest in the Curio, check out the
Let’s Explore the Curio – Getting Started post.

This little machine can definitely add that personal touch to projects that others cannot.
Check out this post on Silhouette Inspiration to see a few more projects I’ve created with the Silhouette Curio.

Silhouettesecrets+Curio_projects

2. Creating a vinyl decal & layering vinyl using the Silhouette

Sil_Secrets_layeredvinyl copy

This is a 1 hour class showing the entire process of creating, cutting, and layering an adhesive vinyl decal in the Silhouette Studio software.

This class uses the Monogram Script Arrow font by Rivka Wilkins to create a 3 color decal using Oracal 651 adhesive vinyl.

3. Cutting & Layering HTV in Silhouette Studio

Layered vinyl copy

This is a 45-minute video class that is a step-by-step process of cutting & applying a multi-color HTV design.

I used the Sparkle Like a Unicorn design by Sarah Hurley with Siser HTV to create this body suit gift in the video class.

4. Glass Etching with Silhouette

Silhouette-Secrets+_GlassEtchingPhoto copy

This glass etching video class is approximately 1 hour and 13 minutes showing the process of setting up a design to create a stencil for glass etching, cutting a stencil with Oracal 651 adhesive vinyl & Oramask 813, and using Etchall glass etching cream.

5. Heat Transfer Print & Cut with Silhouette

CQLG3491 copy

In this 35-minute video class go through the step-by-step process of creating a print & cut design, printing on heat transfer paper, cutting, and applying the heat transfer paper.
This class can apply to all print and cut projects no matter what material you are printing on.

I used a Flamingo Clipart Mega Pack for the design and JetPro SS Heat Transfer Paper from Heat Press Nation for this class.

6. Creating a Knockout Design with HTV
Bonus HTV & Subtract

SilSecrets_Knockout copy

This is a 1 hour video class to create a HTV Knockout design with Silhouette Studio, cutting, and applying the HTV. A short bonus software video with using HTV & subtracting the design is also included.

I used the USA States Dingbat Font by Sandi Idleman and Siser HTV in this class.

7. Creating a Rhinestone Design in Silhouette Studio

SilSecrets_Rhinestone copy

This is a 45 minute class creating a rhinestone design in the Silhouette software, cutting from rhinestone template material, and applying the rhinestone design to a zippered bag.

I used Siser Glitter HTV,  rhinestone materials from The Rhinestone World, and a Cotton Zipper bag from Craft Chameleon in this class.
The Designer Edition software upgrade or higher is required to create a rhinestone design in the Silhouette software.

Why online classes?

Every user is going to vary in where they are located. Maybe they cannot get to an in-person lesson with an instructor, a workshop, or an event. Maybe their schedule does not work for booking a lesson in-person. It can vary for all users.

Each user learns differently. Some people can learn by reading a tutorial and pick it up with no issues, while others prefer a video that they can pause and re-watch whenever they want. What I have learned by doing in-person lessons is that there can be a lot of information discussed during a 1 hour lesson and rarely do students remember everything that was discussed. This is one reason that I also provide a follow up email to my in person students to highlight some of the topics discussed. With a video lesson, you can control that and hear it again when you need to.

Video class suggestions

As I mentioned above, these classes were created at the request of students and followers. Feel free to provide suggestions on video classes that you would like to see by joining my Facebook group – Silhouette Secrets+ with EllyMae or sending an email to silhouettesecretsplus@gmail.com

I do keep a list of videos to create and there are several in the process, but they do take time to create. It has definitely been a learning process for me. I know the Silhouette software and love teaching that, but recording, video editing software, video hosting sites…. that is all a new world to me.

I would love to see how you are using your Silhouette machines!
Feel free to post on my Facebook group at Silhouette Secrets with EllyMae.

Enjoy!

SS_Signature copySS Logo snip it

**This post may contain affiliate links. What that means is that I may receive compensation if you purchase through the links I have provided. The price you pay for the product or service is not higher but I may get compensated for sharing.
Posted on 13 Comments

Cameo 4 Cover and more!

Look what I did!
(Read to the end and you’ll find a surprise!)

SilSecrets_Cover copy

*This post may contain affiliate links. Please see the bottom of the post for more information.

Now, usually I am not one who can decide what design to put on my machine. But, when I saw Sparkleberry Ink release this Laura’s Abalone design, I just knew what I wanted to do with it.

Note: you will need a piece of Sparkleberry Ink vinyl or other brand that is at least 12″ x 24″ long.

I created this Cameo 4 cover all by using a tape measure, the drawing tools in the Silhouette software, and cutting test cuts of the templates to make sure they would fit before cutting my precious Sparkleberry Ink vinyl.

So how did I do it?

I started out by measuring each space that I wanted to add a piece of vinyl to and writing that down.

IMG_20191016_190707132

Cameo 4 cover_updated copy

Then I chose the draw rectangle tool in the software and created a rounded rectangle (6.285″ x 2.420) for the top left panel (E).

Drawing rounded rectangle copy

Next, I drew a rectangle (6.285″ x 2.687″). I used the Align tools to center the rectangles together and then moved them together until the total width of the panel was 2.682″. Then I selected both the rounded and regular rectangle and made a copy, this way I have an original shape to go back to. And I’m so glad I did because I had to cut this one a couple of times to get the right rounded rectangle angles.

Next, I right clicked and chose Weld.

Weld copy

Then I cut it from cardstock to see how well it fit. Here are a few of the pieces I test cut to see how they would work for the panels.

IMG_20191016_165058335 copy

Then I continued to measure each and draw the shapes according to those measurements.

IMG_20191016_165117249 copy

By cutting it out of cardstock, I could place the cardstock up to the space available and see how it fit. If it was too big, I could scale it down. If it was too small, I could scale it up a little bit.

I added all my pieces of my design to a “working file” that I saved, just in case something happened.

Working file copy

Once I knew the piece would fit, I then moved it to my original cut file and positioned it on the mat, so I could get the most out of the 12″ x 24″ cutting space.

Silhouette file photo copy

Then I did something daring. I wanted mine to have sparkle to it. So I took a 12″ x 24″ piece of Glitter Laminate Overlay and I applied it to the top of the Sparkleberry InkLaura’s Abalone adhesive vinyl.

Why is this daring? Well, anytime you add a layer on top of another layer, you have the chance of getting bubbles. But, I went for it!

I followed these instructions HERE for using the Glitter Laminate Overlay and it worked! Would I recommend this for all users – No, probably not. I would definitely recommend practicing with a smaller piece first. But, sometimes you just have to go for it 😉 !

IMG_20191011_200646477 copy

Look at it sparkle!

This is definitely one of those times that you feel all giddy when a project is coming together. If you look really close on the right side in the photo above, you may even see a few bubbles. I’m good with that.

IMG_20191011_205303758 copy

After all the pieces were cut, I cut them apart, added transfer tape and started applying 1 panel at a time. I of course started with the largest panel first, the cover.
Well, at this point – might as well go big.

IMG_20191011_205311771 copy

Since this Laura’s Abalone pattern was directional, I realized after I cut the first one, I had turned a couple of the panels to fit on the mat and that affected the way the pattern was. So I ended up re-cutting a few pieces so the entire pattern matched.
(I corrected that in the final cut file – see below)

IMG_20191012_082222452 copy

I was happy with it as it shows above, however, my kids came to inspect it and my 10 year old said, “Mom, what about the top? Aren’t you going to do the top pieces, so when the lid is open, it all flows.”

Very good point!

Cameo 4 cover copy

And the final pieces were created.

Updated – 1/12/20 to include right panel & UK top panel option
IMG_20200112_093933194 copy

Now, is it perfect? Nope, it has a few bubbles in it. But, I’m ok with that and hopefully as it settles, those will work themselves out or I can help them a little bit.

But, I have to say I love it!
It sits on my desk next to my computer and just sparkles at me.

Now, I did all the measuring and test cutting, but you don’t have to!

Feel free to grab this free cut file of the Cameo 4 cover I created HERE.

Silhouette file photo copy

Cameo 4 cover FREE cut file

Header photo copy

Now, what if you do not have a Cameo 4 yet or don’t plan to buy one? Well, you can still use some pretty Sparkleberry Ink vinyl to add a little color to your Cameo if you would like, no matter what model you have.

I’ve updated and created a full cover file for the Cameo 3 model as well.
Grab this free cut file HERE

Cameo 3 cover example copy

I did cut without a mat when creating this one since it is a larger surface area, however, you could use a 12″ x 24″ cutting mat as well and arrange the pieces on it. Just keep in mind that if you pattern has a direction to it, you want to keep the same consistency in how the pattern goes across the cuts.

I’d also suggest going slow and taking your time when applying, especially on the lid. It is a large surface to get lined up. In this cut file, the pieces are designed slightly smaller than the actual panel sizes, so there is a little bit of machine color showing through to break up the pattern.

For more details on cutting without a mat, check out this post HERE.

Cameo 3 and 4 copy

Cameo 3-4 lid closed copy

I did not cover the inside of the Cameo 3 lid as it has some instructions inside. If you would choose to do so, I would recommend measuring the inside and then drawing a rectangle that same size. I used cardstock and cut out a piece that was the same length top to bottom and held it up to the machine to make sure it was the correct size, before I committed a full sheet of adhesive vinyl.

Or if you have other model machines, grab this Silhouette Cameo Cover Template from the Silhouette Design Store, some of your favorite Sparkleberry Ink vinyl & maybe some Glitter Laminate Overlay too and get to cutting.
*Note this file contains cuts for the Cameo 1 panels, Cameo 2 panels, and Cameo 3 lid.

Silhouette cover

I would love to see how you decorate your Silhouette machine!

Here is my Silhouette Mint Stamp machine decorated in another Sparkleberry Ink pattern called Cute Crawlers Lime.

IMG_20190831_190213600

Feel free to post your machine decoration or any Silhouette projects on my Facebook group at Silhouette Secrets with EllyMae.

Enjoy!

SS_Signature copySS Logo snip it

**This post may contain affiliate links. What that means is that I may receive compensation if you purchase through the links I have provided. The price you pay for the product or service is not higher but I may get compensated for sharing.

Posted on 3 Comments

Let’s Explore v4 – Silhouette Designs – Part 2

Last week in the Silhouette Designs – Part 1, I showed how to make designs go farther by using some of the tools in the software such as releasing the compound path, grouping different pieces of the design together, and making new compound paths to create a different look.

Today let’s take it a step further and I’ll show you how I created this stacked pumpkin design by moving the Layers around, and then welding the black background together..

eZy_watermark_23-09-2019_01-03-40 copy

Again, don’t get overwhelmed here. I did not get it in the first try but kept on testing different steps to get it to do what I wanted.

Let’s take a look at how I did it.

First, open all the pumpkin files that we created in last week’s post –
Silhouette Designs – Part 1.
We will be using the Modify Panel and the Layers Panel to create the pumpkin stack.

Stack Pumpkins copy

If you have grouped the design back together, right click on it and ungroup. Move the green stems away from the 2 bottom pumpkins. They will not be needed and could be deleted.

Layers panel copy

Open the Layers Panel. Once the pumpkin is ungrouped, each piece of the pumpkin will show as a separate item in the Layers Panel. The black background of the bottom pumpkin is selected and the item labeled “Polygon” that matches will highlight. Polygon is a general name because it’s a shape, if you right click on it, the option to rename the layers is available.
I did not ungroup the pumpkin at the top of the page. In the Layers Panel, you can see that this object is labeled “Group”. When this object is ungrouped, it will break up into separate items in the Layers Panel, like the others show below in the layers list.

Layers Panel renamed copy

I have renamed all of the Layers in the panel so it is easier to know which ones match the design.

To make this design stack on each other and cut the black shadow out of all one piece. I moved the layers around so the black shadow layers are next to each other by grabbing the name in the Layers Panel and dragging it down the list.

Organize layers copy

Now I can select the black bottom and the black middle pumpkin layers and right click and choose Weld. Notice that the orange pumpkin part is now overlapping. We will use the OffsetModify Panels in a minute to fix that.

Weld bottom layers copy

When you weld the 2 layers together, notice that the name changes back to “Polygon”. It can be renamed again if needed.

To make this easier to work with and selecting the correct part of the design, I selected all of the design and changed the Fill Color to transparent.

Select the middle pumpkin, open the Offset Panel, create a small offset of 0.040″, and click Apply.

Offset copy

With the Offset selected, hold the Shift key down and select the bottom pumpkin.

Open the Modify Panel and choose Subtract. This will subtract the middle pumpkin offset from the bottom pumpkin, leaving a space between the pumpkins.

Subtract copy

Fill the pumpkins with orange and the back layer with black to see how the design will look.

Here is a comparison of how the design looks with the Offset vs without the Offset.

Comparison copy

Now, did I have to do this? No, but I wanted the pumpkin designs to be separated in some way so they didn’t look like one giant orange blob.

Now, to add the top pumpkin to the stack, we will repeat the steps for that pumpkin.

Move the top pumpkin above the bottom 2, position as desired, and ungroup the design.

Top Pumpkin copy.jpg

Once the top pumpkin is ungrouped, the layers will separate in the Layers Panel and it will show 3 new Polygon layers. I have gone ahead and renamed the layers to make it easier to see.

Top pumpkin layers copy

In the Layers Panel, move the black background layer of the top pumpkin down the list next to the Black background of the design. With both the black layers selected, right click and choose Weld.

Top pumpkin black layer copy.jpg

Now, you’ll see the top and the middle pumpkin overlap.

Select the top pumpkin, open the Offset Panel, and create a 0.040″ offset. It may be easier to select the designs if the color is removed from the design first.

Top pumpkin offset copy

With the top pumpkin offset selected, hold the Shift key down, and select the middle pumpkin. Using the Modify Panel, choose Subtract. Now the Offset is subtracted from the middle pumpkin and you have a separation between the designs.

Fill the design back in with color to see how it will look.

Full design with color copy

Scale the design to the size you want. I knew I had about 24″ to work with in my area, so I sized the design about 19″ tall. You can use a 12″ x 24″ cutting mat or cut without a mat.
Check out this post on Cutting Without a Mat for tips on setting up for a successful cut without a mat.

Full design scaled copy

I added layering marks to the top of the design by drawing a rectangle, making a copy, aligning the rectangles, and grouping them together. Now, I will cut these layering marks with each color of the design, so I can use them to line the image up. Check out this post on Layering Vinyl for more information on how to create the layering marks.

I also moved the green stem off the design mat, so it did not cut with the 2 long layers. I can cut that from a much smaller piece of vinyl and add it on separate.

Then I used the Cut by Fill Color option and chose which colors I wanted it to cut each time.

Cut by Fill Color copy

Click on the Send tab in the top right corner. Then choose Fill Color in the menu just below the Send menu.

Check the box next to the colors that you want to cut. I want the layering marks to cut with both the black layer and the orange layer, so the light green will remain checked for both cut.

When a color is selected by clicking on the box next to it, you will notice that the cut lines of the design on that color will become bold. In the photo above, the black and the light green have bold cut lines around them. When cutting by Fill Color, the cut lines will be the same color as the Fill color.

I cut the black first, then unchecked the black and checked the box next to the orange.

Cut by Fill orange copy

After the design is all cut, weed away the excess and then layer the design together using the layering marks to line it up.

Check out this time lapse video of piecing this design together.

This is the longest decal that I have attempted to layer. I would suggest starting with a smaller size and practicing with the layering marks to line things up before attempting a large design.

eZy_watermark_23-09-2019_12-57-56

I repeated the process for the evil jack-o-lanterns on the right side.

And yes, even though the bottom right jack-o-lantern decided to go rogue and not stay in his designated spot when I placed him, I just let him be his own self. I do think there was a vinyl issue when I was cutting and the vinyl got stuck a little bit and caused the cut to be off. It happens and it happens to us all.

The designs used in this post are all from the Silhouette Design Store and can be found here:
Pumpkin by Wild Pilot – Design #274430
Pumpkin by Wild Pilot – Design #274429
Pumpkin by Wild Pilot – Design #274427
Pumpkin by FoxSister – Design #273881
Pumpkin by FoxSister – Design #273880
Pumpkin by FoxSister – Design #273879

Now, I played with pumpkins, but this can be used for any design.
What will you play around with and see what you can create?

I would love to see your projects feel free to post on my Facebook group at Silhouette Secrets with EllyMae.

Enjoy!

SS_Signature copySS Logo snip it

**This post may contain affiliate links. What that means is that I may receive compensation if you purchase through the links I have provided. The price you pay for the product or service is not higher but I may get compensated for sharing.

Posted on 1 Comment

Cameo 4 Unboxing

Just wanted to pop in here really quick and post the video I did unboxing my new Cameo 4. Whether you have decided to add one to your Silhouette family or are waiting a bit, check out the video to see what’s in the box and the first cut with it.

If you have any question feel free to ask on my Facebook group at
Silhouette Secrets+ with EllyMae.

If you do decide to order here are 3 places I’d recommend:
Silhouette America
Heat Press Nation
Swing Design

I am so excited for the new tools – Rotary blade, Kraft blade 3 mm (Cameo 4), Punch Tool, and Kraft blade 2 mm (Cameo 3 & Curio) and can’t wait to show you!

Now matter what machine you have, get that baby out and start cutting with it!

I would love to see what projects you create with any Silhouette machines! Feel free to post on my Facebook group at Silhouette Secrets with EllyMae.

Enjoy!

SS_Signature copySS Logo snip it

**This post may contain affiliate links. What that means is that I may receive compensation if you purchase through the links I have provided. The price you pay for the product or service is not higher but I may get compensated for sharing.
Posted on 60 Comments

Let’s Explore v4 – Drawing Tools

Do you use the Silhouette software to draw your own designs? Or maybe you are like me and don’t feel you are creative enough to draw your own designs?
Today we are going to talk about the Drawing Tools and hopefully, you will feel a little differently by the end.

Drawing Tools Panel copy

As I’ve mentioned in previous posts, you will find the Tools on the left side of the Design Tab and the Panels that control the properties of those Tools on the right side.

Tools vs Panels copy

Understanding the different terms in the software can help in remembering where to access some of these features. Check out this FREE PDF file that diagrams the Design Tab out with each of the Icon names.

Let's Explore v4 diagram copy

Let’s Explore v4 – Drawing Tools

Drawing Tools close up copy

Draw a Rectangle Tool

Select the Rectangle Tool on the left side and the cursor will change to a cross-hair. Click the left mouse button and hold to draw a rectangle of any size.

Draw rectangle copy

To draw a perfect square, hold down the SHIFT key as you draw and it will draw a perfect square.

But, be careful not to let go of the SHIFT key before you release the mouse button or it will not be an equal sided square.
The undo option is your best friend in the software at times.

Now, after you draw that rectangle, does your mouse keep on drawing shapes?
You can change this under the Preferences in the software.
Check out this post on Preference – Tools to find out how.

Draw a Rounded Rectangle

The draw a rounded rectangle tool works the same as the rectangle tool, except the corners are rounded and you have the option to adjust the curve of the corners by moving the red dots that appear on the corner.

Rounded Rectangle copy

The red dots can be adjusted individually for each side of the corner or if the SHIFT key is held down when grabbing one, it will adjust them proportionally on all sides.

Draw an Ellipse

Select the draw an Ellipse tool to draw an oval or circle shape.

Draw an ellipse copy

Again, holding down the SHIFT key will allow a perfect circle to be drawn.
If the SHIFT key is released before the mouse button, it will revert back and not be a perfect circle.

Draw a Regular Polygon

Select this tool to draw a polygon. The polygon can be adjusted with the red dots or by using the slider bar in the middle of the shape to adjust the number of sides from 3 to 60.

Regular Polygon tool copy

Now, those are your basic shapes and can be used together to make all kinds of designs. What can you think to create?

I created this snowflake just by using a few of these basic shapes.
A rounded rectangle, a circle, and an oval.
Group or weld the ovals to create the leaf design.

Snowflake design copy

After drawing all the shapes, I used the Align tool to line them all up by the Align Center option. Then weld the shapes together.
Next, mirror the welded shape below from the Replicate Panel and then move the copy up a little so they are overlapped, then weld.

Snowflake welded copy

Now, use the Replicate Two Copies option and weld in the Replicate Panel to create 2 more copies. Then weld the copies together.

Snowflake Replicate copies copy

And then I repeated the same steps for the next part of the snowflake.

Snowflake 2nd arm copy

Once both parts of the snowflake are created, select the smaller snowflake piece and Rotate By 30 degrees, using the Transform Rotate Panel. Select both parts of the snowflake and use the Align Center option under the Transform Panel.

Snowflake welded final copy

Ta-Da! You have drawn a snowflake with basic shapes found in the Drawing Tools on the left side of the Silhouette Studio.

Drawing Tools Pinterest

Want to save this for later? Pin the photo above to Pinterest to refer back to later.
I love Pinterest – find me HERE!

What will you draw or create in the Silhouette software now?
Want another tip?
Check out basic drawing books to see how they combine shapes to make designs and objects.

Feel free to post your comments and questions below or on my Facebook group at Silhouette Secrets with EllyMae.

Enjoy!

SS_Signature copySS Logo snip it

**This post may contain affiliate links. What that means is that I may receive compensation if you purchase through the links I have provided. The price you pay for the product or service is not higher but I may get compensated for sharing.