
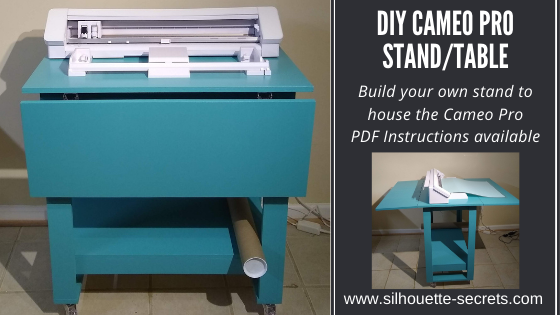
I’ve shared a few glimpses of this DIY stand/table that we’ve been in the process of creating for the Cameo Pro. And it’s now finished – whew!
Let me tell you, writing the instructions, filming the video, and writing the blog post took twice as long as actually building the stand.
Whether you are considering building your own stand/table for a machine or not, I hope you’ll continue reading and watching as all Silhouette users can pick up some tips from the information in the video below. And maybe share a laugh too!

If you are a Cameo Pro owner then you know how large this machine is and if you have been considering it, this is great information to know about so you can plan for it.
Since the machine has a cutting width of 24″ it is much larger than the average Silhouette machine. The machine is approximately 35″ wide and you really want the entire width of the machine to be securely supported.
You also want to consider whether you will be using a cutting mat with the machine or not. If you will be, the full length of that cutting mat needs to be fully supported and rolling in and out of the machine as flat as possible. The Pro simply cannot work against gravity and keep in mind that the mat and material on the mat is weight. If it is hanging down in front of the machine the cuts may not line up properly.
And keep in mind that you need the clearance in the back of the machine whether you are using vinyl or a cutting mat.
There has to be somewhere for the material to go.
I just have to say that after filming the video above, there is never a dull moment in our house. If I get everything set up to record, then it never fails the microphone dies, I forget to push record, the camera is full and shuts off, I misspeak and say 12″ vinyl instead of 24″ vinyl, or you find something unusual where it shouldn’t be.
It’s life! And sometimes you just have to laugh it off!
Note: the sock is gone but new things appear. It’s like the Easter bunny or Santa leaving presents. You just never know what I’ll find.

Affiliate links may be present in the following blog post and as an Amazon Associate, I earn from qualifying purchases.
Here are the supplies we used to create this DIY Cameo Pro stand:
Necessary tools:
– Power Drill with #2 Phillips screw driver
– Saw & Miter Box
– Tape Measure
– Pencil
– 3/32-inch drill bit
– Sand Paper (120 grit, 180 grit, 220 grit)
Recommended Tools:
– 1 to 2 – 6-inch clamps
– Wood glue
– Miter Saw
– Countersink Drill Bit Set
– Spackle, Paint, Paint Brush
– Power sander (quarter sheet or random orbital)
– Square
– Awl
Supplies:
– 1 – 4’ x 8’ sheet of 3/4 inch Sandeply (Home Depot/Lowes) *$40.98
– 5 – 1 x 3 x 8’ (Home Depot/Lowes) *$36.05
– 1 – 1 x 4 x 6’ (Home Depot/Lowes) – *$5.15
– 100 – #8 x 1¼” Phillips wood screws (Home Depot/Lowes/Amazon) *$9.01
– 100 – #8 x 3/4” Phillips wood screws (Home Depot/Lowes/Amazon) *$7.28
– 4 – Drop Leaf Hinges (Amazon) or similar *$15.97
– 4 – 3” Urethane Casters (Harbor Freight) *$15.96
*Our cost – note prices may vary by location. Total cost of base table supplies = $130.40

This Cameo Pro stand was designed so that a crafter could complete the construction using basic tools. My biggest concern for any new Cameo Pro owner is that the machine is fully supported and stable so you can get the best use and most consistent cuts.
The one thing I would highly suggest is reading the instructions and viewing the photos a couple of times before starting. Even though I was right in the middle of the build process, I still re-read the written instructions several times.
We have written a step-by-step 27-page PDF document that is complete with photos and detailed instructions for the construction of this DIY Cameo Pro Stand.
These instructions are available to confirmed newsletter subscribers.
Like what you see, buy us a coffee.
We thank you for your support!

Whether you build your own Cameo Pro stand or not, I hope that the video and photos have given you some tips and ideas to think about when setting up your own Cameo Pro.
It is amazing how my to-do list for the Cameo Pro has grown. Just like everything else, it seems like a never ending list of projects I want to complete.


Check out the other Cameo Pro posts on the blog:
Cameo Pro Released
Cameo Pro – The Details
Maker’s Sign – Cutting large adhesive decals
Tips for the Cameo Pro – Tools, Materials, and Tips
Wood Burning with Gun Powder
Silhouette Fail or Success Project
What are you creating with your Silhouette machine?
Save this for future reference by pinning the image below.

Enjoy !
THANK YOU for your support! How can you help? Click HERE & buy a coffee.
Every little bit helps with the cost of running the site.
Silhouette Classes
Never stop learning! Let me help you take the anxiety out of learning with Silhouette and get to creating faster! My Silhouette classes are heavily focused on software, so you can take the skills & techniques taught and apply them to many future projects!


**This post may contain affiliate links. What that means is that I may receive compensation if you purchase through the links I have provided. The price you pay for the product or service is not higher but I may get compensated for sharing.
Discover more from Silhouette Secrets-Swift Creek Customs
Subscribe to get the latest posts sent to your email.


[…] Information on the DIY Cameo Pro Stand HERE […]
[…] it. (It may have been motivated by the fact that I took over his gaming table.)We completed the DIY Cameo Pro Stand and have shared those instructions for free […]