Posted on Leave a comment

Beginner’s Guide to the Silhouette Cameo 5 Step-by-Step Class Now Available!

Silhouette Beginner's Guide to the Cameo 5
Silhouette Secrets+ with EllyMae

Are you ready to start crafting with your Silhouette Cameo 5 but don’t know where to begin? 🎉 Our brand-new Beginner’s Guide to the Silhouette Cameo 5: Crafting Made Easy is here to help! This step-by-step class is designed with beginners in mind, walking you through everything from unboxing your machine to mastering your first project. Whether you’re brand-new to Silhouette or want to boost your confidence with the Cameo 5, this class is packed with practical tips and easy-to-follow instructions to set you up for crafting success. Let’s get started on your creative journey today! 🌟

Beginner’s Guide to the Silhouette Cameo 5: Crafting Made Easy
step-by-step class
Click HERE

Take the guesswork out of using your Silhouette Cameo 5 with this hands-on, step-by-step class designed for beginners. You’ll learn how to set up your machine, navigate the essential features of Silhouette Studio, and master the basics of cutting with confidence. This class covers everything from opening the box to getting your first successful cuts, with expert tips all along the way. Perfect for new users, this guide will leave you equipped with the skills and knowledge to bring your creative ideas to life!

Portrait 4 owners: this video course can also be used for Portrait 4 machines as well. Most of the information is the same for both machine models, the main difference is the cutting width of each machine.
View an unboxing of the Portrait 4 here.

The supplies needed for this class are minimal. I used Oracal 651 adhesive vinyl, AT 65 Transfer Tape, and Cardstock.

Complete course outline below:

Introduction, Unboxing, and Proper Setup of the Silhouette Cameo 5 – 20 minutes

  • Unboxing the Silhouette Cameo 5
  • Explanation of all parts included in the box
  • Proper Setup of Silhouette Cameo 5 machine
  • Proper Installation of the included Roll Feeder on the Silhouette Cameo 5
  • Explanation & Tips to Autoblade Installation and Tool Housings

Silhouette Cameo 5 New Machine Setup & Warranty Registration – 15:53 minutes

  • Set up on the Silhouette America Website
  • Registration to Your Account
  • Silhouette Studio Software
  • Silhouette Cameo 5 Setup
  • Silhouette Cameo 5 Firmware Updates

Silhouette Studio Software: Important Information

  • Silhouette Studio software version information

Silhouette Cameo 5: First Cuts with Adhesive Vinyl & Cardstock – 56:40 minutes

  • Setting up a Design Using Text
  • Cut Settings on the Send Tab Explained
  • 2 Ways to Do Test Cuts
  • First Cuts from Adhesive Vinyl
  • Explanation of the Autoblade Adjustment
  • Removing materials from the cutting mat
  • Weeding Tips
  • Applying Transfer Tape
  • Removing the Backing off Adhesive Vinyl & Cutting Tips
  • Changing Blades & Reinstalling for Cardstock Cuts
  • Test Cuts on Cardstock
  • Drawing Basic Shapes & Adjusting a Polygon
  • Cutting Basic Shapes from Cardstock
  • Troubleshooting Tips for Cut Issues
  • Tips to Removing Materials, Saving Adhesive on the Mat, and Materials Not Curling When Removed
  • More Tips

Additional Resources
Terms of Use

This class will help get you up and cutting faster than figuring it out yourself! Help yourself get started quicker and be on your way to more fabulous projects in no time!

Beginner’s Guide to the Silhouette Cameo 5: Crafting Made Easy class found HERE
Check out all of the Silhouette classes HERE.

Save this for future reference by pinning the image below.

Silhouette Cameo 5 Beginner's Class

Find more Silhouette resources and tutorials on the A to Z section on the blog HERE.

Enjoy !

THANK YOU for your support! How can you help? Click HERE & buy a coffee.
Every little bit helps with the cost of running the site.

Silhouette Classes

Never stop learning! Let me help you take the anxiety out of learning with Silhouette and get to creating faster! My Silhouette classes are heavily focused on software, so you can take the skills & techniques taught and apply them to many future projects!

Silhouette step-by-step Classes by Silhouette Secrets+

Silhouette Secrets+ with EllyMae
**This post may contain affiliate links. What that means is that I may receive compensation if you purchase through the links I have provided. The price you pay for the product or service is not higher but I may get compensated for sharing.

Posted on Leave a comment

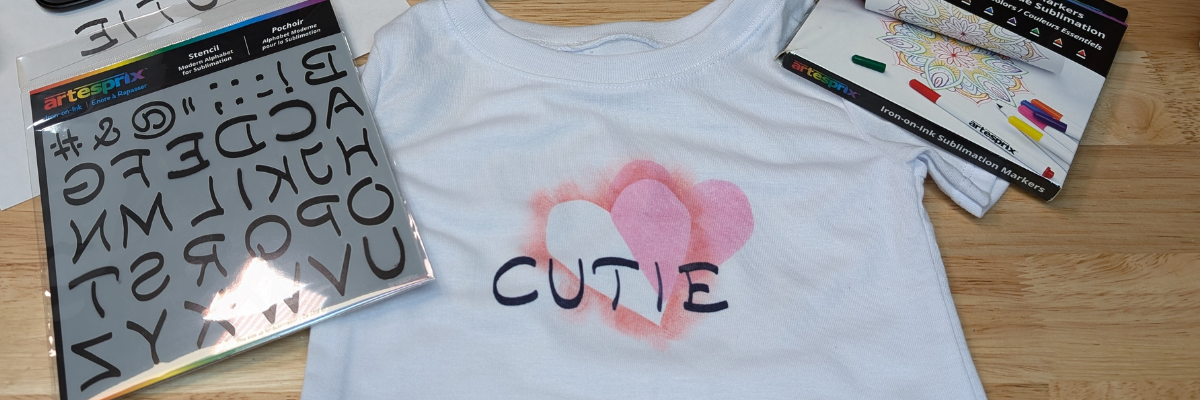
How to Sublimate a Baby Bodysuit Using Artesprix Markers, Stencils, and Inks

Artesprix Sublimation Inks Custom Baby Bodysuit
Silhouette Secrets+ with EllyMae

Looking for a fun and creative way to make a personalized baby bodysuit with sublimation? In the latest project video on the Artesprix channel, I’m showing you step-by-step how to sublimate an adorable baby bodysuit using Artesprix Sublimation Markers, Stencils, and Inks. Whether you’re crafting a unique gift for a baby shower, making something special for your little one, or just exploring sublimation techniques, this project is easy, beginner-friendly, and oh-so-cute! I’ll also share all the supplies you need to create your own, so you can get started right away.

Custom Baby Bodysuit with Artesprix Sublimation Inks & Stencil

Affiliate links may be present in the following blog post and as an Amazon Associate I earn from qualifying purchases.

Supplies for Custom Sublimation Baby Bodysuit:

Watch this tutorial HERE on the Artesprix YouTube channel.

I absolutely love working with Artesprix products—they never fail to ignite my creativity and inspire countless ideas for future projects. Find more projects I’ve created using the Artesprix sublimation products HERE.

I’ll be sharing more so make sure to follow Artesprix on social media to see more projects!
YouTube channel
Blog
Facebook Page
Iron-on-Ink Inspirational Facebook Group

Save this for future reference by pinning the image below.

Sublimation Bodysuit with Artesprix Sublimation Inks, Stencil & Marker Pinterest

Grab some Artesprix sublimation products and get to creating today!

Enjoy !

THANK YOU for your support! How can you help? Click HERE & buy a coffee.
Every little bit helps with the cost of running the site.

Silhouette Classes

Never stop learning! Let me help you take the anxiety out of learning with Silhouette and get to creating faster! My Silhouette classes are heavily focused on software, so you can take the skills & techniques taught and apply them to many future projects!

Silhouette step-by-step Classes by Silhouette Secrets+

Silhouette Secrets+ with EllyMae
**This post may contain affiliate links. What that means is that I may receive compensation if you purchase through the links I have provided. The price you pay for the product or service is not higher but I may get compensated for sharing.
Posted on Leave a comment

How to Fix the ‘Materials Not Found’ Message in Silhouette Studio

Silhouette Studio Quick Tip - Materials Not Found
Silhouette Secrets+ with EllyMae

Have you ever seen the message stating materials not found when opening a design in Silhouette Studio? Encountering the “Materials Not Found” message in Silhouette Studio can leave you wondering “What is wrong?”. Whether you’re working on a vinyl project, heat transfer design, or a print and cut masterpiece, this error can be frustrating and confusing. But don’t worry! In this post, we’ll explain why it happens and what to do next.

Affiliate links may be present in the following blog post and as an Amazon Associate, I earn from qualifying purchases.

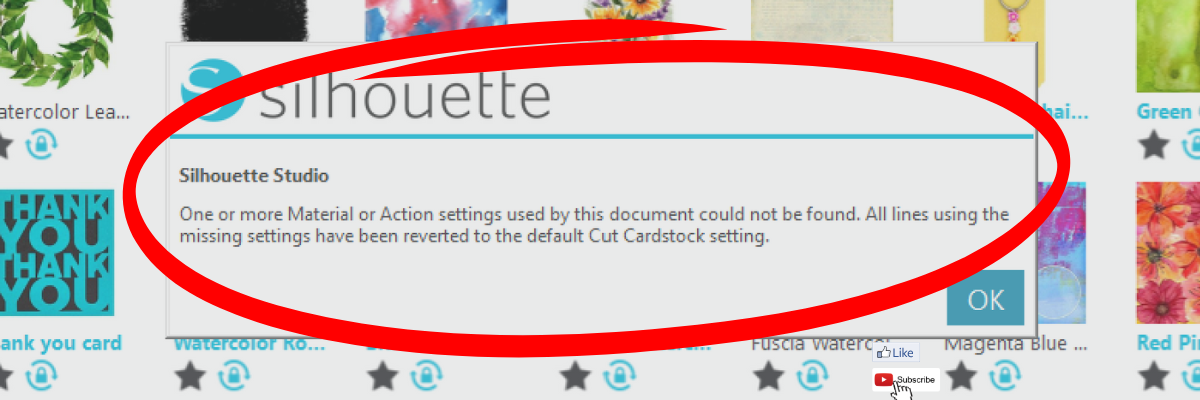
Materials Not Found Message – Silhouette Studio

This is what the materials not found message can look like in Silhouette Studio on the Design Tab.

Silhouette Studio Materials Not Found Design Tab

It can also appear when you are opening from the library tab before the image is placed on the design mat.

Silhouette Studio Materials Not Found

This materials not found message is not something to be alarmed about. It simply means that the cut setting that the person who created the file had on their software is not found within the Silhouette Studio software on your computer. This could be for several reasons.

The most common reason is that the designer has their own custom setting created and when they saved the design, those cut settings were saved with the file. When opened, if that cut setting is not on your Silhouette Studio software, it triggers this message.

Whether cut settings are saved with a file in Silhouette Studio is dependent on the software version that the design is saved with.

Another reason is that Silhouette has made changes to the cut settings menu and changed names or added/removed cut settings. With the release of newer model Silhouette machines, more cut settings have been added over time to the Silhouette preset menu.

This message is just letting you know that the cut setting has been switched back to the default of Cardstock. Click OK and proceed as usual.

When it comes time you cut the design, select the material that best fits your project and test cut.

Silhouette Studio Send Tab with Cut Settings

While the idea of having a cut setting that works for all users perfectly is appealing, that is not reality. Materials vary worldwide and many factors go into getting a clean cut such as blade life, machine model, cutting mat adhesion, etc.

Here is a quick video clip demonstrating the ‘Materials Not Found’ message that appears when opening a design file in Silhouette Studio.

Materials Not Found Silhouette Studio Message YouTube video

Additional Resources:

Save this for future reference by pinning the image below.

Silhouette Studio Materials Not Found Pinterest

Enjoy !

THANK YOU for your support! How can you help? Click HERE & buy a coffee.
Every little bit helps with the cost of running the site.

Silhouette Classes

Never stop learning! Let me help you take the anxiety out of learning with Silhouette and get to creating faster! My Silhouette classes are heavily focused on software, so you can take the skills & techniques taught and apply them to many future projects!
Silhouette step-by-step Classes by Silhouette Secrets+

Silhouette Secrets+ with EllyMae
**This post may contain affiliate links. What that means is that I may receive compensation if you purchase through the links I have provided. The price you pay for the product or service is not higher but I may get compensated for sharing.
Posted on Leave a comment

Unlock Creativity: 5 Stunning Projects You Can Create with Just One Design by Megan Hardy

Crafting Creativity with Megan Hardy
Silhouette Secrets+ with EllyMae

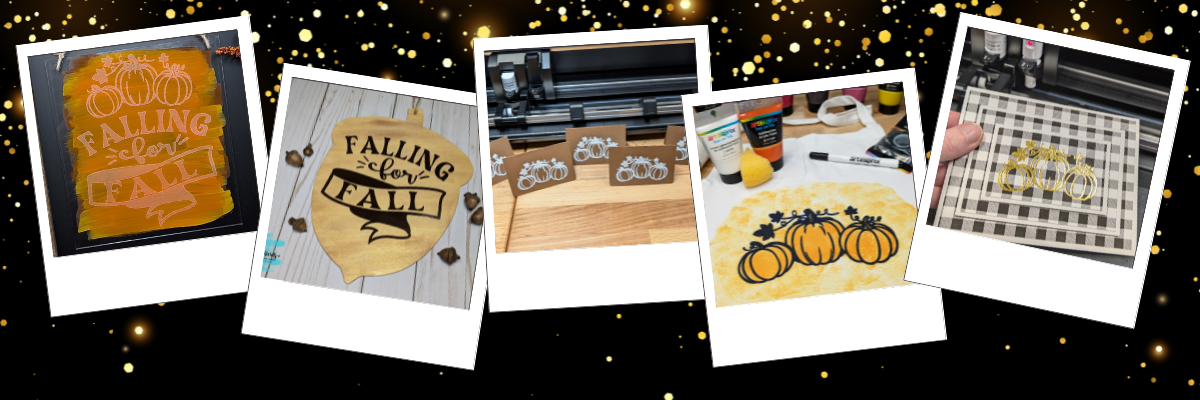
Discover the magic of versatility with Megan Hardy’s creative designs! In this post, we’ll show you how you can transform a single design into five unique projects that are perfect for any occasion. From an etched acrylic sign with the Silhouette Curio 2 to a wood sign using adhesive vinyl, a personalized apron using Artesprix sublimation markers and paints, a sketched place card for stylish gatherings, and a dazzling foiled card featuring the triple mat stacked technique—this post is packed with inspiration and tips to make the most of your crafting tools. Do more with your designs and bring your creativity to life!

Affiliate links may be present in the following blog post and as an Amazon Associate, I earn from qualifying purchases.

Each month in the Silhouette Secrets+ newsletters, I collaborate with an amazing designer to bring you a free file. Throughout the month, I work with the newsletter file to create and share a variety of projects, showcasing the many ways it can be used.

Make sure to sign up for the Silhouette Secrets+ newsletter HERE for future free files & project inspiration.

Crafting Creativity with Megan Hardy

Project #1 – Etched Acrylic Sign with the Silhouette Curio 2

Etched Acrylic Sign with the Silhouette Curio 2 - Design by Megan Hardy

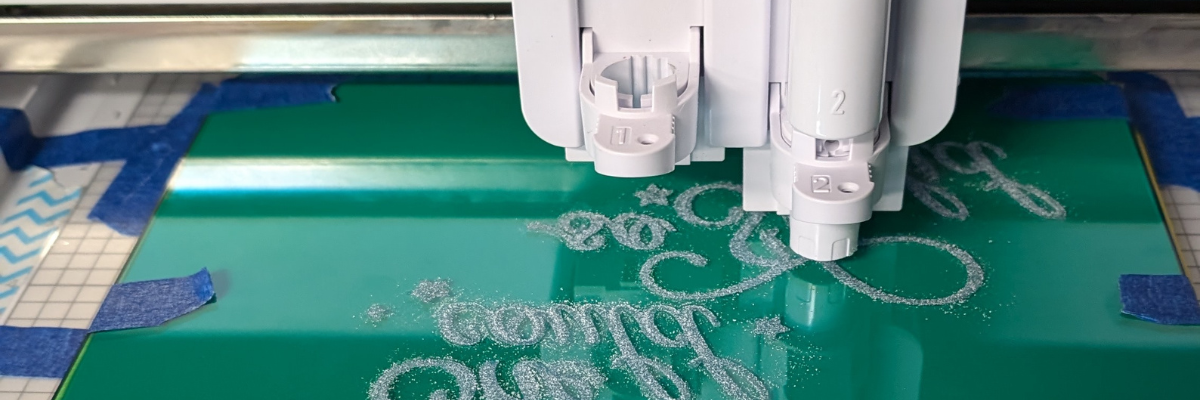
I used the Silhouette Curio 2 with the Power Engraver to etch on a clear acrylic sign.

Silhouette Curio 2 Acrylic Etching Engraving with the Power Engraver

In most cases, I prefer to etch on the backside of acrylic, however, I knew I want to paint on the back, so I etched the front for this design. The Silhouette Power Engraver leaves a pretty smooth finish, but that will also vary based on the actual acrylic being used and the fill options chosen. The only way to know how it will turn out is to test.

I use shapes in the Silhouette Studio software to create a “template” in order to align the design where I want on the blank I’m using. Just make sure to turn the “cut” line off for the template before you send it to etch or it will also etch the outer edge of your blank as well.

Silhouette Studio Setup for Curio 2 Etching

Also make sure to keep the design away from the taped edges or it could affect the etch results. I got lucky in this etching and it still etched through the painters tape, however, that can also gum up the Power Engraver tool too with the tape particles and adhesive.

Silhouette Curio 2 Engraving Tips

Additional Resources:

Don’t have a Silhouette Curio 2 to etch with? No problem!
Check out these other ideas for Acrylic Sign Decor with Silhouette HERE.

Supplies Used:

Project #2 – Wood Sign with Adhesive Vinyl

Wood Sign with Adhesive Vinyl decal - design by Megan Hardy

I grabbed a plain wood sign from my stash that I had picked up years ago in a Target dollar spot. Added a couple layers of paint to the sign and let it dry. Then measured the inside of the blank and used a rectangle as a template to size the design. Once I had the design sized, I moved my rectangle off to the left side and drew in some weeding lines with the line tools so it was easier to weed in pieces.

Silhouette Studio Software - Adding Weeding Lines to a Design

I also cut my material down to the size I need so I can save the adhesive on my cutting mat and don’t have to peel a full sheet of material off the mat each time. To do this I decrease the Transparency on the Page Setup Panel so I can reveal the cutting grid and know what size to cut my material down to.

Cutting Adhesive Vinyl with Silhouette

Now I am not using the adhesive on the rest of the mat and it will increase the lifespan on the cutting mat.

Weeding Lines on Adhesive Vinyl

Adding weeding lines in the Silhouette software may take a couple extra seconds before you send the design to cut, but can save you frustration when weeding adhesive vinyl.

Additional Resources:

Supplies Used:

Project #3 – Sketched Place Cards

Sketched Place Cards with Silhouette - design by Megan Hardy

I love how these turned out! This place card was designed in the Silhouette software, using a rectangle, dashed line for scoring, and the pumpkin design from the Falling for Fall design.

Silhouette Sketched design with white pen - design by Megan Hardy

Let’s not talk about the fact that I created these for Thanksgiving dinner and then totally forgot to use them. There is always next year!

But, they turned out looking awesome! I love the painted liked texture that the sketch fill with the white pen gave it. Each one turned out just a bit different in the way the ink laid down and moved.

After creating these, I did a LIVE tutorial on the Silhouette Secrets+ YouTube channel sharing more on sketching tips and a demo using the Silhouette Electrostatic Mat as well.

Silhouette Sketching & Electrostatic Mat Demo & Tutorial

Watch that Sketching tutorial video HERE.

Additional Resources:

Supplies Used:

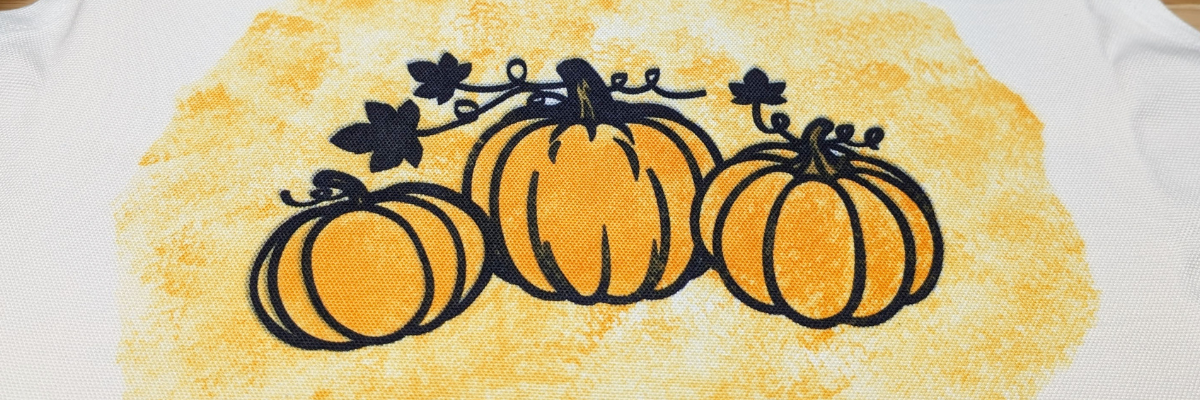
Project #4 – Custom Apron with Artesprix Sublimation Markers and Paints

Custom Apron with Artesprix Sublimation - design by Megan Hardy

Artesprix sublimation products are a great way to test and investigate if you want to go deeper into the sublimation side of things. I used the Artesprix black sublimation marker to sketch out the design with my Silhouette.

Silhouette Studio Sketching with Artesprix - design by Megan Hardy

With Artesprix sublimation products, you don’t need any special paper! Plain ordinary copy paper is all that’s needed and if you don’t like what you’ve made, you aren’t out much. I love playing with the Artesprix products and seeing what can happen.

Once the main design was sketched, then I sponged on some paint in 2 shades of orange around the design to complete the custom apron.

Check out more details in the blog post HERE.

Sublimation Custom Apron with Artesprix Sublimation Markers and Paints

Additional Resources:

Supplies Used:

Project #5 – Foiled Card Design with the Triple Mat Stacked Technique

Foiled Card Design with Triple Mat Stacked Technique - design by Megan Hardy

Make your cards pop with the Triple Mat Stacked technique and add heat foil to that for even more wow factor. I love combining things to make unique projects!

This was completed using a digital pattern in Silhouette Studio, setting it up for a print and cut, then using the setup for foiling the design before cutting.

Silhouette Print and Cut plus Foiling a Card Design with Triple Mat Stacked Technique

Foiling can really add a unique touch to your projects! It does take extra time in creating, but can definitely be worth it.

Silhouette Heat Pen Foiling for a card design

You can see this in action in this video – Quick Foil Card Design: Silhouette Cameo 5, Heat Pen, and Print and Cut video on the Silhouette Secrets+ YouTube channel.

Foil Card Magic with Silhouette Cameo 5 & Heat Pen

Additional Resources:

Supplies Used:

Find more designs by Megan Hardy at the Silhouette Design Store or on Etsy.

Follow along with Megan Hardy here:
Facebook: https://www.facebook.com/MeganHardyDesigns
Instagram: https://www.instagram.com/meganhardydesigns/

I love exploring how one design can inspire multiple creative projects! The Crafting Creativity blog series is your go-to source for endless inspiration, packed with innovative ideas, practical tips, and expert techniques to elevate your crafting. Whether you’re reimagining a favorite design, experimenting with new materials, or mastering advanced skills, these posts are here to ignite your imagination and help you bring your creative visions to life. Head over to the Crafting Creativity series HERE and discover where your creativity can take you!

Save this for future reference by pinning the image below.

5 Projects with 1 Design by Megan Hardy

Enjoy !

THANK YOU for your support! How can you help? Click HERE & buy a coffee.
Every little bit helps with the cost of running the site.

Silhouette Classes

Never stop learning! Let me help you take the anxiety out of learning with Silhouette and get to creating faster! My Silhouette classes are heavily focused on software, so you can take the skills & techniques taught and apply them to many future projects!

Silhouette step-by-step Classes by Silhouette Secrets+

Silhouette Secrets+ with EllyMae
**This post may contain affiliate links. What that means is that I may receive compensation if you purchase through the links I have provided. The price you pay for the product or service is not higher but I may get compensated for sharing.
Posted on Leave a comment

DIY Busted Canvas Art: Transform Your Wall Decor with This Trendy Technique

DIY Busted Canvas
Silhouette Secrets+ with EllyMae

Are you ready to take your wall art to the next level? Or just want to try something new? A busted canvas project is the perfect way to add a bold, trendy touch to your home decor. This creative technique combines texture, dimension, and artistic flair to transform a plain canvas into a statement piece that’s truly one of a kind. Whether you’re a seasoned crafter or new to DIY projects, this guide will walk you through every step of creating your own stunning busted canvas.

First, I don’t think there is a “wrong” way you can do this! Look around your supplies and use what you have and then just keep going. Start with an idea and let it take you from there.

Affiliate links may be present in the following blog post and as an Amazon Associate, I earn from qualifying purchases.

Supplies for DIY Busted Canvas

Basic Supplies:

*this project can be created with a wide variety of materials. I will list some of the ones that I used in the examples I share below

Embellishment Supplies:

Example #1 – Christmas Tree Busted Canvas

Christmas Tree Busted Canvas DIY

Example #2 – Sketched Watercolor Busted Canvas

DIY Busted Canvas Sketched Watercolor Background

How to Create a DIY Busted Canvas

I’m going to share the steps I took, but you can do some of these in any order.

Step 1 – Prep the canvas frame.

With a paint brush or foam brush, add an even layer of Mod Podge to the inside of the back of the canvas frame as a base coat.

DIY Busted Canvas - Step 1 Mod Podge Backside

Step 2 – Cut the pattern material down to size.

Using scissors, cut the pattern material down to size. This does not have to be exact, but get as close from frame edge to frame edge. You want to make sure the center of the canvas is fully covered.

If using napkins, separate the ply of the napkin so you are only using 1 layer that is the patterned piece. This will ensure that the layers don’t separate later on in the process.

With the pattern face up, smooth down on top of the Mod Podge layer. Use a squeegee to help smooth it down onto the backside of the canvas.

DIY Busted Canvas - Step 2 & 3

Step 3 – Add an even layer of Mod Podge on top of patterned material.

I used the Mod Podge Sparkle on this one and love it, but of course, not every design will need bling.

Allow it to dry completely.

Step 4 – Measure the backside of the frame.

Measure the inside of the frame and the outer edge of the frame, so you know how large to create the design. Keep in mind that you want the design to be centered and if it’s too big, the canvas edges may hide part of the design.

Busted Canvas Measuring Frame

Step 5 – Pick a background design

Silhouette Studio Software - Background Design to Print

For this one, I printed a digital patterned background by Clikchic Designs of the Christmas tree. I started by opening the design in the Silhouette Studio software, set my page to letter size for the Koala Inkjet Glossy Paper, and then drew some rectangles using the measurements I took. This way I knew how large to size the design and what would be seen within the frame.

Then I printed the design.

Printing Background Design from Silhouette Studio

Step 6 – Trim the background design down to canvas size.

I used a paper trimmer to trim the background design down to the 8″ x 10″ size of the frame.

Step 7 – Decorate the front side of the canvas however you desire.

DIY Canvas - Painted Front

For this one, I decided I wanted to try to replicate the outer edge design of the patterned background with the blue sky, stars, and snow.

I started with a base layer of a blue metallic paint. Then sponged on a darker blue on top of that. And then added some lighter blue & white paint splatters for the stars. I added a bit of water to the acrylic paints to thin them out and give it some dimension too!

I just kept going to see how it would turn out. I’m learning to do that more and more and just see where it takes me and I’ve been thrilled with almost all the results.

Let that dry completely before moving on to the next step.

Step 8 – Cut the canvas from the backside

DIY Busted Canvas - Cutting the Canvas

Using a sharp utility knife on a safe surface such as a self healing cutting mat, find the center of the backside of the canvas and make slices from the center out towards the frame randomly. The farther back you cut, the deeper the curl will be on the front of the frame.

Step 9 – Secure the background photo to the backside of the frame

DIY Busted Canvas Glue Background to frame

Add hot glue along the edges of the frame and line up the background image to secure it to the backside of the canvas frame.

Gluing down the opposite corners to start can help get it aligned properly before you are too committed and the fine tip glue gun can come in handy. Use a squeegee to run along the edges of the background paper and smooth it down to the glue.

Step 10 – Roll back the cut pieces on the front of the canvas

DIY Busted Canvas Roll Back Edges

Flip the canvas over and gently roll back the cut pieces. Training the curls by rolling it a bit before gluing can help to prevent lifting after it’s glued down. Once curled as desired, add a bit of hot glue to the end and press it down to the canvas. I found using the end of my paint brush worked well to hold it in place while the glue dried and I didn’t burn my fingers.

Continue around the entire frame until all of the sections are curled and securely glued in place.

Step 11 – Admire your new DIY Busted Canvas artwork

DIY Busted Canvas - Christmas Design

Each diy busted canvas will be a unique creation!

DIY Busted Canvas Up Close Look

I love how this turned out!

 DIY Busted Canvas Final Photo

Like I mentioned at the beginning, I don’t think there is any “wrong” way to do this. I’m definitely hooked on the busted technique.

Step 12 – Start planning your next creation

DIY Busted Canvas Next Project

I hope this has given you some creative ideas! Look around your stash and see what you could use to create your own DIY Busted Canvas.

Check out the video tutorial on the Silhouette Secrets+ YouTube channel HERE

DIY Busted Canvas Video Tutorial

Save this for future reference by pinning the image below.

DIY Busted Canvas Tutorial Pinterest

Find more project ideas and tutorials on the blog HERE.

Enjoy !

THANK YOU for your support! How can you help? Click HERE & buy a coffee.
Every little bit helps with the cost of running the site.

Silhouette Classes

Never stop learning! Let me help you take the anxiety out of learning with Silhouette and get to creating faster! My Silhouette classes are heavily focused on software, so you can take the skills & techniques taught and apply them to many future projects!

Silhouette step-by-step Classes by Silhouette Secrets+

Silhouette Secrets+ with EllyMae
**This post may contain affiliate links. What that means is that I may receive compensation if you purchase through the links I have provided. The price you pay for the product or service is not higher but I may get compensated for sharing.
Posted on Leave a comment

4 Creative Ways to Use Lori Whitlock Designs: Inspiring Projects for Every Crafter

Projects with a Lori Whitlock Design
Silhouette Secrets+ with EllyMae

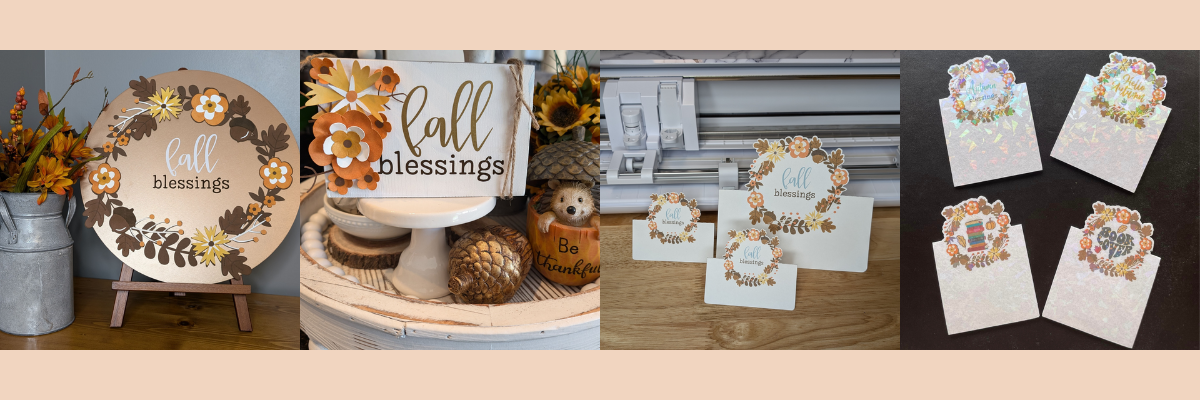
Lori Whitlock’s designs are a treasure trove of inspiration for crafters of all skill levels. Whether you’re a seasoned maker or just starting out, her versatile and beautifully crafted files can transform any project into something truly special. In this blog post, we’ll explore four unique ways to bring Lori Whitlock’s designs to life, showcasing a mix of techniques and ideas that highlight their creative potential. From cards to home décor, these projects will not only spark your imagination but also help you get the most out of your crafting tools.

Affiliate links may be present in the following blog post and as an Amazon Associate, I earn from qualifying purchases.

Crafting Creativity with Lori Whitlock

Project #1 – Fall Blessing Wreath Sign

Fall Blessings Wreath Sign with Lori Whitlock Design

I cut all of the cardstock pieces for the wreath using the Silhouette Electrostatic Bed along with my Cameo 5 . Once everything was cut, I started gluing the pieces of the wreath together and then added it onto a wood round that I’ve had in my stash for awhile.

I am loving the Silhouette Electrostatic Bed and not having to peel the cardstock off the adhesive sticky mat. I’ve cut lots of cardstock in the last year and it has saved me time.

Additional Resources:

Supplies Used:

Project #2 – Tiered Tray Wood Sign Decor

Tiered Tray Wood Sign Decor with Lori Whitlock Design

While I was cutting the cardstock for the wreath shown above, I cut extra flowers and branches. Then added some ink to the cardstock pieces and used shaping tools to give the flowers dimension before gluing them together. Once the flowers were assembled, I cut fall blessings from adhesive vinyl and added that to the wood block. Then arranged the flowers and glued them down on the left side. Added a bit of twine wrapped around the wood on the right and had a new sign for my tiered tray.

Supplies Used:

Project #3 – Pop Out Top Used for Place Cards, Cards, or Treat Toppers

Pop Out Top Cards with Lori Whitlock Design - Place Cards, Cards, or Treat Topper Designs

This is such a fun design to create! For this pop out top card, I used the Fall Blessings design and print and cut. I shared the entire process to create this in a live YouTube tutorial on the Silhouette Secrets+ YouTube channel. In the video tutorial I not only shared how to create the design of the pop out top card, but also gave many tips for successful print and cut projects!

Additional Resources:

Supplies Used:

Project #4 – Magnetic Bookmarks by Teresa P.

Magnetic Bookmarks with a Holographic Overlay

I love these so much! After the Silhouette Live tutorial where I shared how to create the pop out top, I woke up the next morning to see these beauties posted on my group. My friend Teresa creates amazing things and she combined several of my tutorials to make some new magnetic bookmarks.

She used print and cut and added a holographic overlay on top to make them sparkle. In her region, they don’t use the term “fall” so she swapped it out for a few other designs to make it a better fit.

Additional Resources:

Supplies Used:

I love taking one design and thinking of several ways to make projects with it!

The Crafting Creativity blog posts are your ultimate source of inspiration, designed to spark new ideas and help you explore the endless possibilities in crafting. Each post is packed with innovative project ideas, practical tips, and expert techniques to help you think outside the box and take your creativity to new heights. Whether you’re looking for fresh ways to use your favorite designs, exploring new materials, or learning advanced techniques, these posts aim to fuel your imagination and empower you to turn your crafting dreams into reality. Check out the Crafting Creativity series HERE and see where your creativity takes you!

Save this for future reference by pinning the image below.

Crafting Creativity with Lori Whitlock Designs

Enjoy !

THANK YOU for your support! How can you help? Click HERE & buy a coffee.
Every little bit helps with the cost of running the site.

Silhouette Classes

Never stop learning! Let me help you take the anxiety out of learning with Silhouette and get to creating faster! My Silhouette classes are heavily focused on software, so you can take the skills & techniques taught and apply them to many future projects!

Silhouette step-by-step Classes by Silhouette Secrets+

Silhouette Secrets+ with EllyMae
**This post may contain affiliate links. What that means is that I may receive compensation if you purchase through the links I have provided. The price you pay for the product or service is not higher but I may get compensated for sharing.
Posted on 1 Comment

DIY Custom Apron Project: Using Artesprix Sublimation Markers, Paints, and a Silhouette

Artesprix DIY Apron with Sublimation
Silhouette Secrets+ with EllyMae

If you’re looking to add a personal touch to your kitchen or craft space, creating a custom apron is a fun and creative way to do so! In this DIY project, I’m sharing how I designed and create a one-of-a-kind apron using Artesprix Sublimation Markers, Sublimation Paints, and a Silhouette Machine. Whether you want to add a quirky quote, a custom graphic, or a colorful design, this technique allows you to create vibrant, long-lasting prints on fabric. Follow along for a step-by-step guide on how to use these amazing tools to bring your unique design vision to life, all while learning some fun sublimation techniques along the way!

Artesprix Sublimation Apron with Pumpkin Design

Affiliate links may be present in the following blog post and as an Amazon Associate I earn from qualifying purchases.

For this design, I first had the Silhouette machine sketch out the pumpkin design using an Artesprix Black Fine Tip Sublimation Marker.

Silhouette Sketch by Fill Color with Artesprix Sublimation Markers

I had a lot of fun experimenting with the different sketch fills and designs, so I created several extras too!

Check out a quick video of this in action on the Silhouette Secrets+ YouTube channel HERE.

Additional Resources for Sketching with Silhouette

Supplies for DIY Sublimation Apron:

Watch this tutorial HERE on the Artesprix YouTube channel.

Find additional DIY sublimation ideas created with the Artesprix Apron HERE.

I absolutely love working with Artesprix products—they always spark my creativity and leave me inspired with even more ideas for future projects. Find more projects I’ve created using the Artesprix sublimation products HERE.

I’ll be sharing more so make sure to follow Artesprix on social media to see more projects!
YouTube channel
Blog
Facebook Page
Iron-on-Ink Inspirational Facebook Group

Save this for future reference by pinning the image below.

Sublimation Apron with Artesprix Markers & Paint

Grab some Artesprix sublimation products and get to creating today!

Enjoy !

THANK YOU for your support! How can you help? Click HERE & buy a coffee.
Every little bit helps with the cost of running the site.

Silhouette Classes

Never stop learning! Let me help you take the anxiety out of learning with Silhouette and get to creating faster! My Silhouette classes are heavily focused on software, so you can take the skills & techniques taught and apply them to many future projects!
Silhouette step-by-step Classes by Silhouette Secrets+

Silhouette Secrets+ with EllyMae
**This post may contain affiliate links. What that means is that I may receive compensation if you purchase through the links I have provided. The price you pay for the product or service is not higher but I may get compensated for sharing.
Posted on 1 Comment

LIVE Silhouette Studio Tutorial: Create a Stunning Pop Out Top Card & Master Print & Cut!

Pop Out Top Card
Silhouette Secrets+ with EllyMae

New Silhouette tutorial step-by-step to creating a Pop Out Top Card & Mastering Print and Cut in Silhouette Studio on the Silhouette Secrets+ YouTube channel.

Just a quick note to share the link for the Live Silhouette tutorial that happened this month.

Silhouette Pop Out Top Card Tutorial

Click the photo above or find it HERE.

Silhouette Pop Out Top Cards with Print and Cut

This card design technique could be used for many different projects such as place cards, treat toppers, or a card too!

Supplies used for Pop Out Top Card Projects:

Additional Resources:

Here’s a look at another design with this same technique too!

Pop Out Top Card with Silhouette

Make sure to check the Silhouette Secrets+ Upcoming Events tab HERE for future Live tutorials and other events too!

Save this for future reference by pinning the image below.

Silhouette Tutorial Pop Out Top Card

Enjoy !

THANK YOU for your support! How can you help? Click HERE & buy a coffee.
Every little bit helps with the cost of running the site.

Silhouette Classes

Never stop learning! Let me help you take the anxiety out of learning with Silhouette and get to creating faster! My Silhouette classes are heavily focused on software, so you can take the skills & techniques taught and apply them to many future projects!

Silhouette step-by-step Classes by Silhouette Secrets+

Silhouette Secrets+ with EllyMae
**This post may contain affiliate links. What that means is that I may receive compensation if you purchase through the links I have provided. The price you pay for the product or service is not higher but I may get compensated for sharing.
Posted on 1 Comment

Beautifully Etched Acrylic Clipboard Created with Silhouette Curio 2

Etched Acrylic Clipboard with the Silhouette Curio 2 and Power Engraver
Silhouette Secrets+ with EllyMae

Looking to personalize your office supplies or make a custom gift? In this post, I’m excited to share a recent project I created using the Silhouette Curio 2 and the Power Engraver: a beautifully etched acrylic clipboard featuring a design by Sarah Hurley. This project showcases the versatility of the Curio 2, turning a simple clipboard into a stylish, functional piece. Create your own etched masterpiece, perfect for home, office, or as a unique gift. Read on to discover how to elevate your DIY etching projects with the Silhouette Curio 2!

Affiliate links may be present in the following blog post and as an Amazon Associate, I earn from qualifying purchases.

Etched Acrylic Clipboard created with the Silhouette Curio 2

When I get an idea in my head, there are times, it just will not leave until I do something. That is how this project came to be. The first one I did, I etched on the backside of the clipboard.

Etched Acrylic Clipboard with Silhouette Curio 2

It looks great in person, but I had to hold up a sheet of black cardstock behind it in order to get it to show up on a photo. This one was a bit tricky because the hardware on the clipboard is not removable, so I had to rig up some supports underneath the clipboard to make it a completely flat surface. It was definitely a trial and I am so happy with how it turned out, but I knew I wanted to try again.

Test #2 actually was a failure. I switched to etching on the top of the clipboard to see how it would work and I could hear that something was not right while it was etching. Eventually, it just stopped etching entirely. I thought I’d take the Power Engraver out to clean it. Don’t do that during an etch! When the power tool was removed, it did not start up again when I put it back in while the machine was paused.

Silhouette Curio 2 Etching Failure

It is NOT a waste though! The one thing I’ve learned through the years in all the testing and troubleshooting that I do is that things WILL go wrong. Get extra blanks because something is going to happen. And if it doesn’t, well, you have extra blanks to use. Not a waste! A learning experience and opportunity.

I could not figure out what the issue was, so I swapped out the Silhouette Power Engraver for a new one and marked the old one with issues. I’ll troubleshoot that another day.

Test #3 was a success! The Silhouette Power Engrave tool has a smooth finish so even though this etch is on the top of the clipboard, it is not rough to the touch.

Etched Acrylic Clipboard with the Silhouette Curio 2

I used a lint roller to clean up the acrylic dust that the Silhouette Power Engraver creates before I removed anything. Be careful with any debris and keep your machine clean for best results. Do not inhale the acrylic dust or get it in your eyes.

Supplies Used for Etched Acrylic Clipboard with the Silhouette Curio 2

Silhouette Curio 2 Resources

Tips for Etching

  • Get extra blanks
  • Secure the blank well – any movement and it will be a dud as the etching is permanent
  • Not all acrylic is good acrylic – some will just smoosh versus etch – testing is the only way to know what will work
  • Start small – I prefer a 3″ round or a coaster when practicing and testing – cheaper to test and mess up with
  • Do not remove the tool from the machine, even if it is paused.
  • Be careful with any debris and keep your machine clean for best results. Do not inhale the acrylic dust or get it in your eyes.

Silhouette Curio 2 Classes

Want to get started with the Silhouette Curio 2 faster? I have step-by-step classes available on Teachable from out-of-the-box projects to setting up for successful etching on acrylic.

Silhouette Curio 2 Classes by EllyMae at Silhouette Secrets+

Check out all the Silhouette Classes HERE.

Find more Silhouette Curio 2 information on the website HERE.

And more videos on the Silhouette Secrets+ YouTube channel HERE.
Silhouette Curio 2 playlist HERE.

Silhouette Curio 2 Playlist on the Silhouette Secrets+ YouTube channel

Save this for future reference by pinning the image below.

Silhouette Curio 2 Acrylic Etching

Enjoy !

THANK YOU for your support! How can you help? Click HERE & buy a coffee.
Every little bit helps with the cost of running the site.

Silhouette Classes

Never stop learning! Let me help you take the anxiety out of learning with Silhouette and get to creating faster! My Silhouette classes are heavily focused on software, so you can take the skills & techniques taught and apply them to many future projects!

Silhouette step-by-step Classes by Silhouette Secrets+

Silhouette Secrets+ with EllyMae
**This post may contain affiliate links. What that means is that I may receive compensation if you purchase through the links I have provided. The price you pay for the product or service is not higher but I may get compensated for sharing.
Posted on 1 Comment

Mixed Media Journal Cover with Silhouette & Grafix Laminate

Mixed Media Journal Cover
Silhouette Secrets+ with EllyMae

My mixed media journal is no longer naked!!! I had so much fun creating with a combination of digital mixed media and physical mixed media materials. And I feel confident that my cover is going to stand up to being in and out of a tote bag as I travel with it because it’s protected with the Grafix Laminate. I love how all the layers came together!

Affiliate links may be present in the following blog post and as an Amazon Associate, I earn from qualifying purchases.

I have really not gotten into creating with mixed medias too much. But, it is growing on me! One of the hardest things for me to overcome is that there are no rules. There is no right or wrong way to do it. You can use whatever supplies you want, mix them, match them, throw them at it. There is no wrong way. I just have to tell myself to keep going and if I really don’t like something, leave it alone and come back later. My perspective often changes when I take a step back and am not scrutinizing it so close.

I say all of that to say, I am not an expert in mixed media at all! I am watching others and learning from them.

In today’s project, I’ve taken digital mixed media created in the Silhouette Studio software and combined it with physical mixed media to add dimension and layers to it.

Mixed Media Journal Cover

I created a background in the Silhouette Studio software combining a patterned background and clipping masks that were filled with colors to match the background. Then added the text on top and filled with white. Since it was created in Silhouette, I could move things around, adjust colors, test out the text saying, and tweak things without committing. Once I was satisfied, then I printed it on Silhouette Printable Vinyl using the high quality settings on my printer. Make sure to let that dry completely before moving on to the next step.

Silhouette Printable Vinyl for Mixed Media Cover

I stamped white acrylic paint on top of the printed background and then splattered paint around the design.

Mixed Media Journal Cover Close Up Stamped Paint

I love how the stamps looked with the acrylic paint and how it dried to give it texture.

Mixed Media Journal Cover Close Up

Once that was completely dry, then I applied the Grafix Laminate on top of it. This will act as a protectant for the journal cover, but it does not stop there! I used the Tim Holtz Layering Splatters Stencil with a bit of Staz-On ink and added that to the top of the laminate.

Mixed Media Journal Cover with Stencil on top of Grafix Laminate

And here is a look at the bottom right corner of the journal cover.

Mixed Media Journal Cover with Stenciled Design on top of Grafix Laminate

I love the textured look that is protected with the layers of ink on top of the Grafix Laminate!

Grafix Laminate Mixed Media Journal Cover

This was so much fun to create and I’m not even sure it’s 100% finished. I can continue to add things to it in the future. That’s one of the the things I’m learning more and more with these projects is that there is no wrong way to do it!

Check out the video on the Grafix Arts YouTube channel where I share how I did this HERE and I’ve included a supply list below too!

Supplies used for Mixed Media Journal Cover:

Designs I used in the video:

Save this for future reference by pinning the image below.

Mixed Media Journal Cover with Grafix Laminate Protectant

Find more tutorials on the Silhouette Secrets+ website HERE.

Enjoy !

THANK YOU for your support! How can you help? Click HERE & buy a coffee.
Every little bit helps with the cost of running the site.

Silhouette Classes

Never stop learning! Let me help you take the anxiety out of learning with Silhouette and get to creating faster! My Silhouette classes are heavily focused on software, so you can take the skills & techniques taught and apply them to many future projects!

Silhouette step-by-step Classes by Silhouette Secrets+

Silhouette Secrets+ with EllyMae
**This post may contain affiliate links. What that means is that I may receive compensation if you purchase through the links I have provided. The price you pay for the product or service is not higher but I may get compensated for sharing.