Posted on 1 Comment

Beautifully Etched Acrylic Clipboard Created with Silhouette Curio 2

Etched Acrylic Clipboard with the Silhouette Curio 2 and Power Engraver
Silhouette Secrets+ with EllyMae

Looking to personalize your office supplies or make a custom gift? In this post, I’m excited to share a recent project I created using the Silhouette Curio 2 and the Power Engraver: a beautifully etched acrylic clipboard featuring a design by Sarah Hurley. This project showcases the versatility of the Curio 2, turning a simple clipboard into a stylish, functional piece. Create your own etched masterpiece, perfect for home, office, or as a unique gift. Read on to discover how to elevate your DIY etching projects with the Silhouette Curio 2!

Affiliate links may be present in the following blog post and as an Amazon Associate, I earn from qualifying purchases.

Etched Acrylic Clipboard created with the Silhouette Curio 2

When I get an idea in my head, there are times, it just will not leave until I do something. That is how this project came to be. The first one I did, I etched on the backside of the clipboard.

Etched Acrylic Clipboard with Silhouette Curio 2

It looks great in person, but I had to hold up a sheet of black cardstock behind it in order to get it to show up on a photo. This one was a bit tricky because the hardware on the clipboard is not removable, so I had to rig up some supports underneath the clipboard to make it a completely flat surface. It was definitely a trial and I am so happy with how it turned out, but I knew I wanted to try again.

Test #2 actually was a failure. I switched to etching on the top of the clipboard to see how it would work and I could hear that something was not right while it was etching. Eventually, it just stopped etching entirely. I thought I’d take the Power Engraver out to clean it. Don’t do that during an etch! When the power tool was removed, it did not start up again when I put it back in while the machine was paused.

Silhouette Curio 2 Etching Failure

It is NOT a waste though! The one thing I’ve learned through the years in all the testing and troubleshooting that I do is that things WILL go wrong. Get extra blanks because something is going to happen. And if it doesn’t, well, you have extra blanks to use. Not a waste! A learning experience and opportunity.

I could not figure out what the issue was, so I swapped out the Silhouette Power Engraver for a new one and marked the old one with issues. I’ll troubleshoot that another day.

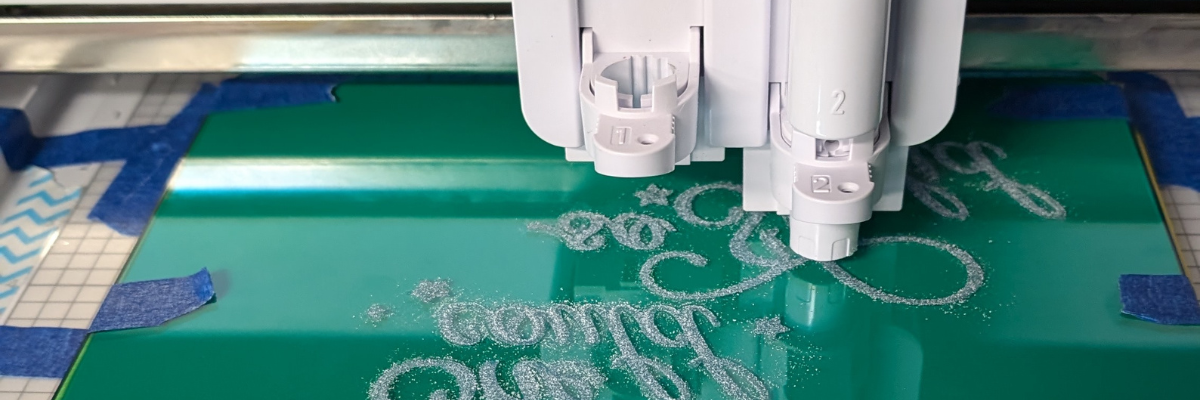
Test #3 was a success! The Silhouette Power Engrave tool has a smooth finish so even though this etch is on the top of the clipboard, it is not rough to the touch.

Etched Acrylic Clipboard with the Silhouette Curio 2

I used a lint roller to clean up the acrylic dust that the Silhouette Power Engraver creates before I removed anything. Be careful with any debris and keep your machine clean for best results. Do not inhale the acrylic dust or get it in your eyes.

Supplies Used for Etched Acrylic Clipboard with the Silhouette Curio 2

Silhouette Curio 2 Resources

Tips for Etching

  • Get extra blanks
  • Secure the blank well – any movement and it will be a dud as the etching is permanent
  • Not all acrylic is good acrylic – some will just smoosh versus etch – testing is the only way to know what will work
  • Start small – I prefer a 3″ round or a coaster when practicing and testing – cheaper to test and mess up with
  • Do not remove the tool from the machine, even if it is paused.
  • Be careful with any debris and keep your machine clean for best results. Do not inhale the acrylic dust or get it in your eyes.

Silhouette Curio 2 Classes

Want to get started with the Silhouette Curio 2 faster? I have step-by-step classes available on Teachable from out-of-the-box projects to setting up for successful etching on acrylic.

Silhouette Curio 2 Classes by EllyMae at Silhouette Secrets+

Check out all the Silhouette Classes HERE.

Find more Silhouette Curio 2 information on the website HERE.

And more videos on the Silhouette Secrets+ YouTube channel HERE.
Silhouette Curio 2 playlist HERE.

Silhouette Curio 2 Playlist on the Silhouette Secrets+ YouTube channel

Save this for future reference by pinning the image below.

Silhouette Curio 2 Acrylic Etching

Enjoy !

THANK YOU for your support! How can you help? Click HERE & buy a coffee.
Every little bit helps with the cost of running the site.

Silhouette Classes

Never stop learning! Let me help you take the anxiety out of learning with Silhouette and get to creating faster! My Silhouette classes are heavily focused on software, so you can take the skills & techniques taught and apply them to many future projects!

Silhouette step-by-step Classes by Silhouette Secrets+

Silhouette Secrets+ with EllyMae
**This post may contain affiliate links. What that means is that I may receive compensation if you purchase through the links I have provided. The price you pay for the product or service is not higher but I may get compensated for sharing.
Posted on 2 Comments

3 Ways to Customize Acrylic Shapes with Silhouette

I’m in love with these Layered Snowflake Arabesque Tile acrylic shapes from Craft Chameleon. They come in a wide variety of colors and I’ve been using them for testing. I want to share 3 methods I tested, my results with each, and which one is my favorite at the end – you might be surprised.

Affiliate links may be present in the following blog post and as an Amazon Associate, I earn from qualifying purchases.

Layered Acrylic Shapes Snowflakes Craft Chameleon

I am calling these ornaments, but they can be so much more. Gift tags, ornaments, stand alone decor item, and more!

3 Ways to Customize Acrylic Shapes with Silhouette

  1. Etching Acrylic with the Silhouette Curio 2 Power Engraver – Let It Snow Design
  2. Etching Acrylic with the Silhouette Curio 2 Punch Tool – top left Snowflake saying
    (the Curio 1 and Silhouette etching tool can do this too – more info below)
  3. Adhesive Vinyl Decal – any cutting machine can do this with good quality vinyl!

1 – Etching Acrylic with the Silhouette Curio 2 Power Engraver

I have been doing a lot of testing with the Silhouette Curio 2 and just had to try this with the new Silhouette Power Engraver Tool.

Silhouette Curio 2 Power Engraver Acrylic Etching

I have had great results with the Silhouette Power Engraver. However, it is not a fine detail engraving tip. When you are working with it, you want to keep that in mind and may need to adjust the design to work with it.

I have a full step-by-step class the Silhouette Secrets+ Teachable site on setting up for etching/engraving on acrylic with the Silhouette Curio 2 including how to get exact placement on shapes. I share all the things that worked and those that did not in the class too!
Find all the details and see more examples of my etching tests HERE.

Silhouette Curio 2 Power Engraver Etched - Engraved Acrylic

The etch is pretty subtle on the colored acrylic. Acrylic blanks are also one of the most difficult things to photograph too! Right up there with glass objects.

I love the sparkle of the top layer of this acrylic shape.

Check out a quick look at the Silhouette Power Engrave Tool in action on the Silhouette Secrets+ YouTube channel HERE.

Supplies used:

Silhouette Curio 2, Curio Debris Tray, Silhouette Cutting Mat, Silhouette Power Engraver, Let It Snow by Jamie Lane Designs, Layered Snowflake Arabesque Tile acrylic shape, lint roller, super glue, craft clamps, ribbon
*use code SECRETS at CrafterCuts to save 10% on Silhouette supplies – does not apply to new machines

For more details on the Silhouette Curio 2 click HERE.

2 – Etching Acrylic with the Silhouette Curio 2 Punch Tool

With the release of Silhouette released version v4.5.760+, which means the Silhouette Punch Tool has been unlocked for etching with both the Silhouette Curio 2 and the Silhouette Cameo 5. I have been testing the Silhouette Punch Tool for etching with both models of machines.

For more details on etching with the Silhouette Cameo 5 and Punch Tool check out this post HERE.
Note: etching on the Silhouette Cameo 5 is designed for Silhouette metal etching sheets and not for acrylics – more details in my blog post

The Silhouette Punch Tool is supposed to be the etching tool for finer details with the Silhouette Curio 2 and Cameo 5. While it does etch, it definitely is no where near the same quality of etch as the Silhouette Curio 1 was with the Silhouette etching tool.

If you have a Silhouette Curio 1, I would recommend hanging on to it and get that baby out to etch on acrylic. It does a fantastic job.

However, the Silhouette Curio 2 is here to stay. It is the new machine model and the Silhouette Curio 1 is no longer manufactured. Honestly, the Curio 1 had a really, really long lifespan for a machine model. I am surprised that it was manufactured for so long.

The Silhouette Curio 2 and the Silhouette Cameo 5 has a specialized Carriage 2 housing that allows not only for specialty tools, but also a higher force. While the Carriage 1 housing on Silhouette models is an up and down motor, the Carriage 2 housing on Silhouette model machines is a round and round motor. This means that it is different than the Silhouette Curio 1 machine that was designed over 10 years ago. Different machine, different results.
I’ll have more details on the blog later about all of that.

Bottom line is – the Silhouette Punch Tool does etch.

Check out a quick look at the Silhouette Curio 2 & Punch Tool in action on the Silhouette Secrets+ YouTube channel HERE.

Supplies used:

Silhouette Curio 2, Curio Debris Tray, Silhouette Cutting Mat, Silhouette Punch Tool, Snowflake Kisses Holiday Wishes Design, Layered Snowflake Arabesque Tile acrylic shape, lint roller, super glue, craft clamps, ribbon
*use code SECRETS at CrafterCuts to save 10% on Silhouette supplies – does not apply to new machines

For more details on the Silhouette Curio 2 click HERE.

3 – Adhesive Vinyl Decal

I used Oracal 651 white adhesive vinyl and cut this with the Silhouette Cameo 5 using the Silhouette Autoblade.

Yes! The Silhouette Autoblade!

Silhouette Cameo 5 Detailed Vinyl Cut with Autoblade

I selected the Vinyl Glossy setting and increase the blade depth to a 2. Actual cut settings that will work for you will depend on your material, machine, and blade life. Test cuts are the only way you will know what works for you. Find more information on Perfect Cut Settings HERE.

One of the big key factors is you want high quality adhesive vinyl and good quality transfer tape for detail works. Low quality vinyl can just be a mess and more of a headache than the money it tricked you into saving. If you have ever cut low quality vinyl or old vinyl, you are nodding right now and know exactly what I mean!

Silhouette Oracal 651 Vinyl Cut with Autoblade

Now, yes, I lost the dots to my i’s. But holy smokes! This is tiny details! At this size, I could care less about those little dots on the i’s. I can either cut more and add them or add in a different embellishment to the project.

Silhouette Oracal 651 Fine Detail Cut with Autoblade

One of the things that can help when cutting this small is adding Weeding Lines to the design and it definitely helped in this small detail cut.
For more details on adding Weeding Lines click HERE.
For designs like this, I prefer to draw my own weeding lines. It takes just a little more time in the setup and cutting process, but it can be 100% worth it to save you headache when weeding.

I have more tips on cutting small fonts & designs HERE too!

Silhouette Oracal 651 Vinyl Fine Detail Cut with Autoblade

Check out a quick look at weeding this design on the Silhouette Secrets+ YouTube channel HERE.

Supplies used:

Silhouette Cameo 5, Silhouette Autoblade – Type B, Silhouette Cutting Mat, Oracal 651 White adhesive vinyl, AT65 Transfer Tape, Snowflake Kisses Holiday Wishes Design, Layered Snowflake Arabesque Tile acrylic shape, super glue, craft clamps, ribbon
*use code SECRETS at CrafterCuts to save 10% on Silhouette supplies – does not apply to new machines

My Favorite

Out of all 3 methods, this one has to be my favorite because it really stands out. And the best part is, anyone with a cutting machine could do this method!

Silhouette Cameo 5 Detailed Adhesive Vinyl Decal with Autoblade

I hope that gives you some ideas how you can create and customize with acrylic shapes. You are not limited to Snowflake Arabesque Acrylics either! Craft Chameleon has a wide selection of acrylic blanks. The 3″ clear acrylic rounds are my favorite and I make sure to stock up each time I order.

Save this for future reference by pinning the image below.

Enjoy !

THANK YOU for your support! How can you help? Click HERE & buy a coffee.
Every little bit helps with the cost of running the site.

Silhouette Classes

Never stop learning! Let me help you take the anxiety out of learning with Silhouette and get to creating faster! My Silhouette classes are heavily focused on software, so you can take the skills & techniques taught and apply them to many future projects!

Silhouette step-by-step Classes by Silhouette Secrets+

**This post may contain affiliate links. What that means is that I may receive compensation if you purchase through the links I have provided. The price you pay for the product or service is not higher but I may get compensated for sharing.
Posted on 1 Comment

Let’s Explore v4 – Etching photos with the Curio

Etching photos with the Silhouette Curio

I love my Curio! So much that I now have 2 of them, just in case.
This little machine amazes me all the time!

Check out this post – Silhouette Inspiration – to see a few more Curio etched projects.

Today I am going to share my “secret” to etching photos with the Silhouette Curio.

IMG_20200216_140337580 copy

How is this possible? Just taking the photo by itself and trying to etch it doesn’t turn out well. Photos are made up of so many different aspects that you can’t just fill it with an emboss fill and call it good. It would just turn out like a big etched blob. It might work for a silhouette of a person, but not to capture the essence of the photo itself.

Well, it’s really not a “secret” at all. But, this is what I do.
I followed a technique that Kay Hall with Clever Someday composed and put into an eBook – Etching Photos on Acrylic with the Silhouette Curio.

Ebook

This past week I had a lesson with a student and she asked me about etching photos.
This is what I told her, “While I can teach you all about etching acrylic on your Curio, I highly recommend you grab this eBook and read it. In fact, I recommend that you read it 2-3 times before you even try to follow it.”
And that is what I would recommend to all of you reading this. I can etch acrylic with the emboss fills pretty much in my sleep – in fact, there are nights that is all I “think” about when I’m sleeping. But, this etching photos technique uses the sketch fills and gives an amazing finished project. It is a technique that has many steps, but if you follow it exactly, you will end up with a stunning project.

Now, keep in mind each photo you etch is going to turn out differently. I know it’s not the answer my students want to hear when I say, “Each design is going to act differently.” This is true for fonts, designs, photos, tracing, etc.
Why?
Because they are all made up of different elements. There is rarely a 1 click button to have something magically turn into something amazing. It is a process and it takes some time to go through that process. Skipping steps rarely leads to a good result.

How do I do it?

Blog post written in v4.3.370
Affiliate links may be present in the following blog post and as an Amazon Associate I earn from qualifying purchases.

I open the eBook every single time and follow it step-by-step. If I don’t, I know that I will miss a step and it won’t turn out.

So let’s take a look at the photo first. I opened the photo in Silhouette Studio and then scaled it down to fit on the Curio mat.

Original Photo copy

Like I said above, each photo is going to be different. In this photo, I don’t want the extra background to be etched, just the people in it. So I used the Magnet Trace feature to draw around the people and “extract” them out of the photo.

Magnet Trace copy

Magnet Trace is a Designer Edition upgrade feature in the Silhouette Software. As you can see in the photo above, the edges are not smooth around the photo. But, we can change that. I love the Magnet trace for extracting photo because even after I delete the background, it retains the memory of the photo. So I can use the Edit Points feature and adjust the edges around the part of the photo that I want to clean up.
If the tool has traced or placed an edit point too far in on the photo, I can move it out and it still “remembers” what the photo looked like. It is very forgiving and I highly encourage you to play around with it. It takes some practice but can come in quite handy.

Point Edit Magnet Trace copy

Each of the little gray dots is an Edit Point. I can delete or adjust the points until I have the desired edge around my photo.

After I have “extracted” my photo, I then cropped it down by drawing a square around the section of the photo I wanted & used the Modify – Crop feature to capture only the section I want etched. Then I enlarged that section of the photo to fill the acrylic blank area.

Crop copy

Now that my photo is ready, I open the Etching Photos onto Acrylic eBook and follow the directions. I do highly recommend that you read the book from start to finish 2-3 times before you even try to follow along in the software. While it may not make sense completely when you are reading it those first few times, it will make a whole lot more sense when you sit down and try to follow the technique in the software.

The more you do it, the more comfortable you will get.

Once you click on the Send button, a timer shows up in the bottom right corner of the Send tab. However, it is rarely accurate, especially with etching projects. Sometimes it’s less, but more often than not, it’s more time. This project said it would take 20 minutes & 59 seconds to etch and it actually took 32 minutes.

IMG_20200216_140744157 copy

The top of this is the etched photo and the bottom is etched into a Silhouette metal etching sheet using the Emboss fills.

I think the longest etching project I’ve done is around 3 hours. This is why I love that with the Business Edition upgrade to the software I can use multiple machines at a time. So I can set up a project to etch and still cut with my Cameo or start another project on my 2nd Curio.

Multiple machines copy

For more information on how to use multiple machines at the same time, check out this post – How to Use Multiple Silhouette machines.

IMG_20190520_162605898 copy

Don’t have a Curio? Here are a few places you will find them:
Amazon
Silhouette America
Swing Design

Want to get started etching with the Silhouette Curio?

First grab some acrylic blanks from Craft Chameleon and then a Silhouette etching tool.

Then, if you are a beginner with the Curio here is what I recommend to start:

1. Let’s Explore the Silhouette Curio
Header image copy

2. Beginner Curio Etching Metal
beginner curio Etching metal header copy

3. Want an online etching class? Check out the 1 hour Basic Acrylic Etching with the Silhouette Curio class on my Teachable site – HERE.

SilSecrets Curio Etching copy copy

I show you the steps I use to set up an acrylic etch from beginning to end.
Here is the course curriculum from the design file to the full etching video course.

Teachable course copy

and then once you feel comfortable with the etching process and your Curio

4. Grab the Etching Photos onto Acrylic with the Silhouette Curio by Kay Hall
Ebook

5. Want personalized lessons? To be able to ask questions in real time to an instructor? Set up an in-person or online lesson.
More information HEREOnline Lessons & Classes.

6. Join us at the All Things Silhouette Conference in November to learn more about All Things Silhouette – from software to machines to hand-on project classes.

ATS-logo-slider-11-2020

7. Check out the “Let’s Explore v4” series HERE for more in-depth software information including all about the Emboss Panel, which is the key to the Curio and etch fills for more projects. Etching on photos is the only thing I use the sketch fills for, otherwise the Emboss Panel is the main focus with the Curio.

I really feel that the software is the key to it all. You learn how to do things in the software that will translate over to all kinds of projects in the future.

I would love to see what you create!
Feel free to post on my Facebook group at Silhouette Secrets with EllyMae.

Save this for future reference by pinning the image below.

Photo Etching Curio

Enjoy!

SS_Signature copySS Logo snip it

**This post may contain affiliate links. What that means is that I may receive compensation if you purchase through the links I have provided. The price you pay for the product or service is not higher but I may get compensated for sharing.