Posted on Leave a comment

Silhouette Curio Etched Ornaments

Looking for a unique décor or gift idea?
Acrylic etched items can be just the thing.

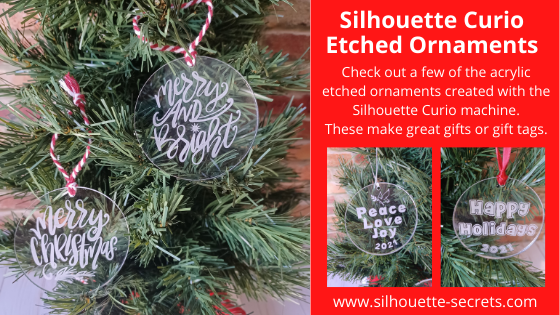
Etched Acrylic Ornaments with the Silhouette Curio

Affiliate links may be present in the following blog post and as an Amazon Associate I earn from qualifying purchases.

Take a 3″ acrylic circle and customize it however you like.
Add a simple saying with the date or jazz it up even more.
These acrylic circles could be used for tree ornaments, gift tags, bag tags, and more!

Here are a couple that I created for a Curio demonstration at the Craft Chameleon Fall Open House.
Check out the replay of this demo HERE.

The supplies for this project include:
– a Silhouette Curio machine
Silhouette Etching tool
3″ acrylic round from Craft Chameleon
Curio template for 3″ round from Craft Chameleon
– Double sided tape from Craft Chameleon
– designs of your choosing

The above designs are ones that I created myself and made using fonts and designs.
Grab those designs for free
HERE

If you’d like to create your own here are the fonts I used:
Happy Holidays – CC Too Much Fun Bold Font
Peace, Love & Joy – CC Gobsmacked Solid Font
Merry Christmas – CC Elegande Font

But, you can also take a design and size it down to fit in the 3″ circle to etch with as well. My only caution is to give yourself clearance around the edges of the acrylic and the hole at the top. If the tool catches on the edge or the hole, it will throw the etch off and you have a dud.

Here are a few examples of ornaments I’ve created and I’ll share the links to the designs I used.

Merry Christmas Ornament by Sweet Afton – Design #333980
Merry & Bright Ornament by Sweet Afton – Design #333981

Merry Ornament by Sweet Afton – Design #337453
Snowflake design created with the Drawing Tools in Silhouette Studio – more details found HERE

I love doing a combination of etching and adding vinyl to give it colors, dimension, and make it “pop”.
Dear Santa Design by Craft Chameleon
Noel Ornament design by Sweet Afton – Design #334450

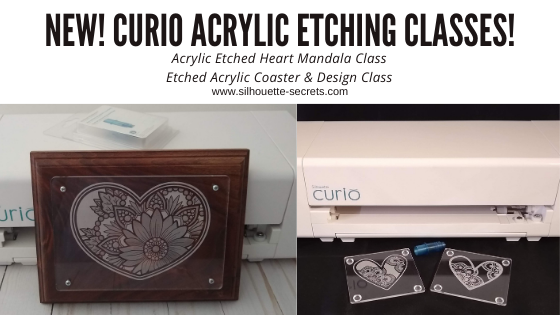
This design is one I created for a Silhouette Curio etching class that is available on my Teachable site.
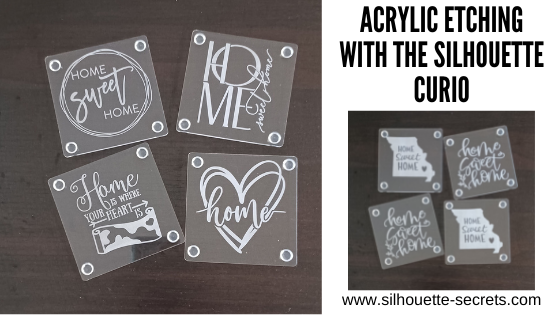
Keep in mind that designs you have can be used on many different blanks from ornaments to coasters, etc.

There are so many gift ideas that you can create with your Silhouette machine and even more options when you have a Silhouette Curio.

Check out more gift ideas created with the Curio machine HERE.

At the time of writing this, Swing Design still has Curio machines available.
Find those HERE.

You will also need a Silhouette Etching Tool for etching projects.
These are a little difficult to come by right now because of manufacturing and shipping delays worldwide, but keep on checking. Once you have the machine, you have the biggest part.
Find Silhouette etching tools here:
Silhouette America
Amazon

I do not recommend 3rd party etching tools as they can void the machine warranty and I had more blank spots in the etch when I used them. The Silhouette etching tool has given me the best results and I etch a lot when I’m developing classes.

The worldwide shortage on supplies, manufacturing, and shipping delays affect so many things including but not limited to Silhouette products. They are coming, but there is nothing that can be done but wait as we all work through these times we are in.

This little machine is a fantastic machine and will make fabulous projects for years to come.
Check out more Curio projects in my virtual demo table on YouTube HERE

I currently have 8 Curio classes on my Teachable site that will take you from Beginner to more advanced projects.
Find those HERE

I would love to see what you are creating with your Silhouette machines or software.
Feel free to post photos or questions on my Facebook group at 
Silhouette Secrets with EllyMae.

Save this for future reference by pinning the image below.

Enjoy!

This image has an empty alt attribute; its file name is logo.jpg

THANK YOU for your support! How can you help? Click HERE & buy a coffee.
Every little bit helps with the cost of running the site.

If you are looking for more in-depth, step-by-step classes, check out all of my online Silhouette classes on my Teachable site HERE.

SS Logo snip it
**This post may contain affiliate links. What that means is that I may receive compensation if you purchase through the links I have provided. The price you pay for the product or service is not higher but I may get compensated for sharing.
Posted on Leave a comment

New Curio Class Released!

Just a quick post to give a heads up that I’ve released a new Curio etching class on my Teachable site.

Etched Metal Cake Server Class with the Curio

This is a step-by-step class showing how to etch an odd shaped object on the Curio machine. I share how I secure the cake server on the Curio cutting mat and use shape templates to place the design and size it for the etching. Plus a trick to getting a tighter etch fill for harder surfaces like these stainless steel servers.

Supplies used in this class are:
– Silhouette Curio small cutting mat
– Silhouette Curio Etching/Stippling Tool – Click here to find at Silhouette or Amazon
*Watch for these to come in stock soon 😉
– Silhouette Curio small base with ALL platforms – please double check that you have all the platforms – a 2+1+cutting mat
– Metal Cake Server from Amazon
Monogram Wreath Font by Kristen Magee – Design #260225

Check out all of the Curio classes available on my Teachable site HERE

Create unique and custom gifts and projects with the Curio.
Check out this post HERE on more gift ideas of what you can do with the Silhouette Curio.

The Curio is a fantastic little machine that can do so much!

Want to see more Curio projects? Check out the virtual demo table video that I created for our past Curio virtual retreats on my YouTube Channel HERE.

I’d love see what you create!
Feel free to post on the
Silhouette Secrets+ Facebook Group.

Save this for future reference by pinning the image below.

Enjoy!

This image has an empty alt attribute; its file name is logo.jpg

THANK YOU for your support! How can you help? Click HERE & buy a coffee.
Every little bit helps with the cost of running the site.

Or if you are looking for more in-depth, step-by-step classes, check out all of my online Silhouette classes on my Teachable site HERE.

SS Logo snip it
**This post may contain affiliate links. What that means is that I may receive compensation if you purchase through the links I have provided. The price you pay for the product or service is not higher but I may get compensated for sharing.
Posted on Leave a comment

Etched Acrylic Coasters with the Curio

What happens when you move into a furnished apartment with wood furniture? My husband says to me, “We should have brought coasters.”

No problem! Pull out the Curio, pick out a couple of designs and the Curio is etching away.

I may be working on the dining room table, but I am happy to have the Curio out and running.

Affiliate links may be present in the following blog post and as an Amazon Associate I earn from qualifying purchases.

I picked up a few designs from the Silhouette Design Store, grabbed some acrylic coasters from my stash, my Curio coaster template, and the Curio machine did all the work.

Home Sweet Home by Diva Watts Designs – Design #346725 (top left)
Home Sweet Home by Diva Watts Designs – Design #346001 (top right)
Home is Where the Heart Is by Graphic House Design – Design #333473 (bottom left)
Home Hearts by Sophie Gallo – Design #318625 (bottom right)

Home Sweet Home Missouri by Jennifer Wambach – Design #148499
Home Sweet Home by Diva Watts Designs – Design #347923

And now the furniture will be protected….
well, if we can get the kids to use them.

Do you have a Curio and it’s just sitting there?
Get it out and play!

I’ve been teaching Curio classes for a couple of years now and have several available on my Teachable site HERE.

If you are interested in Acrylic Etching with the Curio, I would suggest the Basic Acrylic Etching with the Silhouette Curio class or the Acrylic Etching & Design with the Curio class.

If you are not a Curio owner, here is more information on etching with the Silhouette machines and why I highly recommend getting a Curio –
Etching with Your Silhouette Machine.

I would love to see and hear about what you are creating on my Facebook group at 
Silhouette Secrets with EllyMae. If you have questions feel free to post below or on the Facebook group too!

Save this for future reference by pinning the image below.

Enjoy!

This image has an empty alt attribute; its file name is logo.jpg

THANK YOU for your support! How can you help? Click HERE & buy a coffee.
Every little bit helps with the cost of running the site.

Or if you are looking for more in-depth, step-by-step classes, check out all of my online Silhouette classes on my Teachable site HERE.

SS Logo snip it
**This post may contain affiliate links. What that means is that I may receive compensation if you purchase through the links I have provided. The price you pay for the product or service is not higher but I may get compensated for sharing.
Posted on 2 Comments

New! Curio Etching Classes released!

Just a quick note to share 2 new Curio acrylic etching classes that I’ve released on my Teachable site.

Acrylic Etched Coasters & Design with the Curio – found HERE

In this 1 hour 18 minute video class we will go through the step-by-step process of setting up an etch design in the Silhouette Studio software, setting up the Silhouette Curio machine to etch, and etching an acrylic blank. We will etch this coaster design 2 ways and work through the design process to get a different look for each coaster.
This class goes beyond just the basics of etching and dives into changing a design up and filling it with different emboss fills to achieve a different end result.

Curio Etched Heart Mandala Class – Advanced Beginner – found HERE

In this 1 hour 50 minute video class we will go through the step-by-step process of setting up a heart mandala etch design in the Silhouette Studio software, setting up the Silhouette Curio machine to etch, etching on an acrylic panel, and mounting it to a backing board.

All of my online Silhouette classes can be found HERE.
These are step-by-step classes taught exactly the same as if we were face-to-face.

I would love to see what you create with your Silhouette!
Feel free to post on my Facebook group
Silhouette Secrets with EllyMae.
If you have questions feel free to post below or on the Facebook group too!

Save this for future reference by pinning the image below.

Enjoy!

This image has an empty alt attribute; its file name is logo.jpg

THANK YOU for your support! How can you help? Click HERE & buy a coffee.
Every little bit helps with the cost of running the site.

Or if you are looking for more in-depth, step-by-step classes, check out all of my online Silhouette classes on my Teachable site HERE.

SS Logo snip it
**This post may contain affiliate links. What that means is that I may receive compensation if you purchase through the links I have provided. The price you pay for the product or service is not higher but I may get compensated for sharing.
Posted on 1 Comment

Silhouette Curio Get Started Creating Fabulous Projects

The hardest part of creating something is choosing the design that I want to commit to.
I was searching for a 50th Anniversary card to create and nothing looked right to me.

Then I saw a project on my Silhouette Secrets+ with EllyMae Facebook group that a member was creating and it was an inspiration
(Thank you Patti!).

Sometimes that is all it takes. Seeing a project that someone else is creating and it sparks that creative energy and all the pieces just fall into place.

Today, I am here to share the finished project and how you can get started creating amazing things with the Silhouette Curio.

Affiliate links may be present in the following blog post and as an Amazon Associate I earn from qualifying purchases.

I always like to create gifts that are unique and with the Curio that is possible. With the ability to etch on metal or acrylic, I can create a customized gift in no time. But, sometimes I still need a creative jump-start. I know many of my Facebook group members love and can’t wait to see what is posted in the Show and Tell on Saturdays.
It is a great place to share your Silhouette creations, projects in-progress, or see what others might be creating with their machines.

The above metal etching project was created with the Silhouette Curio, Silhouette Etching tool, and the Silhouette metal etching sheets. These Silhouette metal etching sheets are what I recommend for any new user to start with when wanting to learn etching with the Curio.

How can you learn the Curio?

There are a couple ways you can get started with this awesome little machine.

1 – Check out this Unboxing video on Youtube to see how to set up the machine – HERE.

2 – Curio Beginner Setup & First Cuts with Cardstock & Vinyl video course HERE

3 – Let’s Explore the Curio – Getting Started blog post HERE

4 – Beginner Curio Etching Metal written tutorial found HERE

5 – Beginner Curio Metal Etching Video Course HERE

6 – Basic Acrylic Etching with the Curio video course HERE

7 – Etching Photos with the Curio found HERE

8 – Curio Advanced Beginner – Metal Etching placement video course HERE

8 – Embossing Leather with the Curio can be found HERE

The Curio is a fantastic machine and takes some time to learn.
But it is so worth it when you do!

I would love to see what you are creating with your Silhouette machines.
Feel free to post photos or questions on my Facebook group at 
Silhouette Secrets with EllyMae.

Don’t have a Curio machine yet, but want to add it to your tools?
Find it here:
Silhouette America
Amazon

Save this for future reference by pinning the image below.

Enjoy!

SS Logo snip it
**This post may contain affiliate links. What that means is that I may receive compensation if you purchase through the links I have provided. The price you pay for the product or service is not higher but I may get compensated for sharing.
Posted on 2 Comments

Silhouette Curio Virtual Retreat Highlights

We just wrapped up the first Silhouette Curio Virtual retreat this past weekend that was hosted by Terri Johnson Creates and it was a success! 3 days of diving into Curio projects that included metal etching, acrylic etching, leather embossing, more acrylic etching, and sketching on wood.

This event was originally scheduled as a hands-on retreat, but due to the current situation we made the decision not to cancel it but to move it to a virtual online retreat. Students received class supply kits, written instructions, access to recorded video lessons for each project, video conference calls for discussion & questions, and support through our private Facebook group during the event.

Let me tell you, I have been testing these class projects for months, over and over. And by the end of an event, I will admit I sometimes feel that I just don’t need another project with my initial on it.

But, these attendees blew me away. They watched the video classes and created some fabulous projects! I hope these project photos will inspire you just like they have me!

Silhouette Metal Etching

Affiliate links may be present in the following blog post and as an Amazon Associate I earn from qualifying purchases.

Thank you Silhouette for sponsoring this class using the Silhouette metal etching sheets!

Acrylic Etched Coasters with the Curio

Thank you Craft Chameleon for sponsoring this class.

We used the Acrylic Coaster, Curio Coaster Template and Mandala Heart design by Sophie Gallo – Design #275077.

Embossed Leather Earrings & Key Fob

Thank you to Silver Creek Leather Co. for sponsoring this class.
We used ReaLeather tooling leather in this project with the Silhouette Embossing Tool.

Check out this short video showing the Curio in action on the leather.

Etched Acrylic Panel & Silhouette Design

Thank you Craft Chameleon for sponsoring this class.

Sketching on Wood

We used the Pine Cone sketch design by Tanya Batrak – Design #236611 for the main sketching design and then the attendees got creative and branched out.

While we could not meet in person due to the circumstances, we had a great time meeting together in the first Virtual Curio retreat.

For more information on the Silhouette Curio, check these out:
Curio Unboxing Video
Let’s Explore – The Curio – Getting Started
Beginner Curio Metal Etching
Basic Acrylic Etching with the Curio

The feedback we received from the event was amazing!
Here are just a few of the reviews from this weekend.

“I was glad when it was announced that this would be a virtual class. I wasn’t going to be able to attend otherwise. I was a little skeptical of taking a virtual class like this since I am not self motivated to watch online videos. But I found that I was very motivated to keep up with the class schedule and projects. Loved being able to watch the classes and stop, back up, and go over a technique several times if I needed to. Would love to take more classes like this with Terri and Elly. Fantastic instructional classes and awesome instructors. Thank you for taking us to another level of learning.” Carol R

“A truly wonderful virtual experience. It was so relaxing to go at your own pace and rewind the videos when you “didn’t quite get it” as many times as you needed or refer back to the written instructions when that worked better. Terri and EllyMae were always there for you when you needed to reach out and the ZOOM calls opened you to questions and answers you might not have thought about. I would definitely take another virtual class. You can see just how much time and detail was put in to these classes. Thank you Terri and EllyMae for a fantastic experience and loving all the knowledge I gained.” Jean S

“Thanks so much for offering this virtually. We had contact with other participants through Zoom, the projects were varied and fun, and the instruction was superb!. The videos were well-organized, thorough, and well paced. It was helpful to be able to go back and repeat sections. The workbook is an excellent resource going forward. I hope you continue to offer virtual retreats. “ Boo M.

“This retreat was a blast! Everything – from materials to instruction sheets to instructional videos – was so thought out down to the tiniest detail. Terri and EllyMae, as well as the retreat helpers, are experts in all things Curio – how it works, how to troubleshoot, about the materials, cut/etch settings, Silhouette software, etc. They are genuine, professional, personable, and very patient. I learned some new techniques and how to use some materials I had never thought of. My mind is now in overdrive thinking of all the projects and possibilities. I would so do this again – either in person or virtual.” Leigh W

“This was an outstanding weekend. I would definitely take another class in this format. I had all my materials available to me in my space, I was able to go at my own pace & could rewind if I needed to listen to something again. I loved it!! Judy A.”

Those are just a few and I’ll share more in the future.

We are all finding ourselves in a new time with the current events happening and this virtual retreat was definitely a new experience for us all.

Make sure to get signed up on the Terri Johnson Creates blog and subscribe to this blog on the right side to get notified for future events!
You will also find us on Facebook at:
Terri Johnson Creates Page
All Things Silhouette Facebook Group
Silhouette Secrets+ Page
Silhouette Secrets + with EllyMae Facebook Group

Save this for future reference by pinning the image below.

We want to say a great big THANK YOU to all our sponsors!
From class sponsorship’s to goody bag items to your support, we cannot do this without YOU!
Atlanta Stylish Point
Craft Chameleon
Silhouette America
Silver Creek Leather Co.
Sparkleberry Ink
THANK YOU!

I’d love to see what you are creating with your Silhouette!
Feel free to post photos or questions on my Facebook group at 
Silhouette Secrets with EllyMae.

Enjoy!

SS Logo snip it
**This post may contain affiliate links. What that means is that I may receive compensation if you purchase through the links I have provided. The price you pay for the product or service is not higher but I may get compensated for sharing.
Posted on 1 Comment

Let’s Explore v4 – Etching photos with the Curio

Etching photos with the Silhouette Curio

I love my Curio! So much that I now have 2 of them, just in case.
This little machine amazes me all the time!

Check out this post – Silhouette Inspiration – to see a few more Curio etched projects.

Today I am going to share my “secret” to etching photos with the Silhouette Curio.

IMG_20200216_140337580 copy

How is this possible? Just taking the photo by itself and trying to etch it doesn’t turn out well. Photos are made up of so many different aspects that you can’t just fill it with an emboss fill and call it good. It would just turn out like a big etched blob. It might work for a silhouette of a person, but not to capture the essence of the photo itself.

Well, it’s really not a “secret” at all. But, this is what I do.
I followed a technique that Kay Hall with Clever Someday composed and put into an eBook – Etching Photos on Acrylic with the Silhouette Curio.

Ebook

This past week I had a lesson with a student and she asked me about etching photos.
This is what I told her, “While I can teach you all about etching acrylic on your Curio, I highly recommend you grab this eBook and read it. In fact, I recommend that you read it 2-3 times before you even try to follow it.”
And that is what I would recommend to all of you reading this. I can etch acrylic with the emboss fills pretty much in my sleep – in fact, there are nights that is all I “think” about when I’m sleeping. But, this etching photos technique uses the sketch fills and gives an amazing finished project. It is a technique that has many steps, but if you follow it exactly, you will end up with a stunning project.

Now, keep in mind each photo you etch is going to turn out differently. I know it’s not the answer my students want to hear when I say, “Each design is going to act differently.” This is true for fonts, designs, photos, tracing, etc.
Why?
Because they are all made up of different elements. There is rarely a 1 click button to have something magically turn into something amazing. It is a process and it takes some time to go through that process. Skipping steps rarely leads to a good result.

How do I do it?

Blog post written in v4.3.370
Affiliate links may be present in the following blog post and as an Amazon Associate I earn from qualifying purchases.

I open the eBook every single time and follow it step-by-step. If I don’t, I know that I will miss a step and it won’t turn out.

So let’s take a look at the photo first. I opened the photo in Silhouette Studio and then scaled it down to fit on the Curio mat.

Original Photo copy

Like I said above, each photo is going to be different. In this photo, I don’t want the extra background to be etched, just the people in it. So I used the Magnet Trace feature to draw around the people and “extract” them out of the photo.

Magnet Trace copy

Magnet Trace is a Designer Edition upgrade feature in the Silhouette Software. As you can see in the photo above, the edges are not smooth around the photo. But, we can change that. I love the Magnet trace for extracting photo because even after I delete the background, it retains the memory of the photo. So I can use the Edit Points feature and adjust the edges around the part of the photo that I want to clean up.
If the tool has traced or placed an edit point too far in on the photo, I can move it out and it still “remembers” what the photo looked like. It is very forgiving and I highly encourage you to play around with it. It takes some practice but can come in quite handy.

Point Edit Magnet Trace copy

Each of the little gray dots is an Edit Point. I can delete or adjust the points until I have the desired edge around my photo.

After I have “extracted” my photo, I then cropped it down by drawing a square around the section of the photo I wanted & used the Modify – Crop feature to capture only the section I want etched. Then I enlarged that section of the photo to fill the acrylic blank area.

Crop copy

Now that my photo is ready, I open the Etching Photos onto Acrylic eBook and follow the directions. I do highly recommend that you read the book from start to finish 2-3 times before you even try to follow along in the software. While it may not make sense completely when you are reading it those first few times, it will make a whole lot more sense when you sit down and try to follow the technique in the software.

The more you do it, the more comfortable you will get.

Once you click on the Send button, a timer shows up in the bottom right corner of the Send tab. However, it is rarely accurate, especially with etching projects. Sometimes it’s less, but more often than not, it’s more time. This project said it would take 20 minutes & 59 seconds to etch and it actually took 32 minutes.

IMG_20200216_140744157 copy

The top of this is the etched photo and the bottom is etched into a Silhouette metal etching sheet using the Emboss fills.

I think the longest etching project I’ve done is around 3 hours. This is why I love that with the Business Edition upgrade to the software I can use multiple machines at a time. So I can set up a project to etch and still cut with my Cameo or start another project on my 2nd Curio.

Multiple machines copy

For more information on how to use multiple machines at the same time, check out this post – How to Use Multiple Silhouette machines.

IMG_20190520_162605898 copy

Don’t have a Curio? Here are a few places you will find them:
Amazon
Silhouette America
Swing Design

Want to get started etching with the Silhouette Curio?

First grab some acrylic blanks from Craft Chameleon and then a Silhouette etching tool.

Then, if you are a beginner with the Curio here is what I recommend to start:

1. Let’s Explore the Silhouette Curio
Header image copy

2. Beginner Curio Etching Metal
beginner curio Etching metal header copy

3. Want an online etching class? Check out the 1 hour Basic Acrylic Etching with the Silhouette Curio class on my Teachable site – HERE.

SilSecrets Curio Etching copy copy

I show you the steps I use to set up an acrylic etch from beginning to end.
Here is the course curriculum from the design file to the full etching video course.

Teachable course copy

and then once you feel comfortable with the etching process and your Curio

4. Grab the Etching Photos onto Acrylic with the Silhouette Curio by Kay Hall
Ebook

5. Want personalized lessons? To be able to ask questions in real time to an instructor? Set up an in-person or online lesson.
More information HEREOnline Lessons & Classes.

6. Join us at the All Things Silhouette Conference in November to learn more about All Things Silhouette – from software to machines to hand-on project classes.

ATS-logo-slider-11-2020

7. Check out the “Let’s Explore v4” series HERE for more in-depth software information including all about the Emboss Panel, which is the key to the Curio and etch fills for more projects. Etching on photos is the only thing I use the sketch fills for, otherwise the Emboss Panel is the main focus with the Curio.

I really feel that the software is the key to it all. You learn how to do things in the software that will translate over to all kinds of projects in the future.

I would love to see what you create!
Feel free to post on my Facebook group at Silhouette Secrets with EllyMae.

Save this for future reference by pinning the image below.

Photo Etching Curio

Enjoy!

SS_Signature copySS Logo snip it

**This post may contain affiliate links. What that means is that I may receive compensation if you purchase through the links I have provided. The price you pay for the product or service is not higher but I may get compensated for sharing.

Posted on Leave a comment

Acrylic Etching at ATS – November 2019

I’ve just arrived home from the November All Things Silhouette Conference for 2019 and so many ideas are hitting me. I am making notes for when I get a chance to start creating again.

I wanted to share a project I created and put in the Silhouette Showcase room at the conference.

This is an acrylic etched with the Silhouette Curio. It is a lighted base that can be found at Craft Chameleon and the acrylic is specifically sized for the base.
This is one of my favorite ones that I have etched for the base.

eZy_watermark_12-11-2019_03-23-14

Acrylic light base by Craft Chameleon found HERE

SilSecrets_lightedbase copy

There are several different acrylic shapes that fit in the lighted bases and also Curio Templates for all those shapes.
I LOVE the Curio templates to help hold my blanks in place!

Thank you to Craft Chameleon for allowing me “test” this one out for them to share with everyone at the ATS – Showcase.

I couldn’t stop there though. I etched 150 of the 15/16″ acrylic discs and gave those out to the attendees of all the Ultimate ATS attendees for the Friday classes in their goody bags.

SilSecrets_acrylic charm

For these I added a wine charm to the bag but they could also add it to a key chain or other type of hardware too!

I had a few extras and turned mine into a pair of earrings that I wore this weekend too!

SilSecrets_earrings

And yes, there is a Curio template for these charms too! I was able to etch 10 charms at a time.

And I want to share this with all of you because I think it is so neat.
I was able to use my Business Edition software to connect to 6 different Curio machines to etch 30 snowflake ornaments during the conference.
It’s a long story on why but where else do you get access to a room full of Curios.
Next time, I’ll try even more!

Are you just getting started with the Curio? I recommend starting with the Silhouette metal etching sheets and practicing first.
Here is a step by step tutorial on how I do that – Beginner Curio Etching Metal.

beginner curio Etching metal header copy

Want to learn how to etch on acrylic? I just recently launched an online class on my Teachable site to show you how.
Check it out HERE along with my other classes that are available.

SilSecrets Curio Etching copy

Or if that is not enough, come join us for a full weekend of Curio projects on May 1-3, 2020 at the Curio Retreat in Woodbridge, VA!
Grab your seat quick as we are already over 50% full!

SilSecrets_Curioworkshop.jpg

I would love to see your projects feel free to post on my Facebook group at Silhouette Secrets with EllyMae.

Enjoy!

SS_Signature copySS Logo snip it

**This post may contain affiliate links. What that means is that I may receive compensation if you purchase through the links I have provided. The price you pay for the product or service is not higher but I may get compensated for sharing.


Posted on 14 Comments

Let’s Explore v4 – Emboss Panel

The Emboss Panel is such neat feature. Currently, it is only available to those who have plugged in a Curio machine.

It can be found on the right side of the Silhouette Studio v4 software and looks like a star with a shadow.

Emboss panel copy

Since this is a currently a Curio feature only, if you have not plugged a Curio into your computer, the Panel will be grayed out. If you hover over the icon, you get this message.

Emboss warning

So keep that in mind if you are looking at it along with me.

Emboss detail copy
  1. Deboss – the design will be created as seen on the screen & will press the design down into the material exactly as seen on screen.
    For example, if using cardstock, it will create a valley where the design is.
    Emboss – the design is flipped horizontally so it is mirrored BUT it does not show this on the screen. You will place your material face down on the embossing mat and the design will be pressed mirrored. When it’s finished, you will flip it over and the design should be raised on the side that was face down on the mat.
  2. F – This tells you which way to put the material on the mat. For deboss, put the material face up.
    F Deboss
    For emboss, put the material face down.
    F Emboss
  3. Embossing Patterns – Choose between 5 options: none, lined, concentric, cross hatched, or spiral.
    Lined
    Line Pattern
    Concentric
    Concentric Pattern
    Cross hatched
    Cross hatched pattern.JPG
    Spiral
    Spiral
    Each design will vary in which pattern may look better for the emboss. Again it is a matter of personal preference. I prefer the look of the cross hatched pattern, especially when etching on acrylic. But, that is just my preference, you should play with the patterns and decide what you like.
  4. Spacing – Increase or decrease the grid spacing between the lines of the pattern. This is 0.005 spacing – a really tight DebossSpacing smallIf we zoom in on the design, you will see the pattern.
    Spacing small zoom

    Here the deboss is 0.025.

    Spacing larger

    This is another area where you are changing a lot of data at one time, so be patient with your computer if it is thinking.

    If the pattern spacing is smaller than what the Silhouette can process, then you will end up with a blue square or a square with an X in it.

    Error spacing
    Use the up arrow and increase the spacing just a bit or delete and type in a number just a bit higher than the current spacing, until the box disappears. Remember, be patient and go slow, it is processing a lot of data.


    Above 0.015 was too small but increasing to 0.025 there was no longer the error.

    Error spacing2
  5. Angle – Change the angle of the deboss or emboss pattern.
  6. Release Emboss – Releases the lines of the emboss pattern. When you are satisfied with the pattern, click on the Release Emboss button.Once the emboss/deboss is released, you could add another pattern on top if you chose to.

Here is the flower design (Floral Elements Design #191146) embossed on a piece of Silhouette Score & Emboss paper. This was embossed using the Silhouette fine tip embossing tool and 3 different embossing patterns.

Flower emboss

Now, while I have not been that impressed with the emboss ability on cardstock, it is just not deep enough for my liking,  I do love using the emboss features on materials such as metal and acrylic.

Silhouette Metal Etching Sheet
Metal etching 2
Home Sweet Home Montana by Jennifer Wambach Design #148502

Metal etching 1
Welcome Elk by Sophie Gallo Design #89012

Acrylic

acrylic etching
Acrylic coaster blanks from Craft Chameleon
Eat, Sleep, Coffee Repeat by Sophie Gallo Design #230872
Less Monday More Coffee by Tany Batrak Design #209927
Yes, Coffee by Kolette Hall Design #171334
But First Coffee by Lilium Pixel SVG Design #242962

I hope you have learned a little bit about the Emboss Panel today. The Curio machine very quickly because a favorite of mine and now I can’t put it away.

Here are a few more a things to help you get started on the Curio.
The Curio – Getting Started with the Curio
Silhouette Curio Beginner Metal Etching
Basic Acrylic Etching Video Class

I’d love to see what you are creating with your Silhouette machine.
Feel free to post over on my Facebook group at Silhouette Secrets with EllyMae.

Enjoy!

SS Logo snip it

**This post may contain affiliate links. What that means is that I may receive compensation if you purchase through the links I have provided. The price you pay for the product or service is not higher but I may get compensated for sharing.