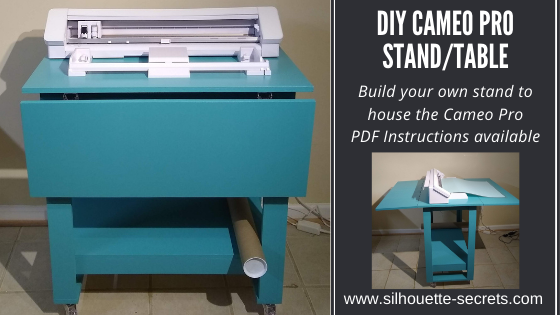
I’ve shared a few glimpses of this DIY stand/table that we’ve been in the process of creating for the Cameo Pro. And it’s now finished – whew! Let me tell you, writing the instructions, filming the video, and writing the blog post took twice as long as actually building the stand.
Whether you are considering building your own stand/table for a machine or not, I hope you’ll continue reading and watching as all Silhouette users can pick up some tips from the information in the video below. And maybe share a laugh too!
The photos on the wall aren’t really crooked, just the angle of the photo – lol.
If you are a Cameo Pro owner then you know how large this machine is and if you have been considering it, this is great information to know about so you can plan for it.
Since the machine has a cutting width of 24″ it is much larger than the average Silhouette machine. The machine is approximately 35″ wide and you really want the entire width of the machine to be securely supported.
You also want to consider whether you will be using a cutting mat with the machine or not. If you will be, the full length of that cutting mat needs to be fully supported and rolling in and out of the machine as flat as possible. The Pro simply cannot work against gravity and keep in mind that the mat and material on the mat is weight. If it is hanging down in front of the machine the cuts may not line up properly. And keep in mind that you need the clearance in the back of the machine whether you are using vinyl or a cutting mat. There has to be somewhere for the material to go.
I just have to say that after filming the video above, there is never a dull moment in our house. If I get everything set up to record, then it never fails the microphone dies, I forget to push record, the camera is full and shuts off, I misspeak and say 12″ vinyl instead of 24″ vinyl, or you find something unusual where it shouldn’t be. It’s life! And sometimes you just have to laugh it off!
Note: the sock is gone but new things appear. It’s like the Easter bunny or Santa leaving presents. You just never know what I’ll find.
It’s life…. lol.
Affiliate links may be present in the following blog post and as an Amazon Associate, I earn from qualifying purchases.
Here are the supplies we used to create this DIY Cameo Pro stand:
Supplies: – 1 – 4’ x 8’ sheet of 3/4 inch Sandeply (Home Depot/Lowes) *$40.98 – 5 – 1 x 3 x 8’ (Home Depot/Lowes) *$36.05 – 1 – 1 x 4 x 6’ (Home Depot/Lowes) – *$5.15 – 100 – #8 x 1¼” Phillips wood screws (Home Depot/Lowes/Amazon) *$9.01 – 100 – #8 x 3/4” Phillips wood screws (Home Depot/Lowes/Amazon) *$7.28 – 4 – Drop Leaf Hinges (Amazon) or similar *$15.97 – 4 – 3” Urethane Casters (Harbor Freight) *$15.96
*Our cost – note prices may vary by location. Total cost of base table supplies = $130.40
Both of the signs were creating using the Cameo Pro and the wider cutting space.
This Cameo Pro stand was designed so that a crafter could complete the construction using basic tools. My biggest concern for any new Cameo Pro owner is that the machine is fully supported and stable so you can get the best use and most consistent cuts.
The one thing I would highly suggest is reading the instructions and viewing the photos a couple of times before starting. Even though I was right in the middle of the build process, I still re-read the written instructions several times.
We have written a step-by-step 27-page PDF document that is complete with photos and detailed instructions for the construction of this DIY Cameo Pro Stand. These instructions are available to confirmed newsletter subscribers.
Like what you see, buy us a coffee. We thank you for your support!
Whether you build your own Cameo Pro stand or not, I hope that the video and photos have given you some tips and ideas to think about when setting up your own Cameo Pro.
It is amazing how my to-do list for the Cameo Pro has grown. Just like everything else, it seems like a never ending list of projects I want to complete.
What are you creating with your Silhouette machine?
Save this for future reference by pinning the image below.
Enjoy !
THANK YOU for your support! How can you help? Click HERE & buy a coffee. Every little bit helps with the cost of running the site.
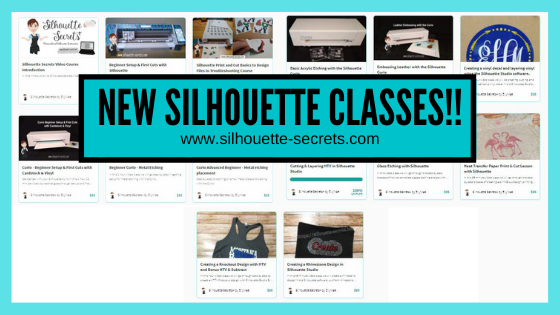
Silhouette Classes
Never stop learning! Let me help you take the anxiety out of learning with Silhouette and get to creating faster! My Silhouette classes are heavily focused on software, so you can take the skills & techniques taught and apply them to many future projects!
**This post may contain affiliate links. What that means is that I may receive compensation if you purchase through the links I have provided. The price you pay for the product or service is not higher but I may get compensated for sharing.
This year has definitely been an interesting one. I haven’t really felt like pulling all of the Christmas decorations out, but still wanted to do something.
While cruising on Pinterest one night, I saw this and thought it would be perfect for a bit different look on our buffet in our dining area this year.
Affiliate links may be present in the following blog post and as an Amazon Associate, I earn from qualifying purchases.
This is a Christmas village that is constructed out of black cardstock and the window inserts on printable vellum. So it was fairly easy to put together. The file can be found HERE – on the Adventure in a Box website. I purchased the full file so I was able to get right to the project instead of creating my own images.
Now, they hand cut all of the files, but I’m not much up for that. Since you can open PDF files in the Silhouette software directly with the Designer Edition upgrade or higher, you can bring it right into the Silhouette software to set up to cut for you.
Let’s take a look at how that is done.
Make sure you are using the PDF file for this design. I used the png images for the silhouette parts and it was not the same size as the PDF file silhouettes, so they were a little bit big for the cutouts of the houses.
First, like I said above, you will need at least the Designer Edition upgrade or higher to open the pdf file.
Download the file, save it to a safe place, and then unzip/extract the file. Next, in the top left corner of the software choose File > Open in the Silhouette software and choose the PDF file.
When you open a PDF file, it will give you a couple of options. I always try the “Import as vector” first because in some cases, depending on how the file was created, it may open up with cut lines already done. The only way to know is to open as a vector and click on the Send tab to see if the cut lines are there.
If the PDF file has more than 1 page to it, you will want to choose which page to open first.
In this case, the first 3 pages are instructions, so we don’t need those at the moment. They can be handy for assembly if you need them. I chose Page 4 and then click on Import in the bottom right corner to open the file.
Now, use the Basic Trace, increase the threshold until it turns as smooth of yellow on the black as possible.
Now click Trace and then move the original design away. Since the original design does not have “score” lines to fold the building on for it to stand up, I added those in myself.
Using the Line Drawing tool on the left side, hold the Shift key down and draw a line that almost touches from one end to the next. I didn’t want the score line to cut edge to edge, so I made the line a little bit smaller. Next, on the Line Style Panel on the right side, change the Style of the line to a dashed line. This will act like a score line and not be fully cut through and the cardstock can easily be folded on this line. Adjust the line between the outer cut lines as needed.
Select the entire design and the score lines and then right click and choose Group, so the entire design moves as one piece. Using the Transform Panel – Rotate Tab, rotate the design 90 degrees on the page.
Fill it with color to see what it will look like when cut. Now, save the design.
You will do this for all of the pages with the house designs. Then I cut each out of black cardstock.
Next, we will open the next page of the PDF file for the silhouettes in the windows. Using File > Open once again, choose the PDF file, then page 5, and choose open as a vector.
This is how it will open up.
Next, using the Draw Rectangle tool on the left side, draw a rectangle around each of these window images. We do not need all of the black grid lines to print, only the images. Make sure to give yourself some clearance around the images so there is area to add glue to.
Now, select the entire design and drawn rectangles. You can either hit Ctrl+A to select all on the page or left click and hold the mouse button down and drag it across the entire design touching each object you want to select. Then open the Modify Panel on the right side and choose Crop.
I then opened up all of the silhouette files and cropped the images down. Then copied and pasted them all onto one design mat. And then we can set this file up as a Print and Cut project. I would suggest saving each Print and Cut page as a new design, just in case you have to go back and recut the pieces for some reason.
For tips on setting up a Print and Cut projects, check out this Print and Cut Basics post HERE. I recommend printing using all of the defaults for the print and cut, for the best results.
Once you have the page setup with the registration marks, print each page on printable vellum. I used this I found on Amazon HERE. I printed using the photo quality for matte paper. Printing at photo quality allows the ink to be laid down on the paper at a slower rate and allows it to dry better when working with specialty papers.
The first 2 pages I cut with had no issues what so ever and then the 3rd page would not cut correctly. I ended up printing it 5 times, just trying it over and over. When I should have done this little trick in the first place. Place white paper underneath the registration marks in each corner. This allows the optical eye a better chance at picking up only the registration marks printed and not other interference. Make sure the white paper is cut large enough that it would be the same size as the cross-hatched area for best results.
Keep in mind that the Silhouette optical eye is just a laser that turns on when you have registration marks on your page. This laser eye is looking for black marks on the page. However, it’s just a laser eye, it will pick up any black marks on the page. This includes the Silhouette grid lines if the paper is translucent or clear. This is also why the cross-hatched area around the registration marks is so important! And why, for the best results you should not have your design or cut lines in the cross-hatched area. As I said, it worked for the first 2 pages, but it didn’t like that 3rd page.
And that little trick was all it took for it to pick up the registration marks and cut accurately. Again, this is only something that might need to be added if the paper you are using is translucent or clear.
Once it’s all cut out of the black paper and the printable vellum, I used a bit of Scrapbook tape runner adhesive to glue it to the backside of the black cardstock, folded the score lines, and set it up.
I added some tea lights behind the designs to let it shine through and I have a new piece of holiday décor in our dining room.
Whether you create the same file, design your own silhouette images to fit in the Christmas Village, or follow the same techniques as I used above for another project; I hope you will share that on my Facebook group here Silhouette Secrets with EllyMae. If you have questions feel free to post below or on the Facebook group too!
Save this for future reference by pinning the image below.
Enjoy!
THANK YOU for your support! How can you help? Click HERE & buy a coffee. Every little bit helps with the cost of running the site.
Or if you are looking for more in-depth, step-by-step classes, check out all of my online Silhouette classes on my Teachable site HERE.
**This post may contain affiliate links. What that means is that I may receive compensation if you purchase through the links I have provided. The price you pay for the product or service is not higher but I may get compensated for sharing.
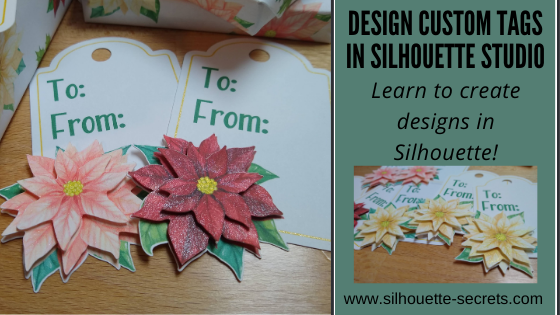
The gift tag was created from scratch in the Silhouette Studio software with just a few basic shapes.
Step 1 – Using the Drawing Tools on the left side, draw a rounded rectangle and a oval. Place the oval at the top of the rounded rectangle. Use the Align Center tool to center the oval with the rounded rectangle.
Quick Tip: The QAT or Quick Access Toolbar contains the most common used tool quick keys at the top of the software. This is dependent on what objects are selected. You will see the quick keys change depending on the type of object – for instance, text versus designs.
Step 2 – Select the rounded rectangle and oval, right click and choose Weld. Use the Drawing Tools on the left side, draw a small circle. Hold the Shift key down while drawing to draw a perfect circle. Place the circle towards the top middle of the tab. Use the Align Tools to center it with the tag shape.
Step 3 – Select the tag shape and then choose the Offset Panel and choose Internal Offset. Adjust the Offset distance if desired – I used the default. This is creating the line to draw using a sketch pen around the inside of the tag.
Step 4 – Select the Internal Offset and then change the line color to blue in the Line Style Panel. This will be the sketch line to be done with the gold pen.
At this point I would make a copy of the entire design and move it to the left side of the cutting mat in the holding area, so you have an original to go back to if needed.
Double click on the file from the library and depending on the software version you are using it may open on the same design mat. If not, right click on the design in the Library tab, then choose Merge and it will be added to the current design mat.
Step 6 – Scale the design down to the size needed by grabbing the corner bounding box and dragging it in. Move the design to where you would like it placed on the tag.
Step 7 – Right click on the tag and choose Ungroup. This will separate the cut line from the image. Make a copy of the image and pull it off to the left side.
Step 8 – Select the inner blue sketch line, open the Offset Panel, and click internal offset. Change the distance to .005. Click Apply. This will create a small, very thin frame which will be important in the next step.
Step 9 – Select both of the inner blue lines. Again, the easiest way may be to drag select as described above and then hold down the Shift key and de-select the items you do not want. Once those 2 blue lines are selected, right click and choose Make Compound Path.
Step 10 – Next, select only the inner blue line and the cut line around the flower. The easiest way to do this is to select all of the design, then hold the Shift key down and click on the cut lines you do not want selected. In this case, the hole at the top of the tag, the outer tag cut line, and the flower graphic should not be selected. There will be a gray “selection box” around each piece that is currently selected.
Step 11 – Open the Modify Panel on the right side. With the inner blue sketch line and the outside cut line of the flower selected, choose Subtract All. This will cut the blue line out from behind the flower, so the sketch line will end where the flower starts.
This is why we created the “frame” with the blue sketch line when we made the internal offset and then selected the 2 blue lines and made it a compound path.
Move the design away from the tag to see the blue line was “subtracted” from behind the flower design. Make sure to hit the “Undo” button if you do this to move the design back into place again.
Or press the Ctrl+Z (PC) buttons on the keyboard for the keyboard shortcut. (MAC = Command+Z)
Step 12 – Next, select only the outer tag shape and the cut line around the flower. The easiest way to do this is to select all of the design, then hold the Shift key down and click on the cut lines you do not want selected. In this case, the hole at the top of the tag, the blue sketch line, and the flower image. Again, there will be a gray “selection box” around each piece that is currently selected.
Step 13 – Once those are selected, right click and choose Weld or select Weld from the Modify Panel. This should combine the outer edge of the tag and the cut line of the flower, so the Silhouette will cut around both.
Move the design away to see how the lines have welded together. Then hit Undo again to move the flower back.
Step 14 – Select the outer tag shape and the inside circle, right click and choose Make Compound Path. This will “punch out” the circle from the tag.
Another way to select multiple objects at once is to click on the 1st object, hold the Shift key down and click on the next object. In this case, the outer tag line and the inside tag circle a the top.
Make a copy of the tag and pull it off to the left side for safe keeping.
Now, you have a custom tag that could be printed, then sketched, and cut around.
Repeat these steps if you have different designs you want to use. The more you do it, the more comfortable you will get with it and the software.
Step 15 – Set up the tags to print. For all print and cut projects, I follow the same steps and use all the defaults for the best results. Check out this Print and Cut Basics blog post on how to set it up step-by-step or my video course HERE.
Then click on the Page Setup Panel – Tab 3 and turn the registration marks on. Click the Restore Defaults button. Position the designs on the page between the registration marks and not in the cross-hatched areas.
Step 16 – Print the design and then set it up in the top left corner of the Silhouette cutting mat exactly as you see it on the screen, completely covering the grid lines on the cutting mat.
Step 17 – Set up the sketch action first. Install the sketch pen in the Silhouette machine. I used a Silhouette gold sketch pen. Click on the Send tab – choose by Line Color under the top right header.
Set up the Materials, Action, and Tool. Uncheck the red color and leave the blue color checked. This means that the machine will first sketch the lines in bold blue.
Step 18 – Set up the Cut lines. Uncheck the blue and check the red box. Install the Silhouette blade to cut the tags.
And you have a custom tag created.
You could stop there, but why not keep going? Now, it’s time to embellish these a bit more! Let’s add some dimension to the tags.
Have you ever heard of fussy cutting? It’s a common term in the paper crafting world that means to hand cut around a design with scissors. I did fussy cut the first few I did as samples just to see how this would work and I had thought for a brief moment that I would do that for all of them. But, why? Let’s “fussy cut” around these flowers and let the software and Silhouette machine do all the work! Yes, it may take a little bit to set the file up, but it would take time to fussy cut all of them and let’s save our hands some aching!
I am using the Freehand drawing tool in the Silhouette software on the left side to “fussy cut” or draw around my design in the exact place I want it to cut.
I chose the Draw Smooth Freehand tool on the left side panel in Silhouette Studio.
Watch in this video how it works to draw around the Poinsettia flower on the right side to get the different layers on the flowers.
If viewing in email, please click the image above to view video.
I love that with Point Editing you can adjust the image even after it’s cropped and still bring back or take out areas as needed.
Here is another video showing Point Editing up close on the designs and how you can adjust the image even after it’s cropped to fine tune it.
If viewing in email, please click the image above to view video.
Once you have the design cropped how you like, duplicate the design, set it up as Print and Cut page, and print out all the designs to “fussy cut” around the design.
Perfect “fussy cut” around the design!
You will notice that I have my page set up as a 12″ x 12″ print and cut. This is all dependent on how large your printer can print. I still use all the same defaults and tips for Print and Cut, no matter the size I create. Check out the Print and Cut Basics post HERE and the Print and Cut Large Format post HERE.
Once all the designs are cut out, I used a clear & gold CTMH shimmer brush to give the flowers a bit of sparkle.
Then I used foam tape to stack the flower pieces on top of each other for dimension.
While you may not make the exact same tags, you can choose your own design and complete the same steps above. This is great practice for using the tools in the Silhouette Studio software.
Is that a lot? When you list it, yes! But, you use so many tools in the software without even knowing you are actually “using tools”. The more familiar you become with the software, the more comfortable you will be with your Silhouette and tackling future projects.
I would love to see what you are creating with your Silhouette machines! Feel free to post on my Facebook group at Silhouette Secrets with EllyMae. If you have questions feel free to post below or on the Facebook group too!
Save this for future reference by pinning the image below.
Enjoy!
THANK YOU for your support! How can you help? Click HERE & buy a coffee. Every little bit helps with the cost of running the site.
Or if you are looking for more in-depth, step-by-step classes, check out all of my online Silhouette classes on my Teachable site HERE.
**This post may contain affiliate links. What that means is that I may receive compensation if you purchase through the links I have provided. The price you pay for the product or service is not higher but I may get compensated for sharing.
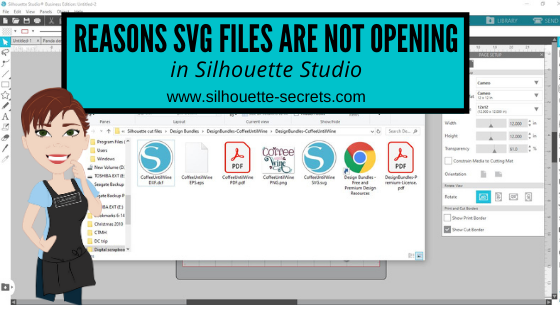
There are several reasons that a svg file may not open directly into Silhouette Studio.
Affiliate links may be present in the following blog post and as an Amazon Associate, I earn from qualifying purchases.
1 – To open svg files, the Designer Edition upgrade or higher is required to “unlock” this feature.
Getting the upgrade is the easiest way to open svg files direct and retain their svg properties. The svg file is usually the higher quality cut file compared to a dxf, a trace, or outside conversion programs.
After you purchase the upgrade and receive the code, enter it under Help > Upgrade in the software and it will be active. As you can see in this photo, my Upgrade option is grayed out because I have the highest level of Business Edition. This will show at the top of the software or under Help > About Silhouette (PC) or About Silhouette (MAC).
2 – The folder you are accessing the svg file from is not unzipped or extracted.
When you download files, they usually come as a “compressed” file. This is so that it can download faster. If files are not “compressed” or “zipped” it would take FOREVER to download as they can be large file types.
Extracting a downloaded folder
The first step to opening a .svg is to download the file from the source. Most files will come in a zipped (compressed) folder and this will need to be unzipped/extracted first. This will depend on your computer system but for me on a Windows PC, I right click on the folder and choose Extract All. Or select the file by clicking on it once and choose the Extract button at the top of the folder. MAC users if you double click on the folder, it should unzip the folder.
You can tell this is a compressed folder because it says at the top of the window and has a zipper on the file icon.
You will not be able to access the full design files unless the folder is unzipped/extracted.
Once you click the Extract All button, it will give you the options to choose where to save the Extracted file to. Select where and then click Extract.
Now, the folder can be fully accessed.
3 – The default program on a computer, especially Windows computers is set to open in a web browser. You will see it as a web browser icon next to the file name. This will be whatever web browser your computer is set to. For instance, on a PC I use Google Chrome but Microsoft Edge or Internet Explorer are other ones you may see.
Windows updates have a tendency to revert this back when they process. You will need to change this back on the computer, for it to show accurately.
If you open the svg file first in a web browser and then copy it to the software, you lose the svg properties. Changing it to open correctly is what I would recommend.
The computer will use the default program to open any file type when you double click it. What does this mean? You will most likely have to change the default program that the computer uses to open .svg files with a double click.
Here is how to change the default on your computer.
Changing the default program for .svg files on Windows
Right click on the .svg file name and choose Properties.
Under the General Properties tab, next to the “Opens with” section, click on Change.
Now, find the Silhouette program and choose it as the default. Scroll down to the bottom and choose More Apps if you do not see it in the list.
You may need to keep clicking to look further on the computer programs.
Once you find the Silhouette Program keep on clicking into the folder, then choose Silhouette Studio for the default to open .svg files.
NOTE: where the Silhouette Studio program can be found is dependent the software version you are using.
Versions of Silhouette Studio that are older than v4.3 will be found under the C: Program Data (x86)
Versions of Silhouette Studio higher than v4.3 the software is found under C: Program Data
Once you have set the default to use the Silhouette software to open a .svg file, then you will see the icon next to the file name change to the Silhouette icon.
And when you double click on that file, it will then open up in the Silhouette software.
NOTE: Save these instructions as you may need to do this again after a Windows update!
4 – If you have purchased a software upgrade, is it still active?
There are rare times where a software upgrade deactivates on a computer, for instance a Windows update may wipe it out.
The software upgrade would need to be activated again by entering the upgrade code under Help > Upgrade again.
New computer owners will also need to activate the software upgrades on the system when they install the software to the new computer. It is NOT automatic!
Click on the person icon in the top right corner for the Account Settings.
Then scroll down and click on the Silhouette Studio Keys and click on it. This will show all the upgrade codes you currently have registered to your account. NOTE: you will need to enter the codes in the same order that you purchased in. For instance, if you bought Designer Edition first and then Business Edition later, you need to enter the codes in the same order.
If you get an error code that it is already active, you may need to contact Silhouette support to have the codes reset. The codes can be active on up to 3 computers, but if you hit the 3 install limit and it is not active on more than 3 computers, they can reset the code for you.
Opening a .svg file in Silhouette Studio
Now that the downloaded file is fully accessible, it can be opened in Silhouette Studio. Again keep in mind, that you must have the Designer Edition upgrade or higher in order to open a .svg file in the Silhouette software.
As with a lot of the tools and features, there are several ways you can open files in the Silhouette software.
1. Use File and then Open in the Silhouette software.
Then choose where the file is located and click OK. Or double click on the file and it should open in the Silhouette software.
2. Drag and drop the file from the Computer folder.
With the Silhouette software open on the Design tab, open the My Computer/Windows Explorer folder where the file is saved.
Now grab the .svg file by left clicking the mouse and holding the mouse button down, then drag the file on to the design mat of the Silhouette software.
The design will show up on the Silhouette work space where you drag it to.
3. Double click the .svg file to open directly in the Silhouette software. If you have already set the default program on your computer to open svg files with the Silhouette software, then you should be able to double click the file and it will open in Silhouette Studio.
Hope this helps get you going with svg files!
If you have further questions, or something does not look quite right, please post on my Silhouette Secrets+ Facebook group and we can start troubleshooting why it is not working for you to extract/unzip the folder.
Save this for future reference by pinning the image below.
Enjoy!
THANK YOU for your support! How can you help? Click HERE & buy a coffee. Every little bit helps with the cost of running the site.
Or if you are looking for more in-depth, step-by-step classes, check out all of my online Silhouette classes on my Teachable site HERE.
**This post may contain affiliate links. What that means is that I may receive compensation if you purchase through the links I have provided. The price you pay for the product or service is not higher but I may get compensated for sharing.
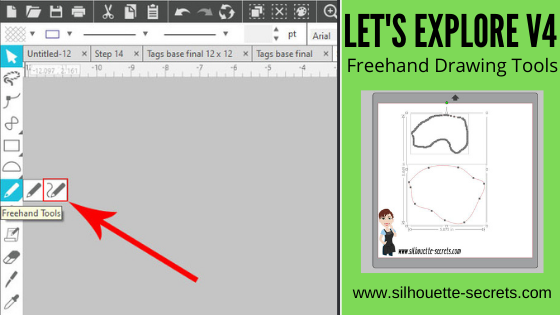
Who can freehand draw? Well, typically not me, but it can come in handy for certain projects. My freehand drawing is something to laugh at these days. I will say that it is something that takes practice. I use a trackball mouse, so it can be a bit easier than a regular mouse, but you will still be able to use this tool no matter what tool you use. If you have a touchscreen, you may be able to use a stylus or your finger to draw.
On the left hand side of the Silhouette Studio software you will find the Tools. Under the Freehand tool here are 2 options: Draw Freehand and Draw Smooth Freehand
Check out the video below to see the difference between the two tools
If viewing in email please click on the image above to view the video.
Notice that the Smooth Freehand Drawing tool will “smooth” out the design between the red dots that appear. This gives you less edit points on the line you are drawing but will affect the final shape. Each tool can have it’s useful purposes.
Here is a closer look at how the Smooth Freehand Drawing tool works in action around a design
If viewing in email please click on the image above to view the video.
And after the drawing is done, you can then make additional changes by adjusting the Edit Points as shown in the video above.
I love that there are so many options in the Silhouette software! It can definitely be a handy tool to have.
So many options in the Silhouette software and there is just no way to remember them all! Check out the full Let’s Explore v4 series on the blog HERE!
What are you creating with your Silhouette machine?
I would love to see and hear about it on my Facebook group at Silhouette Secrets with EllyMae. If you have questions feel free to post below or on the Facebook group too!
Save this for future reference by pinning the image below.
Enjoy!
THANK YOU for your support! How can you help? Click HERE & buy a coffee. Every little bit helps with the cost of running the site.
Or if you are looking for more in-depth, step-by-step classes, check out all of my online Silhouette classes on my Teachable site HERE.
**This post may contain affiliate links. What that means is that I may receive compensation if you purchase through the links I have provided. The price you pay for the product or service is not higher but I may get compensated for sharing.
Today we are going to talk about etching with the Silhouette machines.
I am seeing a lot of questions regarding which Silhouette machines can etch and we are going to get into some of the nitty gritty details about it.
Updated 1/1/9/2024 New machine models with etching abilities The Silhouette Curio 2 – more information HERE. The Silhouette Cameo 5 can etch on Silhouette metal etching sheets. It is limited in etching capabilities due to the clearance on the machine. More details on Etching with a Cameo 5 HERE.
Which Silhouette machine is designed for etching?
The Silhouette Curio is designed for etching. It is the only machine that is designed by Silhouette for etching.
We will go into more details farther down on why.
Can I etch with my Silhouette Cameo or Portrait?
First, the Cameo or Portrait machines were not designed for etching. This means that if you do decide to etch with the machine it can void the warranty on the machine and my biggest concern for you is it may decrease the lifespan on the machine.
How will it decrease the lifespan of my machine if I etch?
Etching is much more taxing on the housing than if you were just cutting. Why? When you are etching, you are scratching away the surface of a harder material such as metal or acrylic. This is more taxing on the machine as it moves back and forth.
As an example, let’s take a look at this heart design. On the left side you can see the cut lines of a regular cut file. On the right side is the same file that I have etched on my Curio.
Now, I’ll zoom in on the etch file and you will see that this file has hundreds or thousands more lines in it that need to “etch” to fill the design in. Again, keep in mind that etching takes more force to scrap away the surface of the harder material vs just cutting through a material such as vinyl or cardstock. It is a completely different action.
While some users will say they tried it and it worked, the Cameo or Portrait machines were not designed for this purpose. Which means that the machines were not tested for etching and the additional wear and tear it may have on your machine.
Yes, while it may work ok. What are the long term effects of that etching on your machine? Let’s take a look at the Cameo 4 as an example.
Tools To etch with it, users are squishing a 3rd-party tool into the adapter (if needed) and then squishing the tool into the housing. Over time, if you stretch that housing or put additional force on the tool holder, it could break or stretch. Third-party tools are often heavier than a normal Silhouette blade and could affect the tool housing with long term use. Silhouette does not have an etching tool designed for the Cameo or Portrait because it is not something the machine was designed or tested for. Click HERE for official information on 3rd-party tools in the Silhouette machine.
The clearance of the machine. This will all depend on the machine you are using and how much clearance it has. Most often I see tool marks in the materials that are etched on a Cameo 4 or a Portrait because it just does not have the proper clearance needed to not only fit the blank under the roller bar and under the tool tip once it’s installed. A Cameo 4 has a clearance of 3 mm.
Bottom line – the lifespan of your machine. How is the etching going to affect the lifespan of your machine? On the Cameo 4, Tool 1 housing is the only housing for using a regular cutting blade in it and Tool 2 housing is for specialty blades. This is due to the 2 different motor types in the machine. They are designed for different purposes. If your Tool 1 housing gets broken or is not functioning properly, you are toast! You now have a Cameo 4 machine that can only utilize Tool 2 tools. This is my biggest concern for users who are seeing that etching can be done with a Cameo or Portrait! I don’t want you to decrease the lifespan on your machine or encounter future issues because you have chosen to etch with it.
If something happens to your machine, who is responsible for replacing it? You! Not the person who encouraged you to etch with it. Not Silhouette because the machine was not designed for etching in the first place.
I know this is not what you want to hear, but my biggest concern is for YOU, your machine, and your success! If you etch with your Cameo or Portrait it is a DO AT YOUR OWN RISK. What I don’t want is someone doing it without knowing the risks and then being totally devastated when their machine no longer works properly.
For more details on the warranty on a Silhouette machine, click HERE.
The Silhouette Curio
Now, let’s talk about the Silhouette Curio and why it is the machine designed for etching.
Update: The Silhouette Curio 1 is no longer manufactured, however, it is still a great machine and you may still find it available used. The Silhouette Curio 2 was released in September 2023.
Stable base The Curio has a solid, stable base that must be used when cutting or etching. There are 2 sizes. A small base which has a cutting mat space of 6″ x 8.5″ and a large base which has a cutting mat space of 8.5″ x 12″. The Curio cannot be used without a base and you cannot “trick” the Curio to use a large cutting mat on a small base or vice versa.
Adjustable platforms to accommodate thicker materials The Curio base comes with several adjustable platforms which allow for up to 5 mm clearance. The platforms are stacked on the base and the embossed number plus the material thickness should add up to a 6, which is equal to 6 mm.
This platform system is what enables you to be able to place a 3 mm acrylic blank or a piece of tooling leather in the Curio and still have the clearance to work with the material.
Silhouette etching tool
The Silhouette etching tool is the only one designed by Silhouette for the Curio machine. I have used other 3rd party tools to test and I find that I get the best, most consistent etch with the Silhouette etching tool.
Yes, you do have to replace it as it wears down. Keep in mind you are scratching away at a hard surface when you are etching. It is just like replacing a blade. For me, the results are better with the Silhouette etching tool than any other, so it is well worth the cost of a replacement versus blanks with areas missing an etch.
Emboss Panel unlocked When a Curio is plugged in and recognized by the software, the Emboss Panel is unlocked. I feel this is the best method for the etch fills.
Each user will vary in what they prefer, but I like a tight cross-hatched etch fill to give me the best filled in look. Each design will vary in what is going to look the best and often you do not know how it will look until you’ve tested it.
Etch Action In the Silhouette software, there are different “actions” for the different functions. For instance, cut vs sketch vs etch vs Kraft cut vs Rotary cut, etc.
Each of these actions tells the software/machine to send the data in a different way. When you choose the etch action you are telling the software exactly what you are doing with the tool and machine. In my experience, the Emboss Panel with the etch action is much less data intensive on the Silhouette software and takes less time to etch vs using the Sketch Action or the Line Effects Panel.
Exact placement due to tool orientation to the same location One of the best features of the Silhouette Curio is that if you have loaded the base properly, the tool housing aligns to the EXACT same place every single time! This is awesome for placing your blanks on the cutting mat as the Silhouette design screen matches the cutting mat exactly. Yes, on a Silhouette or Portrait the cutting mat on screen and physically match as well, but you also have user input when you load the cutting mat that can throw the alignment off. That is less likely to happen with the Curio as long as the base is properly loaded.
For more information on how to set up and load the base in the Curio check out this post The Curio – Getting Started.
Now, will the machine eventually wear out. Yes! My original Curio is starting to see some wear and tear on it. However, I etch more than the “average” user. Since I teach classes at events, online, and private lessons – I have thousands of more machine hours into my Curio than most users would have. When I am preparing for a class, I will etch or emboss the same design over and over again to test the settings, time the design, and to write/create the class. For instance, for my Leather Embossing class, I have hundreds of hours into this class from researching to recording the class and here are just a few of the samples I created during the entire 6 month process of creating the class.
When I create an acrylic etching class, I may have a stack of acrylics 30 high that I’ve done testing on. It is all a process and I test the settings over and over to get the best etch results that are reproducible by a student who would be taking or viewing the class.
I etch way more than the “average” user and my machine is still etching 2+ years later. I do wish there was a machine hours counter on it, so I could share with you how many real machine hours I have invested in it. Again, I am seeing a bit of wear and tear on it, but I purchased a back up Curio machine because I do use it so much.
The average user should be able to see years of etching with their Silhouette Curio machine if it’s used and cared for properly.
You have heard the saying “The right tool for the job.”, right? Well, in this case, I could not agree more. Again my biggest concern for you is your machine, the machine’s life-span, and your success.
Want to see more projects created with the Silhouette Curio? Check out this YouTube video collection of a “demo table” I created for a Curio event this past year.
Click the video above to open in YouTube if viewing in your email.
None of these can be completed on the Cameo or Portrait due to the clearance.
Now the Curio is a bit different to set up and get started with and the number one thing you will need time. This machine can do fabulous things, but you will need to learn how to set it up properly. I do believe that anyone can do these same types of projects! Check out all of my Silhouette classes on the Curio on my Teachable site HERE.
I would love to see and hear about what you are creating on my Facebook group at Silhouette Secrets with EllyMae. If you have questions feel free to post below or on the Facebook group too!
Save this for future reference by pinning the image below.
Enjoy!
THANK YOU for your support! How can you help? Click HERE & buy a coffee. Every little bit helps with the cost of running the site.
Or if you are looking for more in-depth, step-by-step classes, check out all of my online Silhouette classes on my Teachable site HERE.
**This post may contain affiliate links. What that means is that I may receive compensation if you purchase through the links I have provided. The price you pay for the product or service is not higher but I may get compensated for sharing.
The Silhouette Studio software is so powerful in what it can do and what you can create with it. The biggest limit is YOU! The more time you take to learn about the Silhouette software and how to do things in it, the more you can expand your skills and apply those to your future Silhouette projects. This is why I have the “Let’s Explore v4” series and most of my blog posts focus on tools and techniques in the software. It is the key to it all!
If you learn how one tool functions and all it can do in the software, then you can take that knowledge and apply it to so many future projects.
Affiliate links may be present in the following blog post and as an Amazon Associate, I earn from qualifying purchases. This is a sponsored post.
Today I’m going to share how I created a custom pattern that could be used for gift wrapping and making a matching gift tag.
As you may know from reading the blog, I am a Silhouette Elite Affiliate, and occasionally they will ask if we want to participate in an activity. This month it was a gift wrap & tag challenge.
The only supplies needed to create this pattern are cardstock/paper, designs from the Silhouette Design Store, and a printer.
Once you have the pattern created, you can create all kinds of projects with it.
Print on a light weight paper like copy paper and use it as wrapping paper.
I also used it to create the bow to add to the top of the package to match. This bow is called Layered Gift Bow by Jamie Lane Designs – Design #284007. The bow is originally 2 layers and I printed the pattern on copy paper cut it, then did an offset of the pattern layer and cut out of Close to My Heart gold glitter cardstock.
And then the final layer was the red cardstock. I followed the assembly instructions and put it together. I would recommend if you are doing 2 or 3 layers of cardstock to use a really strong glue.
Print the pattern on cardstock and use it to create gift boxes where no wrapping paper is needed.
I had so much fun creating this idea and putting it into action. It’s amazing how when you get involved with a project hours can go by and you don’t even realize it.
Creating a custom pattern with designs
Now, let’s take a look at how I created this. It is actually very simple.
I started by opening up each design and placing it on the design mat. To open multiple designs on the same design mat, right click on the file in the library and choose Merge.
If you are opening the file from outside the software, use File > Merge to bring a design onto the current design mat. Or drag and drop the design from the Windows Explorer or Finder window.
Once all of the designs are on the same design mat, select them all and scale them to the size you would like. This will ultimately depend on the designs that you are using, but in this case, I wanted all of the flower designs to be proportional to each other and the holly sprigs to be smaller to fit in between.
Rearrange and duplicate the designs on the page as desired. Each user is going to find what they prefer and like in designing. However, the one thing that I have found that is common among all users is that we are often most critical of our own work. If you are feeling like something is not quite right, don’t scrap it. Save the design file and then come back to it at a later moment. You might find that given some time you open up that file and it is just perfect the way it is!
I started by creating a 12″ x 12″ page size and then I also created a separate 11″ x 17″ page size as well. How large you can print is going to be determined by your printer capabilities.
When I am doing a print project, I always use the Print Preview before I send to my printer. This has saved me on so many occasions to catch something that doesn’t look right before it prints.
For instance, one time while creating this design, I sent it to print and a 3″ section at the bottom showed up blank. The design was on the screen, but it didn’t show up in the print preview. It just turned out to be a glitch and a save and software restart solved it, but if it had printed that way, it would have not been good.
And wahlah! You have a custom designed patterned to print and use in projects!
Save this for future reference by pinning the image below.
Enjoy!
THANK YOU for your support! How can you help? Click HERE & buy a coffee. Every little bit helps with the cost of running the site.
Or if you are looking for more in-depth, step-by-step classes, check out all of my online Silhouette classes on my Teachable site HERE.
**This post may contain affiliate links. What that means is that I may receive compensation if you purchase through the links I have provided. The price you pay for the product or service is not higher but I may get compensated for sharing.
Let me just start off with saying – I hate painting. I hate waiting for it to dry! I hate that you have to do it in so many stages! I hate when it doesn’t turn out!
But I gave it another go! I really did try. I’ve been doing a lot of painting and I still don’t like it.
But I’m going to show you. Not every project turns out perfect, however, there can be good things that do come out of it.
If you’ve followed me lately, then you know the Cameo Pro has been released and I’ve been testing it for several weeks prior to the release. With that brought on a whole new list of project possibilities! That part has been exciting. The design process, the cutting process, and some of the application process – but, not the painting part. Some of you will completely understand and others will give me crazy eyes. You may enjoy painting and that is great! That is what makes the Silhouette machines so great, is that it opens up new avenues for everyone. Some work for me and some work for you.
Affiliate links may be present in the following blog post and as an Amazon Associate, I earn from qualifying purchases.
So, I started with the same size wood sign from Hobby Lobby as my Maker sign found HERE.
And then I found a design I liked. I am using the Thankful Grateful Blessed by Jillibean Soup – Design #326141.
I started out the same way with this project as the Maker sign and drew a rectangle using the Drawing tools on the left side, to the size of the area for the sign. Then I used the Transform Panel – Scale Tab on the right side to change the dimensions to my size needed.
As you can see in the photo above, I actually drew 2 rectangles and rotated one, just so I could see how the design would look on the sign in a different orientation.
I settled on the horizontal view.
This design opens up with a dimension of 9” x 10”.
My sign is much larger than that so I did some adjusting by grabbing the corner bounding box to scale it up proportionally. Then I grabbed the middle bounding box on the side and stretched it. Keep in mind that stretching a design by one dimension only may or may not work for a design. Each design you use will be different.
If you want to further adjust the word arrangement in this design, right click on it and choose Ungroup. This will ungroup all the pieces individually and then you can select each word and right click and group it back together, so they move as one object. Just like in the Makers sign post, each design may vary in what steps need to be done to alter a design. It all depends on how the designer created it. Notice how when it is ungrouped, there are individual selection boxes around each piece.
Once the design is how you like, click on the Send tab. Choose the Material setting, adjust the cut settings, and do a test cut! The test cut is one of the most important steps, especially when cutting large decals. Check out some other tips for cutting large decals in this blog post HERE.
When I’m working with a design and have several different options on the design area, once I am ready to cut, I will copy the full design and then paste it onto a new design mat to cut. And don’t forget to save your work! So, I will save a “working file” and then a “cutting file”.
Since I was painting this sign, I used Oramask 813 as my stencil and Oracal Transfer tape.
Here is a video of the Cameo 4 Pro cutting, weeding, and application process. A time table is below the video for each process, so you can jump to a particular part of interest.
If viewing in the blog click on the photo above to open the video
Video Timeline Oramask 813 cutting – Start Weeding Oramask 813 – 2:26 Applying Transfer Tape – 4:45 Applying Stencil – 7:34 Painting sign – 10:34 Final photos – 13:06
Now, I did a lot of time lapses and recording on that video. That 15-minute video process took hours. And after all that work – Epic Fail or Success? FAIL!!!! Remember me saying I don’t like to paint?
Paint bled – sand it down and start over!!!
So on to the next part! To heck with painting. Let’s cut some vinyl and apply it!
The cutting process is the same and since I saved my design, I can just recut it with Oracal 651.
If viewing in email, click on the photo above to open the video
I love the finished project and it was much quicker than painting! More time for other projects!
I hope this has sparked a little creative energy in you as you read and watched!
I have had a lot of fun creating larger sign decals, not so much the paint ones, but each user will find what they truly enjoy creating!
Can you do this same project on a Cameo 4, Cameo 3, 2, or Portrait? Yes, you can! you would just need to break up the design into smaller sections and apply it to the sign in a few applications. But, it can be done!
Save this for future reference by pinning the image below.
Enjoy!
THANK YOU for your support! How can you help? Click HERE & buy a coffee. Every little bit helps with the cost of running the site.
Or if you are looking for more in-depth, step-by-step classes, check out all of my online Silhouette classes on my Teachable site HERE.
**This post may contain affiliate links. What that means is that I may receive compensation if you purchase through the links I have provided. The price you pay for the product or service is not higher but I may get compensated for sharing.
Join me in 2+ hours of video course that covers Silhouette Print & Cut from step-by-step setup, to working with many different file types for print and cut, and my troubleshooting tips. This course is divided out into 3 main videos covering each of these topics in depth. By following these steps & tips, print and cut can expand your Silhouette skills. Let’s take the anxiety out of print and cut and get started.
Course includes: Class Overview Class Supply List
Print and Cut – Part 1 – Step-by-step Setup Video – 1 hour 3 minutes – Step-by-Step setup for print and cut – Establishing a baseline print and cut – Print and cut a single design – Print and cut with a sticker set
Print and Cut – Part 2 – Designs and moreVideo – 1 hour 6 minutes – working with excess backgrounds on designs – print and cut with text – print and cut with Color Fonts – turning a cut file into a print and cut – 3 examples – altering a cut file to create a print and cut – 2 examples – tips on registration marks – print and cut in large format
Print and Cut – Part 3 – Troubleshooting Tips Video – 18 minutes In this section we will discuss 11 tips for troubleshooting print and cut when things don’t work and tips for getting the best success.
Check out this online video course on my Teachable site HERE.
Course includes: Class Overview Class Supplies list
Basics of the Curio video – 38 minutes
Advanced Beginner Curio – Metal etching with blanks & placement on the Curio video – 24 minutes – Setting up the Curio base to etch with the blank – Measuring the blank – Securing the blank – Setting up the Silhouette design mat for the etch design – Design placement for etching on blanks – Tips for working with text & alignment – Emboss fill for etching – Etching on the Curio – Examples of etching on blanks
If you are looking to expand on your Silhouette skills and want to dive in and learn from all of my testing and tricks, check out the rest of the Silhouette courses available:
All of these are designed as step-by-step classes that are taught just like an in-person lesson.
The more you get into Silhouette and start playing with it the more you will pick up. Sometimes it can be overwhelming and testing can take a long time to get it just right. Let’s take that anxiety out of your Silhouette projects and get started!
For more information and to see each class details – CLICK HERE.
Save this for future reference by pinning the image below.
Enjoy!
THANK YOU for your support! How can you help? Click HERE & buy a coffee. Every little bit helps with the cost of running the site.
Or if you are looking for more in-depth, step-by-step classes, check out all of my online Silhouette classes on my Teachable site HERE.
**This post may contain affiliate links. What that means is that I may receive compensation if you purchase through the links I have provided. The price you pay for the product or service is not higher but I may get compensated for sharing.
I was first introduced to this technique by my friend Kat G. last year when she submitted it for a class at the All Things Silhouette Conference. Once I told my husband about it we started looking into it a little bit more and found there are many gunpowder wood-burning artists out there. It is so fascinating to watch. While I am no artist that can hand draw things, especially with gunpowder, I can use my Silhouette to create a stencil to wood-burn with.
I was cruising on Pinterest one night and showed my husband a design and he suggested we do the wood-burning with gunpowder again. I added this to my growing list of Cameo Pro projects. Since the Pro can cut up to 24″ wide, the 17″ wood round was no problem for this design.
Affiliate links may be present in the following blog post and as an Amazon Associate, I earn from qualifying purchases.
The first thing I did was take a photo of the wood blank I would be using, or one similar and then open that photo in the Silhouette software. This allows me to use the photo of the blank to design on and create a “mock-up” of the design so I know what it might look like.
Keep in mind that photo file can come in quite large, depending on the size of the image. I then used the Scale option in the top Quick Access Toolbar (QAT) to scale the image down to a size I could see next to my design mat.
Next, I drew a circle to 17″ using the Draw Ellipse tool on the left side. Hold the Shift key down when drawing and it will create a perfect circle. The Transform Panel – Scale Tab can also be used after it is drawn in order to get the exact dimensions as well.
I have increased the line thickness so you can see the red cut line of the 17″ circle drawn.
I then scaled the wood round image to fill the 17″ circle by using the corner bounding boxes.
Select both the photo image and the circle drawn and then using the Modify > Crop tool, I could eliminate the excess around the wood round image.
Now, I have the image to use when creating my design.
I add things to my design page and move things around, test out different fonts, and usually create quite the creative “mess” on my working file. Keep in mind the more data you add to the file, the larger it is, so make sure that you save your file often.
Do your files look like that? I love the ability to be able to create and move things and test what I think is going to work. This file took me several weeks of back and forth with font styles and designs to get it how I liked it.
And then I sent the full design through the Cameo Pro to cut. It is awesome to be able to cut this stencil decal all in one solid piece. While you could still accomplish this with a smaller Silhouette machine, it would have to be done in pieces and then hand placed.
With large decals I find that that hinge method works great for applying the decal as you can keep it held in place with painter’s tape so it will not move while you secure it down. Here is a quick video to show the hinge method
If viewing on email, click on the photo and YouTube should open.
Next, I taped off the edges. I found that making the decal slightly smaller than the wood round helped me to align the design so it was easier to center. Then taping off the edges of the wood round ensured that it didn’t get burned in places outside of the decal.
And then comes the fun part! Applying the gun powder & burning!
Now, first let’s talk a little bit about safety. I know that doesn’t sound very fun, but it is necessary. Safety precautions: fire extinguisher, safety goggles, no wind, long lighter, safe area outside away from buildings, vehicles, and children While the gun powder does not burn for too long, it is an explosive. You should have seen the UPS guy drop the package at our house and run – lol!
Now that that’s out of the way…..
Spread the gun powder out on the design and do small sections at a time. The extra time it takes to do it in small areas will be well worth it. We also burned each area twice to get a good solid fill with the burning.
We found out with our first large round that trying to do it all at once just lead to the vinyl melting into the wood and made it difficult to remove. Here is a photo of our first attempt, which I will later sand down and use for something else.
With a little more time and controlling the burning a little bit more, we ended up with a successful 17″ round burned with the design. Check it out here:
If viewing on email, click on the photo and YouTube will open.
After all the burning is done, remove the adhesive vinyl. I did not let it sit too long because I did not want the adhesive to set up.
Finish off the wood round as desired. I used an oak stain on top and then a coat of wipe on polyurethane.
And I love how it turned out! Perfect for my dining room wine décor!
I love all the possibilities that are available when using the Silhouette machine! The possibilities are endless! What do you think? Something you would try or does it get the creative juices flowing? Comment below or on my Facebook group.
Save this for future reference by pinning the image below.
Enjoy!
THANK YOU for your support! How can you help? Click HERE & buy a coffee. Every little bit helps with the cost of running the site.
Or if you are looking for more in-depth, step-by-step classes, check out all of my online Silhouette classes on my Teachable site HERE.
**This post may contain affiliate links. What that means is that I may receive compensation if you purchase through the links I have provided. The price you pay for the product or service is not higher but I may get compensated for sharing.
THANK YOU for your support! How can you help? Click the link to buy a coffee. Every little bit helps in the cost of running the site.