
In the Let’s Explore v4 series, we have covered the Send Tab – Simple option in this post HERE.
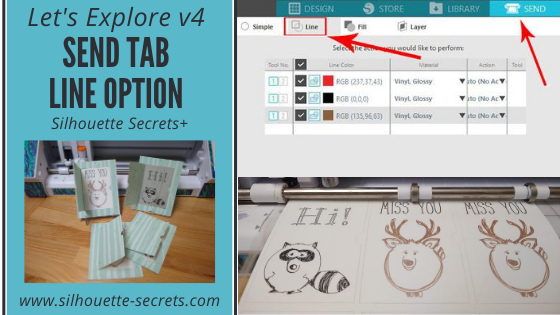
Today, let’s take a look at the Send Tab – Line option.
Most often you will hear it referred to as Cut by Line or Sketch by Line, but in the software it is simply called Line under the Send Tab.
Tutorial completed in version 4.3.372 of Silhouette Studio.

Affiliate links may be present in the following blog post and as an Amazon Associate I earn from qualifying purchases.
First, you will want to set up the design you want to cut or sketch by Line Color.
Use the Line Style Panel – 2nd tab to change the line color of the designs on the mat or the QAT – Line Color Option.

Select each object and change the colors of the Line. This way we can set up the design so that each color can have a different material type, action, and tool. For instance, to cut and sketch a design of a project.
In this case, I want the sentiment and the animals to sketch and then the card pieces to cut. So I have turned my sketch lines to black & brown and my cut lines are red.
Once the design is set up, click on the Send tab in the top right corner and the Line option.

You will notice that this looks a little bit different than the Send Tab – Simple Option.
In this tab, you have each color separated out in it’s own line and you can adjust the settings accordingly. For instance, I want the black and brown lines to sketch and the red lines to cut. I can change the Action and Tool for each of these settings.
Let’s take a look at what this all means.

Tool No.
Choose whether you will be using Tool 1 or Tool 2
For Cameo 4 users, there are 3 tools that will work in Tool 2 – find more information on the Cameo 4 Tools HERE.
Line Color
The same colors of lines that were set up on the Design Tab, should all show in the list under Line Color.
The checkbox next to the color is how you turn the cut line on or off.
If the box is checked, the cut line for that color is ON.
Bold color lines will be around the design that the cut lines are turned ON for.

If the box is unchecked, the cut line for that color is OFF.
Notice the red line is not bold since it is turned OFF.
Material
Choose the Material type you are using for each color.
Each line color will need to be changed separately.
Action
Choose what action you will want to perform.
In this case, I want the red lines to Cut and the black & brown lines to Sketch.
Tool
Choose what tool you will be using to perform the action.
In this example, red lines will be cut with an Autoblade and black & brown lines will be sketched with a pen.
If you were to keep all of the colors checked and have the cut lines ON, the order in which they appear in the list is the order in which the action will be done. For instance in my photo that would mean, the red would cut, then the black would sketch, then the brown would sketch.
You can rearrange the order by clicking and grabbing a color and move it up or down in the list.
Moving down the right side of the Send tab – Line Option, you will see that the cut settings are expanded further down to show what the settings are for each option you have chosen.

The color that is highlighted (selected) at the top of the panel will be the settings that you see at the bottom. In my photo, the black color is highlighted, so it shows the settings for the Black lines in the bottom.
Here is where you can adjust the settings as needed.
For the Cameo 4 with the Silhouette sketch pens, I decreased the force to 7 and the speed to a 5. This seems to work well with the sketch pens and causes less drag marks than the preset settings.
(Note: in v4.4, the sketch pen settings have been adjusted so you may not need to change them)
You can also add a Pause in between the difference color actions if you would like to do that versus unchecking the box to turn the cut lines off. Each user is going to vary in what they prefer to do. I prefer to check and uncheck the boxes as needed, just in case I have to step away from my machine.
But you can test out which way works best for you.
Now, the rest of this panel is the same as when using the Simple tab.
Check out the post on the Send Tab – Simple Option HERE for all those details.

Using the Send Tab – Line Option, you can turn the lines on and off and perform several actions on the same project such as cutting and sketching.
Do not unload the cutting mat between the colors, just swap out the tools you are using if you are switching between sketch pen colors or the blade.

Tips when using Sketch Pens
– Scribble with the pen prior to using and get the ink flowing.
– On the Cameo 4, the black bodied sketch pens are designed for the blue adapter. There is a lip on the sketch pen that holds it securely in the adapter. Some users may find the white Silhouette pens work in the blue adapter, while others feel it is too lose and do not get a good sketch with it.
– On the Cameo 4, decrease the Force to 7 and Speed to 5. This will help with any drag marks.
– I sketch first and then cut so the cardstock doesn’t move between actions.
– Cap the sketch pen immediately after use.
– DO NOT unload the cutting mat between colors.
Wait until all the sketching and cuts are complete, so it will line up completely.
Sketching with the Silhouette can be a unique way to create something new!

The designs I used in this example are:
Rectangular Card Base w/ Flap by Loni Stevens – Design #8690
Bear and Raccoon Sketch by Cali Arroyo – Design #43495
Deer and Moose Sketch by Cali Arroyo – Design #43498
Slap Happy Font by Sarah Ehlinger – Design #74397
Paprika Font by Silhouette – Design #40924
There are so many options available in the Silhouette software, sometimes it’s just fun to play! Set aside some “free” time to just explore the software and see what you can create!
I would love to see what you make!
Feel free to post photos or questions on my Facebook group at
Silhouette Secrets with EllyMae.
Save this for future reference by pinning the image below.

Enjoy!

**This post may contain affiliate links. What that means is that I may receive compensation if you purchase through the links I have provided. The price you pay for the product or service is not higher but I may get compensated for sharing.
Discover more from Silhouette Secrets-Swift Creek Customs
Subscribe to get the latest posts sent to your email.


[…] can also add in a cut line, change the color of the cut line, and then use the Cut/Sketch by Line Color to cut out around the sketch designs as desired. Since I am using a Cameo 4, I do need to swap out […]
[…] Install the sketch pen in the Silhouette machine. I used a Silhouette gold sketch pen.Click on the Send tab – choose by Line Color under the top right […]
[…] can also either change the Line Color or the Fill Color of the B and then use the Cut by Line or Cut by Fill color options to turn the cut lines on or […]
[…] can also either change the Line Color or the Fill Color of the B and then use the Cut by Line or Cut by Fill color options to turn the cut lines on or […]
[…] Style Panel.Then I could set the action of sketch and cut for each color on the Send Tab under the Line Option.Check out more information on this feature here – Let’s Explore v4 – Send Tab […]
[…] Let’s Explore v4 – Send Tab – Line Option […]
[…] blue using the QAT Line Color option in the top left corner. This is going to allow us to use the Send by Line Color option and set up the design for foiling first and the cut […]
[…] HTV. The Autoblade did all the work to change the settings once set up. Check out this tutorial HERE for tips on cutting by line or fill color – they are the […]
[…] are 4 different options for working in the Send Tab. – Simple– Line– Fill– Layer (Designer Edition […]
[…] I will set the sketch lines to blue and then the red is a cut line. Then I’ll use the Cut by Line option on the Send tab to tell the machine what I want it to do first. I like to sketch then cut, […]
[…] Cut by Line […]