Posted on Leave a comment

Sketch by Color with the Silhouette Cameo 5

Affiliate links may be present in the following blog post and as an Amazon Associate I earn from qualifying purchases.

Have you sketched with your Silhouette machine?
Sketching with the Silhouette machines is so much fun! I love it!

Today I have a quick video tutorial on how I set up 2 designs to sketch with the Artesprix sublimation markers and how I let my Silhouette Cameo 5 do the work for me.

Check out the latest video on the Silhouette Secrets+ YouTube channel HERE.

Supplies Used in This Project

Silhouette Cameo 5
– Silhouette Type B Pen Holder – Bundle HERE or separate HERE
Mom of Monsters by Sweet Afton – Design #225585
Little Monster by Sophie Gallo – Design #278113
Artesprix Sublimation Markers
Artesprix Sublimation Shirt
Artesprix Protective Mat
Artesprix Protective Paper
Artesprix Heat Tape
Siser 9″ x 12″ Heat Press
– Other supplies: copy paper, pencil, scissors

Want more tips on sketching with your Silhouette machines?
Click HERE

Check out the Artesprix video tutorial on the Artesprix YouTube channel here too!

Save this for future reference by pinning the image below.

Grab some Artesprix sublimation products and get to creating today!

Enjoy !

THANK YOU for your support! How can you help? Click HERE & buy a coffee.
Every little bit helps with the cost of running the site.

Silhouette Classes

Never stop learning! Let me help you take the anxiety out of learning with Silhouette and get to creating faster! My Silhouette classes are heavily focused on software, so you can take the skills & techniques taught and apply them to many future projects!

Silhouette step-by-step Classes by Silhouette Secrets+

SS Logo snip it
**This post may contain affiliate links. What that means is that I may receive compensation if you purchase through the links I have provided. The price you pay for the product or service is not higher but I may get compensated for sharing.
Posted on Leave a comment

Quick Halloween Shirts with Artesprix Sublimation Markers

Affiliate links may be present in the following blog post and as an Amazon Associate I earn from qualifying purchases.

This month I had a little bit of fun creating Mommy and Me shirts with the Artesprix Sublimation Markers and using my Silhouette Cameo 5 to sketch out the designs!

And I grabbed one of my little monsters to do a little photo shoot with. This little monster also helped me in the brainstorming behind the project this month as well.

Such a good little monster.

She even tried to bring in the model from last months Artesprix video but he wasn’t feeling like a photo shoot today.

I’ve had so much fun creating and thinking of new ideas to make with the Artesprix sublimation products!

Check out the new video HERE on the Artesprix YouTube channel.

Artesprix Sublimation Supplies

Here is a list of the supplies I mentioned and demonstrated in the new YouTube video:
Artesprix Sublimation Markers
Artesprix Sublimation Shirt
Artesprix Protective Mat
Artesprix Protective Paper
Artesprix Heat Tape
– Heat Source that reaches 400 degrees
I used a Siser 9″ x 12″ Heat Press
– Silhouette machine or other cutting machine that can sketch – Cameo 5
– Silhouette Type B Pen Holder – Bundle HERE or separate HERE
– Other supplies: copy paper, pencil, scissors

Check out the new YouTube video HERE.

I’ll be sharing more so make sure to follow Artesprix on social media to see more projects!
Artesprix YouTube channel
Artesprix Blog
Artesprix Facebook Page
Artesprix Iron-on-Ink Inspirational Group

Save this for future reference by pinning the image below.

Grab some Artesprix sublimation products and get to creating today!

Enjoy !

THANK YOU for your support! How can you help? Click HERE & buy a coffee.
Every little bit helps with the cost of running the site.

Silhouette Classes

Never stop learning! Let me help you take the anxiety out of learning with Silhouette and get to creating faster! My Silhouette classes are heavily focused on software, so you can take the skills & techniques taught and apply them to many future projects!

Silhouette step-by-step Classes by Silhouette Secrets+

SS Logo snip it
**This post may contain affiliate links. What that means is that I may receive compensation if you purchase through the links I have provided. The price you pay for the product or service is not higher but I may get compensated for sharing.
Posted on 6 Comments

New Silhouette class released – Sketching

Silhouette Sketch pens & Sketch Pen Design Class

Just released!
New online video class with tips, tricks, and troubleshooting for sketching with your Silhouette.

I had no idea how popular this class would be when I submitted it for the May All Things Silhouette Conference. I had a limited window of opportunity right after conference to get this recorded and edited, but I’m happy to announce that after 18 hours of video production – IT’S HERE!!!

Click HERE to go to the class on my Teachable.

This is a total video time of around 2 hours, however, the class will take approximately 3 hours to complete with all the sketching and design time.

In this class you will learn all about sketch pens & creating sketch designs. We discuss different pen styles, adapters, sketch designs, fonts, filling designs, and trouble-shooting too.
We will be doing some testing, demos, and finished projects.
At the end of the class, you will have a better understanding of what works and doesn’t work for sketching with your Silhouette machine.
This class can be completed with a Portrait, Cameo, or Curio machine.

Check out the class HERE

Affiliate links may be present in the following blog post and as an Amazon Associate I earn from qualifying purchases.

There are some differences between the different Silhouette model machines on the supplies you might need for this class, so I am including the class supply information below.

Sketching Supplies:

Cameo 4, Cameo Plus, Cameo Pro, and Portrait 3 owners

Either:

a Silhouette blue sketch pen adapter (Silhouette America, The Vinyl Spectrum)
with Silhouette black bodied pens (Silhouette America)

Or

a Silhouette Type B pen holder (Silhouette America, The Vinyl Spectrum) and pens that fit
Pens I’ve tested: Sharpie Pen S-Gel, Sharpie Pen Style, Pilot G2 Gel Fine 0.7 mm, Gelly Roll Classic 06 Black, Gelly Roll white, Gelly Roll Moonlight 10 Ice Cream Smooth

Cameo 3, Cameo 2, Cameo 1, Curio, Portrait 1 or 2 owners

Either:

Silhouette black bodied pens or white bodied pens (Silhouette America)

Or

A Silhouette Type A pen holder (Silhouette America, The Vinyl Spectrum) and pens that fit
*pens listed above with links

Other supplies:

Designer Edition upgrade (or higher) in the software to unlock Line Effects
retailers: The Vinyl Spectrum, Swing Design
Design #65898 Mushroom Sketch by Tanya Batrak
Design #271670 Hello Friend Brush Script by Gina Marshall (optional)
Design #79759 Cancun Sketch font by Dresden Carrie (optional)
– 5+ sheets of white cardstock
– Silhouette cutting mat
– Silhouette blade
– 5” x 7” black frame (optional)

Full Sketching class HERE on my Teachable site.

We would love to see what you are working on!
Feel free post on the
Silhouette Secrets+ Facebook Group.

Save this for future reference by pinning the image below.

Enjoy!

This image has an empty alt attribute; its file name is logo.jpg

THANK YOU for your support! How can you help? Click HERE & buy a coffee.
Every little bit helps with the cost of running the site.

Or if you are looking for more in-depth, step-by-step classes, check out all of my online Silhouette classes on my Teachable site HERE.

SS Logo snip it
**This post may contain affiliate links. What that means is that I may receive compensation if you purchase through the links I have provided. The price you pay for the product or service is not higher but I may get compensated for sharing.
Posted on 4 Comments

Sketching with Silhouette

Have you seen the classes that Silhouette and Michael’s have been hosting online?

I’ve been attending the Silhouette and Michael’s online classes when I see one that is of interest. In the most recent one that I attended, Kelly Wayment with Finding Time to Create showed how to create some simple cards by using sketch pens in the Silhouette software.

In these classes, I prefer to watch when they do the class live and then complete the project later at my own pace. I decided to make a couple sets to have on hand for different occasions.

Affiliate links may be present in the following blog post and as an Amazon Associate, I earn from qualifying purchases.

Check out this class on the Michael’s YouTube channel HERE.
Grab a cup of your favorite drink and sit back and watch Kelly create.
Then gather your supplies and make up a few cards to have on hand.

Check out all of the upcoming classes on the Michael’s website HERE.

It is always fun to learn something new and to expand on your skills and Silhouette techniques.

I would love to see what you create with your Silhouette!
Feel free to post on my Facebook group
Silhouette Secrets with EllyMae.
If you have questions feel free to post below or on the Facebook group too!

Save this for future reference by pinning the image below.

Enjoy!

This image has an empty alt attribute; its file name is logo.jpg

THANK YOU for your support! How can you help? Click HERE & buy a coffee.
Every little bit helps with the cost of running the site.

Or if you are looking for more in-depth, step-by-step classes, check out all of my online Silhouette classes on my Teachable site HERE.

SS Logo snip it
**This post may contain affiliate links. What that means is that I may receive compensation if you purchase through the links I have provided. The price you pay for the product or service is not higher but I may get compensated for sharing.
Posted on 15 Comments

Let’s Explore v4 – Line Effects

If you have been around the Silhouette software for awhile, you may or may not have noticed that there was a change in the software. This change seemed to happen overnight and it’s not one that would severely impact a user, but you may see the differences in tutorials.
With the release of v4.2.479, the Sketch Panel changed to the Line Effects Panel.
With this new change came a few more options.

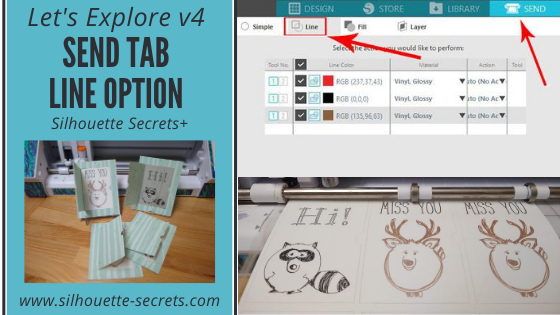
Let’s take a look at the Line Effects Panel and what it looks like in versions v4.2.479 and higher.

Tutorial is written in Silhouette Studio v4.3.372

If a user only has the Basic (free) Silhouette software, then they will have less options in their Line Effects Panel. This is also a change from before. In versions prior to v4.2.479, you didn’t have the option to select anything under the Sketch Panel in the basic version.

If a user has the Designer Edition, Designer Edition Plus, or Business Edition upgrades they will see several more options in the Line Effects Panel.

Line Effects Settings

Let’s take a look at the sections on the Line Effects Panel.

1 – Fill Effects
Add a sketch fill to any design.
The options include: grid, stripe, concentric, spiral, zig-zag, curly, cross-hatched, scribble, and charcoal.

Each of these fills will act differently depending on the design being applied to. Change the Spacing and Angle to see what will look best for the design.

2 – Edge Effects
Add a sketch line to the outside edge of a design.
The options include: plain, scribble, double effect, curly, rough, and charcoal.

3 – Release Effects
Releasing the sketch when it’s finished takes it out of editable sketch mode and then makes it a vector design.

This opens up a whole new world of possibilities in editing your sketch design. Once the sketch is released, then you can access individual point editing on the sketched design and can manipulate it how you like.

Each of the gray points is an edit point that can be manipulated in this design.
Now, not only do you have the gray edit points, but the sketch fill lines have been released so you can move those as well. Keep in mind that a red dot means that it is an open point and not a closed object, so you will not be able to fill this with color. You can move the red dots towards each other and connect the dots to change the sketch fill.
For more information on Edit Points check out this post HERE.

Each of the red lines you see on the screen is a sketch line.
When a design is filled with line style fills, each line is more data. Be patient with your computer in processing all of this data.

On the 2nd tab of the Line Effects Panel, there are even more options that you can adjust the sketch fills with.

Each has multiple options and varies according to what fill and edge effects you have chosen to start with.

Each design you choose is going to vary in what sketch fill looks good, what spacing might work, what angle might work, etc.

The best way to see what is going to work is to just start playing around with your design.

Affiliate links may be present in the following blog post and as an Amazon Associate I earn from qualifying purchases.

I am going to use 3 Fall Leaves by Lori Whitlock – Design #33053 as an example.

Here is the Scribble fill with the spacing adjusted up and the Scribble edge effects.

Here is the cross-hatched fill with the double edge effect.

Here is the curly fill effect with the rough edge effect.

And here is the zig-zap fill effect with the charcoal edge effect.

As you can see, each line effects fill & edge effect will give you a different look.

Now, something to keep in mind is that when you fill the object with sketch fills, you are adding more data with each red line that you add in. This demo page took over 75 minutes to sketch out. There is one drag mark on the page and that is from when it rolled back through to the starting point. I could adjust it a little bit and try to prevent that for future projects. The more you do it, the more comfortable you will feel with it.

You can also add in a cut line, change the color of the cut line, and then use the Cut/Sketch by Line Color to cut out around the sketch designs as desired.
Since I am using a Cameo 4, I do need to swap out the tools, but that just takes a second.
By using the Sketch/Cut by Line Color, I can turn on and off the line color I want to work with so it allows me time to swap out the tools. Just make sure you do not unload the cutting mat after it’s done sketching.

For more information on the Cut/Sketch by Line Color, check out this post HERE.

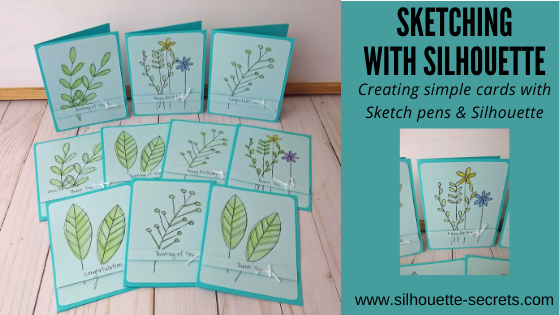
Sketching can be a lot of fun and give your projects a unique look. Whether you are using a design that you have filled with a Line Style effect or are using the sketch pens with a sketch design as shown below, they are a lot of fun to play with.

I would love to see what you are creating with your Silhouette machines!
Feel free to share on my Facebook group at 
Silhouette Secrets with EllyMae.

Save this for future reference by pinning the image below.

Enjoy!

This image has an empty alt attribute; its file name is logo.jpg

THANK YOU for your support! How can you help? Click HERE & buy a coffee.
Every little bit helps with the cost of running the site.

Or if you are looking for more in-depth, step-by-step classes, check out all of my online Silhouette classes on my Teachable site HERE.

SS Logo snip it
**This post may contain affiliate links. What that means is that I may receive compensation if you purchase through the links I have provided. The price you pay for the product or service is not higher but I may get compensated for sharing.
Posted on 8 Comments

Let’s Explore v4 – Sketch Panel

One of the options with the Silhouette machine is using pens in the tool holder and then the Silhouette will draw the design you choose. There are sketch designs that you can find in the Silhouette Design store and are all ready to use with your sketch pens. This is one of my favorites I did while preparing for a class.

IMG_2944

But, did you know that you can turn images into sketched designs? If you have the Designer Edition upgrade to the Silhouette software, you have the Sketch Panel available to you.

Sketch Panel copy

This is so fun to play around with and you never know what you may like until you try it.

Sketch Settings

Sketch Panel detail copy

  1. Edge Sketch – 7 different edge style sketchesEdge SketchAs you can see, each one gives it a little different look. Keep in mind that the more lines you see or the darker the sketch is, the longer it will take to sketch out that design.
  2. Fill Sketch –  8 different fill option for the sketch design.Fill SketchIn the above example, an outer edge sketch line was chosen to help show the design better and then each one is a Fill option.
  3. Release Sketch – This opens up a whole new world of possibilities in editing your sketch design. Once the sketch is released, then you can access individual point editing on the sketched design and can manipulate it how you like. On the left is before the sketch is released. Each of the gray points is an edit point that can be manipulated in this design. On the right is after the sketch has been released. Now, not only do you have the gray edit points, but the sketch fill lines have been released so you can move those as well. Keep in mind that a red dot means that it is an open point and not a closed object, so you will not be able to fill this with color. You can move the red dots towards each other and connect the dots to change the sketch fill.

And there are even more options

Advanced Sketch Settings

Advanced Sketch copy

  1. Edge Effect – 4 options for Edge Effect. These look the same when you first click on them, but with each one there may be more options for you to adjust the design.Plain – there are no further options given. AS Plain Continuous – Option for width, density & waver. AS Continuous I have made a few adjustments from the photo above to show you the difference. AS Continuous2 Rough – Option for stroke length, width, density, splay, curvature. AS Rough 1 And this photo below shows a few adjustments and how it can change the look of the sketched design. AS Rough 2 Scribble – Options for loop separation, loop size, randomness, and density. AS Scribble 1 And here is an example of adjustments made to the Scribble options. AS Scribble 2
  2. Fill Type – 3 additional options for Fill type – none, zigzag, and hatchZigzag – Options for spacing, angle, offset FT Zigzag And here is adjusting those options. FT Zigzag2 Hatch – Options for spacing, angle, sweep, offset. FT Hatch1 And more adjustments made to the Hatch fill. FT Hatch2
  3. Options – As shown in the examples above, these options change for each type of sketch fill you choose.
  4. Fill Effect – 2 advanced OptionsRough – options for stroke length, width, density, splay, curvature. FE Rough1 And changing the options up a bit, yields a different sketched look. FE Rough2 Scribble – Options are loop separation, loop size, randomness, and density FE Scribble 1.JPG And more adjustments to the options. FE Scribble 2

Now, did you know there were so many options? You could play with this feature for a long time and make many different designs with it, just by changing a few things.

Sketch pens are so fun to play with and can make very unique designs.

Keep in mind that that the Sketch Panel is available for those that have the Designer Edition upgrade to the Silhouette software.

Check out this video showing how to turn a design into a sketched design using this Sketch Panel.

Enjoy !

THANK YOU for your support! How can you help? Click HERE & buy a coffee. Every little bit helps with the cost of running the site.

Looking for more in-depth, step-by-step classes, check out all of my online Silhouette classes on my Teachable site HERE.

SS Logo snip it

**This post may contain affiliate links. What that means is that I may receive compensation if you purchase through the links I have provided. The price you pay for the product or service is not higher but I may get compensated for sharing.