This year I have taken a step back from many of the virtual events for several reasons, but I’m excited to announce that I am participating in the upcoming Scrapbook Fun Summit happening November 4-8, 2026.
Affiliate links may be present in the following blog post and as an Amazon Associate, I earn from qualifying purchases.
I am teaching a class on designing in Silhouette called Endless Options: Custom Titles with Cutting Machines.
In this class I am sharing how you can use cutting machine software to design and customize titles easily. Make your scrapbook titles stand out and fit your needs with a few tools in the software. Need a large title or a specific size to fit a small space on a layout? No problem! I will share how you can easily make it do what you want. This class will demonstrate 3 title options that can unlock creative ideas for many, many more!
In the Silhouette Studio software you will learn:
How to offset and manipulate text to create layered titles.
How to use software tools to change a design to fit your style.
Create multiple design options easily and mock up layout ideas before cutting.
I show step-by-step how I created different title options as well as creating the full layout in Silhouette. Here is a sneak peek at my mock-up and working file in Silhouette.
The best part about this is that no matter what type of Silhouette projects you make, this class can be applied to designing in Silhouette and other cutting machine software. Take the techniques taught and apply those to your real life designing and projects!
Now, that’s just my class. There are 30 more instructors at this event too!
I know those photos are tiny. Make sure to check out the details on the Scrapbook Fun Summit landing page and scroll down to see the class titles and larger project photos.
And remember, even if the instructor does not use the same machine or software as you, you may still get ideas, inspiration, and files that can be used with what you are using. I find there is usually always a little nugget of gold in each class I watch.
This is a free event but does require registration and you are able to watch the classes released each day for free for 24 hours. So make sure to register for the free ticket and watch on Thursday for my class.
There is also the option to purchase a VIP pass for extended access, so make to to review that offer as there is a short window for the cheapest price on that immediately following the free registration.
Thanks so much for using my links to register for events! That helps support my small business too!
I am excited to be participating at the Scrapbook Fun Summit and hope you’ll join us too!
I will also be LIVE with the Scrapbook Fun Summit team on Thursday, November 5, 2026 at 12 pm EST. Make sure to check out the links for the fun Summit events to join us.
Enjoy !
THANK YOU for your support! How can you help? Click HERE & buy a coffee. Every little bit helps with the cost of running the site.
Silhouette Classes
Never stop learning! Let me help you take the anxiety out of learning with Silhouette and get to creating faster! My Silhouette classes are heavily focused on software, so you can take the skills & techniques taught and apply them to many future projects!
**This post may contain affiliate links. What that means is that I may receive compensation if you purchase through the links I have provided. The price you pay for the product or service is not higher, but I may get compensated for sharing.
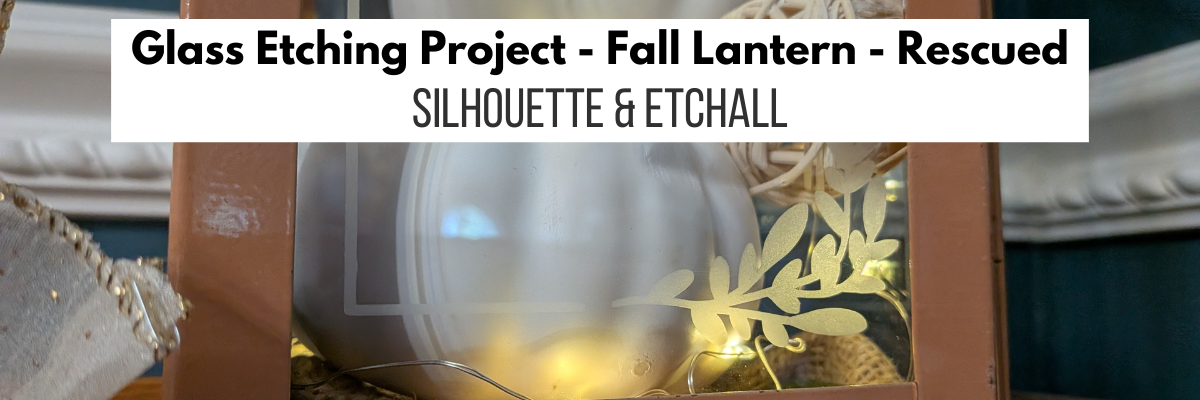
As I’ve mentioned in my past glass etching projects, I look for glass blanks whenever I’m out at a thrift store. Not only can you find great deals, save money on blanks, but can repurpose an item and give it new life too! I found this lantern at a thrift store and it was not perfect. But it was kismet because I knew just what I wanted to do with it.
Affiliate links may be present in the following blog post and as an Amazon Associate, I earn from qualifying purchases.
It was dirty – no problem. That can be cleaned up. It was pretty beat up – scratches in the paint, sticky residue on the panels, the handle, top and the, door were bent. But, it was the perfect blank for this project.
Now the only thing left to do was take the time to pull the entire project together. I am sharing the steps to glass etching, supplies, and my project process below.
This project was inspired by something I found on Pinterest, which turned out to be an AI image and not a real project that a human had created, until now. I used that creative inspiration and made my own real life Glass Etched Fall Lantern design.
Steps to Etched Glass Projects
Create a stencil for etching.
Clean glass blank with alcohol and allow to dry.
Apply stencil.
Mask off edge of stencil to prevent bleeding
Apply Etchall Etching Creme and allow to sit for 20 minutes.
Remove any excess Etching Creme and place back in the bottle.
Wipe off remaining excess with a paper towel and safely discard paper towel.
Run water in the sink and rinse off decal thoroughly.
Remove masking tape and adhesive vinyl under running water.
Gather the supplies for the glass etching project and protect your work space.
I started by measuring the panels. On this lantern, the panels are not the same size and the design needed to be adjusted to fit. I did modify this design a bit to make it work for this project.
Once I had all of the panel stencils designed to fit, then I grabbed some vinyl in a color I don’t use much of and cut each panel. I did do a test cut before cutting the entire stencil design.
I love being able to create my own stencils with a cutting machine and having the option that if I mess something up, such as put it on crooked, I can simply remove it and cut another stencil. My project is not lost and I don’t have to go buy more. I do use scrap vinyl whenever I can or colors that I don’t typically use on projects or have more of than others. The stencils do not have to match either.
I used transfer tape to apply the stencil onto the glass panels on the lantern. This particular lantern the panels were not removable and I worked on each panel separately. I tried to apply the stencil as straight as possible, however, as I mentioned, this lantern is a bit damaged, so not everything is perfectly aligned. And that is OK!
Glass etching is permanent and I like to ensure success, especially with detailed designs. So I used a little bit of heat with my heating tool. Be careful here and let the glass cool after this. Hot glass looks like cool glass.
I also add a layer of painter’s tape around the edges just in case any etching creme dribbles or runs. For this project, I felt it was very important given the edges of the glass panels and the damage making things crooked.
I then cover the entire stencil area where the design is with Etchall etching creme and wait 20 minutes.
When 20 minutes is up, I carefully scrap the Etchall etching creme off and put it back in the jar. Etchall etching creme can be reused and does not lose its potency. After the excess is scrapped off, I will carefully wipe the design with a paper towel before running water in the sink and rinsing off any remaining residue. At this step, you do want to be careful not to dislodge any pieces of the design. It never fails that when an oops happens and the creme touches an area you do not want to etch; it will etch in seconds.
Once the Etchall etching creme has been rinsed, removed the stencil and painter’s tape, and then carefully dry the glass container.
Here is a close up look at the top of the first panel etched.
I then repeated that process for the other 3 panels on the lantern. Do you have to do all 4 sides? No, but why not! For my project I wanted it to show from every angle.
After all the etching is done, then it was time to start working on the rest of the project. I love magnolias and made some a few years back that I have on display in my living room. And the best part was I had extra crepe paper already prepped for the double sided magnolia leaves.
I used the Magnolia Wreath file by Masion Gregoria and cut out a template from cardstock for the magnolia flowers. Then easily cut them by hand. I find this much faster than setting up my machine to cut as I can cut through multiple layers of crepe paper easily with scissors.
I took an alcohol ink marker and colored long rectangles of crepe paper for the stamin. Then used fine scissors and fringed it before rolling and gluing it for the centers.
And then I assembled the flowers and leaves. I ended up with 4 magnolia flowers.
This was one of those projects that I test to see what works and then decide if I liked it before gluing things into place. I placed a piece of burlap fabric in the bottom of the lantern, added a few drops of glue to hold it down, then added the white pumpkins and some other random decor items inside.
Hot glued the flowers to the outside, strung the fairy lights inside and around the outside edge. I hid the switch under the back flower. And added a gold wired ribbon bow on top. I love how it turned out. I think the lantern cost me $7 at the thrift store and it turned out amazing! The biggest investment on my end was the time to create it after I decided to stop dreaming and get to work.
Here is a close up look at the front top of the front panel.
And a close up look at the bottom of the front panel.
Another awesome project with Etchall Etching Creme!
Here is a look at the left side of the glass etched lantern showing the magnolia blooms.
A look at the back of the glass etched lantern. The little battery pack for the fairy lights fit perfect underneath the magnolia leaves and is easily accessible.
And a look at the right side of the glass etched lantern.
Glass etched projects are a great way to turn something plain into something unique. Or something that others might pass up on because it’s a bit damaged and repurpose it into an amazing decor piece.
I love using Etchall etching creme and have perfect etches each time! I’ve compared etching creme’s and it is the best. Glass can have its flaws, which can cause some imperfections in the etch, but those are few and far between with Etchall etching creme.
I’ve already picked up my next project piece at a craft thrift store a few weeks back and it’s calling my name to be customized.
Save this for future reference by pinning the image below.
Enjoy !
THANK YOU for your support! How can you help? Click HERE & buy a coffee. Every little bit helps with the cost of running the site.
Silhouette Classes
Never stop learning! Let me help you take the anxiety out of learning with Silhouette and get to creating faster! My Silhouette classes are heavily focused on software, so you can take the skills & techniques taught and apply them to many future projects!
**This post may contain affiliate links. What that means is that I may receive compensation if you purchase through the links I have provided. The price you pay for the product or service is not higher, but I may get compensated for sharing.
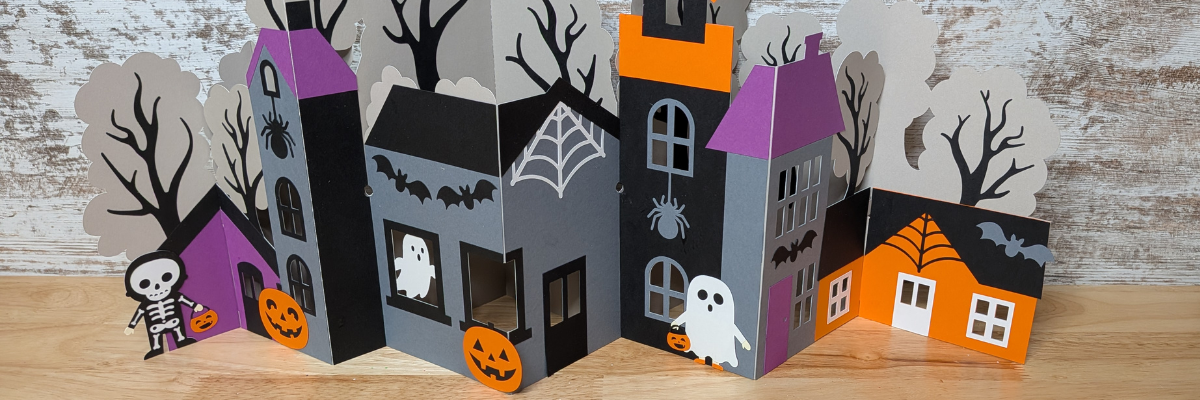
I love paper crafts! I started in the craft industry over 20 years ago with scrapbooking and I have always loved creating 3D paper craft projects. This XL Flat Fold Halloween Village is a large one, but not difficult to put together. I am sharing tips to working with the file and assembling it below.
Affiliate links may be present in the following blog post and as an Amazon Associate, I earn from qualifying purchases.
Here is a look at the file when opened from the Silhouette library. Files that sync to the Silhouette library directly from the Silhouette Design Store are .studio files.
Once the file is open, I would recommend immediately use File > Save As to create a new working file to move the pieces around.
One thing I noticed after I had all of the piece’s cut was that on the original file, the dark gray piece that the red arrow points to is in front of several of the other elements. It is not an issue but can catch you off guard when looking at the file for assembly.
Once the dark gray piece is moved, it will reveal the pieces underneath it. When assembling this make sure to glue the dark gray piece directly onto the lighter gray cardstock sections and then the black window frames go on top.
The sections in this file may need to be ungrouped to move the colors around for cutting. Each section may vary in how many times it needs to be ungrouped.
One other thing to note when ungrouping the sections is that the score lines will also ungroup from the file. Make sure to select the score lines and the larger section and group together so the lines move with it.
Not the end of the world if it is moved and you lose it. Grab a scoring board and score the lines yourself. They are pretty easy to find when you open the original file. This is exactly what I did because I wasn’t paying close enough attention when I moved several of the pieces to the mat to cut.
I ungrouped the sections and moved them around to cut. I keep uncut pieces on the left side of my virtual cutting mat then move them onto the mat by color and then cut all of one color first. Once the pieces are cut, I move them off to the right side. I’ll share a photo of my working design file at the end of this post.
Once all the pieces are cut for the Halloween village, start matching them up and dry fit them before securing anything with adhesive. Open the original file again and use it as your guide to fit all the pieces in.
I worked on one section at a time, except the black tree branches. I left all of those until the very end and they were the last pieces I adhered down. I dry fit each section before gluing down. Once all the sections were done, then I glued the tabs together to create the 2 long sections.
Here is a close up look at the details. My Silhouette Cameo 5 and Autoblade cut it perfectly and I didn’t have to recut any piece until I glued one windowpane in the wrong spot.
Rather than force my well used blade through the cardstock on the first pass. I chose to use 2 passes at the Cardstock Textured setting and it worked well.
I watched the video by Lori Whitlock for this design style to see how the 2 pieces fit together.
The XL Flat Fold Halloween Village Scene looks much more complicated to put together than it really is.
Now I mentioned I’d share my working file. It’s a mess, but it is a system that I find works well. Normally I don’t have the pieces overlap each other after they are moved to the right side after being cut, however, this is a large file, so they are overlapping today.
And there are more of these files by Lori Whitlock too!
Save this for future reference by pinning the image below.
Enjoy !
THANK YOU for your support! How can you help? Click HERE & buy a coffee. Every little bit helps with the cost of running the site.
Silhouette Classes
Never stop learning! Let me help you take the anxiety out of learning with Silhouette and get to creating faster! My Silhouette classes are heavily focused on software, so you can take the skills & techniques taught and apply them to many future projects!
**This post may contain affiliate links. What that means is that I may receive compensation if you purchase through the links I have provided. The price you pay for the product or service is not higher, but I may get compensated for sharing.
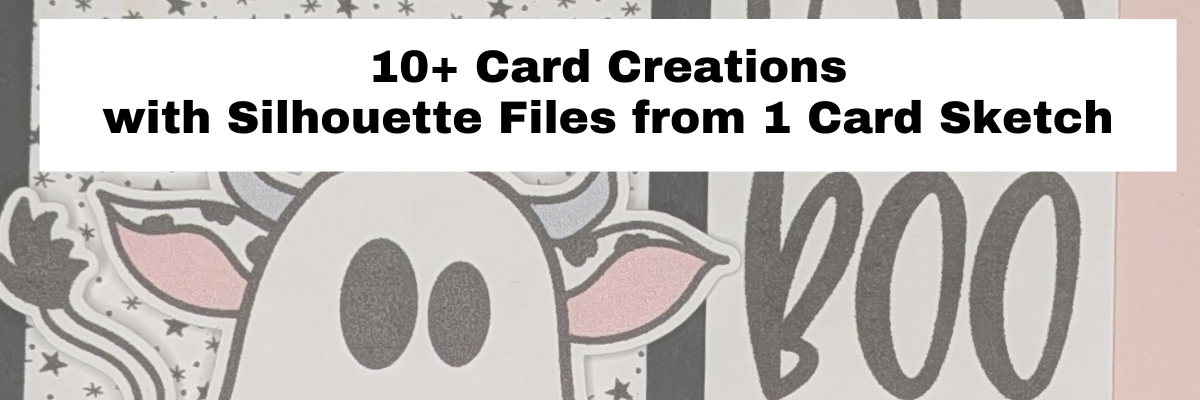
One card started it all and I ended up spending the afternoon designing with files from my Silhouette library to create 10 more cards. Find all the details below for the general card making supplies I used and the Silhouette files for each card creation. I made Halloween themed cards, but you could use this same sketch idea from Meg Davies eBook – Card Sketches with a Twist to create cards for all kinds of occasions.
Affiliate links may be present in the following blog post and as an Amazon Associate, I earn from qualifying purchases.
I used Sketch #1 from the eBook and created all of these cards based off of that sketch idea. Two things sparked my creative ideas. First, in the eBook, Meg shares 4 real-life card creations for each sketch in the book, along with the supply list and dimensions. Card sketches are a great starting point. Find the eBook HERE.
Second, I created 1 card and then while looking in my Silhouette library for the files I wanted for the first card, I kept seeing more designs that I wanted to use. So I did just that!
Here is a look at the first card that started it all.
Happy Halloween Ghost – Card #1
Halloween Background – Printable Word Art by Traci Vanover – Design #446324 (no longer available)
After creating the first card, I recorded a video sharing how I turned the card sketch into a cut file and then designed the cards in Silhouette Studio. Watch the video below
For most of these cards, I set up the backgrounds with 4 to a page and printed, then used a paper trimmer to cut since it was straight edges and I could fit more on the page without the registration marks. A few snips with the paper trimmer and the backgrounds were cut.
I set up the sentiments and graphic elements with print and cut and fit as many as I could on a page.
If I am creating multiples of the same card, I would copy and paste and fit as much as I could of the elements on the print and cut page. I was creating different designs for each card, so I arranged all the elements and fit as much as I could on each page. I did save each print and cut page as a separate file, so I have the files to go back to and use again or if something would have happened and the cut was off, I could reprint and repeat.
All the images cut perfectly and I didn’t have to repeat any of these designs. I do follow the same steps every single time for print and cut and stick to the defaults and basics. If I do alter things away from the defaults, I tell myself that if it doesn’t work, then it’s my own fault. Check out this print and cut blog post for tips and Successful Print and Cut Projects – Back to Basics.
Happy Halloween Frog & Cat – Card #2
For this card, I inked the edges of the background paper with orange and then used a distressing tool on the edges of the torn paper rectangles of purple and green. I used foam tape to pop up the frog and cat with the pumpkin graphic and the matted sentiment.
On this card I inked the edges of the background paper with black ink and used foam tape on the bat to pop it up on the card. The green piece of cardstock was cut with a paper trimmer from a scrap.
For this card, I use the Bibbity Bobbity Boo Silhouette file and assembled it in the software and set it on a green background to print and cut. I used the Cut Edge on the Send tab to cut only the outside of the rectangle. The witch and moon are cut from colored cardstock scraps. And the background pattern is inked with black ink.
This card the entire background is set up as a print. The Boo-tiful design and border was placed on a white background. I duplicated the border design, then released the compound path to leave the window pieces and filled those with yellow and placed them over top of the open windows to give it the appearance of the lights showing through.
For this card background, I used the knife tool to cut the rectangle apart, then added the torn edge border to cut edges. Once it was lined up and the same size as the background rectangle, I selected both and welded together, then filled it with the background pattern for printing. Since this one had a specific cut pattern on one side, I did set up the design to print and cut along with the book spider. The Happy Halloween design is printed directly onto the background of the card front.
I used print and cut elements from the 3D Chipboard Village Halloween Silhouette file and added an offset then filled it with white and set it up for a print and cut. The sentiment has an offset behind it that is filled with white and set up as a print and cut. I also printed the washi tape Silhouette files and then layered those on the card front. The background paper is inked with black ink. And the black squares were cut from scraps of black cardstock.
For this card, the cow is set up as a print and cut along with the sentiment was added to a white rectangle background and then printed. Black and pink cardstock rectangles were cut to layer underneath the sentiment and foam tape was used under the cow design.
I added an offset around the ghost and then cut that from an orange piece of cardstock. The sentiment is set up on a white rectangle and print and cut, then layered on top of a purple cardstock rectangle. The green cardstock was cut with a paper trimmer. I added black ink around the edges of the background paper. I used foam tape underneath both the ghost and the sentiment.
For this card, I set up the ephemera pieces as a print and cut along with the Happy Halloween sentiment. Then layered the designs together and used foam tape on the bottle and skull. The red piece of cardstock is a scrap, and I tore the edge by hand. I used an Old Paper Distressed Ink on the background paper.
For this card, I layered the Halloween word art on top of the alcohol ink background and changed the word art color to match one of the colors picked up from the background with the eyedropper tool. Then set it up for printing. I added the additional word art on top of a torn edge rectangle and then print and cut the Silhouette file. The orange rectangle is cut from a scrap. I inked the background with orange ink and used foam tape under the cat and bat Silhouette files.
It was difficult to stop with these designs, and I have a few more in the creation process but had to tell myself this was enough for one blog post. I hope you’ll open the Silhouette software and look through your library and see what you can put together for a future project.
Save this for future reference by pinning the image below.
Enjoy !
THANK YOU for your support! How can you help? Click HERE & buy a coffee. Every little bit helps with the cost of running the site.
Silhouette Classes
Never stop learning! Let me help you take the anxiety out of learning with Silhouette and get to creating faster! My Silhouette classes are heavily focused on software, so you can take the skills & techniques taught and apply them to many future projects!
**This post may contain affiliate links. What that means is that I may receive compensation if you purchase through the links I have provided. The price you pay for the product or service is not higher, but I may get compensated for sharing.
Have you ever used a card sketch or a scrapbook layout? Whether it’s an idea you drew out on paper before creating or you used someone else’s for inspiration, it can be a great way to start. Years ago when I started scrapbooking, we called this scraplifting and there are sites that specialize in just that. One of those that I’ve used many times in the past is called PageMaps. But there are many others, such as Meg Davies with I Teach Stamping who is the October 2026 collaborating artist for the Silhouette Secrets+ newsletter.
Affiliate links may be present in the following blog post and as an Amazon Associate, I earn from qualifying purchases.
Meg has provided one of her card sketches for the October newsletter from her eBook – Card Sketches with a Twist. This eBook not only gives you a sketch idea, but it also provides 4 real-life applications including the supply list and dimensions that Meg used to create the cards for each of the sketch ideas.
For the first week of Crafting Creativity projects for October, I created a card design using supplies from my Silhouette library and then cut all the elements and assembled it.
One of my goals lately has been to use more of my Silhouette library files. I have collected so many throughout the years and I am trying to use more of those files instead of just collecting them. Using the card sketch was the perfect way to create with what I already have in Silhouette.
I shared how to take the card sketch and make a cut file from the idea and then showed how to put that into a real life projects right in Silhouette Studio in this video below. After watching the video, make sure to check out additional information below the video.
In the video I also shared creating a 2nd card and here is a look at the card created with that digital idea.
Supplies for Card Creations from a Card Sketch Demo
Once I started creating with the digital supplies in my Silhouette library, I couldn’t stop and I created 10 more cards starting with this card sketch idea. Stay tuned for more details (I’ll link the blog post when it goes live), but here is a sneak peek.
Start thinking about some of the Silhouette files that you’ve collected through the years and start putting those to use. While the cards I created are Halloween themed, you can used this card sketch idea for cards or other projects all year long. I’ll be sharing more with newsletter subscribers and then put it all together in a future Crafting Creativity blog post.
Save this for future reference by pinning the image below.
Enjoy !
THANK YOU for your support! How can you help? Click HERE & buy a coffee. Every little bit helps with the cost of running the site.
Silhouette Classes
Never stop learning! Let me help you take the anxiety out of learning with Silhouette and get to creating faster! My Silhouette classes are heavily focused on software, so you can take the skills & techniques taught and apply them to many future projects!
**This post may contain affiliate links. What that means is that I may receive compensation if you purchase through the links I have provided. The price you pay for the product or service is not higher, but I may get compensated for sharing.
I absolutely love papercrafting — and this project reminded me just how much! While creating this DIY 3D Halloween Graveyard Busted Canvas with Silhouette, I honestly thought, maybe I should give up everything else and just be a paper craft artist! That’s how much fun this was to make. Using designs by Paper Beats Dynamite, I built a spooky graveyard scene complete with a 3D tombstone and a skeleton coffin. The dimensional layers, textures, and eerie details came together perfectly, making this one of my favorite Halloween projects yet.
Affiliate links may be present in the following blog post and as an Amazon Associate, I earn from qualifying purchases.
Last year I created several busted canvas projects and it has been on my mind ever since. I had a 16″ x 20″ black canvas that had a hole in it and I’ve kept it around for the perfect project. When I started creating a class for the 2025 Scrapbook Fun Summit and thought I’d share the technique for a card, this Halloween themed canvas started taking form in my head too.
I started by gathering some supplies in the Halloween decor isles. This was one of those projects that was not a set plan and came together as I went along. I wasn’t sure exactly on what I wanted to use, so I just grabbed things that I thought might work.
Supplies Used for the Halloween Graveyard Busted Canvas:
I took a lot of photos along the way of the entire process, I’ll share a few below, but make sure to check out the video where I share more on the creative process!
Creative Process – Halloween Busted Canvas with Silhouette
Here is a look at the front pattern I used for this busted canvas. It is a large canvas design so I had to piece 3 sheets of paper together to cover it. Since it will be cut up, it won’t be as noticeable that the pattern is not continuous. Of course, during the project creation my supervisor, Goldy, had to be right there helping too.
Once the glue was dry, I could add the pattern paper to the backside of the canvas and when everything was good and dry, then I could cut the busted canvas design and start to curl the edges back. I have found after making several of these that if you “train” the curls back and let them rest, they will stay better than if you try to immediately glue them down.
Next up was to secure the plastic chains to the back of the canvas before adding the background layer.
Before proceeding, I had to test it to make sure that the skeleton would be able to sit in the frame.
For this project, I actually made up 3 different backgrounds until I found the one that I settled on, so you will see that the final background is different from the beginning to the final results.
And then came the construction of the elements to add onto the front of the canvas. I started with the Skeleton Coffin by Paper Beats Dynamite. At the time of this project, I was testing the brand new Silhouette Cameo 5 alpha and was impressed with how the cuts came out with this detailed design.
I do not recommend starting with such a detailed, intricate design when testing a new machine model, especially for a beginner. This was quite a test for a new out of the box machine and while it turned out well, that may not always be the results.
I followed the instructions from the designer for assembly and it turned out AMAZING! Yes, there was a happy dance and a bit of gloating that happened. And let me tell you, YOU SHOULD! If you create an amazing project that you love, cheer for yourself!
Here is a close up at the top of the coffin that shows all the details
And the bottom of the coffin – look at those details! I doubted myself and didn’t think it would turn out like the designer’s original design. I’m so glad I was wrong. I followed the instructions and it turned out fantastic.
I do have years of paper crafting experience, however, I do believe that any Silhouette user can create this with a bit of practice, following the instructions, and the time to invest in creating it. The biggest factor into projects like this is TIME. It takes time for all of it to come together from the cutting, assembly, and dry time.
This element was ready and then on to the next piece.
Next up was a 3D Tombstone by Paper Beats Dynamite. I did not take many photos of the cutting process, but here’s a look after I started folding the pieces for assembly.
I again followed the instructions provided by the designer to assemble and paint the tombstone.
The hardest part about these projects was waiting for things to dry before I could move on to the next step. I often get involved in multiple projects at once because I’m waiting for things to dry on one and I can’t just sit idle.
Once everything was dry, it was time to put it all together.
My husband mentioned that the skeleton was too clean, so I had to dirty it up a bit with some Distress spray.
Here is the first final test hanging on the wall.
After letting it sit a bit, we decided that the background was too similar to the front. Back to the studio I went to make a new background. I definitely like the spooky graveyard background for the final-final result even better than the first option.
Here are a couple close ups of the 3D skeleton coffin and tombstone in place on the canvas.
I added in some skulls, bones, and fabrics to add more texture and elements to the entire piece.
I had so much fun creating this piece of art that will be displayed year after year. The entire process took several weeks to complete but was so worth the end result.
Do you create 3D designs? It’s one of my favorite things to do and I really should make more time for it.
Save this for future reference by pinning the image below.
Enjoy !
THANK YOU for your support! How can you help? Click HERE & buy a coffee. Every little bit helps with the cost of running the site.
Silhouette Classes
Never stop learning! Let me help you take the anxiety out of learning with Silhouette and get to creating faster! My Silhouette classes are heavily focused on software, so you can take the skills & techniques taught and apply them to many future projects!
**This post may contain affiliate links. What that means is that I may receive compensation if you purchase through the links I have provided. The price you pay for the product or service is not higher but I may get compensated for sharing.
We have seen some major changes to the Silhouette Design Store the past couple years and they are continuing to improve on it since the website migration that didn’t go as planned. Not only have we seen improvements in the Silhouette Design Store, but in general there have been some major changes in the world. AI has now become a big deal world-wide. For this blog post we are referencing AI specifically for designs for cutting machines. There has been a big jump in AI created designs and AI designers in general.
Affiliate links may be present in the following blog post and as an Amazon Associate, I earn from qualifying purchases.
AI designs are supposed to be labelled so the person buying the design or using the design knows that it is AI. That was one of the recent updates at the beginning of 2026 to the Silhouette Design Store. Now all designs have to be labelled as either AI assisted or Fully AI generated. This is something that is filled out by the designer when they upload the file. When this was added into the Silhouette Design Store in January 2026, designers were notified to update their files.
This information can be found in the design information under the title of the design in the Silhouette Design Store. It will be labeled as AI assisted or Fully AI generated. This is something that the designer has to input when they upload designs and is completely the designers responsibility.
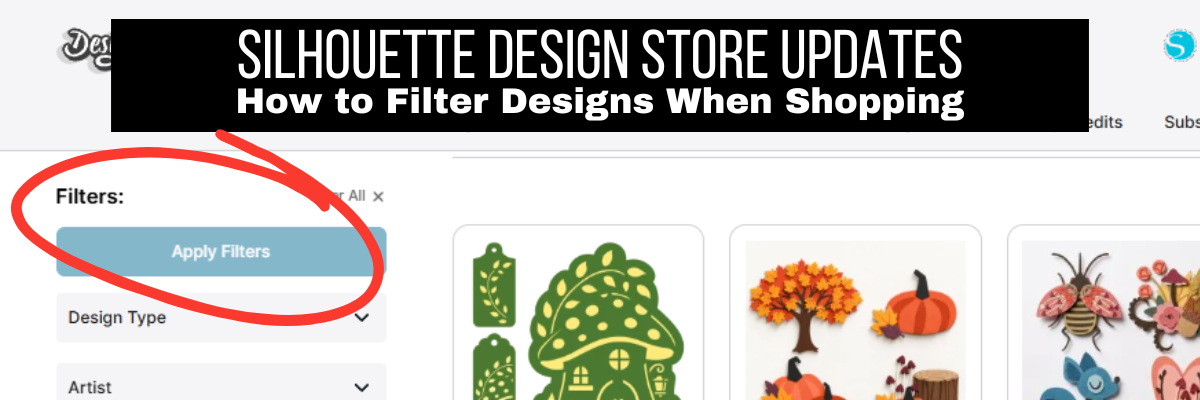
In addition to the new labelling which was implemented in January 2026, there is now the option to filter designs based on criteria such as AI, CU (Commercial Use), File Type, etc.
At the time of writing this, the AI filter is not available under all menus, but it is available under some of the categories such as “Designs” tab at the top of the website.
Something to note here is that these screenshots are taken the day this blog post is composed and changes to the Silhouette Design Store website can occur at any time. The information should be relevant, even if the location of the items might change compared to the screenshots.
At the time that I write this, the AI filter is not available if you do a search by keyword on the website, however, I have asked that it be added to all of the website locations.
I share a few more details and show a demonstration of selecting by filters in this video.
I still continue to shop in the Silhouette Design Store and support my favorite designers. I purchase Credit Boosts so my credits do not expire and are ready for use whenever I am looking for something. I also watch for sales on Credit Boosts, which can get you even more credits per level purchased.
If you find a designer that you want to “bookmark”, you can add them to your “Artists I Follow” section on the Silhouette Design Store. You will need to be logged in so it remembers your account.
Then you can click on the Follow button under the designers store or on an individual design, scroll down and locate the designers name and you should see a “Follow” button.
Here is a look at what my “Artists I Follow” looks like today. I had to zoom out quite a ways to show them all. But, I do spend a lot of time looking at designs and planning what might work for the Silhouette Secrets+ newsletter Crafting Creativity series.
I hope these tips have helped and you are able to narrow down the designs easier for something you might like.
Save this for future reference by pinning the image below.
Enjoy !
THANK YOU for your support! How can you help? Click HERE & buy a coffee. Every little bit helps with the cost of running the site.
Silhouette Classes
Never stop learning! Let me help you take the anxiety out of learning with Silhouette and get to creating faster! My Silhouette classes are heavily focused on software, so you can take the skills & techniques taught and apply them to many future projects!
**This post may contain affiliate links. What that means is that I may receive compensation if you purchase through the links I have provided. The price you pay for the product or service is not higher, but I may get compensated for sharing.
This edition of Crafting Creativity is all about projects with a 3D Lemonade Bouquet Card by Lori Whitlock and is designed to spark the creative ideas of what you can do with 1 file. This blog post covers 6 projects I created using one 3D card design with my Silhouette Studio software and machines.
Affiliate links may be present in the following blog post and as an Amazon Associate, I earn from qualifying purchases.
The Crafting Creativity series is designed for sharing inspiration, designs, and showing how to make your designs go farther or think outside the box. Find more Crafting Creativity inspiration HERE.
Crafting Creativity with Lori Whitlock
The Crafting Creativity video below shares a preview of the projects created with 3D Lemonade Bouquet Card file by Lori Whitlock. Additional photos, details, tips, tutorials, and supply lists can be found by scrolling under the video.
Project #1 –3D Lemonade Bouquet Card and Mini Card
I like to start with the original file as it was designed to kick the monthly projects off. This card is designed to fit in a 5″ x 7″ envelope and has a little mini buddy card with it.
Check out the LIVE video I did to assemble this card below. I shared tips for assembly, admitted my mistakes, showed ways to embellish the card, and assembled a 2nd card style during the LIVE as well.
For this project, I took the lemon blossoms and the saying from the design to create the sign. I like to mock up the design in Silhouette and see what the placement will look like. This way I can play with the sizing of the design and know what will work to cut. I draw out a rounded rectangle the same size as the actual chalkboard and then adjust the design as needed. Here is a look at my design file and the arrangements I was looking at.
When I was ready to cut, I set up the design to cut multiple colors of adhesive vinyl at one time.
I did modify the lemon blossom designs a bit, so I was not layering adhesive vinyl on top of each other. Sometimes when using colors like white and yellow over top of a darker color, like green, the green will affect the color of the lighter vinyl. I didn’t want that, so I took the layered design and subtracted the areas underneath. When I did this, it was not exact, so I had to do some clean-up, which then turned into the August Creative Community member exclusive tutorial. I shared step-by-step how I did it and what worked, what didn’t, what you might encounter, and we covered several tools in Silhouette Studio.
In addition to that, I needed to be able to provide members with a design to practice with, which I shared how I created that in the YouTube video shown below.
I took the lemon blossoms, arranged them together, and turned them into a print and cut page. It started as a card design using print and cut elements and personally, I have to fill up the extra space with additional designs and not leave it blank, so I added in a few smaller lemon blossoms too.
To give these designs a bit more dimension & depth, I added a line color to the green and yellow of 0.75″ in a slightly darker shade of the fill color. This helps to differentiate between the overlapping lemons and leaves.
This is not something that you have to do and is very project dependent, but I felt it helped to make the pieces stand out versus melt together in blobs.
With the entire design selected, click on the Send tab and it might look like a mess of cut lines. That is because the file is designed to cut each of the pieces out of material and layer it together.
With the design selected, you’ll also see that on the right side, “Cut” is highlighted. This means that the software thinks every piece is to be cut out and why you see the overlapping cut lines. With the entire design selected, choose “Cut Edge”.
I printed on sticker paper and had a few extra planner stickers in addition to 4 card designs.
There are a couple things to mention here for this type of project. The Silhouette software only does what you tell it to do. If a design isn’t filled with color, then nothing will be printed. This file was filled with color when it was opened, so those are the colors that I used. However, you can change things up simply by selecting the design and changing the fill color.
By now, you have read me say – “select the design” several times. This is very important! It is one of the most common things we see users post with issues. Most often, they are referring to the Send tab and the options for “Cut” or “Cut Edge” are not highlighted or won’t allow a change. Or in old Silhouette software versions, it could be changed, but nothing happens on the screen.
If nothing is selected, there is nothing to change. So if the design is not selected on the screen, the software has nothing to apply the changes to and that is why “Cut” and “Cut Edge” are not highlighted or able to be switched.
While we see it most often with the Send tab and changing Cut to Cut Edge or turning cut lines off entirely, it can also be a reason something else isn’t looking right either. For instance, if nothing is selected on the screen the QAT (Quick Access Toolbar) won’t have as many options shown.
If you have ever wondered why you couldn’t select “Cut” or “Cut Edge” or why some options aren’t available to you, hopefully that solves that mystery.
For this project, I took the Lemonade Bouquet Card and blew it up! Using .studio or SVG files have so much versatility in that you can scale a project up or down and not lose quality. I took the file and made it the largest I could with the supplies I had.
I used the Silhouette Cameo Pro MK II and 22″ x 28″ poster board to make this giant, supersized card.
Here is a photo showing the size difference in the original card design next to the giant, supersized project.
There are 4 main factors that affect how large you can create:
Material size – cardstock sizes can be a limiting factor. I used poster board for the largest pieces of this giant card.
Machine model – from the Silhouette Portrait with a cutting width of 8-8.5″ wide up to the Cameo Pro with a cutting width of ~24″ wide
The Design – layout and pieces of the design affect the size or if the file will need modified to cut larger
Time – all projects take time. The larger you go, the more time it might take to cut and assemble.
I was able to put together a quick video showing how I determine the size I can create in Silhouette and a few additional tips I learned along the way with my project.
These next 2 cards just happened through the month. I attended an in-person event called Craft Roulette and started participating in their challenges as a goal for myself – to create more!
Craft Roulette is a weekly online “show” that spins a wheel to give the creators different parameters each week. It is designed to challenge the creator and help crafters think outside the box. What is posted in the gallery and Facebook group is amazing! So many different ideas that come up the same parameters is truly inspiring.
Here is my first ever submission to Craft Roulette that I submitted the week before the in-person event.
I mixed and matched designs in this project and have those listed below.
And then I used the design again at the end of the month for a Craft Roulette submission. This one took the lemonade bouquet and shrunk it down to fit on the front of a card.
Do you only use a file one time or for the original project? Or are you getting the most out of your designs that you own? I hope these ideas have sparked some creative energy and get you thinking about your designs in a new way.
Never miss out on the news, tips, “secrets”, deals, classes, and more that I share on Silhouette Secrets+. Sign up for the newsletter and get information delivered to your inbox every Friday. Unsubscribe at anytime.
For even more inspiration, tips, and creative project ideas, be sure to browse the Crafting Creativitysection on the Silhouette Secrets+ website — click HERE to explore!
Save this for future reference by pinning the image below.
Enjoy !
THANK YOU for your support! How can you help? Click HERE & buy a coffee. Every little bit helps with the cost of running the site.
Silhouette Classes
Never stop learning! Let me help you take the anxiety out of learning with Silhouette and get to creating faster! My Silhouette classes are heavily focused on software, so you can take the skills & techniques taught and apply them to many future projects!
**This post may contain affiliate links. What that means is that I may receive compensation if you purchase through the links I have provided. The price you pay for the product or service is not higher but I may get compensated for sharing.
These cards turned out fantastic and I just have to share how I created the Fall cards with my Silhouette and supplies from Pointer USA.
Sometimes I get the opportunity to work with a company or product and my goal is to find ways to use that with my Silhouette or with a Silhouette project. That is after all the main focus of Silhouette Secrets+ right!
I am a Creative Professional with NAMTA and Pointer USA reached out to me before the 2026 Creativation to see if I’d like to test some of their products. I will fully admit I wasn’t sure what the quality would be when I first looked at the site, but once I started using the products I had no doubts. I have since purchased more myself because I am using the products in my projects. Not only are they a good quality craft supply, but they are also economical too, which I know that most of those reading are also looking for. No matter what supplies you use, I hope you get some ideas from this blog post for your future projects
Full disclosure: I have received products from Pointer USA for testing and was paid for the Instagram reel created (Sept 2026). My opinions are my own and I was not paid to promote with this blog post. Affiliate links may be present in the following blog post and as an Amazon Associate, I earn from qualifying purchases.
First, I want to share the Instagram reel that I created that shows the process. Of course, reels are designed for short form & it takes longer than 50 seconds to complete the project, so it is a very quick glimpse at my process. I’ll share a few more details, a supply list, and screenshots of my design in Silhouette Studio below the reel, so make sure to scroll farther down.
I started first with the watercolor background. This takes no skill at all and anyone can do this smoosh technique. I love how it gives a different pattern and unique look each time.
I started with my lightest color first. I added a bit of yellow watercolor paint on top of my Glassboard mat and then added water with a water brush from the watercolor travel kit.
Then I laid down the mixed media paper over top to pick up the color. I repeated that to fill the entire page. And repeated the same process with the orange and red watercolors. Have fun with this and create some awesome background images. Don’t focus on what the entire page looks like. It should be random, especially for this project since you will only see a glimpse of the background through the leaf cutouts of the card front.
I chose to use the Art PRO watercolor tubes of paint for this project and it turned out fantastic and bright.
While that dried I headed to the Silhouette Studio software to create my card design. I used a combination of sketching and cutting with the Silhouette to make the card fronts and designed everything in Silhouette so I knew exactly how it would look.
Here is a look at the card design in Silhouette Studio all put together. I love to be able to mock-up a design before I start cutting so I can see how it will all fit together.
The white and the yellow layers have the leaves cut out so it will show through the red layer which is going to be the watercolor background.
Here is a look at the layers of this card design separated out in Silhouette Studio.
The fall sentiment will be sent to sketch out on the front of the card and then without unloading the mat, the leaves will be cut from the card front. From one sheet of letter size paper, I could get 4 card fronts and I took it a step farther by swapping out the pen for each one. This took a little bit more time to complete, but I wanted to show how the colors would look and mix it up.
Since I was sending the designs to sketch and then cut, I used the Cut by line feature to be able to send each action separately. This was extremely helpful to be able to send only one card to sketch at a time and swap out the pen colors in between. More details on using the Cut/Sketch by Line Color in Silhouette HERE.
Look at that background showing through! It turned out even better than I thought it would. Each card is completely different and I don’t know which one is my favorite.
I love playing with paper and seeing what is possible. I hope this has sparked some ideas for crafty projects in your future.
Save this for future reference by pinning the image below.
Enjoy !
THANK YOU for your support! How can you help? Click HERE & buy a coffee. Every little bit helps with the cost of running the site.
Silhouette Classes
Never stop learning! Let me help you take the anxiety out of learning with Silhouette and get to creating faster! My Silhouette classes are heavily focused on software, so you can take the skills & techniques taught and apply them to many future projects!
**This post may contain affiliate links. What that means is that I may receive compensation if you purchase through the links I have provided. The price you pay for the product or service is not higher, but I may get compensated for sharing.
Have you ever cut chipboard with your Silhouette? Have you ever had troubles cutting chipboard? Years ago, I was testing and cutting chipboard with the plan to put out information on it. I ended up having some issues with different types of chipboard and burnt myself out on the topic. Fast forward to this month and I am working with a pocket notebook design for the Silhouette Secrets+ newsletter and have been cutting more chipboard again. So, it seemed fitting to share tips that can help you be successful if you use it for a project.
Here is a look at the first pocket notebook that I cut.
Affiliate links may be present in the following blog post and as an Amazon Associate, I earn from qualifying purchases.
And then I wanted to cut it bigger, so I did. That’s the best part of having a cutting machine, being able to cut what you want.
Tips for Cutting Chipboard with Silhouette
Do NOT unload the cutting mat after the cut. Check to see if it cut first and then send it again if needed.
It is common for chipboard to require multiple passes.
Increase the blade depth incrementally for each round of passes. Starting at a high blade depth can be more difficult to cut through thicker materials and can cause cut issues.
Not all parts of the file may need cut multiple times. For instance, score lines may not need to be cut more than a few times, since it’s not a cut through. Turn the cut lines off for those parts of the file. This can save you time & decrease the areas the cut can go wrong.
If the cut lines are not lining up on additional passes or the mat is skewing, this generally happens because the cut settings are too high. Back off the blade depth and try a few more passes before increasing the blade depth.
Buy extra materials!
Keep a dedicated blade for materials that are fibrous or dull quicker than others.
The blade may need to be cleaned out when cutting fibrous materials. Debris build up inside the blade can affect the swivel action and cut capabilities. Unscrew the cap on the bottom of the blade housing and remove any debris, then carefully screw the cap back on. Be careful not to cross thread the cap or it may not cut properly.
Save this for future reference by pinning the image below.
Enjoy !
THANK YOU for your support! How can you help? Click HERE & buy a coffee. Every little bit helps with the cost of running the site.
Silhouette Classes
Never stop learning! Let me help you take the anxiety out of learning with Silhouette and get to creating faster! My Silhouette classes are heavily focused on software, so you can take the skills & techniques taught and apply them to many future projects!
**This post may contain affiliate links. What that means is that I may receive compensation if you purchase through the links I have provided. The price you pay for the product or service is not higher, but I may get compensated for sharing.
THANK YOU for your support! How can you help? Click the link to buy a coffee. Every little bit helps in the cost of running the site.