Have you ever cut chipboard with your Silhouette? Have you ever had troubles cutting chipboard? Years ago, I was testing and cutting chipboard with the plan to put out information on it. I ended up having some issues with different types of chipboard and burnt myself out on the topic. Fast forward to this month and I am working with a pocket notebook design for the Silhouette Secrets+ newsletter and have been cutting more chipboard again. So, it seemed fitting to share tips that can help you be successful if you use it for a project.
Here is a look at the first pocket notebook that I cut.
Affiliate links may be present in the following blog post and as an Amazon Associate, I earn from qualifying purchases.
And then I wanted to cut it bigger, so I did. That’s the best part of having a cutting machine, being able to cut what you want.
Tips for Cutting Chipboard with Silhouette
Do NOT unload the cutting mat after the cut. Check to see if it cut first and then send it again if needed.
It is common for chipboard to require multiple passes.
Increase the blade depth incrementally for each round of passes. Starting at a high blade depth can be more difficult to cut through thicker materials and can cause cut issues.
Not all parts of the file may need cut multiple times. For instance, score lines may not need to be cut more than a few times, since it’s not a cut through. Turn the cut lines off for those parts of the file. This can save you time & decrease the areas the cut can go wrong.
If the cut lines are not lining up on additional passes or the mat is skewing, this generally happens because the cut settings are too high. Back off the blade depth and try a few more passes before increasing the blade depth.
Buy extra materials!
Keep a dedicated blade for materials that are fibrous or dull quicker than others.
The blade may need to be cleaned out when cutting fibrous materials. Debris build up inside the blade can affect the swivel action and cut capabilities. Unscrew the cap on the bottom of the blade housing and remove any debris, then carefully screw the cap back on. Be careful not to cross thread the cap or it may not cut properly.
Save this for future reference by pinning the image below.
Enjoy !
THANK YOU for your support! How can you help? Click HERE & buy a coffee. Every little bit helps with the cost of running the site.
Silhouette Classes
Never stop learning! Let me help you take the anxiety out of learning with Silhouette and get to creating faster! My Silhouette classes are heavily focused on software, so you can take the skills & techniques taught and apply them to many future projects!
**This post may contain affiliate links. What that means is that I may receive compensation if you purchase through the links I have provided. The price you pay for the product or service is not higher, but I may get compensated for sharing.
Do you create more than one project with a cut file? That is exactly what the Crafting Creativity series is all about! Do more with your files like blow it up and create a supersized, giant card creation with your Silhouette. Have you seen the giant cards in the store? If you own a cutting machine, you can make your own. I took a 5″ x 7″ card design by Lori Whitlock and scaled it up as large as I could to create a giant card.
Affiliate links may be present in the following blog post and as an Amazon Associate, I earn from qualifying purchases.
This project type could be done with any model of Silhouette machine from the Silhouette Portrait, Silhouette Cameo, the Silhouette Cameo Pro, and even the Silhouette Curio 2. In the video below, I shared factors that go into this type of project & how I determined how big I could cut this file depending on the machine type.
Plus, more tips, still photos, and a supply list are included farther down in this blog post.
I used the Silhouette Cameo Pro MK II to cut all the pieces for this giant card using the 24″ x 24″, 12″ x 24″, and 12″ x 12″ Silhouette cutting mats. Here is a look at the giant card next to the original card design size of 5″ x 7″.
If I were to recreate this project again, I would probably cut multiples of each piece and layer them together to make the card a bit more sturdy.
Here is a look at all the pieces cut for this card next to the Silhouette Cameo Pro MK II.
How Large Can a Design Be Cut?
When cutting large projects like this, there are 4 main factors to how large you can cut.
Material size – cardstock sizes can be a limiting factor. I used poster board for the largest pieces of this giant card.
Machine model – from the Silhouette Portrait with a cutting width of 8-8.5″ wide up to the Cameo Pro with a cutting width of ~24″ wide
The Design – layout and pieces of the design affect the size or if the file will need modified to cut larger
Time – all projects take time. The larger you go, the more time it might take to cut and assemble.
Cut Settings for Poster Board
Poster board varies greatly in thickness, coating, density, and quality. There is no magic numbers for cut settings that works for all poster board. What does work to determine what works for the poster board you have are TEST CUTS!
The poster board I was using is thinner than other brands I’ve worked with, so my cut settings did not have to be very high.
As I mentioned in the video, you want to use the largest piece of the design to determine the maximum size you can cut with your materials. I thought this green leaf piece was the largest piece and it was not until I started cutting parts out that I realized the largest piece was the pop out mechanism. I was already half way done cutting when I realized this, but for this project it was not too big of a deal and I could just scale the pop out mechanism down a little bit and keep on going.
This was such a fun project to create. Have you ever created a supersized project with Silhouette? Let us know below in the comments.
Check out the even faster reel on Instagram HERE. It took me about an hour to cut all the pieces for the card, but when you forget to adjust the timelapse speed from auto, it records it all in 21 seconds.
Save this for future reference by pinning the image below.
Enjoy !
THANK YOU for your support! How can you help? Click HERE & buy a coffee. Every little bit helps with the cost of running the site.
Silhouette Classes
Never stop learning! Let me help you take the anxiety out of learning with Silhouette and get to creating faster! My Silhouette classes are heavily focused on software, so you can take the skills & techniques taught and apply them to many future projects!
**This post may contain affiliate links. What that means is that I may receive compensation if you purchase through the links I have provided. The price you pay for the product or service is not higher, but I may get compensated for sharing.
The Silhouette Cameo Pro MK II opens up a whole new world of possibilities for makers who love working on a larger scale. From oversized decals and statement wall designs to banners, signage, and long-format heat transfer vinyl projects, this machine is built to handle it all—but success with long cuts comes down to more than just size. In this deep dive tutorial, you’ll discover practical, real-world techniques that help you get smoother feeds, more accurate alignment, and consistently clean cuts across extended lengths of vinyl.
Inside this post, you’ll find a quick breakdown of the key strategies covered in the full video, along with actionable tips you can start using right away. These insights are designed to help reduce common issues like material shifting, tracking errors, and uneven cutting—so your larger projects feel just as manageable as smaller ones. Whether you’re brand new to the Cameo Pro MK II or looking to refine your workflow, this guide will help you cut with more confidence and control on every long-format project.
Affiliate links may be present in the following blog post and as an Amazon Associate, I earn from qualifying purchases.
Watch the full deep dive video below and see a quick nutshell of tips below.
Tips for Success in a Nutshell – Cameo Pro MK II
Do you really need to cut 10 feet of material at one time?
If the design is one long design, then maybe yes. But, if it’s a bunch of designs, cutting it in smaller chunks can be more successful and less wasted materials and time in the long run.
Make sure the leading edge of the material is completely straight.
Set yourself up for success from the start. If the leading edge is crooked or uneven, then it will have a greater chance of failure because it will be more difficult to load straight.
Here is a look at my vinyl roll before I started. High rate of failure trying to use an uneven edge like this.
I have a large self healing sewing mat and use a rotary cutter with an acrylic ruler to straighten out my vinyl edge.
Silhouette Cameo Pro models do not like bulk rolls.
Bulk rolls can be very heavy and not easy to pull the vinyl off of.
Silhouette Roll Feeder Setup Properly
Make sure the roll is properly set up in the roll feeder on the front of the machine and is secure and moving freely.
Adjust the roll feeder screws to accommodate different roll thicknesses, but the vinyl should always sit on top of the roller of the roll feeder and roll freely. The roll should not be down in the roll feeder or resting on the table top inside the roll feeder.
The photo below shows improper setup of the roll feeder for this size of a roll. It is sitting down in the roll feeder and not on top of the rollers of the feeder.
Adjust the screws and lengthen the roller support as needed to fully support the size roll being used.
For best results, always use the roll feeder stability bar. If the material roll hits the stability bar, then the roll is too big and can have issues with feeding properly.
Fully Support Vinyl the Full Length in front and behind the machine.
Vinyl that is hanging off a table is working against gravity to pull up and into the machine.
Load Material Properly
The line on the far left of the Silhouette Cameo Pro MK II is for use with a 24″ cutting mat. The line on the right side that the arrow points to is for all other widths of materials or mats.
The left edge of the material should be next to the proper load line and the left roller completely on the material.
The right roller should be securely on the right edge of the material and in a location it can be locked in place.
Listen to Your Machine When Loading Materials
You will be able to hear it more than see it if the material catches on something as it is loading. There are multiple areas where materials can get hung up in the machine such as the bottom roller bar, the channel in front of the cutting strip, and the channel on the cross cutter on the backside of the machine.
Materials catching can affect the feed and if the vinyl is loaded straight. Crooked vinyl from the start will only get worse the greater distance it goes into the machine.
Settings that Affect the Feed in Silhouette Studio
On the Send tab in the Silhouette software, click on the gear icon in the bottom right corner. If you are having issues with feed and cutting specific designs, try adjusting the Cut Order Sorting settings to see if it helps.
Feed the Vinyl Through the Machine for the Full Length
This can help identify if there are going to be any issues before you even put the blade in to cut. It can save you time and money in materials by doing this.
If you continue to have issues with a material catching in the machine, feed in 4″+ to advance the leading edge of the material past all of the areas it may be catching on. 4″ of material can save you time and material in the long run. Use that 4″ for scrap later for other projects.
Test Cut, Test Cut, Test Cut!!!
Cut settings that are too deep can affect the feed and whether the cuts will connect and complete. It will save a lot of materials, time, and money
Get Extra Vinyl
It’s always a good idea to have extra vinyl on hand for any mistakes or errors, especially if working on a deadline.
I share additional tips in the Silhouette Cameo Pro Unboxing as well.
Save this for future reference by pinning the image below.
Enjoy !
THANK YOU for your support! How can you help? Click HERE & buy a coffee. Every little bit helps with the cost of running the site.
Silhouette Classes
Never stop learning! Let me help you take the anxiety out of learning with Silhouette and get to creating faster! My Silhouette classes are heavily focused on software, so you can take the skills & techniques taught and apply them to many future projects!
**This post may contain affiliate links. What that means is that I may receive compensation if you purchase through the links I have provided. The price you pay for the product or service is not higher, but I may get compensated for sharing.
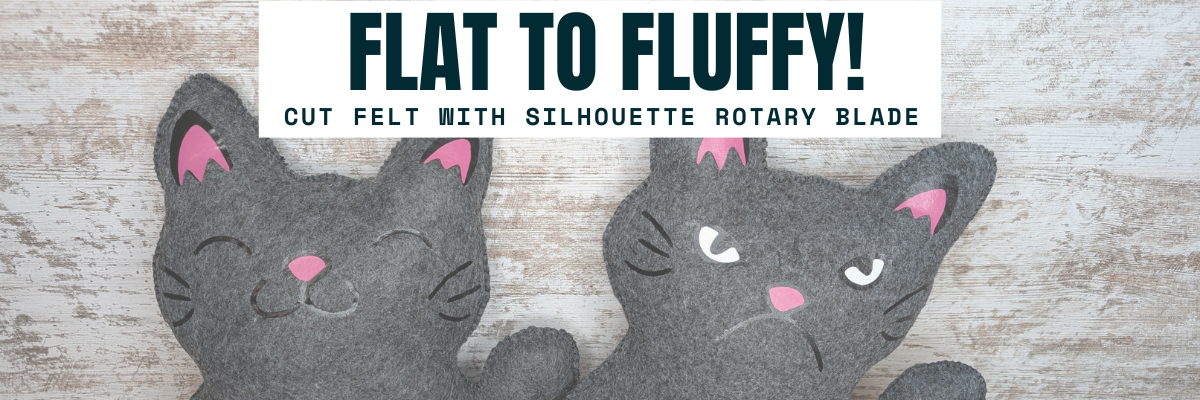
Have you ever looked at a flat cut file design and wondered if it could become something more—like a soft, squishy 3D felt stuffy? With the Silhouette Cameo and Rotary Blade, you can easily cut felt and bring your designs to life in a whole new way! I’m sharing tips in this blog post for cutting felt and how I turned a 2D digital file into a custom 3D plush using felt, a Silhouette machine, and a little creativity. Whether you’re crafting gifts, keepsakes, or fun decor, this is a must-try technique for any felt lover or Silhouette enthusiast!
Affiliate links may be present in the following blog post and as an Amazon Associate, I earn from qualifying purchases.
These designs are by Sarah Hurley and the entire project is inspired by her cat Bosh. I have followed him since his adoption and my daughter has recently been following along too. So I asked if she wanted a Bosh stuffy, even though I already knew the answer. Anyone else have projects that jump in front of the line? Fun projects seem to do that!
I brought the design into Silhouette and scaled it up for the size I wanted to create with. When working with the Silhouette Rotary blade, size does matter! Well, let’s face it – size matters for a lot of things.
I opened both designs on the same design mat and then determined the size I wanted to make it based on my machines cut width capabilities and the felt sheet size. I used a 12″ x 24″ Silhouette cutting mat so I could make it as large as I could. For this project, I selected both designs and scaled them up at the same time, so they would be similar in size and I could make a double sided Bosh for myself.
On the Send tab, select the design and choose No Cut under Tool 1 and then click on Tool 2 and choose Cut. I used the Fabric, Wool setting to cut with.
See those little blue lines that appear around the design? Those are called hooks and loops and it is how the Silhouette Rotary blade works. It has to have some way to turn the blade to get going in the next direction. It does this by either cutting a loop to turn or lifting up and making a hook to turn the blade and start a new direction.
The hooks and loops will change depending on the design and where you have things placed on the cutting mat. You can watch this in action by following the steps above to turn the Rotary action on and then moving the design around on the Send screen. The hooks and loops change based on the design, placement of the design, and what exactly is on the design mat.
I did cut the pink and black felt for the cat face, but I ended up going a different direction after cutting the felt bits. Some of them were just too small for the felt and it just pulled apart. This was a combination of the design and the actual felt itself. Even though these were the same exact brands of felt purchased from Michaels, the larger sheets were thicker than the smaller sheets. So the pink and black were different than the gray felt sheets. That makes a difference in the success of the project. Not all felt is created equal and there are different compositions.
Here is a look at what the Send tab looked like for the Pink felt pieces.
This shows the loops that the Silhouette Rotary blade uses to turn and it just depends on the design. The Silhouette software determines what is the best method for the Rotary Action. This is based on the shape of the design, placement on the design mat, and proximity to other designs on the design mat.
The pink felt designs were successful.
And then I cut the black felt for the facial features and that just didn’t work as well as there were some pretty small bits for the whiskers, eyes, and grumpy face.
Look at those hooks and loops!
It did cut, but some of the pieces were so thin that they just easily pulled apart. So I switched directions and cut black and pink Siser Easyweed HTV and used my heat press to apply it before I stitched it together.
Now, I’ll admit that I didn’t think it would work just based on my previous experience, the material, and how this specialty blade works. In the end HTV was less work for this project. You could always hand embroider the facial features on too.
I grabbed some embroidery floss and used a basic blanket stitch to stitch the sides together. I had 2 of these to stitch together, so I kicked up my feet and turned on a tv show and started stitching away.
And don’t forget to add Poly-Fil before surgically closing the stuffy up.
My daughter chose to have a single sided Bosh stuffy and I made myself a double sided Bosh stuffy. Would you choose Happy Bosh or Grumpy Bosh? Or both depending on the day?
Tips for Cutting Felt or Fabric with Silhouette
Use transfer tape on the Silhouette cutting mat to protect the mat from fibers.
Change the transfer tape after the cut because it does cut through and shifting after can cause cut issues.
Use a sharp pair of scissors to snip any fibers and bits from fabric that didn’t cut through completely.
The design matters! Small designs or interior cuts may not work well.
Hooks and Loops matter! It’s how the blade turns and changes direction.
Complex designs can crash the software if it’s too much for the rotary action. If this happens, try having less on the design mat and cutting pieces one at a time.
Here are a couple more felt projects that I’ve cut with the Silhouette Rotary blade in the past.
This Red Panda was cut with the Silhouette Cameo 4 Pro using the Rotary blade and a Strong Tack Cutting Mat. Here is a look at all the pieces before I assembled him.
And I think this might have been my first felt stuffy I created using the Rotary Blade. I know I shared photos on Facebook when I made these, but I don’t think they ever made it to the blog.
Save this for future reference by pinning the image below.
Enjoy !
THANK YOU for your support! How can you help? Click HERE & buy a coffee. Every little bit helps with the cost of running the site.
Silhouette Classes
Never stop learning! Let me help you take the anxiety out of learning with Silhouette and get to creating faster! My Silhouette classes are heavily focused on software, so you can take the skills & techniques taught and apply them to many future projects!
**This post may contain affiliate links. What that means is that I may receive compensation if you purchase through the links I have provided. The price you pay for the product or service is not higher but I may get compensated for sharing.
Heat foil projects are a show-stopping way to add a touch of elegance and shimmer to your designs, whether you’re crafting cards, gifts, or custom decor. With the right tools and techniques, creating stunning heat foil projects can be simple and rewarding. In this guide, we’ll walk you through five easy steps to achieve excellent results using your Silhouette machine. Whether you’re a beginner or looking to enhance your foiling skills, these tips will help you create dazzling projects that shine every time. Let’s get started!
Affiliate links may be present in the following blog post and as an Amazon Associate, I earn from qualifying purchases.
5 Steps for Gorgeous Heat Foil Projects
Create Your Design – design or select your project in Silhouette Studio
Set Up the Foil Action – adjust your settings for the perfect foil application
Prepare the Mat – place the foil on your material in the correct position & secure it
Send to Foil – let your Silhouette machine work it’s magic
Reveal Your Design – carefully remove the foil to unveil your stunning creation
New video on the Silhouette Secrets+ YouTube channel – Additional Tips!
We’ve just released a brand-new video on the Silhouette Secrets+ YouTube channel, Silhouette Heat Foil Pen Dos & Don’ts: Tips for Perfect Foiling Every Time! In this video, we break down the essential tips and common mistakes to avoid when using the Silhouette Heat Foil Pen. You can see the machine in action and what goes right and what did not. Use these tips along with the step-by-step details below for perfecting your foiling techniques.
Don’t forget to like, subscribe, and hit the notification bell to stay up-to-date with all our Silhouette tips and tricks on YouTube.
Your Step-by-Step Guide to Flawless Heat Foil Projects
1 – Create the Heat Foil Design
Choose a design to foil, or create your own custom design in Silhouette Studio.
Decide if you want the outline of the design to be foiled or if you prefer to fill the entire design with foil.
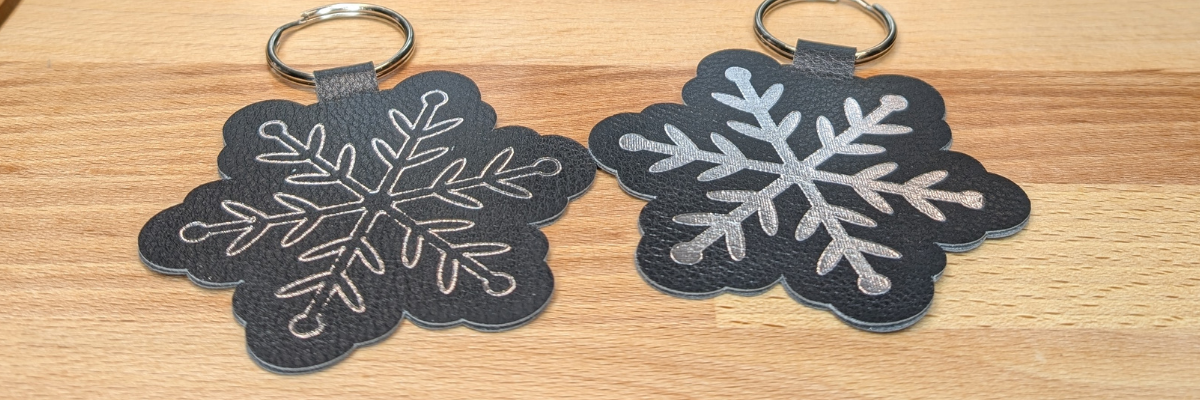
Silhouette Studio is a cutting program, so any design that is on the screen is automatically an outline. Filling it with a color only changes how it looks on the screen and is used for printing through a printer. The design on the left in the photo above is the snowflake design sent without adding any additional steps to it. The design on the right is filled with a cross-hatched fill using the Specialty Tools Panel – Heat Pen Tab.
The best fill and spacing is really dependent on the design and materials that are being used. The only way to really know what will look the best is to test it and see for yourself.
If the fill on your design is too tight, it can cause the foil to be removed from certain areas due to multiple passes over the same spot, leaving blank spaces. On the other hand, if the fill is too loose, it can also result in gaps. The ideal fill depends on the desired final look, and the best way to determine what works is to test it out.
I set my foiling and sketch projects up with blue as the foil/sketch lines and red for the cut line using the Line Color in the QAT or the Line Style Panel. This will be helpful when setting up the foiling settings in the next step.
For those who are using older model Silhouette machines and the Foil Quill, the Sketch/Line Effects Panel can be used to add a fill to the design following the same tips listed above.
2 – Set Up the Heat Foil Action
When using the Silhouette Heat Pen, there is an Action for the Heat Pen that may need to be set up. Click on the Send tab and then select your material such as Cardstock, Plain Cardstock, or Leatherette. If there is no Heat Foil Action that shows up for the material, then a custom setting will need to be created. This is not hard to do and we will go through it below.
On the Send tab, in Silhouette Studio, once the Heat Pen has been recognized in the Silhouette Cameo 5, Portrait 4, or Curio 2, you should see a message asking if you want to turn it on. The Silhouette Heat Pen takes approximately 3 minutes to heat up before it can be used properly.
I use the Cut by Line option on the Send tab, so the different actions can easily be turned on and off, so the design can first be foiled, then the foil removed, and then cut if the project requires.
Select the material setting for the red color cut lines. Test cuts will be the only way you know what the perfect setting is for your material, so don’t skip that step before you start and waste materials.
When using the Cut by Line or Cut by Fill Color options, it’s important to ensure the correct color is selected when adjusting settings in the bottom section of the Send tab. For example, if red is selected at the bottom but isn’t the box check for cutting, any changes made will apply to the red cut lines instead of the intended selection. Always double-check that the selected color matches the cut settings you’re adjusting. More details and a visual example of that in this Silhouette Cutting Issues – Cut by Line or Fill Color video.
The next thing to note is that if there is no Heat Pen action programmed for a material, you will see a Setting not found message. This is not a problem, we will create a custom setting by clicking on the MORE button and then creating our own setting for our material.
Click the + sign at the bottom of the materials list, name your material, and then select the machine model.
Now, the next steps are important so the setting is not created with actions that are not needed.
With the material you added selected, select Carriage 2, then click on the + sign on the right side. Choose Add Foil Action. Adjust the settings for force, speed, etc. The only way to know what settings work will be to test and use those settings.
Now, the important part. Click on the Kraft Action and choose REMOVE ACTION at the bottom of the Send tab.
If the Kraft Action or any other action that is set for a material is not removed, it will show up in the settings when the material is selected and can be confusing and cause future issues for projects.
Next click the drop down shown above and select the material that is closest to what you are using for this setting. I don’t actually know that this does anything other than serve as a reminder to you, but it was added randomly to the software many versions back.
Click SAVE if it’s available and then click the giant X at the top of the Send tab to close this window.
Then select the new material created in the drop down next to the line color you want it applied to. User Created Settings will appear at the bottom of the Materials selection drop box.
Verify that the settings are what you created and look right.
Congratulations! You have created your own custom setting. I would also recommend writing down these settings in a safe place. Sometimes they can disappear out of the software. They can also be exported by clicking on the MORE button and right click on the material and export, however, that file cannot always be successfully imported back in. These are just some things we’ve seen over the years with different software versions.
For older model machines and creating a custom setting, please see this tutorial HERE.
3 – Prepare the Mat
If the material will be cut after the foiling, place the materials at the bottom of the Silhouette cutting mat so it easier to remove the foil before sending the material to be cut.
Apply the foil in the same location on the material and mat that is set up in the Silhouette Studio software. Make sure the foil covers the entire area of the design to be foiled and that the washi tape is not in the areas being foiled or it can interfere with a complete foiled image.
Add the washi tape to one corner and then move to the diagonal corner and apply the washi tape, pulling it taunt. Then add washi tape to the final 2 corners and pull taunt as applied. Adjust as needed so the foil does not have any slack or creases. If it catches or has creases, it can affect the final results.
Once the foil is secured flat on the materials, load the cutting mat in the Silhouette machine.
When the design is placed in the top left corner as we are used to, then it can be difficult to remove the foil without unloading the mat. I got too excited and did that on my first design.
It took a bit more work, but I was able to remove the washi tape and foil without unloading the cutting mat. If this every happens to you, make sure to check for any washi tape that might get stuck under the roller bar or in the machine. I found a small piece that could have been a BIG problem on future projects if I had not seen it.
4 – Send to Foil
Check the box next to the Heat Foil setting and verify it’s set for Tool 2. Make sure the red is unchecked so you have time to remove the foil before it cuts the design. Then click Send in the bottom right and approve any windows that might pop up.
Remove the foil before cutting or the foil can dull the blade faster or get caught up in the machine during the cut and the project can be ruined.
5 – Reveal Your Design
Make sure to carefully remove the washi tape & don’t let the foil touch the adhesive cutting mat. It will stick immediately and then be stuck onto your cutting mat. If you reveal it slowly and it did not foil well, you can try securing the foil back down and run it again to see if it will foil better. You may need to adjust the settings and this is why testing is so important.
Do not unload the cutting mat between the foil and cut action or the design may not cut in the correct location. This is why the location of the design at the bottom is easily to work with.
Next, on the Send tab in Silhouette Studio, uncheck the blue line color and check the red color, then send the design to be cut.
When it’s finished, check the cut before unloading the cutting mat. If it did not cut well, you can send it again. After it’s cut, unload the cutting mat, flip the mat over, and peel the mat away from the material at a sharp angle to help it release.
Keep in mind that anytime you sketch or foil with a fill, the tool is going over the design multiple times depending on your fill options. This can mean that the material will be stuck down to the cutting mat in that area and may need a bit more care to remove without damage.
Finish out the project with any assembly needed and then enjoy!
Make sure to check out the video on the Silhouette Secrets+ YouTube channel for a visual of creating these projects and additional Dos and Don’ts too! Find it HERE.
Additional Resources for Mastering Heat Foiling Techniques
Save this for future reference by pinning the image below.
Enjoy !
THANK YOU for your support! How can you help? Click HERE & buy a coffee. Every little bit helps with the cost of running the site.
Silhouette Classes
Never stop learning! Let me help you take the anxiety out of learning with Silhouette and get to creating faster! My Silhouette classes are heavily focused on software, so you can take the skills & techniques taught and apply them to many future projects!
**This post may contain affiliate links. What that means is that I may receive compensation if you purchase through the links I have provided. The price you pay for the product or service is not higher but I may get compensated for sharing.
The Silhouette Cameo Pro MK II was announced for future release at the 2024 Silhouette Summit. I attended the Silhouette Summit and asked a lot of questions regarding this new machine model. In this blog post, I’ll be sharing details that we learned at Summit. We were able to see this new model in action on both the demo floor and also a close up look where we could ask specific questions in a classroom setting.
This blog post is part of series of my account at Silhouette Summit 2024 because it’s a lot of information on new products and information. Find more details on Silhouette Summit 2024 – Part 1 – cloChé Heat Press announcement HERE. And I’ll add additional links as I publish information too!
Affiliate links may be present in the following blog post and as an Amazon Associate, I earn from qualifying purchases.
The Silhouette Cameo Pro MK II is now available at Silhouette America HERE or at CrafterCuts HERE. *updated 12/12/24 Silhouette Stand released 3/26/25 – available HERE
Silhouette Cameo PRO MK II
Please note that the following information & photos are all directly from the Silhouette Summit 2024 and at the time of writing this the Cameo Pro MK II is not yet available for purchase. I will be updating the post when we receive more information.
First, this is NOT a Cameo 5 model. It is called a Cameo PRO MK II, which is a little bit to get used to saying as you’ll see me mention in the videos linked above.
Why is it not just called a Silhouette Cameo 5?
It is different and why it could not simply be called a 5. It is the Cameo Pro 4 body with all of the guts of the Cameo 5 model installed.
The Silhouette Cameo PRO MK II has:
Updated chassis system for improved carriage stability and new belt drive minimizes deviation and vibration
New design of the roller bar and rollers, which include the ability to move the right roller to more locations to be locked in securely
5 auxiliary rollers that are removable for additional support when cutting different widths of materials
Dual cross cut option – the user can choose to use the Auto cross cut or the rear cross cut option (more on the auto cross cut feature HERE)
Repeat Job now available – when a repeat job is enabled, the load button flashes. Press and hold the button for more than 3 seconds and it will repeat the last job sent.
Powered Carriage 2 tool housing for use with powered Silhouette accessories
NEW!!! 4 point registration mark for print and cut. There will now be registration marks on all 4 corners of a print and cut jobs. **This will be an addition to the Silhouette software in a future release.
Basically, the Silhouette Cameo 5 guts installed in the Cameo 4 Pro body. Some of the updates from the Cameo 5 12″ and 15″ Plus are now in the Cameo Pro MK II.
The Silhouette Cameo PRO MK II is NOT compatible with the Silhouette Electrostatic Bed accessory. It does not have the powered connection on the front of the machine to connect to an electrostatic bed.
So bottom line is, it is a Cameo 4 Pro body with the improved guts of the Silhouette Cameo 5 models installed inside.
We did see the Silhouette Cameo PRO MK II in action both in the Summit demo room and in smaller classroom settings where we were able to ask questions and get a closer look.
Here is a look at the machine in action cutting a large decal. There were 3 class session times and they demonstrated it for all who attended those sessions. In the above photo you can also see the demos from the previous sessions behind the machine against the wall.
In the classroom session, there were 4 Cameo PRO MK II machines all set up and providing a close up look at the machine. These are smaller breakout sessions where it was much easier to ask questions, touch and feel, and really see if it was doing what they said it was.
I did check the cut after it was completed and it was successfully cut and was able to be weeded. They did offer to let me keep one of the decals, but I had no easy way to get it home successfully on the airplane.
Now, let’s take a closer look at some of the specifics mentioned above.
Silhouette Cameo PRO MK II – Auxiliary Rollers
The Cameo PRO MK II now has 5 auxiliary rollers to help in keeping materials as flat as possible while it’s being cut. Each auxiliary roller can be moved left to right along the roller bar. For best results, space the auxiliar rollers out evenly across the width of a material.
The auxiliary rollers on the Cameo PRO MK II are removable. This is the only machine model that the rollers are removable. If the auxiliary roller is removed, make sure to keep it in a safe place so you can find it again. Or move it to the right side of the machine and install on the roller bar (I show this tip in the video HERE)
When cutting wider widths of materials, the material needs to be held securely and as flat as possible while it’s cut. Any bunching or bowing of materials between the left and right rollers can cause cut issues.
The auxiliary rollers of the Silhouette Cameo PRO MK II can be used on the Silhouette Cameo 5 models (12″ and Plus 15″) that have the redesigned roller bar. Note: the auxiliary rollers are NOT removable on the Silhouette Cameo 5 model machines.
NEW!!! 4 Point Registration Mark for Print and Cut
There will now be a 4th registration mark added to print and cut projects. This is designed for more accurate reading and to reduce the off-cuts in the bottom right corner.
Unfortunately, we did not get any really good photos of the examples shown on screen of this new feature and I only have the image from the media kit provided to me from Silhouette. It was not something that was demonstrated for us at Summit.
It will be something that is implemented into the Silhouette Studio software in a future release.
Silhouette Cameo PRO MK II Wrap Up
I am one of the original testers for the Silhouette Cameo 4 Pro model and have a lot of information out there on proper setup and usage (more details HERE). Most of the same information, tips, and recommendations will still apply to the Silhouette Cameo Pro MK II model.
I know there has been lots of users frustrated with the Cameo 4 Pro and the exact setup that it requires to function properly. I do feel the improvements to the Cameo Pro MK II will solve some of those user frustrations, however, it will still be very, very important to have the proper setup and space for a machine of this size to function properly. For all models of cutting machines, proper setup is important!
I did see many demonstrations of the Silhouette Cameo Pro MK II in action performing different functions and completing projects, but will not have real life experience with the machine until it is available for consumers. At the time of this publication we do not have a release date, but I will update with more information as I get it.
Save this for future reference by pinning the image below.
Enjoy !
THANK YOU for your support! How can you help? Click HERE & buy a coffee. Every little bit helps with the cost of running the site.
Silhouette Classes
Never stop learning! Let me help you take the anxiety out of learning with Silhouette and get to creating faster! My Silhouette classes are heavily focused on software, so you can take the skills & techniques taught and apply them to many future projects!
**This post may contain affiliate links. What that means is that I may receive compensation if you purchase through the links I have provided. The price you pay for the product or service is not higher but I may get compensated for sharing.
Have you ever sketched designs or fonts with your Silhouette machine? It can give your projects a unique look or just be fun to play around with.
I’m fascinated by the countless creative applications Silhouette users create with sketching options, from addressing envelopes to crafting signs and beyond!
Today I wanted to share some tips and resources that can help when you are sketching with your Silhouette machines. Sketching can be done with all Silhouette machine models, with the right tools.
This week I released a new video on the Silhouette Secrets+ YouTube channel sharing information on sketching with the Silhouette Cameo 5 and the new Type C pen holder. Even if you do not have a Cameo 5, the information in the video can be helpful and I’ve had several comments from users who learned new things.
Find out which Silhouette pens fit in each machine model, what adapters you might need, and which pen holder is compatible with your Silhouette machine HERE.
How to Fill in a Sketch with Silhouette
One of the most common things we see asked is how to fill in a font or design.
The Silhouette machines do what the user tells them to do. They are designed as cutting machines, so the red cut lines that you see on the screen around a design is the exact path that any tool placed in the Silhouette machine would follow.
In the photo above, the design is showing exactly what a pen would sketch out using a font called Willow Bloom Modern Calligraphy Font by Angele Kamp. The red lines that you see are the exact path the pen would follow.
Since all text that is typed in Silhouette Studio now defaults to Cut Edge, you don’t need to weld it prior to sending, however, you still want to look closely to make sure that the letters are overlapping. If a letter does not overlap another letter, then it will be sketched as an individual letter. Personally, I always weld my text, just because it’s a routine step in my process and I know I’ve looked closely at the font to make sure it’s going to do what I want before I send it.
Remember that once you change a font in any way, such as welding, it is no longer editable text and is now a vector design. I recommend making a copy of the text so you always have an original before you make changes.
Another big thing to note here is that since text now defaults to Cut Edge, that also affects some sketch fonts and how they behave. In the example below, I used BFC Fantasy Sketch by Blush Fonts. Notice how there are sections that are missing or are not highlighted bold red? It is going to sketch exactly as you see on the screen.
This is easily fixed by selecting the entire design and choose Sketch instead of the Sketch Edge. The most important factor here is that the design has to be selected first before you can change the action.
Now that we’ve covered the normal behavior of a font, can you fill in a font or design? Yes!
The best method to use is the Line Effects or Sketch Fill Panel. This is the same exact panel, however, the name has changed depending on the software version you are using.
The Sketch Panel gives you the most fill options and can be used for a wide variety of things.
Keep in mind when filling in a design or font, that the pen follows every single red line in the design. If you use a tight fill pattern, the pen will completely fill in the object, however, it can also be more difficult to remove from the cutting mat as the pen has gone over and over that design many times.
Scribble with the pens prior to installing in the machine to get the ink flowing. The machine writing with a pen is just like writing with a pen by hand. If the pen won’t write smoothly by hand, you can’t expect the machine to magically make it happen either.
Use a clean cutting mat free of debris. Any bits of paper or debris that are stuck to the cutting mat will affect how that pen reacts on the paper and you could have skipping in the sketch.
Keep the Silhouette cutting mat completely level and flat the entire time it is sketching. If the mat is hanging down in front or behind, it can bubble up in the middle and the pen can hit it and cause marks as it travels to complete the sketch.
Keep the material completely flat and secure on the cutting mat. Any variance in the thickness of material can affect how it sketches. For example the flap on the envelope will create a bump that can affect how the pen writes over that area. Keep that in mind when you are sketching.
When using the Silhouette pen holders, use the pen holder cap to set the pen depth. Not sure what I mean, check out the YouTube video and I show a demo of how this is done. Or another method is to place a popsicle stick (craft stick) underneath the tool housing. Then place the pen in the housing. When the tip touches the popsicle stick, lock the pen holder in place.
Silhouette Cameo 3 with Type A Pen Holder
This is easier to do on the older Silhouette machine models. The newer machine models have different housings and not as easy to maneuver.
And DON’T FORGET to take the popsicle stick out after you are done setting the blade depth.
Test, test, test!!! Have fun with it!
Want to see how a font will sketch out? Type out the name of the font style and select that font and then sketch it out. The photo above is an example how I did just that. All of these are fonts I have from the Silhouette Design Store and that is exactly what I did.
This is a tip I shared last year in the Silhouette Secrets+ weekly newsletter. If you’d like tips, information, news, sales, and more “secrets” delivered to your inbox on a regular basis, make sure to subscribe and confirm your subscription.
Silhouette Secrets+ Newsletter
Never miss out on the news, tips, “secrets”, deals, classes, and more that I share on Silhouette Secrets+. Sign up for the newsletter and get information delivered to your inbox every Friday.
The Sketching with Your Silhouette class has been one of my most popular classes released. I have been blown away at the feedback from this class by those who’ve enrolled.
And just have FUN!!!!
Oh and if you have a Silhouette Curio 2, there are even more possibilities for sketching on thicker materials too! The Silhouette Curio 2 has a clearance of 20 mm, which is the highest clearance of any cutting machine out there!!! So exciting and fun to play with!
Find more details on sketching with the Silhouette Curio 2 HERE.
Save this for future reference by pinning the image below.
Enjoy !
THANK YOU for your support! How can you help? Click HERE & buy a coffee. Every little bit helps with the cost of running the site.
Silhouette Classes
Never stop learning! Let me help you take the anxiety out of learning with Silhouette and get to creating faster! My Silhouette classes are heavily focused on software, so you can take the skills & techniques taught and apply them to many future projects!
**This post may contain affiliate links. What that means is that I may receive compensation if you purchase through the links I have provided. The price you pay for the product or service is not higher but I may get compensated for sharing.
In this Let’s Explore v4 tutorial, we will cover the Silhouette Cut by Fill option. The Silhouette Studio software, has 4 options on the Send Tab on how to send the design to be cut – in the top right corner of the Send tab you will find the options Simple, Line, Fill, and Layers.
Affiliate links may be present in the following blog post and as an Amazon Associate, I earn from qualifying purchases.
The Silhouette Cut by Fill option allows you to cut a project by fill color. The Silhouette software generates the list shown under the Fill option based on the colors that you (or the designer) has filled the design with.
In this example using the Mardi Gras Mask file by Cut Files Makers, the file is already filled with color. If a design is not, you would need to select the pieces you want to fill and then select the color you want designated for that piece from the Fill Color Panel on the right or the Fill Color icon in the QAT in the top left of the Silhouette Studio software.
In this Send – Fill option, you have each fill color separated out in it’s own line and you can adjust the settings accordingly.
If you see an option that has a crosshatched pattern in it, that means there is no fill color for that cut line. This can happen when shapes haven’t been filled with a color or there is an image such as a png or jpeg on the file.
Details of the Silhouette Cut by Fill Color
Let’s take a look at what the actions are at the top of the Send tab in Silhouette for Cut by Fill Color.
Tool No. Choose whether you will be using Tool 1 or Tool 2, also called Carriage 1 and Carriage 2
On/Off Checked = Cut lines On Unchecked = Cut lines Off
Bold color lines will be around the design that the cut lines are turned ON for. Notice the purple and yellow lines are not bold since they are turned OFF. Some colors are more difficult to see the bold edge, such as white.
Weld The outer edge of overlapping objects of the color selected will be cut. Welding typically combines objects, but in this instance, the objects remain separate and the Cut Edge is activated.
Fill Color The same colors of the fill that were set up on the Design Tab, should all show in the list under Fill Color. Different shades of a color will show up as different options.
Material Choose the Material type you are using for each color. Each fill color will need to be changed separately if you did not select the material on the Simple tab before clicking on the Cut by Fill Color option.
Action Choose what action you will want to perform.
Tool/Carriage Choose what tool you will be using to perform the action.
If you were to keep all of the colors checked and have the cut lines ON, the order in which they appear in the list is the order in which the action will be done. For instance in my photo that would mean, the green would cut first, then the yellow, and then the purple.
You can rearrange the order by clicking and grabbing a color and move it up or down in the list as shown in the video below demonstrating with the line color option.
Moving down the right side of the Send tab – Fill Option, you will see that the cut settings are expanded further down to show what the settings are for each option you have chosen.
The color that is highlighted (selected) at the top of the panel will be the settings that you see at the bottom. In my photo, the green color is highlighted, so it shows the settings for the green lines in the bottom.
Here is where you can adjust the settings as needed. The key here is to make sure that the color you want to change is the one highlighted at the top AND the color shows on the bottom. We are seeing many users changing the settings for the wrong color.
You can also add a Pause in between the difference color actions if you would like to do that versus unchecking the box to turn the cut lines off. Each user is going to vary in what they prefer to do. I prefer to check and uncheck the boxes as needed, just in case I have to step away from my machine. But you can test out which way works best for you. See a quick demo of Adding a Pause HERE.
Now, the rest of this panel is the same as when using the Simple tab. Check out the in-depth tutorial on the Send Tab – Simple Option HERE for all those details.
Save this for future reference by pinning the image below.
Enjoy !
THANK YOU for your support! How can you help? Click HERE & buy a coffee. Every little bit helps with the cost of running the site.
Silhouette Classes
Never stop learning! Let me help you take the anxiety out of learning with Silhouette and get to creating faster! My Silhouette classes are heavily focused on software, so you can take the skills & techniques taught and apply them to many future projects!
**This post may contain affiliate links. What that means is that I may receive compensation if you purchase through the links I have provided. The price you pay for the product or service is not higher but I may get compensated for sharing.
I’ve wanted to write a faux leather tutorial with tips for Silhouette for a long time, but other things seemed to jump in front of it on my to-do list. So when Amy announced her Faux Leather event, I made it a goal to really dive in and create with some faux leather.
Affiliate links may be present in the following blog post and as an Amazon Associate, I earn from qualifying purchases.
Amy Romeu, hailed as the Queen of Faux Leather by many, recently hosted an event that I attended. I had a great time crafting along with her videos and picked up a lot of great tips that can help in being successful in cutting faux leather with any cutting machine.
Before we get too far in, let’s cover a few things about faux leather that will help in the process.
Faux Leather Information
Can Silhouette machines cut faux leather? Yes! Can Silhouette machines cut ALL faux leather? NO! Can all cutting machines cut ALL faux leather? NO!
Faux leather is such a broad term, just like “genuine” leather is. Cutting some faux leathers is easy, some pose greater difficulty, and others simply do not cut well at all.
Factors influencing whether a Silhouette or another machine can cut faux leather include:
Color – Yes! Many users don’t know this, but color affects how materials cut. Different colors go through different processes in the production and that can affect how it cuts. Some can be tougher than others due to coloring.
Backing – Faux leathers can have a variety of backing on it. Some don’t have any and are soft and pliable. While others can have a mesh, woven backing which can be difficult to cut through.
Texture – Faux leathers can come in all kinds of textures such as embossed, glitter, sequins, etc. This will affect how it cuts. Just think of a blade trying to bounce over a texture material to cut a clean line. Texture affects it! The texture also influences the ease of cutting by hand. The same is true for a cutting machine.
Thickness – There is a wide array of thicknesses for faux leather. Super thin ones can be too pliable and just smoosh around on the cutting mat. Thicker ones may need multiple passes to cut through and a longer blade such as the Deep Cut blade.
Composition – Faux leather is such a broad term. The definition of “faux” is artificial or fake. So keep in mind that faux leather is fake leather. What it is made of? A wide variety of things. Plastic mostly. For instance, I ordered some leather on Amazon and it is PU Leather. It is by definition, artificial leather, crafted from a thermoplastic polymer commonly employed in the production of furniture or shoes. Faux leather = fake leather = plastic
Silhouette 2 mm Manual Blade (this is what I used – more info below), Premium blade or Deep Cut blade, Silhouette Autoblade, 1 mm Manual blade, Silhouette blade available at CrafterCuts (code SECRETS for 10% off) or Silhouette America (code 10OFF for 10% off)
So the first place to start is to gather your supplies for whatever you are working on. I was so excited for these projects and I knew I would be creating several, so I pulled out all my faux leathers and my scrap HTV. I have several boxes of scrap HTV and it’s a great way to use it by adding it to faux leather projects.
Keep it a secret, but I actually obtained more faux leather than shown because I needed to test several during these projects. And once I went down that rabbit hole, I found many patterns I wanted to collect.
Cut the faux leather down to size and give yourself some extra space for taping down the edges to the cutting mat.
Place the faux leather front facing down on the cutting mat, so you are cutting through the backside first. **NOTE: if cutting real leather, DO NOT place it face down or you can ruin the finish on the real leather. That can be a very expensive mistake!
Utilize a reliable sticky cutting mat to secure the materials in place during the cutting process. Using a brayer to smooth the materials down to secure it. If the materials shift during the cut, the cut may fail, or your blade might become stuck.
Securely tape down the material edges. I found that using longer pieces of tape not only ensured a better hold but also reduced the risk of it getting caught in the machine during cutting. You can also reuse painter’s tape if removed carefully at the end.
For best results, keep the painters tape away from the edges of the cutting mat so it is not going under the rollers. Any change in the surface area under the rollers and it can cause it to lose grip or the left and right roller to not move at the same rate, which can cause issues.
When using a Silhouette cutting mat, you can use the grid for exact placement for lining up your materials and your design. If you load the mat properly, the on-screen design will align with the Silhouette cutting mat. Third party cutting mats may not line up and it will be a guessing game for design placement and alignment.
Give yourself a good allowance and grace because you may still mess up, just like I did in the photo above. I would recommend that you cut a little bit excess of the faux leather and not try to cut through the painters tape as it can affect the cut results. The cut was ok in this instance, but it went off my faux leather, so I ended up cutting another truck piece.
For tips on lining things up check out this tutorial HERE. I use this method all the time and still make mistakes. Remember to “measure twice, cut once.” But, I find I make the most mistakes if I’m rushing or I tell myself it will be just a quick project.
Test cut, test cut, test cut!!!
I used a 2 mm Manual blade for all of my faux leather cuts. This blade is the equivalent of the older style Premium blade, it’s just redesigned to fit directly into the newer model machines housing without needing an adapter. The 2 mm Manual blade (or Deep Cut blade) allows you to go from 1-20 in the blade depth settings. All faux leather will vary and some can be cut with a regular blade that is 1-10 settings, while others may need a higher blade depth than 10. Test cuts are the way you will know.
Do not unload the mat after you cut!!! Check to see how well it cut. Having a thread or two is not a bad thing! Grab a sharp pair of scissors and simply snip it.
If it does not lift easily or has more than just a few threads hanging on, send the cut again. If you have not unloaded the cutting mat, it should cut again in the exact same place. If you unload the cutting mat, it will be a hope and a prayer trying to get it lined up perfectly again to cut in the same place.
Some faux leathers may take more than 1 pass and this is why test cutting is such an important step. I write down the settings that worked for each of the materials I test and keep a log so I can refer back to it. It is not a bad thing to use more than 1 pass with certain projects. I find with thicker materials, you can get a cleaner cut when you are not trying to force the machine to do it all at once time. However, for thinner materials such as adhesive vinyl or regular cardstock, multiple passes shouldn’t be necessary if the blade is installed properly.
This is white faux leather from Craft Chameleon. I used the 2 mm Manual blade (equivalent of the Deep Cut blade) . Blade depth – 9 Force – 30 Passes – 2
For more details on what blade depth and force are, check out this in-depth tutorial on the Silhouette Send tab HERE.
Once the cut is successful, unload the mat, remove the painter’s tape – it can be reused and carefully peel away the excess. Snip any threads as you carefully remove the excess so you do not stretch the design.
When cutting, check the blade regularly for debris stuck to it or inside the cap. The fibers of the faux leather can hinder the cut results.
It is perfectly normal to have to increase the settings of the blade as you cut materials. A blade cutting any material is going to dull with usage. Keep in mind that you are cutting through plastic and fibers. That will cause a blade to wear differently than other materials.
For this design I used the Red Truck Ornament file from Amy Romeu and there is a front and back layer cut from faux leather that will be glued together. The rest of the design is cut from HTV, so I swapped out my blade for my HTV blade and set up my cutting mat to cut different colors of scraps at the same time.
I used the Cut by Fill Color so I could set up different cut settings for my Smooth HTV versus my Glitter HTV. The Autoblade did all the work to change the settings once set up. Check out this tutorial HERE for tips on cutting by line or fill color – they are the same.
And then I set up my cutting mat to match exactly what I had set up on the Silhouette software. Check out tips on cutting multiple colors at the same time HERE.
Then I simply weeded the design and pressed the pieces on according to Amy’s instructions. I also cut this design out of cardstock and adhesive vinyl too! The faux leather ornament is on the left and the cardstock ornament is on the right.
Check out Amy Romeu’s YouTube video HERE for instructions on the assembly. Even though she is using a Cricut machine to cut, the process and tips are useful.
I was having so much fun cutting faux leather that I couldn’t stop and wanted to test more!
I followed the same tips as above and taped it securely to my cutting mat.
If you compare this photo to the first one, you’ll notice that the backing differs on the white versus this silver embossed piece. That can affect the cut settings and results. The woven backing texture can be a bit more difficult to cut and may require higher settings and more passes to cut cleanly.
I used the 2 mm Manual blade (equivalent of the Deep Cut blade). Blade depth – 9 Force – 30 Passes – 2-3 however, that was still not a clean cut, so I then increased the Blade depth to 11 and did 2 more passes.
In this case, the Embossed texture on the front is uneven and can affect the cut.
I did not have all the supplies to finish this out as Amy did, so I used what I had on hand and made my own holly berries and leaves. The holly leaves are drawn from scratch in Silhouette Studio. If you want to learn how, I show step-by-step in the Designing in Silhouette Studio – Creating Keepsake Ornaments class HERE. I cut the leaves from cardstock, painted some small craft balls, and then glued it all onto the ornament.
In both the designs shown above, the faux leather was cut for the front and the backside and then glued together so it had a finished look. But for this next project, I used Siser Metal HTV and adhered it to the backside of the white faux leather from Craft Chameleon before cutting.
I pressed it once with the carrier sheet on and then a second time without the carrier sheet for just a few seconds. The second press allows the texture of the faux leather to show through and it is gorgeous! Photos do not do it justice.
But keep in mind, anytime you add something to a material, that can change the cut settings.
I used the 2 mm Manual blade (equivalent to the Premium blade). Blade depth – 10 Force – 30 Passes – 1 And I probably could have done one more pass.
Now, what you’ll notice is that all of the pieces are still attached. However, they easily popped out and I only had a few threads to snip. This actually worked better for the next steps as I could keep it all organized in one place until I was ready to press.
I loved the finished look of the Siser Metal HTV on the backside! And I used up a few scraps of Glitter HTV, not much, but it is the perfect project for those scraps that you might have.
I had so much fun creating along with this event and now have faux leather for many more projects.
I hope those tips help you to be successful with cutting faux leather with your Silhouette machine.
You can still purchase the VIP package for the Faux-La-La Crafting Fun and join in on the fun. You get the files for all the projects, all the videos in one place, a printable guide, and more! Check it out HERE for all the details.
Save this for future reference by pinning the image below.
Enjoy !
THANK YOU for your support! How can you help? Click HERE & buy a coffee. Every little bit helps with the cost of running the site.
Silhouette Classes
Never stop learning! Let me help you take the anxiety out of learning with Silhouette and get to creating faster! My Silhouette classes are heavily focused on software, so you can take the skills & techniques taught and apply them to many future projects!
**This post may contain affiliate links. What that means is that I may receive compensation if you purchase through the links I have provided. The price you pay for the product or service is not higher but I may get compensated for sharing.
As many of you know, I was invited by Siser to Italy in September 2022 for a product launch. We were given a tour of the Siser headquarters in Italy and a first glance at their new cutting machines. I have been using the Siser Juliet and Romeo machines in my craft projects since last fall when they were released.
Before we go farther, yes, I am still using my Silhouette machines too! I am using both. Sometimes even together for some projects!
This opportunity presented itself at a great time for me and I’ve enjoyed the challenge of learning something new. For me, this is continuing education. I love to find out how things tick and I love new tools!
If you want to see more about my trip seeing the Siser HQ, check out this post – New Release from Siser HERE. I love behind-the-scenes looks at how companies in the industry work!
Since returning from Italy last fall, I have been testing and putting these new machines through the paces. Basically, anything I do with my Silhouette machines, I then try with the Siser Juliet or Romeo. I dive in and really watch how the machine works and what it can do. I’ve learned a lot and feel comfortable sharing that now with others. Check out the Swift Creek Customs YouTube channel to see that side of things!
But, one of the big questions that was asked from the very beginning was – how does it compare to the Silhouette or Cricut machines?
So the first thing I want to say is that it takes time to learn a new machine and the software that runs it. Opening the box and giving a comparison may not reflect accurately on either machine. Now that Siser Juliet and Romeo have been out and I am very familiar with the machine and the Leonardo Design Studio software, I have a few things to share.
A few weeks back I published a new video on the Swift Creek Customs YouTube channel sharing a bit more information. Well, really, I focused on 5 specific topics and demonstrate the differences of each with both brands. I had an ever growing list, but I had to narrow it down to a few key factors.
Do I think the Siser Juliet & Romeo machines are for everyone? No Do I think the Silhouette Cameo machines are for everyone? No To be honest, there are some users that do not have the patience to learn either one or any cutting machine for that matter. Do I think that anyone can learn to use a Silhouette Cameo or Siser Juliet/Romeo machine? YES! If you are willing to take the time to learn, anyone can do it!
But, and a big but here…. YOU are the only one that can determine what machine is good for you and your projects!!! That could be multiple brands of cutting machines that have their strengths in different areas or it could be one model machine only or it could be none at all. But only YOU can decide!
The 5 topics I cover in the video are: – Craft Cutting Machine vs More Professional Machine – Software – Machine Rollers – Print and Cut – Blades, Tools & Cutting Mats
Save this for future reference by pinning the image below.
Enjoy !
THANK YOU for your support! How can you help? Click HERE & buy a coffee. Every little bit helps with the cost of running the site.
Silhouette Classes
Never stop learning! Let me help you take the anxiety out of learning with Silhouette and get to creating faster! My Silhouette classes are heavily focused on software, so you can take the skills & techniques taught and apply them to many future projects!
**This post may contain affiliate links. What that means is that I may receive compensation if you purchase through the links I have provided. The price you pay for the product
THANK YOU for your support! How can you help? Click the link to buy a coffee. Every little bit helps in the cost of running the site.