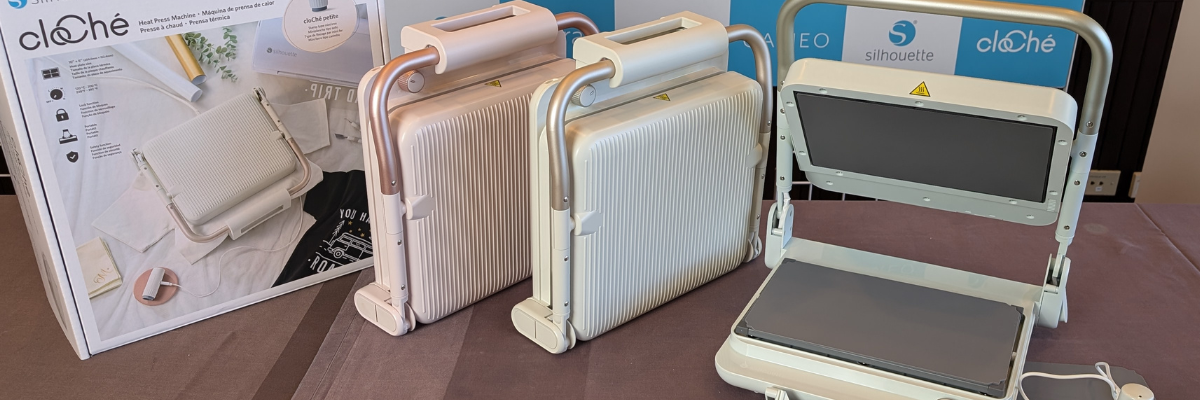
The wait is over – the Silhouette cloChé Heat Press has officially arrived in the U.S., and it’s making a stylish statement! Available in three gorgeous colors—Milky White, Chiffon Pink, and Ice Green.
Affiliate links may be present in the following blog post and as an Amazon Associate, I earn from qualifying purchases.
After the Silhouette Summit 2024, I published a detailed blog post sharing everything we learned about the Silhouette cloChé. If you are interested in seeing the specs, recommended usage, temperatures, duration of use, and more; please see the post Silhouette Summit 2024 – cloChé Heat Press HERE.
At this time, there is no release date or information for international areas. If you are outside the U.S., please contact your Silhouette retailer for more information.
Silhouette first announced a heat press with a prototype at the 2019 Silhouette Summit. It was big, clunky and only a prototype that was not functional. The new Silhouette cloChé heat press is a completely new design from what we saw originally. A sleek, modern look.
I will continue to share information on the new products released from Silhouette and watching to see who does add it to their craft rooms. I am still waiting on the new tools – Super Fine Power Engraver and the Leather Carving Knife to be available.
Save this for future reference by pinning the image below.
Enjoy !
THANK YOU for your support! How can you help? Click HERE & buy a coffee. Every little bit helps with the cost of running the site.
Silhouette Classes
Never stop learning! Let me help you take the anxiety out of learning with Silhouette and get to creating faster! My Silhouette classes are heavily focused on software, so you can take the skills & techniques taught and apply them to many future projects!
**This post may contain affiliate links. What that means is that I may receive compensation if you purchase through the links I have provided. The price you pay for the product or service is not higher but I may get compensated for sharing.
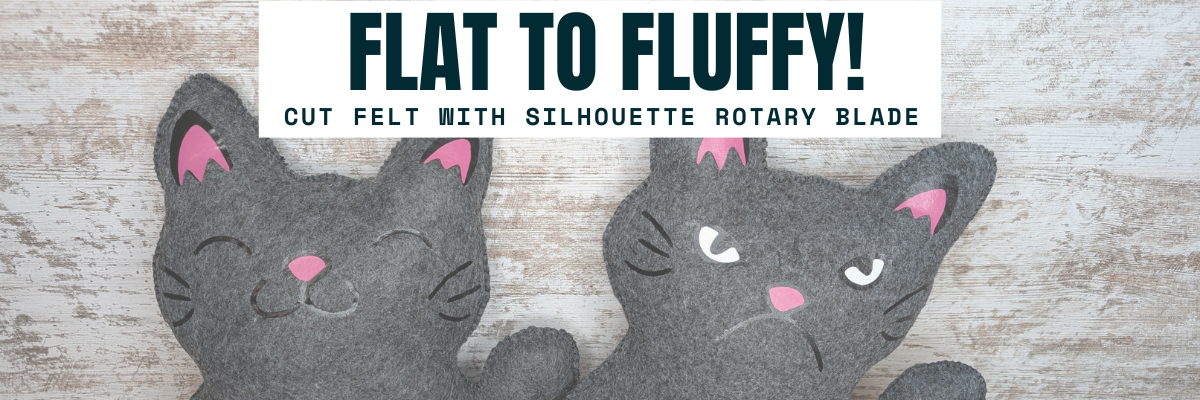
Have you ever looked at a flat cut file design and wondered if it could become something more—like a soft, squishy 3D felt stuffy? With the Silhouette Cameo and Rotary Blade, you can easily cut felt and bring your designs to life in a whole new way! I’m sharing tips in this blog post for cutting felt and how I turned a 2D digital file into a custom 3D plush using felt, a Silhouette machine, and a little creativity. Whether you’re crafting gifts, keepsakes, or fun decor, this is a must-try technique for any felt lover or Silhouette enthusiast!
Affiliate links may be present in the following blog post and as an Amazon Associate, I earn from qualifying purchases.
These designs are by Sarah Hurley and the entire project is inspired by her cat Bosh. I have followed him since his adoption and my daughter has recently been following along too. So I asked if she wanted a Bosh stuffy, even though I already knew the answer. Anyone else have projects that jump in front of the line? Fun projects seem to do that!
I brought the design into Silhouette and scaled it up for the size I wanted to create with. When working with the Silhouette Rotary blade, size does matter! Well, let’s face it – size matters for a lot of things.
I opened both designs on the same design mat and then determined the size I wanted to make it based on my machines cut width capabilities and the felt sheet size. I used a 12″ x 24″ Silhouette cutting mat so I could make it as large as I could. For this project, I selected both designs and scaled them up at the same time, so they would be similar in size and I could make a double sided Bosh for myself.
On the Send tab, select the design and choose No Cut under Tool 1 and then click on Tool 2 and choose Cut. I used the Fabric, Wool setting to cut with.
See those little blue lines that appear around the design? Those are called hooks and loops and it is how the Silhouette Rotary blade works. It has to have some way to turn the blade to get going in the next direction. It does this by either cutting a loop to turn or lifting up and making a hook to turn the blade and start a new direction.
The hooks and loops will change depending on the design and where you have things placed on the cutting mat. You can watch this in action by following the steps above to turn the Rotary action on and then moving the design around on the Send screen. The hooks and loops change based on the design, placement of the design, and what exactly is on the design mat.
I did cut the pink and black felt for the cat face, but I ended up going a different direction after cutting the felt bits. Some of them were just too small for the felt and it just pulled apart. This was a combination of the design and the actual felt itself. Even though these were the same exact brands of felt purchased from Michaels, the larger sheets were thicker than the smaller sheets. So the pink and black were different than the gray felt sheets. That makes a difference in the success of the project. Not all felt is created equal and there are different compositions.
Here is a look at what the Send tab looked like for the Pink felt pieces.
This shows the loops that the Silhouette Rotary blade uses to turn and it just depends on the design. The Silhouette software determines what is the best method for the Rotary Action. This is based on the shape of the design, placement on the design mat, and proximity to other designs on the design mat.
The pink felt designs were successful.
And then I cut the black felt for the facial features and that just didn’t work as well as there were some pretty small bits for the whiskers, eyes, and grumpy face.
Look at those hooks and loops!
It did cut, but some of the pieces were so thin that they just easily pulled apart. So I switched directions and cut black and pink Siser Easyweed HTV and used my heat press to apply it before I stitched it together.
Now, I’ll admit that I didn’t think it would work just based on my previous experience, the material, and how this specialty blade works. In the end HTV was less work for this project. You could always hand embroider the facial features on too.
I grabbed some embroidery floss and used a basic blanket stitch to stitch the sides together. I had 2 of these to stitch together, so I kicked up my feet and turned on a tv show and started stitching away.
And don’t forget to add Poly-Fil before surgically closing the stuffy up.
My daughter chose to have a single sided Bosh stuffy and I made myself a double sided Bosh stuffy. Would you choose Happy Bosh or Grumpy Bosh? Or both depending on the day?
Tips for Cutting Felt or Fabric with Silhouette
Use transfer tape on the Silhouette cutting mat to protect the mat from fibers.
Change the transfer tape after the cut because it does cut through and shifting after can cause cut issues.
Use a sharp pair of scissors to snip any fibers and bits from fabric that didn’t cut through completely.
The design matters! Small designs or interior cuts may not work well.
Hooks and Loops matter! It’s how the blade turns and changes direction.
Complex designs can crash the software if it’s too much for the rotary action. If this happens, try having less on the design mat and cutting pieces one at a time.
Here are a couple more felt projects that I’ve cut with the Silhouette Rotary blade in the past.
This Red Panda was cut with the Silhouette Cameo 4 Pro using the Rotary blade and a Strong Tack Cutting Mat. Here is a look at all the pieces before I assembled him.
And I think this might have been my first felt stuffy I created using the Rotary Blade. I know I shared photos on Facebook when I made these, but I don’t think they ever made it to the blog.
Save this for future reference by pinning the image below.
Enjoy !
THANK YOU for your support! How can you help? Click HERE & buy a coffee. Every little bit helps with the cost of running the site.
Silhouette Classes
Never stop learning! Let me help you take the anxiety out of learning with Silhouette and get to creating faster! My Silhouette classes are heavily focused on software, so you can take the skills & techniques taught and apply them to many future projects!
**This post may contain affiliate links. What that means is that I may receive compensation if you purchase through the links I have provided. The price you pay for the product or service is not higher but I may get compensated for sharing.
In this edition of Crafting Creativity I’ll be sharing the projects I created through the month with an arrow background/stencil design. So many great options from one file! A great big thank you to Sarah Hurley for providing the free file for the Silhouette Secrets+ August newsletter!
Affiliate links may be present in the following blog post and as an Amazon Associate, I earn from qualifying purchases.
What is Crafting Creativity?
I started sharing a blog post each month where I’m sharing the projects I’ve created with 1 file from an artist I have collaborated with. This is a file that the designer has provided for the Silhouette Secrets+ Newsletter subscribers and each month is something new! My goal is to share how you can take 1 design and think about different projects use it in to make your designs go farther! In each blog post, I’m sharing the projects created, the supply list, and additional resources that can help you learn more and advance your skills!
Crafting Creativity with Sarah Hurley
Project #1 – Fun Card with Bosh Cat and Arrow Background
I knew the moment I saw the Bosh cat design that I wanted to use him on a project. In following Sarah Hurley on social media and saw that she had adopted him, so I watch for his appearances. I always wonder what he’s thinking and feel like many of her designs would fit right in with Bosh’s thoughts.
Projects seem to take on a life of their own and I am getting better about just going with the flow of things and the direction it takes me. I knew I wanted to start with something bigger with this project and it developed along the way.
This fun sign is magnetic and the saying can be swapped out depending on what mood strikes you. Feeling snarky? Add a snarky saying. Sarah Hurley has some good ones in the Silhouette Design Store and sometimes I just enjoy scrolling through them for a laugh. Need a pick-me-up? Add an inspiration saying…. or – leave them guessing at what will be up next.
Watch the video on the Silhouette Secrets+ YouTube channel and learn how to create your own interchangeable sign. Find it out HERE or click the image below.
Video tutorial on the Silhouette Secrets+ YouTube channel HERE
Project #3 – This Side Up T-Shirt Using Text to Path
This was a fun way to use up scraps and create a fun shirt for myself. Anyone who’s ever traveled with me knows that I can trip over thin air. It’s genetic or that’s what we joke about because I get it from my Mom. If you ever see me on the ground, you’ll know why.
Project #4 – Sublimation Journal Cover with a Stencil
I love being able to create my own projects and modify them as needed. That is exactly what I did in creating this stencil with the Grafix Stencil Film. The arrow background/stencil design came in as a square, but I was able to modify it with a few simple steps to make it for what I needed.
Or use with any inks or paints to create amazing projects!
Project #5 – Bookmarks with Print and Cut
I used the arrow background/stencil design to create these bookmarks and then added my own custom color to it with the help of the Color Cubes by Sarah Renae Clark to select a color palette for the 2 different designs.
I hope this edition of Crafting Creativity with Sarah Hurley has sparked a few ideas about what you can create. Write those ideas down and see where they take you!!!
A great big thank you to Sarah Hurley for contributing the free file for the Silhouette Secrets+ newsletter for the month of August! If you missed grabbing the free Arrow Background/Stencil, it is available in the Silhouette Design Store HERE.
Sign up for the weekly newsletter HERE to have information delivered direct to your inbox and grab the new freebie each month.
Silhouette Secrets+ Newsletter
Never miss out on the news, tips, “secrets”, deals, classes, and more that I share on Silhouette Secrets+. Sign up for the newsletter and get information delivered to your inbox every Friday. Unsubscribe at anytime.
I hope this has given you some ideas on how one file can lead to many different projects!
Save this for future reference by pinning the image below.
Enjoy !
THANK YOU for your support! How can you help? Click HERE & buy a coffee. Every little bit helps with the cost of running the site.
Silhouette Classes
Never stop learning! Let me help you take the anxiety out of learning with Silhouette and get to creating faster! My Silhouette classes are heavily focused on software, so you can take the skills & techniques taught and apply them to many future projects!
**This post may contain affiliate links. What that means is that I may receive compensation if you purchase through the links I have provided. The price you pay for the product or service is not higher but I may get compensated for sharing.
I’ve wanted to write a faux leather tutorial with tips for Silhouette for a long time, but other things seemed to jump in front of it on my to-do list. So when Amy announced her Faux Leather event, I made it a goal to really dive in and create with some faux leather.
Affiliate links may be present in the following blog post and as an Amazon Associate, I earn from qualifying purchases.
Amy Romeu, hailed as the Queen of Faux Leather by many, recently hosted an event that I attended. I had a great time crafting along with her videos and picked up a lot of great tips that can help in being successful in cutting faux leather with any cutting machine.
Before we get too far in, let’s cover a few things about faux leather that will help in the process.
Faux Leather Information
Can Silhouette machines cut faux leather? Yes! Can Silhouette machines cut ALL faux leather? NO! Can all cutting machines cut ALL faux leather? NO!
Faux leather is such a broad term, just like “genuine” leather is. Cutting some faux leathers is easy, some pose greater difficulty, and others simply do not cut well at all.
Factors influencing whether a Silhouette or another machine can cut faux leather include:
Color – Yes! Many users don’t know this, but color affects how materials cut. Different colors go through different processes in the production and that can affect how it cuts. Some can be tougher than others due to coloring.
Backing – Faux leathers can have a variety of backing on it. Some don’t have any and are soft and pliable. While others can have a mesh, woven backing which can be difficult to cut through.
Texture – Faux leathers can come in all kinds of textures such as embossed, glitter, sequins, etc. This will affect how it cuts. Just think of a blade trying to bounce over a texture material to cut a clean line. Texture affects it! The texture also influences the ease of cutting by hand. The same is true for a cutting machine.
Thickness – There is a wide array of thicknesses for faux leather. Super thin ones can be too pliable and just smoosh around on the cutting mat. Thicker ones may need multiple passes to cut through and a longer blade such as the Deep Cut blade.
Composition – Faux leather is such a broad term. The definition of “faux” is artificial or fake. So keep in mind that faux leather is fake leather. What it is made of? A wide variety of things. Plastic mostly. For instance, I ordered some leather on Amazon and it is PU Leather. It is by definition, artificial leather, crafted from a thermoplastic polymer commonly employed in the production of furniture or shoes. Faux leather = fake leather = plastic
Silhouette 2 mm Manual Blade (this is what I used – more info below), Premium blade or Deep Cut blade, Silhouette Autoblade, 1 mm Manual blade, Silhouette blade available at CrafterCuts (code SECRETS for 10% off) or Silhouette America (code 10OFF for 10% off)
So the first place to start is to gather your supplies for whatever you are working on. I was so excited for these projects and I knew I would be creating several, so I pulled out all my faux leathers and my scrap HTV. I have several boxes of scrap HTV and it’s a great way to use it by adding it to faux leather projects.
Keep it a secret, but I actually obtained more faux leather than shown because I needed to test several during these projects. And once I went down that rabbit hole, I found many patterns I wanted to collect.
Cut the faux leather down to size and give yourself some extra space for taping down the edges to the cutting mat.
Place the faux leather front facing down on the cutting mat, so you are cutting through the backside first. **NOTE: if cutting real leather, DO NOT place it face down or you can ruin the finish on the real leather. That can be a very expensive mistake!
Utilize a reliable sticky cutting mat to secure the materials in place during the cutting process. Using a brayer to smooth the materials down to secure it. If the materials shift during the cut, the cut may fail, or your blade might become stuck.
Securely tape down the material edges. I found that using longer pieces of tape not only ensured a better hold but also reduced the risk of it getting caught in the machine during cutting. You can also reuse painter’s tape if removed carefully at the end.
For best results, keep the painters tape away from the edges of the cutting mat so it is not going under the rollers. Any change in the surface area under the rollers and it can cause it to lose grip or the left and right roller to not move at the same rate, which can cause issues.
When using a Silhouette cutting mat, you can use the grid for exact placement for lining up your materials and your design. If you load the mat properly, the on-screen design will align with the Silhouette cutting mat. Third party cutting mats may not line up and it will be a guessing game for design placement and alignment.
Give yourself a good allowance and grace because you may still mess up, just like I did in the photo above. I would recommend that you cut a little bit excess of the faux leather and not try to cut through the painters tape as it can affect the cut results. The cut was ok in this instance, but it went off my faux leather, so I ended up cutting another truck piece.
For tips on lining things up check out this tutorial HERE. I use this method all the time and still make mistakes. Remember to “measure twice, cut once.” But, I find I make the most mistakes if I’m rushing or I tell myself it will be just a quick project.
Test cut, test cut, test cut!!!
I used a 2 mm Manual blade for all of my faux leather cuts. This blade is the equivalent of the older style Premium blade, it’s just redesigned to fit directly into the newer model machines housing without needing an adapter. The 2 mm Manual blade (or Deep Cut blade) allows you to go from 1-20 in the blade depth settings. All faux leather will vary and some can be cut with a regular blade that is 1-10 settings, while others may need a higher blade depth than 10. Test cuts are the way you will know.
Do not unload the mat after you cut!!! Check to see how well it cut. Having a thread or two is not a bad thing! Grab a sharp pair of scissors and simply snip it.
If it does not lift easily or has more than just a few threads hanging on, send the cut again. If you have not unloaded the cutting mat, it should cut again in the exact same place. If you unload the cutting mat, it will be a hope and a prayer trying to get it lined up perfectly again to cut in the same place.
Some faux leathers may take more than 1 pass and this is why test cutting is such an important step. I write down the settings that worked for each of the materials I test and keep a log so I can refer back to it. It is not a bad thing to use more than 1 pass with certain projects. I find with thicker materials, you can get a cleaner cut when you are not trying to force the machine to do it all at once time. However, for thinner materials such as adhesive vinyl or regular cardstock, multiple passes shouldn’t be necessary if the blade is installed properly.
This is white faux leather from Craft Chameleon. I used the 2 mm Manual blade (equivalent of the Deep Cut blade) . Blade depth – 9 Force – 30 Passes – 2
For more details on what blade depth and force are, check out this in-depth tutorial on the Silhouette Send tab HERE.
Once the cut is successful, unload the mat, remove the painter’s tape – it can be reused and carefully peel away the excess. Snip any threads as you carefully remove the excess so you do not stretch the design.
When cutting, check the blade regularly for debris stuck to it or inside the cap. The fibers of the faux leather can hinder the cut results.
It is perfectly normal to have to increase the settings of the blade as you cut materials. A blade cutting any material is going to dull with usage. Keep in mind that you are cutting through plastic and fibers. That will cause a blade to wear differently than other materials.
For this design I used the Red Truck Ornament file from Amy Romeu and there is a front and back layer cut from faux leather that will be glued together. The rest of the design is cut from HTV, so I swapped out my blade for my HTV blade and set up my cutting mat to cut different colors of scraps at the same time.
I used the Cut by Fill Color so I could set up different cut settings for my Smooth HTV versus my Glitter HTV. The Autoblade did all the work to change the settings once set up. Check out this tutorial HERE for tips on cutting by line or fill color – they are the same.
And then I set up my cutting mat to match exactly what I had set up on the Silhouette software. Check out tips on cutting multiple colors at the same time HERE.
Then I simply weeded the design and pressed the pieces on according to Amy’s instructions. I also cut this design out of cardstock and adhesive vinyl too! The faux leather ornament is on the left and the cardstock ornament is on the right.
Check out Amy Romeu’s YouTube video HERE for instructions on the assembly. Even though she is using a Cricut machine to cut, the process and tips are useful.
I was having so much fun cutting faux leather that I couldn’t stop and wanted to test more!
I followed the same tips as above and taped it securely to my cutting mat.
If you compare this photo to the first one, you’ll notice that the backing differs on the white versus this silver embossed piece. That can affect the cut settings and results. The woven backing texture can be a bit more difficult to cut and may require higher settings and more passes to cut cleanly.
I used the 2 mm Manual blade (equivalent of the Deep Cut blade). Blade depth – 9 Force – 30 Passes – 2-3 however, that was still not a clean cut, so I then increased the Blade depth to 11 and did 2 more passes.
In this case, the Embossed texture on the front is uneven and can affect the cut.
I did not have all the supplies to finish this out as Amy did, so I used what I had on hand and made my own holly berries and leaves. The holly leaves are drawn from scratch in Silhouette Studio. If you want to learn how, I show step-by-step in the Designing in Silhouette Studio – Creating Keepsake Ornaments class HERE. I cut the leaves from cardstock, painted some small craft balls, and then glued it all onto the ornament.
In both the designs shown above, the faux leather was cut for the front and the backside and then glued together so it had a finished look. But for this next project, I used Siser Metal HTV and adhered it to the backside of the white faux leather from Craft Chameleon before cutting.
I pressed it once with the carrier sheet on and then a second time without the carrier sheet for just a few seconds. The second press allows the texture of the faux leather to show through and it is gorgeous! Photos do not do it justice.
But keep in mind, anytime you add something to a material, that can change the cut settings.
I used the 2 mm Manual blade (equivalent to the Premium blade). Blade depth – 10 Force – 30 Passes – 1 And I probably could have done one more pass.
Now, what you’ll notice is that all of the pieces are still attached. However, they easily popped out and I only had a few threads to snip. This actually worked better for the next steps as I could keep it all organized in one place until I was ready to press.
I loved the finished look of the Siser Metal HTV on the backside! And I used up a few scraps of Glitter HTV, not much, but it is the perfect project for those scraps that you might have.
I had so much fun creating along with this event and now have faux leather for many more projects.
I hope those tips help you to be successful with cutting faux leather with your Silhouette machine.
You can still purchase the VIP package for the Faux-La-La Crafting Fun and join in on the fun. You get the files for all the projects, all the videos in one place, a printable guide, and more! Check it out HERE for all the details.
Save this for future reference by pinning the image below.
Enjoy !
THANK YOU for your support! How can you help? Click HERE & buy a coffee. Every little bit helps with the cost of running the site.
Silhouette Classes
Never stop learning! Let me help you take the anxiety out of learning with Silhouette and get to creating faster! My Silhouette classes are heavily focused on software, so you can take the skills & techniques taught and apply them to many future projects!
**This post may contain affiliate links. What that means is that I may receive compensation if you purchase through the links I have provided. The price you pay for the product or service is not higher but I may get compensated for sharing.
Affiliate links may be present in the following blog post and as an Amazon Associate I earn from qualifying purchases.
This video – whew! If it was going to go wrong, it was going to happen on video! Not just the video but in the editing process too! I had to edit this one twice because my editing software deleted the beginning and I didn’t notice until I was at the end.
Some weeks go smoothly and others not so much – but I got there in the end!
And I’ve been successfully using my Silhouette Cameo 5 since this video was recorded. I have cut more Siser Glow HTV and even used it to sketch out some Halloween shirts in an Artesprix Sublimation Marker video I did this month! It worked beautifully!
Here is a look at my successful cut – the 2nd go around. I decided to keep it all in the video and show you the reality of what happens. It does not always go 100% perfect all the time! I mess up, my machine doesn’t cut right, firmware doesn’t update by Bluetooth – everything that happens to users that we troubleshoot, we encounter too!
The new Silhouette Cameo 5 has some new features: – newly designed roller bar – new rollers – new places the rollers can be locked in place – repeat job (highly requested!!!) – quieter operation – new powered housing in Tool 2 new tools! – front crosscutter option (more on that in the future) – emergency stop (which I’ve already used several times on all my new machines) and more!!! I cannot wait to share more!!!
Another new thing that Silhouette has been working on is that the firmware updates for the Cameo 5, Portrait 4, and Curio 2 will be able to update through the Bluetooth connection. On previous Silhouette model machines, it had to be done through a USB connection and was the only way it would update. An internet connection is required to complete a firmware update.
This is great news! However, I do want to note as you’ll see in the video, the current version of the software is not always successful in this and we have reported that. I did have to connect by USB cable in order to complete that. But, it is great that it will be an option moving forward.
Save this for future reference by pinning the image below.
Enjoy !
THANK YOU for your support! How can you help? Click HERE & buy a coffee. Every little bit helps with the cost of running the site.
Silhouette Classes
Never stop learning! Let me help you take the anxiety out of learning with Silhouette and get to creating faster! My Silhouette classes are heavily focused on software, so you can take the skills & techniques taught and apply them to many future projects!
**This post may contain affiliate links. What that means is that I may receive compensation if you purchase through the links I have provided. The price you pay for the product or service is not higher but I may get compensated for sharing.
I’ve had so much fun with the Siser Glow HTV! If you missed Part 1 – check it out HERE. Siser Glow HTV can be cut with any cutting machine and I was swapping back and forth in my creations between Silhouette and Siser machines. Sometimes I had both going at the same time.
Affiliate links may be present in the following blog post and as an Amazon Associate I earn from qualifying purchases.
I had Siser Juliet set up in one room cutting away, while my Silhouette Cameo was cutting next to my computer (shown in Siser Glow HTV Part 1). With the Siser Juliet connected through WIFI, I regularly cut from one room to the next. The Juliet roll holder came in handy for these projects and my rolls of Siser Glow HTV.
One of the most important steps you can do is – test cut, test cut, test cut. It seems like such a basic step, but it can save you!!! Siser machines make it so easy to perform this simple action directly on the touchscreen and it will save you so much in time, materials, and frustration.
I think I found my new favorite shirt for awhile. I’ve been collecting these designs by Sophie Gallo just waiting for the perfect projects. Find this design HERE. Here is a look at the back of the shirt.
I don’t know why I have never really decorated the back of my shirts and I hadn’t ever though about it until I started following MammaBearKay and watching her post her shirts. She runs an awesome business with adult humor shirts.
Here is a look at the Siser Glow HTV in the dark.
And the same shirt under the blacklight.
I’ve already several compliments on it when I have worn it out. Everyone gets a good laugh.
Here is a look at the front. I just took the little guy out of the original design and cut him smaller for the front. If I did this over, I think I’d put him on the other side, but it’s done now and I can always make another.
Let’s light him up!
After dark
And under the blacklight.
But I didn’t stop there…..
My son loves games, so this design from Leonardo Design Studio was perfect!
What kid doesn’t like a glow-in-the-dark shirt? Unless they are playing hide-and-seek or kick the can of course!
I was having so much fun creating. Little green men should glow right?
And I couldn’t leave Siser Romeo out of the fun! As soon as I had the Siser Glow HTV in my hands I had a BIG idea. It was only after I created the design that I realized I didn’t have Siser Glow HTV in the size I needed. So I called in a special request at The Vinyl Spectrum and ordered larger sizes.
Save this for future reference by pinning the image below.
If you missed Part 1 of the Siser Glow HTV – check it out HERE.
Enjoy !
THANK YOU for your support! How can you help? Click HERE & buy a coffee. Every little bit helps with the cost of running the site.
Silhouette Classes
Never stop learning! Let me help you take the anxiety out of learning with Silhouette and get to creating faster! My Silhouette classes are heavily focused on software, so you can take the skills & techniques taught and apply them to many future projects!
**This post may contain affiliate links. What that means is that I may receive compensation if you purchase through the links I have provided. The price you pay for the product or service is not higher but I may get compensated for sharing.
I have been having a lot of fun…. maybe too much, but once I get started, it’s hard to stop.
Here is a little behind-the-scenes look at what my studio looked like a few weeks back when I was in the middle of all my creations.
Affiliate links may be present in the following blog post and as an Amazon Associate I earn from qualifying purchases.
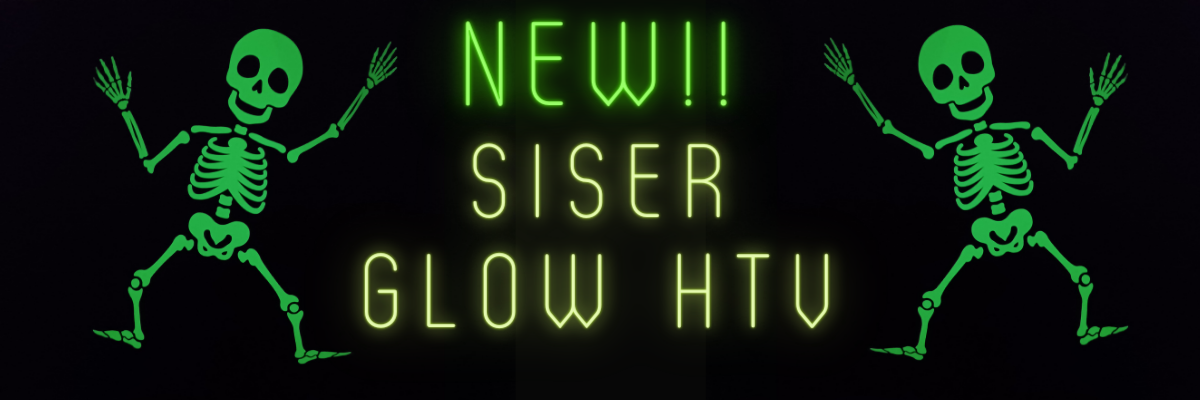
Siser Easy Glow HTV arrived and I went creative crazy! So many ideas came to mind and I just started designing and cutting. I have lots I want to share with you, but I’ll have to split it into 2 parts to share it all. I may have also made myself my new favorite shirt too! (see Siser Glow Part 2)
The first thing to do is test cut! Let me say it again so it sinks in – test cut, test cut, test cut. I started with the recommended settings on the Siser website for Easy Glow and did my test cuts. Your machine, blade life, and many other factors go into what cut settings will work for you in that moment.
For tips more tips that will save you time and frustration check out this post on Test Cuts and also Perfect Cut Settings.
And then I was off and cutting once I knew I wouldn’t waste materials. My kids are getting older and Trick or Treating is still big in our area, no matter their age. But the little cute plastic buckets aren’t doing it anymore.
Check out this awesome video from Siser North America – I love it!
Grab some Siser Glow HTV and see what creative ideas you can come up with! It is currently available in 5 colors. I’ve included my supply list below for these new trick or treat bags.
Save this for future reference by pinning the image below.
Want more tips, projects, and tutorials delivered right to your inbox? Never miss out of information by signing up for the Silhouette Secrets+ Newsletter. Every Friday (or that’s my goal), I will have a new newsletter released sharing Silhouette information that can help you in your projects and learning more! Sign up below and make sure to confirm your subscription to get the newsletter!
Silhouette Secrets+ Newsletter
Never miss out on the news, tips, “secrets”, deals, classes, and more that I share on Silhouette Secrets+. Sign up for the newsletter and get information delivered to your inbox every Friday. Unsubscribe at anytime.
THANK YOU for your support! How can you help? Click HERE & buy a coffee. Every little bit helps with the cost of running the site.
Silhouette Classes
Never stop learning! Let me help you take the anxiety out of learning with Silhouette and get to creating faster! My Silhouette classes are heavily focused on software, so you can take the skills & techniques taught and apply them to many future projects!
**This post may contain affiliate links. What that means is that I may receive compensation if you purchase through the links I have provided. The price you pay for the product or service is not higher but I may get compensated for sharing.
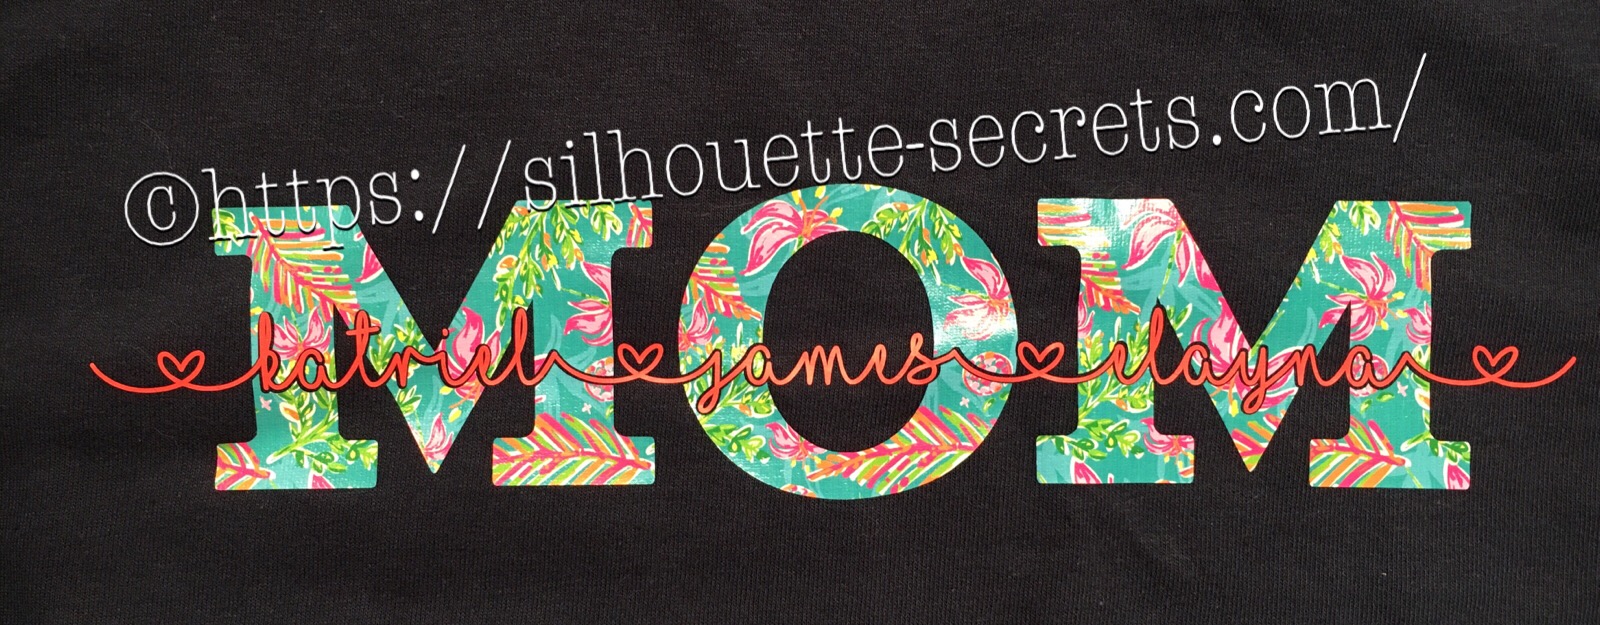
If you’ve ever wanted to turn a simple word into meaningful, personalized word art, the “subtract the name from Mom” technique is one of the most popular and impactful designs you can create in Silhouette Studio. By using basic subtract, weld, and text tools, you can carve a child’s name directly out of the word “Mom,” transforming it into a custom design that feels both modern and deeply personal. In this tutorial-style project, I’ll show you how to build this custom MOM shirt word art and then bring it to life by cutting it from HTV to create beautiful, custom apparel that’s perfect for gifts, family matching shirts, or keepsakes.
These designs have been a big hit for Mother’s Day and we will walk through how to created one.
Affiliate links may be present in the following blog post and as an Amazon Associate, I earn from qualifying purchases.
Create a Custom MOM Shirt with Silhouette & HTV
First click on the Text Tool on the left side of the Silhouette Software.
Click on the design mat & type out the words.
Click off of the words to deselect it and then click back on the text once to select it.
Fill the text with color to make it easier to see & work with.
Now, click on a Font Style Name, the text will change to that font style.
You can then either click on each font, use the text search bar if you know what you are looking for or use the arrow keys to scroll through the text list and as you do the words will change to each font – this is my favorite method if I don’t know what font I want.
For Mom, I chose a font called Gulana – I chose this one by just scrolling through my font list and seeing what I liked best.
Now, resize it how you like it.
Next using the same text tools, type out your second layer.
I used the font MF I Love Glitter by Misti Fonts in this example. The swirl hearts are called Glyphs and are special characters within the font that you can add.
Since this font overlaps make sure to weld the letters together before you cut.
Now position your name design over the top of the Mom design and align it how you want it.
We are going to Subtract the top layer (names) from the bottom layer (Mom).
First, I’d suggest creating an offset. When you are using HTV and pressing individual layers, the HTV can shrink as it’s applied with heat. To help with that we will create an offset, so we don’t have unwanted gaps in our design.
First, make a copy of your design and pull it off to the side in the holding area of the design space. Any time you are working with text, it’s a good idea to make a copy and pull the original off, just in case you need to go back. Once you edit text, it is no longer text and is now treated as a vector image – so the text is no longer editable.
Next, select your name text and click on the Offset Panel on the right side of Silhouette Studio v4.
Then next to the Distance highlight the numbers and type in 0.040, then click on Apply or hit Enter. The Distance of the offset will vary depending on the design you are using. Enter some larger or smaller offsets and see what you like – the Undo button will be your best friend.
The offset option gives you an outline around your text. It can also be used to make text thicker when you are using a very fine line font.
Once you Apply the offset, it will weld any parts that are overlapping. Parts of the design that are not overlapping (like dots of an i) will not be welded together, so you will need to group the offset before you move it, so it all moves as one.
Now move your original text off of the Mom design.
To create this design, we are going to use the Mom and the offset of our name text.
Select both Mom and the offset and under the Modify Panel, choose Subtract.
This will Subtract the top layer (offset) from the bottom layer (Mom) and any pieces that are not connected will now be individual. I would group these together before anything gets moved.
The Group option can be found in the QAT (Quick Access Toolbar) at the top of the software, right click and choose Group or under the Object menu at the top left of the software.
Now, we can move our original text back on top of our Mom design.
You can see when we zoom in that we have created a gap in our layering. This is done with the purpose of allowing for the shrinkage of the HTV and not getting unwanted gaps in our design.
Do you have to do an offset before you use the Subtract option? No, but it can save some frustration when the HTV does shrink.
Now, you are ready to set it up to cut out the material.
I used this awesome Sparkleberry Vaca HTV by Sparkleberry Ink on the Mom design. This is a patterned vinyl and you do not have to mirror or flip your image when you cut their patterned vinyl.
For the name text, I am using Siser Easyweed HTV in Hibiscus. Since this is regular HTV, I will flip (mirror) the text prior to cutting.
Next, prepare your materials. Cut them down to the size you need or place each one on the mat individually, however you like to cut.
Click on the Send tab in the top right corner. Select your Material. Heat Transfer – Smooth is what I used for both the pieces I cut.
Once your mat is loaded, I always suggest doing a Test Cut before cutting the full design. This can save you a lot of frustration in the long run.
Click on the Send button at the bottom and once it’s cut you can weed your designs.
Layer & press the designs on your t-shirt or tote bag and you have a custom made design.
This MOM shirt technique could be used to create many different custom designs such as DAD, NANA, GRANNY, etc.
Save this for future reference by pinning the image below.
Enjoy !
THANK YOU for your support! How can you help? Click HERE & buy a coffee. Every little bit helps with the cost of running the site.
Silhouette Classes
Never stop learning! Let me help you take the anxiety out of learning with Silhouette and get to creating faster! My Silhouette classes are heavily focused on software, so you can take the skills & techniques taught and apply them to many future projects!
**This post may contain affiliate links. What that means is that I may receive compensation if you purchase through the links I have provided. The price you pay for the product or service is not higher, but I may get compensated for sharing.
THANK YOU for your support! How can you help? Click the link to buy a coffee. Every little bit helps in the cost of running the site.