Posted on Leave a comment

DIY Interchangeable Glass Frame Sign with Silhouette Studio – One Project for All Seasons

Silhouette Secrets+ with EllyMae

Looking for a versatile home décor project you can enjoy all year long? This DIY Interchangeable Glass Frame Sign with Silhouette Studio is the perfect solution! Using a simple glass frame, adhesive vinyl, Sharpie Creative Markers, and Epson Presentation Paper, you can create a custom sign with beautiful digital backgrounds and sayings that can be swapped out for every day decor, seasonally, or for holidays. Designed entirely in Silhouette Studio, this project combines the ease of printable designs with the precision of vinyl cutting, making it beginner-friendly yet completely customizable. Whether you’re decorating for spring, adding a spooky touch for Halloween, or creating a cozy Christmas look, this reusable sign is a budget-friendly craft you’ll use again and again.

Affiliate links may be present in the following blog post and as an Amazon Associate, I earn from qualifying purchases.

For this project, you may even have all the supplies available in your craft stash or think about what you could use as an alternative. I’ve listed the supplies I used below, so you can recreate it too! Don’t limit yourself to these designs either! Think Halloween, Christmas, Winter, and more! I’ll add photos to this blog post as I create more too!

A DIY interchangeable glass frame sign featuring the text 'hello FRIENDS' with a pastel bokeh background and floral designs at the bottom. Surrounding the frame are Sharpie Creative Markers in various colors and crafting tools.

DIY Interchangeable Glass Sign Supplies:

How to Create a DIY Interchangeable Glass Sign

Gather the supplies. I grabbed an 8″ x 8″ glass frame from my supply closet, some scrap adhesive vinyl in black, some transfer tape and my Sharpie Creative Markers.

DIY interchangeable glass frame sign supplies photo. A workspace with a Silhouette cutting machine, colorful Sharpie Creative Markers, a black adhesive vinyl sheet, and a glass frame on a wooden table.

Measure the inside of the frame you are using. Even if the photo frame states a certain dimension, make sure to measure it and verify so that you don’t end up with a print that is too small like I did.

Open Silhouette Studio and using the Drawing Tools, draw a rectangle. Size the rectangle to the measurements taken using the Scale Tools and verify it again.

Screenshot of Silhouette Studio software displaying printable background designs featuring floral elements and text elements like 'life is beautiful' and 'hello FRIENDS' for a DIY interchangeable glass frame sign

I designed 3 different backgrounds at the same time. Use the Silhouette Studio software to create the entire design, including sizing the flower shapes to fit within the shape you are working with.

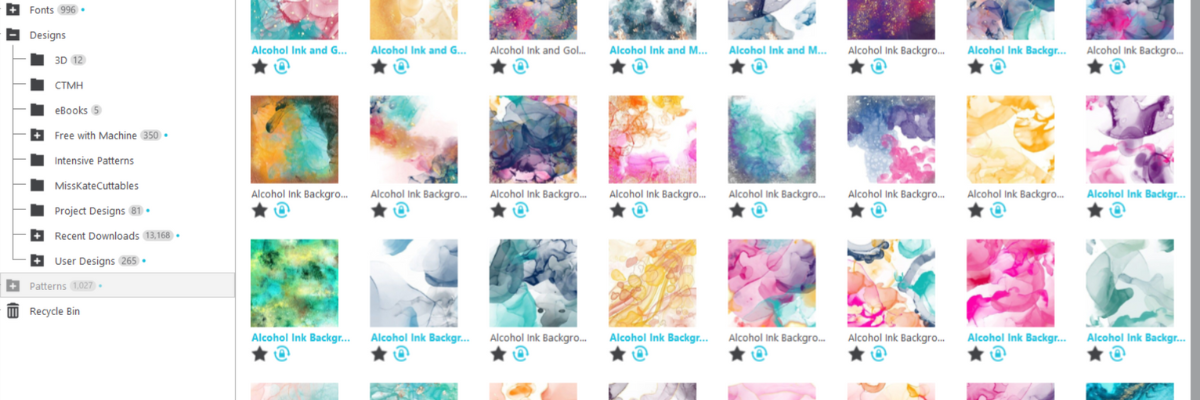
Now comes the longest part of the entire project – selecting a background pattern and the quotes you want to use. This is what always takes me the longest in creating.

There are multiple ways to add a pattern to a shape. Check out the additional resources below for several options.

I selected the square and then clicked on the library tab in the top right. Then selected a pattern from under my Patterns Folder in the Silhouette library and just continued to do that until I found the ones I wanted. I have 1100 patterns in my Silhouette library, so it took me awhile to make a decision.

A DIY interchangeable glass frame sign displaying the phrase 'life is beautiful' over a colorful gradient background with flowers, accompanied by various markers and crafting tools.

Repeat these steps to create as many backgrounds as you choose.

When ready to cut, it’s a great idea to use File > Save As and create a “cut file”, so you keep an original working file that could be referred back to if needed.

When ready, move the flowers away from the background design. Change the line color of the sentiment to transparent. You do not want the red cut line to print around the image and have to reprint. A line thickness greater than 0 on any line in Silhouette Studio will print out.

Various printed designs for a DIY interchangeable glass frame sign, featuring quotes and decorative backgrounds, laid out on a crafting table with a cutting machine in the background.

I am using Epson Presentation Paper – Matte with my Canon TS9521C printer on the photo matte high quality setting. Every printer can vary in what colors look like and the only way to know what the colors will be is to test with your printer. See additional resources below.

Next, cut the flower design (or whatever design you are using) from adhesive vinyl. Make sure that the adhesive vinyl you use is the same color on the backside as the front. This will be applied on the backside of the glass frame.

Tabletop setup for a DIY project featuring a black glass frame, cutting mat with flower designs, adhesive vinyl, and various paper backgrounds.

Weed the adhesive vinyl design and apply transfer tape to the entire design.

Clean the backside of the glass frame carefully and let dry.

Then, carefully apply the design to the backside of the glass frame.

Tip: (not shown) Use painter’s tape along the edges of the glass to make it safer to handle and prevent cuts from the glass edges.

A flat lay image showing various crafting supplies for a DIY project, including black Sharpie markers, a ruler, a clear plastic mat with a floral black vinyl design, and a black frame, with colorful patterned papers in the background.

After applying the adhesive vinyl, don’t worry about seeing the adhesive of the vinyl on the front side. As the vinyl sits on the glass and the adhesive sets up, the adhesive look will disappear. Just make sure to apply the adhesive vinyl smoothly and make sure all areas are adhered well to the glass.

Next, on the backside of the glass, start coloring in the design as desired with the Sharpie Creative Makers. These work great on glass!

Close-up of a hand using a green Sharpie marker to color in a floral design on a glass surface with a black vinyl outline.

Don’t worry too much about it looking a bit messy or coloring only in the lines, you won’t see the backside of the glass.

An assortment of colorful Sharpie markers placed above a hand-drawn floral design on a transparent surface, featuring daisies and pink flowers.

Let the paint dry. Add additional coats as needed for the desired look.

While it dries, grab a paper trimmer and trim down the printed backgrounds. I did not set this up for a print and cut as I would have lost space and not been able to fill my frames completely. Plus, it is 4 straight edge cuts per page. A good quality paper trimmer is a great tool to have in your craft supplies.

A decorative interchangeable glass frame sign featuring inspirational quotes surrounded by colorful floral designs, with Sharpie Creative Markers placed nearby.

And then all that’s left to do is to add the background paper into the frame and secure it.

Grab some photos of your awesome project and think of new ideas that you can swap out the background with or keep it up all year long!

1 frame = endless possibilities!

Additional Resources:

DIY Interchangeable Glass Sign Additional Photos

(I’ll add more photos as I create additional backgrounds to swap out.)

Save this for future reference by pinning the image below.

A DIY glass frame sign featuring a pastel background with the words 'hello' and 'FRIENDS,' along with colorful floral designs at the bottom, demonstrating a versatile home decor craft.

Enjoy !

THANK YOU for your support! How can you help? Click HERE & buy a coffee.
Every little bit helps with the cost of running the site.

Silhouette Classes

Never stop learning! Let me help you take the anxiety out of learning with Silhouette and get to creating faster! My Silhouette classes are heavily focused on software, so you can take the skills & techniques taught and apply them to many future projects!

Silhouette step-by-step Classes by Silhouette Secrets+

Silhouette Secrets+ with EllyMae
**This post may contain affiliate links. What that means is that I may receive compensation if you purchase through the links I have provided. The price you pay for the product or service is not higher but I may get compensated for sharing.

Posted on 2 Comments

Create Stunning Backgrounds in Silhouette Studio Using Fill Gradients

Create Custom Backgrounds in Silhouette Studio
Silhouette Secrets+ with EllyMae

Have you ever explored the Fill Gradient panel in Silhouette Studio to create your own custom backgrounds? It’s a powerful feature that often flies under the radar—but it can completely transform your designs with just a few clicks. Recently, a fellow Silhouette user reached out asking for more details on how to use gradient fills for creating eye-catching backgrounds. So we explored exactly how the Gradient Fill Panel works —and I’ve got two great resources where I walk you through the process step-by-step. Whether you’re crafting cards, printable art, or layering cut designs, you’ll love what gradient fills can do!

Affiliate links may be present in the following blog post and as an Amazon Associate, I earn from qualifying purchases.

Note: all screenshots and references are using version v4.5.812 of Silhouette Studio. At the time of publication, I am not recommending the current version 5, as it has too many bugs and issues in it. Silhouette Studio version 5 does have a bit different look and some things have been moved around. If you are on version 5 and want to revert to a legacy version, see how HERE.

The Fill Color Panel in Silhouette Studio has 3 tabs that include the main Fill Color, Gradient Fill, and Pattern Fill Panels. It is located on the right side and looks like an artists palette.

Screenshot of the Fill Gradient panel in Silhouette Studio, showcasing color options and gradient settings.

Gradient Fills in Silhouette Studio

Let’s get right down to the resources on Gradient Fills in Silhouette Studio.

First up is the LIVE Silhouette tutorial called Mastering the Fill Gradient Panel in Silhouette

Graphic showcasing various gradient fills in Silhouette Studio with instructional text overlay 'CREATE STUNNING GRADIENTS IN SILHOUETTE'.

We covered the Gradient Fill Panel in depth and you can see the demonstration in real time. There are so many options that you can create and play with!

And then I couldn’t stop playing with the patterns and took it one step farther and created custom alcohol ink background patterns. I was so excited I had to share that in this video – How to Create Custom Background Patterns in Silhouette Studio | Easy Step-by-Step Tutorial

An illustrative guide showcasing gradient fills in Silhouette Studio, featuring a solid gradient square and three stunning background designs incorporating vibrant colors and textures.

I took one of the gradient patterns I made in the LIVE tutorial and then added an alcohol ink texture on top of it and created 3 different alcohol ink backgrounds.

A person holding two printed gradient background designs showcasing a blend of colors, with a wall and a calendar visible in the background.

I printed this on 12″ x 12″ cardstock and also on Epson Presentation Paper – Matte. Here is a look at both of those print outs. Notice how the colors are a bit different. The material surface you print on can affect the final colors. The ink soaks into the cardstock more than on the presentation paper, which shows in the final colors. Both can still be used for different projects.

A great way to test and see how colors will look on different materials with your printer is to print out a test. Check out this post – Silhouette Studio: Testing Print Colors for more information and tips.

A greeting card with the text 'Make a Wish' displayed on a cutting machine in a crafting workspace.

Custom created backgrounds can be used for many projects. I used the sheets I printed and cut the pieces for this scalloped step card design by Lori Whitlock. Then stamped a quick sentiment and now have an easy to assemble card.

There is so much you can do with the Silhouette Studio software. Want to learn more? Check out these additional resources below.

Has this sparked ideas of what you could create? Let me know in the comments below.

Save this for future reference by pinning the image below.

Screenshot showcasing gradient fills in Silhouette Studio, featuring colorful gradients and a 'Create' text overlay.

Enjoy !

THANK YOU for your support! How can you help? Click HERE & buy a coffee.
Every little bit helps with the cost of running the site.

Silhouette Classes

Never stop learning! Let me help you take the anxiety out of learning with Silhouette and get to creating faster! My Silhouette classes are heavily focused on software, so you can take the skills & techniques taught and apply them to many future projects!

Silhouette step-by-step Classes by Silhouette Secrets+

Silhouette Secrets+ with EllyMae
**This post may contain affiliate links. What that means is that I may receive compensation if you purchase through the links I have provided. The price you pay for the product or service is not higher but I may get compensated for sharing.

Posted on Leave a comment

Silhouette Studio: 4 Ways to Open Patterns

Silhouette Patterns Folder
Silhouette Secrets+ with EllyMae

Four Ways to Open Patterns in Silhouette Studio

Using patterns in the Silhouette Studio software can give your projects a unique look. Whether you are doing a print and cut project or creating a digital graphic image. Digital patterns can be a great asset to your toolbox. As with many tools in the Silhouette Studio software, there can be multiple ways to do it. I’m sharing 4 ways that patterns can be opened in Silhouette Studio below, but first what is a pattern?

A digital pattern is a photo file. It is typically a JPEG, PNG, or TIFF file format. Before we get too far into it, one thing to note about digital patterns is that they can be quite large. A digital pattern, when designed properly should be 300 dpi for print quality. That means the file size is much greater than your average SVG file. Since every user has a different computer with different specifications, that also means that each user’s computer may handle data differently. When working with heavy data files, close any programs that are not necessary and any tabs within Silhouette that are not needed. I’d also recommend clearing out any Recovered Documents and keep that cleared out as well. This will help your computer and software run as smooth as it can.

4 Ways to Open Patterns in Silhouette Studio

1 – Open the pattern from the Silhouette Library Patterns Folder.
If you want to open the full pattern on the design mat, double click on the pattern in the Silhouette Library Patterns folder.
If you want to fill a particular shape, click on the shape to select it on the design mat. Then click on the Library Tab, Patterns folder and single click on the pattern. Click back on the Design tab and the shape will be filled with the pattern selected.
If you double click with a shape selected, it will fill the shape and then also open the full pattern on top of that too.

Silhouette Library Patterns Folder

2 – Select a pattern from the Fill Color Panel – Tab 3.

Silhouette Fill Color Panel

    3 – Click on the Show/Hide Library icon in the bottom left corner of the design tab.
    This will open a split screen showing the library and the design tab. This can be much easier to see larger images of thumbnails and design with instead of having to swap back and forth between the Design and Library tabs.
    Select a pattern the same way as in #1.

    Silhouette Show Hide Library Split Screen


    4 – Drag and drop a pattern from a folder saved on your computer or storage device.
    When dragging and dropping, drag the pattern to the shape you want to fill and hold it until the pattern has filled the shape. If you move too fast and release the mouse button too quick a little white rectangle will appear and not go away. The only way to get it to disappear is to close and reopen the software.

    Silhouette Drag and Drop Pattern

    I am sharing even more information in this video on the Silhouette Secrets+ YouTube channel found HERE.

    Silhouette YouTube video on 4 Ways to Open Patterns in Silhouette Studio

    I hope these tips have helped give you some ideas on how to work with patterns and create unique projects in Silhouette Studio. Check out the additional resources below to learn even more!

    Additional Resources:

    Save this for future reference by pinning the image below.

    Patterns in Silhouette Pin

    Enjoy !

    THANK YOU for your support! How can you help? Click HERE & buy a coffee.
    Every little bit helps with the cost of running the site.

    Silhouette Classes

    Never stop learning! Let me help you take the anxiety out of learning with Silhouette and get to creating faster! My Silhouette classes are heavily focused on software, so you can take the skills & techniques taught and apply them to many future projects!

    Silhouette step-by-step Classes by Silhouette Secrets+

    Silhouette Secrets+ with EllyMae
    **This post may contain affiliate links. What that means is that I may receive compensation if you purchase through the links I have provided. The price you pay for the product or service is not higher but I may get compensated for sharing.
    Posted on 2 Comments

    Create Stunning Silhouette Projects with Sarah Hurley’s Designs: Cards, T-shirts & More

    Crafting Creativity Sarah Hurley
    Silhouette Secrets+ with EllyMae

    In this edition of Crafting Creativity I’ll be sharing the projects I created through the month with an arrow background/stencil design. So many great options from one file! A great big thank you to Sarah Hurley for providing the free file for the Silhouette Secrets+ August newsletter!

    Affiliate links may be present in the following blog post and as an Amazon Associate, I earn from qualifying purchases.

    Sarah Hurley website

    What is Crafting Creativity?

    I started sharing a blog post each month where I’m sharing the projects I’ve created with 1 file from an artist I have collaborated with. This is a file that the designer has provided for the Silhouette Secrets+ Newsletter subscribers and each month is something new! My goal is to share how you can take 1 design and think about different projects use it in to make your designs go farther! In each blog post, I’m sharing the projects created, the supply list, and additional resources that can help you learn more and advance your skills!

    Sarah Hurley Arrow Background Stencil Design Silhouette Design Store

    Crafting Creativity with Sarah Hurley

    Project #1 – Fun Card with Bosh Cat and Arrow Background

    Card created with designs by Sarah Hurley

    I knew the moment I saw the Bosh cat design that I wanted to use him on a project. In following Sarah Hurley on social media and saw that she had adopted him, so I watch for his appearances. I always wonder what he’s thinking and feel like many of her designs would fit right in with Bosh’s thoughts.

    Additional Resources:

    Supplies Used:

    Project #2 – Fun Interchangeable Sign

    Fun Interchangeable Sign with Silhouette with designs by Sarah Hurley

    Projects seem to take on a life of their own and I am getting better about just going with the flow of things and the direction it takes me. I knew I wanted to start with something bigger with this project and it developed along the way.

    This fun sign is magnetic and the saying can be swapped out depending on what mood strikes you. Feeling snarky? Add a snarky saying. Sarah Hurley has some good ones in the Silhouette Design Store and sometimes I just enjoy scrolling through them for a laugh.
    Need a pick-me-up? Add an inspiration saying…. or – leave them guessing at what will be up next.

    Watch the video on the Silhouette Secrets+ YouTube channel and learn how to create your own interchangeable sign. Find it out HERE or click the image below.

    Video Tutorial link to Silhouette Secrets+ YouTube channel for Interchangeable Sign
    Video tutorial on the Silhouette Secrets+ YouTube channel HERE

    Additional Resources:

    Supplies Used:

    Project #3 – This Side Up T-Shirt Using Text to Path

    Text To Path T-Shirt Design in Silhouette with designs by Sarah Hurley

    This was a fun way to use up scraps and create a fun shirt for myself. Anyone who’s ever traveled with me knows that I can trip over thin air. It’s genetic or that’s what we joke about because I get it from my Mom. If you ever see me on the ground, you’ll know why.

    Text to Path is an awesome feature in the Silhouette Studio software and is available for all users. Check out how easy it is in this new video – Silhouette Tutorial: Quick and Easy Text to Path Tutorial HERE.

    Silhouette Tutorial Text to Path

    Additional Resources:

    Supplies Used:

    Project #4 – Sublimation Journal Cover with a Stencil

    Grafix Stencil Film with Silhouette

    I love being able to create my own projects and modify them as needed. That is exactly what I did in creating this stencil with the Grafix Stencil Film. The arrow background/stencil design came in as a square, but I was able to modify it with a few simple steps to make it for what I needed.

    Check out more details on how I created the stencil in this blog post:
    Create Customs Stencils: Using Grafix Stencil Film with Your Silhouette HERE

    Stencil Design in Silhouette Studio with Sarah Hurley design

    This was a fun project I created in a collaboration with Grafix Arts. Find the new video tutorial on the Grafix YouTube channel HERE

    Additional Resources:

    Supplies Used:

    Project #5 – Bookmarks with Print and Cut

    Silhouette Print and Cut Bookmarks with a Holographic Overlay with Sarah Hurley design

    I used the arrow background/stencil design to create these bookmarks and then added my own custom color to it with the help of the Color Cubes by Sarah Renae Clark to select a color palette for the 2 different designs.

    I shared how I did that in this video – Silhouette Studio Custom Color Palette Add Colors found HERE on the Silhouette Secrets+ YouTube channel.

    Custom Color Palette in Silhouette Studio

    The holographic overlay adds a fun touch as well as protects the bookmark front too!

    Additional Resources:

    Supplies Used:

    I hope this edition of Crafting Creativity with Sarah Hurley has sparked a few ideas about what you can create. Write those ideas down and see where they take you!!!

    Find more amazing designs by Sarah Hurley at the Silhouette Design Store. Follow along with Sarah Hurley on their website, Facebook, and Instagram too!

    A great big thank you to Sarah Hurley for contributing the free file for the Silhouette Secrets+ newsletter for the month of August! If you missed grabbing the free Arrow Background/Stencil, it is available in the Silhouette Design Store HERE.

    Sign up for the weekly newsletter HERE to have information delivered direct to your inbox and grab the new freebie each month.

    Silhouette Secrets+ Newsletter

    Never miss out on the news, tips, “secrets”, deals, classes, and more that I share on Silhouette Secrets+. Sign up for the newsletter and get information delivered to your inbox every Friday.
    Unsubscribe at anytime.

    I hope this has given you some ideas on how one file can lead to many different projects!

    Save this for future reference by pinning the image below.

    Multiple Projects from 1 Design by Sarah Hurley

    Enjoy !

    THANK YOU for your support! How can you help? Click HERE & buy a coffee.
    Every little bit helps with the cost of running the site.

    Silhouette Classes

    Never stop learning! Let me help you take the anxiety out of learning with Silhouette and get to creating faster! My Silhouette classes are heavily focused on software, so you can take the skills & techniques taught and apply them to many future projects!

    Silhouette step-by-step Classes by Silhouette Secrets+

    Silhouette Secrets+ with EllyMae
    **This post may contain affiliate links. What that means is that I may receive compensation if you purchase through the links I have provided. The price you pay for the product or service is not higher but I may get compensated for sharing.
    Posted on 1 Comment

    Creative Projects Using ClikChic Background Patterns in Silhouette: Cards, Coasters, and More

    Crafting Creativity Spotlight Artist Clikchic Designs
    Silhouette Secrets+ with EllyMae

    In this edition of Crafting Creativity I’ll be sharing the projects I created through the month with a watercolor background pattern. Patterns can really make your project unique and be used in creative ways with Silhouette. A great big thank you to Clikchic Designs for providing the free file for the Silhouette Secrets+ July newsletter!

    Clik Chick Designs Website

    Affiliate links may be present in the following blog post and as an Amazon Associate, I earn from qualifying purchases.

    Silhouette Background Patterns Projects

    This past month I have had so much fun designing and creating with the Watercolor Background design by Clikchic Designs.

    Blue Teal Green Watercolor Grunge Printable Background Pattern by Clik Chic Designs

    I even went LIVE on YouTube – which for me is a big step, especially with all the issues Silhouette has been having. In the live video tutorial I shared all about pattern fill and how you can use it.

    Check out the YouTube Live Tutorial – Design with Pattern Fill: Silhouette Studio Tips for Stunning Results HERE.

    Silhouette Secrets YouTube Silhouette Tutorial Pattern Fill

    I’ve been collaborating with designers this year and each week I am sharing new projects that can be created from 1 file. This is a file that the designer has provided for the Silhouette Secrets+ Newsletter subscribers. I want to share how you can take 1 design and think about different projects you can use it in to make your designs go farther!

    Project #1 – Card Design with Watercolor Background

    I used the Watercolor Grunge background and printed it on a 12″ x 12″ sheet of cardstock. Don’t worry if you don’t have the capability to print on 12″ x 12″ cardstock, the same technique can be done with letter size paper too!

    Watercolor Background Cards Created with Background by Clik Chic Designs

    I participated in a card swap and signed up to exchange 20 cards, so this was a perfect way to create 6 cards from one sheet of paper. And every one of these cards was different because of the unique watercolor grunge background.

    Here is another set I made with a vertical layout.

    Watercolor Background on Cards with Clik Chic Designs

    Check out the written tutorial on how I made these cards in this post – Distressed or Grunge Background Designs in Silhouette Studio HERE

    Additional Resources:

    Supplies Used:

    Project #2 – Sublimation Journal Cover

    What started out as a sublimation tumbler idea, morphed into a sublimation journal cover project instead. I could not think of what I wanted to put as a saying onto a tumbler and while I was stumbling over that, I kept walking by these sublimation journals that I had ordered several weeks back.

    Sublimation Journal Design with Clik Chic Designs Watercolor background pattern

    Sometimes when the original project does not turn out, the next one is even better than you could imagine. I love these journal covers!

    Additional Resources:

    Supplies Used:

    Project #3 – Eclipse Cards

    Have you tried the eclipse card design? While it can be difficult to photograph, it can have a big WOW factor in person.

    Eclipse Card with Watercolor Printable Background with Silhouette

    When assembling the design you can use foam tape to either bump up the letters cut out or the background. Each can have a unique look to it.

    Creating an eclipse Card with Silhouette

    Play around with different design ideas and see what you like best.

    Additional Resources:

    Supplies Used:

    Project #4 – T-shirt Design using Siser EasyColor DTV

    Printable patterns can be used for all kinds of projects, including printable HTV. Siser EasyColor DTV is real HTV that can be used with an inkjet printer.

    Printable Background Pattern using Siser EasyColor DTV with Clik Chic Design Background

    I have had great success with the Siser EasyColor DTV and I would contribute that to following the printing and care instructions exactly. I have shirts that still look fantastic that I made when it was first released in August 2022.

    In the video, Design with Pattern Fill: Silhouette Studio Tips for Stunning Results, I showed exactly how I created this design and you even get to see a little bit of troubleshooting LIVE while I tried to figure out what I was doing wrong and how I fixed it.

    Additional Resources:

    Supplies Used:

    Project #5 & 6 – Sublimation Coaster, Earrings & Necklace

    I had a misprint when I first did the sublimation print for the journal and I had a line of “tiling”, which is a sharp distinct line in the actual printout and would not look good on my finished project. I explained about this and showed exactly what it looks like in the YouTube video HERE.

    But, I wasn’t just going to throw away the printed sublimation page. I can use it for other projects! So I started digging in my sublimation blanks to see what the design would fit completely on. The coaster was the perfect fit and now sits on my desk too!

    Sublimation Coaster with Printable Background from Clik Chic Designs

    For the photo, I paired it with a tumbler that I use all the time from a previous class on creating your own custom designs.

    Sometimes mistakes can be a good thing!

    Next, I took a few more sublimation blanks and made some earrings and a necklace pendant from the extra pieces of the mistake sublimation print.

    Sublimation Earrings and Necklace with Background Pattern by Clik Chic Designs

    I don’t even want to admit how many pieces of sublimation printed designs I have just hanging out waiting for the perfect blank. Shhhh…. we won’t talk about it.

    Additional Resources:

    Supplies Used:

    I had so much fun crafting projects with the watercolor grunge background this month and still lots more ideas for future projects too!

    Find more amazing designs by Clikchic Designs at:

    Follow along with Clikchic Designs on their website, Facebook, and Instagram too!

    A great big thank you to Clikchic Designs for contributing the free file for the Silhouette Secrets+ newsletter for the month of July! If you missed grabbing the free Watercolor Grunge Background, it is available in the Silhouette Design Store HERE.

    This year I started offering a free file each month for Silhouette Secrets+ newsletter subscribers. I love designing in the Silhouette Studio software and have shared some of my creations as well as look forward to collaborating with more artists in the future too!

    Silhouette Secrets+ Newsletter

    Never miss out on the news, tips, “secrets”, deals, classes, and more that I share on Silhouette Secrets+. Sign up for the newsletter and get information delivered to your inbox every Friday.
    Unsubscribe at anytime.

    Sign up for the weekly newsletter HERE to have information delivered direct to your inbox and grab each month new freebie.

    I hope this has given you some ideas on how one file can lead to many different projects!

    Save this for future reference by pinning the image below.

    Multiple projects created with a watercolor grunge background in Silhouette Studio

    Enjoy !

    THANK YOU for your support! How can you help? Click HERE & buy a coffee.
    Every little bit helps with the cost of running the site.

    Silhouette Classes

    Never stop learning! Let me help you take the anxiety out of learning with Silhouette and get to creating faster! My Silhouette classes are heavily focused on software, so you can take the skills & techniques taught and apply them to many future projects!

    Silhouette step-by-step Classes by Silhouette Secrets+

    Silhouette Secrets+ with EllyMae
    **This post may contain affiliate links. What that means is that I may receive compensation if you purchase through the links I have provided. The price you pay for the product or service is not higher but I may get compensated for sharing.
    Posted on 3 Comments

    Distressed Background Designs in Silhouette Studio

    Distressed Backgrounds in Silhouette Studio
    Silhouette Secrets+ with EllyMae

    Have you ever wanted to have distressed background or edges on a pattern or photo? While Silhouette Studio does not have the same tools as a graphics program like Photoshop does, there are still ways you can get distressed or grunge edges in the Silhouette Studio software.

    Affiliate links may be present in the following blog post and as an Amazon Associate, I earn from qualifying purchases.

    Recently I was creating a bundle of 20 cards for a card swap that I signed up for through Erin Reed Makes and saw an idea to create 6 card backgrounds from 1 sheet of 12″ x 12″ paper on Pinterest. It was a distressed background with white space left for additional elements to be added to the card front.

    Silhouette Printed Pattern with Distressed Background Card Backgrounds

    Now, these distressed designs are not ideal for cutting as they are quite detailed, but they are awesome for print projects, like creating card backgrounds, sublimation, or other printed projects.

    I grabbed some clipping mask png files from ClikChic Designs on Etsy and created exactly what I wanted. But, I knew it could be easier or more available to Silhouette users, so I reached out to ClikChic Designs and we started working together testing some designs and I’m excited to say there are a few in the Silhouette Design Store! If this is a popular idea, you may see more too – so make sure to leave a comment below so we know if you like this style of designs.

    Let’s take a look at how I created this distressed background pattern in Silhouette Studio.

    Distressed Background Designs in Silhouette

    Open Silhouette Studio and set up the page size for your printer.

    If you don’t have the capability to print a 12″ x 12″ sheet of paper, don’t let that stop you. This could be done with whatever size you can print on to create projects with.

    Open the distressed design and scale it to the size you want to fill as much of the page as you want.

    This is called Grungy Ink Clipping Mask or Border by Clikchic Designs – Design #368071 or you can grab Dry Paint Grunge Clipping Mask Frame or Border by Clikchic Designs – Design #368127

    Open Distressed Design in Silhouette Studio

    A .studio file, which is what is in the Silhouette Design Store or a .svg file is a cut file. This means that you can add patterns to the design. If you open another file type such as a .png or .jpeg, you would need to do additional steps to work with that file. (See below for additional information)

    **Currently as I type this, you will need to download these files direct to your computer to use as the library syncing is broken – click HERE for how to do that.

    If the pattern is outside Silhouette, drag it from the My Computer folder location and hold it over top of the design. The design will fill with that pattern.

    Drag Pattern to Design in Silhouette Studio

    If you move too fast doing this step, it may not work or you may end up with a small square that won’t disappear without closing the software to reset it. Go slow and hold that pattern on top of the design in Silhouette Studio until it fills the shape.

    Patterns from the Silhouette Library could also be used as well. For more on Patterns in Silhouette, check out these tutorials HERE.

    Next, change the Line Color to Transparent to see how the pattern will look. This step also ensures that the red cut border will not print.

    Silhouette Studio Change Line Color to Transparent

    The next steps would depend on what project you are working on. I printed the design on a 12″ x 12″ sheet of Recollections cardstock.

    Silhouette Printed Background Cardstock

    Then I used my paper trimmer, cut the 12″ sheet at 6″ in the middle of the pattern and then again cut those sections down to 4″ widths. Once I had each section I could trim it down further to 4″ x 5.25″ for my card backgrounds.

    Distressed background pattern cards with Silhouette

    I added a stamped sentiment to the front and added some rhinestone gems to each card.

    There are so many options! 6 card backgrounds from 1 sheet of 12″ x 12″ cardstock

    Distressed Background Pattern Cards with Silhouette

    Find more designs like this HERE.

    A great big thank you to ClikChic Designs for working with me and the idea to make this style of designs easily available to Silhouette users. Check out their blog post for additional ideas on this technique HERE.

    I have collected designs by ClikChic for awhile. And then I saw on their Instagram channel where they showed how they create their designs by hand painting them and then digitizing them. I was mesmerized. So make sure to check out their Instagram too!

    For some additional ideas on working with distressed images, check out this blog post – 3 Ways to Distress Photo Edges in Silhouette Studio.

    Save this for future reference by pinning the image below.

    Distressed Backgrounds in Silhouette Pinterest

    Enjoy !

    THANK YOU for your support! How can you help? Click HERE & buy a coffee.
    Every little bit helps with the cost of running the site.

    Silhouette Classes

    Never stop learning! Let me help you take the anxiety out of learning with Silhouette and get to creating faster! My Silhouette classes are heavily focused on software, so you can take the skills & techniques taught and apply them to many future projects!

    Silhouette step-by-step Classes by Silhouette Secrets+

    Silhouette Secrets+ with EllyMae
    **This post may contain affiliate links. What that means is that I may receive compensation if you purchase through the links I have provided. The price you pay for the product or service is not higher but I may get compensated for sharing.
    Posted on Leave a comment

    Let’s Explore v4 – Pattern Fill

    It is so neat what you can do in the Silhouette Studio software and with just a few clicks can have a completely different look.

    Today we are going to explore the Pattern Fill in the Silhouette Studio software.

    Tutorial written in Silhouette Studio v4.4.552
    Affiliate links may be present in the following blog post and as an Amazon Associate I earn from qualifying purchases.

    What would you use a digital pattern for?

    This is a great option for being able to print your own projects. A digital pattern can be added to a shape to cut or even an entire page printed of that pattern.

    There are so many options you have for projects that you can complete with it. Stickers, cards, scrapbook pages, patterned cardstock, sublimation, etc.

    Check out the end of this post for more tutorials on using patterns in projects.

    Software upgrade feature

    Adding custom patterns to the Silhouette Studio library is a Designer Edition upgrade feature. If you are currently using the Basic Silhouette software, you will be able to use patterns from the Silhouette Design store in this same manner, but will not be able to add custom patterns directly to the library as shown below.

    With the Silhouette Basic software, you can open a jpeg or a png file directly into the software and then use the Crop tool to crop the pattern to your shape.
    More details on the Crop tool HERE

    Digital Patterns

    I had previously cut a pattern out of Sparkleberry Ink Bubble Up HTV and it turned out fantastic, so I contacted the owner at Sparkleberry Ink and asked if it was possible to get a digital version to be able to use for printing.

    Thank you Sparkleberry Ink for adding this set to your digital pattern options!

    Grab it HERE at Sparkleberryink.com.
    Make sure if you are planning to use this for business or selling products that you grab the Commercial Use license!

    Adding Patterns to the Silhouette Library

    Open Silhouette Studio.

    Download and unzip the patterns. Open the folder where the patterns are located. I am using Windows Explorer folder to view the file location.

    Now, select the patterns in the folder and drag them into the Patterns folder on the Silhouette Library tree. They can either be added to the main Patterns folder or into a sub-folder you have created.

    The Silhouette library will need to sync and then Ta-da!
    The patterns should now show in the folder that you moved them to.

    Now I have 2 new patterns to play with in my Silhouette software.

    There are a couple things to be aware of when using digital patterns.

    Digital patterns are photo files. This means that they can be large data files.

    Adding digital patterns to your library does take up Silhouette cloud storage space. There is a limit to Silhouette cloud storage, so be mindful of that when adding patterns to the library.

    Since they are large photographic images, it can take longer for them to sync, open, and manipulate in the software. This in some part will vary by each user and how their computer can handle those large amounts of data.

    Save your files often, especially if trying to add a lot of patterns to 1 file.

    How to Use Patterns in Silhouette Studio

    Open the design you want to use in the Silhouette software.

    I am using a file from Design Bundles called Mandala Breathe by On the Spot Studio.

    There are a couple things I want to mention about this file in particular. I am using it because it is one I’ve previously used and I loved it. However, I did have to do some work to the file to use it as it was shown and have 2 separate colors. I will have a future tutorial on how I altered it in order to achieve the look I wanted.

    The other thing I want to mention on this file is….. holy edit points!

    Edit points are the data points that the Silhouette software and machine read in order to cut. It has to connect the dots (edit points) to make the cut. In this particular file and can be common in mandala designs, it has a LOT of edit points.

    You could try to click the Simplify button in the Edit Points panel, but sometimes it changes the look of the design or doesn’t make a big enough difference.

    In this case, the file cuts fine at the size it opens, but if you were to scale it down and try to cut it, you may not have great results. This is because those edit points then are just squished into a smaller area. It still has to hit every single one of them to cut.

    If you have ever experienced a file that you have scaled down and it just tears up the material or doesn’t cut right, this may be why.

    Learn more about Edit Points HERE. They are a great tool to know how to use.

    In this tutorial, we are using digital patterns for printing, so I do not need to cut it, but wanted to mention it for future reference.


    Select the part of the design that you want the fill applied to by clicking on it.

    Next, click on this little icon in the bottom left corner of the Design Tab screen. This is the Show/Hide Library and when you are working with patterns it helps to view the patterns at a larger size.

    This will open up the library in a split screen with the Design Tab.
    I prefer to look at my patterns this way but you can also find them under the
    Fill Color Panel – Tab 3.

    Look at the difference in the size of the pattern icons in the Pattern Fill Panel vs using the Show Library tab. It’s easier on my eyes to use the split screen.

    With the part of the design you want to fill selected, click on the pattern and it will fill with the pattern you selected.

    So cool! And you would never know that this pattern is actually made up of bubbles.

    But that’s not all – there is more!

    Click on the Show/Hide Library icon again to collapse the library split screen.

    Once the design is filled with the digital pattern, it can be adjusted.

    Open the Fill Color Panel – Tab 3 and click on the Advanced Options section.

    You can adjust several things about the pattern that can give you a different look – angle, scale, pan pattern, etc. I was just playing around with this Bubble Up pattern and it was amazing how a few changes could give it a different look.

    On the left, the pattern is scaled up 295% and on the right the pattern is at 100%.

    Such neat options!

    Now, you may have guessed…. that’s not all!

    Use the Fill Color Panel eye dropper to pick up a color from the pattern to fill in the 2nd part of the design.

    And you have a custom colored design using a digital pattern in the Silhouette Studio software.

    This particular design I sent to my Epson F-170 sublimation printer and then pressed it to a shirt.

    I love how it turned out when pressed on the shirt.

    So many options that you could use with digital patterns.

    Don’t forget to grab these digital patterns from Sparkleberry Ink.

    Here is an example of the Bubble Up – Green with the same design.

    Want to dive in more to digital patterns?

    Here are a couple more blog tutorials I have written over the last couple years with digital pattern projects.
    Let’s Explore v4 – 3-D Tank Project
    Let’s Explore – Pattern Fill
    Let’s Explore v4 – Patterns, Print Bleed, Show/Hide Library

    What would you use patterns for?

    I would love to see what you are creating with your Silhouette software or machines!
    Or if you have any questions, feel free to post photos or questions on my Facebook group at 
    Silhouette Secrets with EllyMae.

    Save this for future reference by pinning the image below.

    Enjoy !

    This image has an empty alt attribute; its file name is logo.jpg

    THANK YOU for your support! How can you help? Click HERE & buy a coffee.
    Every little bit helps with the cost of running the site.

    Or if you are looking for more in-depth, step-by-step classes, check out all of my online Silhouette classes on my Teachable site HERE.

    SS Logo snip it
    **This post may contain affiliate links. What that means is that I may receive compensation if you purchase through the links I have provided. The price you pay for the product or service is not higher but I may get compensated for sharing.