Ready to take your Silhouette crafting skills to the next level? In our latest LIVE tutorial, we demonstrated the exciting world of working with leatherette, faux leather, and adding dazzling details with heat foiling using the Silhouette Heat Pen. Whether you’re creating personalized accessories, decorative pieces, or custom gifts, these techniques will help you achieve professional-looking results with ease. If you missed it, don’t worry—we’ve got all the tips, tricks, and must-know details right here! And I am sharing more tips below too!
Affiliate links may be present in the following blog post and as an Amazon Associate, I earn from qualifying purchases.
We had such an amazing time during this month’s Live Silhouette Tutorial! The session was packed with valuable tips, tricks, and techniques to help you elevate your crafting game. I walked through the entire process of creating a bookmark shape, adding a design, and using the Silhouette Heat Pen for stunning foiled details. Plus, I shared insider tips on using the Knife Tool and so much more!
Grab your favorite drink, get comfy, and check out the replay on the Silhouette Secrets+ YouTube channel under the Live section. Don’t miss the chance to learn and create along with us! And that’s not all! I have a couple more tips I wanted to elaborate on below to help you be more successful in your Silhouette journey!
What if you don’t have a newer model machine that can utilize the Silhouette Heat Pen? No problem, the same tips, techniques, and tricks I shared in the video and below can still be useful. I’ve included additional resources below as well for users with older model machines.
When I asked the viewers if they wanted to see more, they said yes! They stuck around while I set up another design but this time with a fill option. Don’t believe that little timer in the Silhouette Studio software!!! The filled design took around 10 minutes to foil completely. That was twice as long as the estimated timer in Silhouette.
In the live, I also mentioned some tips about tool storage with the new powered tools and I wanted to share a bit more about that.
If these prongs get damaged, the powered tools will no longer work. The new tools are not cheap, so I would recommend storing them safely where they will not get beat up. In the video, I shared a brief glimpse at the storage I’m using, which is a storage container by Creative Options.
This works well for the storage of many Silhouette tools as you can see. The Silhouette Gold and Silver Foil have their own space so they won’t get damaged. The sections are adjustable so I’m able to partition the Silhouette powered tools off and store them so their prongs are not going to get knocked into anything else that could damage them. I also have my Silhouette Power Engraver in this container along with a couple blades and the Silhouette Embossing Tools.
My Options container is part of a larger Creative Options system that can house even more supplies too! I love the color of it too!
I shared even more storage tips in this blog post HERE.
One of the other tips that I mentioned in the video that is very important for using these new Silhouette powered tools. That is to keep the machine clean and free of dust and debris.
Any dirt or debris that gets in the powered tool housing connection or on the prongs of the powered tools can affect the functionality of those tools.
I want you to be as successful with your Silhouette machines and tools as possible!
And I know I mention that the end of the Live video that I will record another video sharing the tassel creation, however, when I got started making it, I found I’m no expert on this topic. So I’m sharing the video I followed to create my tassels by Notches Sewing found HERE.
Here is a list of the supplies I used for creating these foiled leatherette projects:
Save this for future reference by pinning the image below.
Enjoy !
THANK YOU for your support! How can you help? Click HERE & buy a coffee. Every little bit helps with the cost of running the site.
Silhouette Classes
Never stop learning! Let me help you take the anxiety out of learning with Silhouette and get to creating faster! My Silhouette classes are heavily focused on software, so you can take the skills & techniques taught and apply them to many future projects!
**This post may contain affiliate links. What that means is that I may receive compensation if you purchase through the links I have provided. The price you pay for the product or service is not higher but I may get compensated for sharing.
Heat foil projects are a show-stopping way to add a touch of elegance and shimmer to your designs, whether you’re crafting cards, gifts, or custom decor. With the right tools and techniques, creating stunning heat foil projects can be simple and rewarding. In this guide, we’ll walk you through five easy steps to achieve excellent results using your Silhouette machine. Whether you’re a beginner or looking to enhance your foiling skills, these tips will help you create dazzling projects that shine every time. Let’s get started!
Affiliate links may be present in the following blog post and as an Amazon Associate, I earn from qualifying purchases.
5 Steps for Gorgeous Heat Foil Projects
Create Your Design – design or select your project in Silhouette Studio
Set Up the Foil Action – adjust your settings for the perfect foil application
Prepare the Mat – place the foil on your material in the correct position & secure it
Send to Foil – let your Silhouette machine work it’s magic
Reveal Your Design – carefully remove the foil to unveil your stunning creation
New video on the Silhouette Secrets+ YouTube channel – Additional Tips!
We’ve just released a brand-new video on the Silhouette Secrets+ YouTube channel, Silhouette Heat Foil Pen Dos & Don’ts: Tips for Perfect Foiling Every Time! In this video, we break down the essential tips and common mistakes to avoid when using the Silhouette Heat Foil Pen. You can see the machine in action and what goes right and what did not. Use these tips along with the step-by-step details below for perfecting your foiling techniques.
Don’t forget to like, subscribe, and hit the notification bell to stay up-to-date with all our Silhouette tips and tricks on YouTube.
Your Step-by-Step Guide to Flawless Heat Foil Projects
1 – Create the Heat Foil Design
Choose a design to foil, or create your own custom design in Silhouette Studio.
Decide if you want the outline of the design to be foiled or if you prefer to fill the entire design with foil.
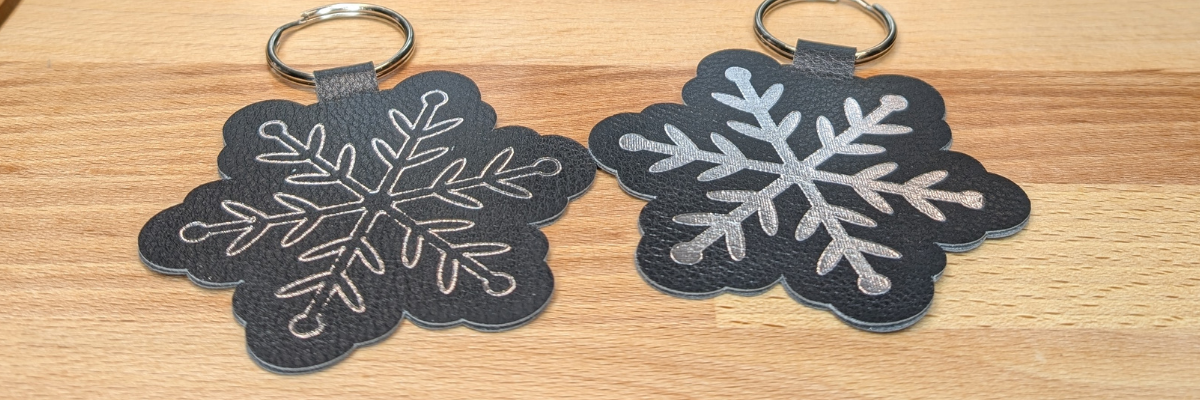
Silhouette Studio is a cutting program, so any design that is on the screen is automatically an outline. Filling it with a color only changes how it looks on the screen and is used for printing through a printer. The design on the left in the photo above is the snowflake design sent without adding any additional steps to it. The design on the right is filled with a cross-hatched fill using the Specialty Tools Panel – Heat Pen Tab.
The best fill and spacing is really dependent on the design and materials that are being used. The only way to really know what will look the best is to test it and see for yourself.
If the fill on your design is too tight, it can cause the foil to be removed from certain areas due to multiple passes over the same spot, leaving blank spaces. On the other hand, if the fill is too loose, it can also result in gaps. The ideal fill depends on the desired final look, and the best way to determine what works is to test it out.
I set my foiling and sketch projects up with blue as the foil/sketch lines and red for the cut line using the Line Color in the QAT or the Line Style Panel. This will be helpful when setting up the foiling settings in the next step.
For those who are using older model Silhouette machines and the Foil Quill, the Sketch/Line Effects Panel can be used to add a fill to the design following the same tips listed above.
2 – Set Up the Heat Foil Action
When using the Silhouette Heat Pen, there is an Action for the Heat Pen that may need to be set up. Click on the Send tab and then select your material such as Cardstock, Plain Cardstock, or Leatherette. If there is no Heat Foil Action that shows up for the material, then a custom setting will need to be created. This is not hard to do and we will go through it below.
On the Send tab, in Silhouette Studio, once the Heat Pen has been recognized in the Silhouette Cameo 5, Portrait 4, or Curio 2, you should see a message asking if you want to turn it on. The Silhouette Heat Pen takes approximately 3 minutes to heat up before it can be used properly.
I use the Cut by Line option on the Send tab, so the different actions can easily be turned on and off, so the design can first be foiled, then the foil removed, and then cut if the project requires.
Select the material setting for the red color cut lines. Test cuts will be the only way you know what the perfect setting is for your material, so don’t skip that step before you start and waste materials.
When using the Cut by Line or Cut by Fill Color options, it’s important to ensure the correct color is selected when adjusting settings in the bottom section of the Send tab. For example, if red is selected at the bottom but isn’t the box check for cutting, any changes made will apply to the red cut lines instead of the intended selection. Always double-check that the selected color matches the cut settings you’re adjusting. More details and a visual example of that in this Silhouette Cutting Issues – Cut by Line or Fill Color video.
The next thing to note is that if there is no Heat Pen action programmed for a material, you will see a Setting not found message. This is not a problem, we will create a custom setting by clicking on the MORE button and then creating our own setting for our material.
Click the + sign at the bottom of the materials list, name your material, and then select the machine model.
Now, the next steps are important so the setting is not created with actions that are not needed.
With the material you added selected, select Carriage 2, then click on the + sign on the right side. Choose Add Foil Action. Adjust the settings for force, speed, etc. The only way to know what settings work will be to test and use those settings.
Now, the important part. Click on the Kraft Action and choose REMOVE ACTION at the bottom of the Send tab.
If the Kraft Action or any other action that is set for a material is not removed, it will show up in the settings when the material is selected and can be confusing and cause future issues for projects.
Next click the drop down shown above and select the material that is closest to what you are using for this setting. I don’t actually know that this does anything other than serve as a reminder to you, but it was added randomly to the software many versions back.
Click SAVE if it’s available and then click the giant X at the top of the Send tab to close this window.
Then select the new material created in the drop down next to the line color you want it applied to. User Created Settings will appear at the bottom of the Materials selection drop box.
Verify that the settings are what you created and look right.
Congratulations! You have created your own custom setting. I would also recommend writing down these settings in a safe place. Sometimes they can disappear out of the software. They can also be exported by clicking on the MORE button and right click on the material and export, however, that file cannot always be successfully imported back in. These are just some things we’ve seen over the years with different software versions.
For older model machines and creating a custom setting, please see this tutorial HERE.
3 – Prepare the Mat
If the material will be cut after the foiling, place the materials at the bottom of the Silhouette cutting mat so it easier to remove the foil before sending the material to be cut.
Apply the foil in the same location on the material and mat that is set up in the Silhouette Studio software. Make sure the foil covers the entire area of the design to be foiled and that the washi tape is not in the areas being foiled or it can interfere with a complete foiled image.
Add the washi tape to one corner and then move to the diagonal corner and apply the washi tape, pulling it taunt. Then add washi tape to the final 2 corners and pull taunt as applied. Adjust as needed so the foil does not have any slack or creases. If it catches or has creases, it can affect the final results.
Once the foil is secured flat on the materials, load the cutting mat in the Silhouette machine.
When the design is placed in the top left corner as we are used to, then it can be difficult to remove the foil without unloading the mat. I got too excited and did that on my first design.
It took a bit more work, but I was able to remove the washi tape and foil without unloading the cutting mat. If this every happens to you, make sure to check for any washi tape that might get stuck under the roller bar or in the machine. I found a small piece that could have been a BIG problem on future projects if I had not seen it.
4 – Send to Foil
Check the box next to the Heat Foil setting and verify it’s set for Tool 2. Make sure the red is unchecked so you have time to remove the foil before it cuts the design. Then click Send in the bottom right and approve any windows that might pop up.
Remove the foil before cutting or the foil can dull the blade faster or get caught up in the machine during the cut and the project can be ruined.
5 – Reveal Your Design
Make sure to carefully remove the washi tape & don’t let the foil touch the adhesive cutting mat. It will stick immediately and then be stuck onto your cutting mat. If you reveal it slowly and it did not foil well, you can try securing the foil back down and run it again to see if it will foil better. You may need to adjust the settings and this is why testing is so important.
Do not unload the cutting mat between the foil and cut action or the design may not cut in the correct location. This is why the location of the design at the bottom is easily to work with.
Next, on the Send tab in Silhouette Studio, uncheck the blue line color and check the red color, then send the design to be cut.
When it’s finished, check the cut before unloading the cutting mat. If it did not cut well, you can send it again. After it’s cut, unload the cutting mat, flip the mat over, and peel the mat away from the material at a sharp angle to help it release.
Keep in mind that anytime you sketch or foil with a fill, the tool is going over the design multiple times depending on your fill options. This can mean that the material will be stuck down to the cutting mat in that area and may need a bit more care to remove without damage.
Finish out the project with any assembly needed and then enjoy!
Make sure to check out the video on the Silhouette Secrets+ YouTube channel for a visual of creating these projects and additional Dos and Don’ts too! Find it HERE.
Additional Resources for Mastering Heat Foiling Techniques
Save this for future reference by pinning the image below.
Enjoy !
THANK YOU for your support! How can you help? Click HERE & buy a coffee. Every little bit helps with the cost of running the site.
Silhouette Classes
Never stop learning! Let me help you take the anxiety out of learning with Silhouette and get to creating faster! My Silhouette classes are heavily focused on software, so you can take the skills & techniques taught and apply them to many future projects!
**This post may contain affiliate links. What that means is that I may receive compensation if you purchase through the links I have provided. The price you pay for the product or service is not higher but I may get compensated for sharing.
As a paper crafter I am loving the Silhouette Electrostatic (ES) Mat! This new technology is pretty darn cool and not having to remove the cut pieces from an adhesive cutting mat can save time. Especially when cutting for large projects! In this post, I’m sharing more tips on having successful results when using the Silhouette Electrostatic (ES) Mat.
Affiliate links may be present in the following blog post and as an Amazon Associate, I earn from qualifying purchases.
How Does the Silhouette Electrostatic Mat Work?
When the electrostatic mat is turned on, a static charge is built up between the electrostatic mat and the protective sheet. This holds the protective sheet in place and materials can be placed on top of it. The charge then builds between the protective sheet and the material, which holds it in place while it’s being cut. Once the design is cut simply break that charge by either lifting the protective sheet off the ES Mat or turning the ES mat off. The charge will dissipate and the material can easily be removed.
What materials does the Silhouette Electrostatic Mat Work With?
Materials that are smooth and completely flat are going to work best with the Silhouette ES Mat. The material has to be able to build up that electrostatic charge and be held in place the entire time it’s being cut. Textured materials, “breathable” materials such as fabric, or curled materials are not going to work well because it cannot build up a charge to hold it in place.
I have cut vellum, copy paper, sticker paper, 65 lb cardstock, 85 lb cardstock, 110 lb cardstock, adhesive vinyl, and I’m sure I’m probably forgetting a few others in the past year that I’ve been testing it.
I did try a thicker cardstock by Bazzill which was their smooth cardstock and it cut, but it was not as clean of a cut as I prefer. However, I have had the same results when using Bazzil on an adhesive cutting mat too. Some cardstocks are just a bit more difficult to cut cleanly with the Silhouette. I tend to stay away from those for cutting projects, but they work well when cut with a paper trimmer.
Tips for Successful Cuts with the Silhouette ES Mat
While cutting pieces for demo projects for an upcoming class, I knew I wanted to share the tips I’ve learned during testing to achieve successful cuts. The best way to learn what works and what doesn’t is often through the failures encountered along the way. And even though I’ve been using cutting machines for many years, there are still failures along the way.
Check out the new video on the Silhouette Secrets+ YouTube channel where I am sharing a look at the cutting process and sharing things that work and things that don’t work.
Don’t forget to like, subscribe, and click the bell for notifications on the Silhouette Secrets+ YouTube channel!
A Closer Look at the Final Cuts
It is so nice to just lift off the cardstock after the cut and see the pieces laying there.
You will start to see the pieces pile up on the right side of the photos as I share the progression.
These projects and cuts can also be successful on an adhesive cutting mat, but it was so nice to just be able to slide the finished cuts off and be ready for the next sheet of cardstock.
Especially when you have a million tiny pieces like on these film strips!
In the video, I also show how my first attempt at cutting these film strips was not successful. I had the design placed too close to the edge of the cardstock and a piece lifted during the cut and it pretty much ate my cardstock. I simply unloaded the ES Mat, cleaned all the bits up, reset the machine, and then moved my design down on the design mat a little bit and sent it again to cut. Perfect cuts!
Now, this design cut beautifully. The ring design is 2 pieces cut for a background. However, I did have to babysit it a little bit more as some of the cavities of the design would lift as it was being cut with the movement under the roller bar. I carefully removed the pieces as they were lifting during the cut and showed that in the video too.
All of these designs were created in the Silhouette Studio software from scratch for an upcoming class. The cutting process is a bit of the behind-the-scenes of that class creation. Watch the Upcoming Events tab or sign up for the Upcoming Craft Events emails and I’ll send an email direct to your inbox when new events open for registration.
Sometimes, the cut won’t stay in place when the excess is removed. This can happen with smaller designs as there is a smaller surface area to hold the electrostatic charge in place.
Master Perfect Silhouette Cuts: Top Tips for Electrostatic Mat
the ES Mat needs a secure connection that is completely flat to connect to the Silhouette Cameo 5 or Portrait 4 machine
materials need to be completely flat to maintain the charge
designs placed too close the edges can cause cut issues and/or lifting which can affect cut results
test cut, test cut, test cut!
make sure ES Mat is turned on and remains on during the entire cut
Save this for future reference by pinning the image below.
Enjoy !
THANK YOU for your support! How can you help? Click HERE & buy a coffee. Every little bit helps with the cost of running the site.
Silhouette Classes
Never stop learning! Let me help you take the anxiety out of learning with Silhouette and get to creating faster! My Silhouette classes are heavily focused on software, so you can take the skills & techniques taught and apply them to many future projects!
**This post may contain affiliate links. What that means is that I may receive compensation if you purchase through the links I have provided. The price you pay for the product or service is not higher but I may get compensated for sharing.
I’ve wanted to write a faux leather tutorial with tips for Silhouette for a long time, but other things seemed to jump in front of it on my to-do list. So when Amy announced her Faux Leather event, I made it a goal to really dive in and create with some faux leather.
Affiliate links may be present in the following blog post and as an Amazon Associate, I earn from qualifying purchases.
Amy Romeu, hailed as the Queen of Faux Leather by many, recently hosted an event that I attended. I had a great time crafting along with her videos and picked up a lot of great tips that can help in being successful in cutting faux leather with any cutting machine.
Before we get too far in, let’s cover a few things about faux leather that will help in the process.
Faux Leather Information
Can Silhouette machines cut faux leather? Yes! Can Silhouette machines cut ALL faux leather? NO! Can all cutting machines cut ALL faux leather? NO!
Faux leather is such a broad term, just like “genuine” leather is. Cutting some faux leathers is easy, some pose greater difficulty, and others simply do not cut well at all.
Factors influencing whether a Silhouette or another machine can cut faux leather include:
Color – Yes! Many users don’t know this, but color affects how materials cut. Different colors go through different processes in the production and that can affect how it cuts. Some can be tougher than others due to coloring.
Backing – Faux leathers can have a variety of backing on it. Some don’t have any and are soft and pliable. While others can have a mesh, woven backing which can be difficult to cut through.
Texture – Faux leathers can come in all kinds of textures such as embossed, glitter, sequins, etc. This will affect how it cuts. Just think of a blade trying to bounce over a texture material to cut a clean line. Texture affects it! The texture also influences the ease of cutting by hand. The same is true for a cutting machine.
Thickness – There is a wide array of thicknesses for faux leather. Super thin ones can be too pliable and just smoosh around on the cutting mat. Thicker ones may need multiple passes to cut through and a longer blade such as the Deep Cut blade.
Composition – Faux leather is such a broad term. The definition of “faux” is artificial or fake. So keep in mind that faux leather is fake leather. What it is made of? A wide variety of things. Plastic mostly. For instance, I ordered some leather on Amazon and it is PU Leather. It is by definition, artificial leather, crafted from a thermoplastic polymer commonly employed in the production of furniture or shoes. Faux leather = fake leather = plastic
Silhouette 2 mm Manual Blade (this is what I used – more info below), Premium blade or Deep Cut blade, Silhouette Autoblade, 1 mm Manual blade, Silhouette blade available at CrafterCuts (code SECRETS for 10% off) or Silhouette America (code 10OFF for 10% off)
So the first place to start is to gather your supplies for whatever you are working on. I was so excited for these projects and I knew I would be creating several, so I pulled out all my faux leathers and my scrap HTV. I have several boxes of scrap HTV and it’s a great way to use it by adding it to faux leather projects.
Keep it a secret, but I actually obtained more faux leather than shown because I needed to test several during these projects. And once I went down that rabbit hole, I found many patterns I wanted to collect.
Cut the faux leather down to size and give yourself some extra space for taping down the edges to the cutting mat.
Place the faux leather front facing down on the cutting mat, so you are cutting through the backside first. **NOTE: if cutting real leather, DO NOT place it face down or you can ruin the finish on the real leather. That can be a very expensive mistake!
Utilize a reliable sticky cutting mat to secure the materials in place during the cutting process. Using a brayer to smooth the materials down to secure it. If the materials shift during the cut, the cut may fail, or your blade might become stuck.
Securely tape down the material edges. I found that using longer pieces of tape not only ensured a better hold but also reduced the risk of it getting caught in the machine during cutting. You can also reuse painter’s tape if removed carefully at the end.
For best results, keep the painters tape away from the edges of the cutting mat so it is not going under the rollers. Any change in the surface area under the rollers and it can cause it to lose grip or the left and right roller to not move at the same rate, which can cause issues.
When using a Silhouette cutting mat, you can use the grid for exact placement for lining up your materials and your design. If you load the mat properly, the on-screen design will align with the Silhouette cutting mat. Third party cutting mats may not line up and it will be a guessing game for design placement and alignment.
Give yourself a good allowance and grace because you may still mess up, just like I did in the photo above. I would recommend that you cut a little bit excess of the faux leather and not try to cut through the painters tape as it can affect the cut results. The cut was ok in this instance, but it went off my faux leather, so I ended up cutting another truck piece.
For tips on lining things up check out this tutorial HERE. I use this method all the time and still make mistakes. Remember to “measure twice, cut once.” But, I find I make the most mistakes if I’m rushing or I tell myself it will be just a quick project.
Test cut, test cut, test cut!!!
I used a 2 mm Manual blade for all of my faux leather cuts. This blade is the equivalent of the older style Premium blade, it’s just redesigned to fit directly into the newer model machines housing without needing an adapter. The 2 mm Manual blade (or Deep Cut blade) allows you to go from 1-20 in the blade depth settings. All faux leather will vary and some can be cut with a regular blade that is 1-10 settings, while others may need a higher blade depth than 10. Test cuts are the way you will know.
Do not unload the mat after you cut!!! Check to see how well it cut. Having a thread or two is not a bad thing! Grab a sharp pair of scissors and simply snip it.
If it does not lift easily or has more than just a few threads hanging on, send the cut again. If you have not unloaded the cutting mat, it should cut again in the exact same place. If you unload the cutting mat, it will be a hope and a prayer trying to get it lined up perfectly again to cut in the same place.
Some faux leathers may take more than 1 pass and this is why test cutting is such an important step. I write down the settings that worked for each of the materials I test and keep a log so I can refer back to it. It is not a bad thing to use more than 1 pass with certain projects. I find with thicker materials, you can get a cleaner cut when you are not trying to force the machine to do it all at once time. However, for thinner materials such as adhesive vinyl or regular cardstock, multiple passes shouldn’t be necessary if the blade is installed properly.
This is white faux leather from Craft Chameleon. I used the 2 mm Manual blade (equivalent of the Deep Cut blade) . Blade depth – 9 Force – 30 Passes – 2
For more details on what blade depth and force are, check out this in-depth tutorial on the Silhouette Send tab HERE.
Once the cut is successful, unload the mat, remove the painter’s tape – it can be reused and carefully peel away the excess. Snip any threads as you carefully remove the excess so you do not stretch the design.
When cutting, check the blade regularly for debris stuck to it or inside the cap. The fibers of the faux leather can hinder the cut results.
It is perfectly normal to have to increase the settings of the blade as you cut materials. A blade cutting any material is going to dull with usage. Keep in mind that you are cutting through plastic and fibers. That will cause a blade to wear differently than other materials.
For this design I used the Red Truck Ornament file from Amy Romeu and there is a front and back layer cut from faux leather that will be glued together. The rest of the design is cut from HTV, so I swapped out my blade for my HTV blade and set up my cutting mat to cut different colors of scraps at the same time.
I used the Cut by Fill Color so I could set up different cut settings for my Smooth HTV versus my Glitter HTV. The Autoblade did all the work to change the settings once set up. Check out this tutorial HERE for tips on cutting by line or fill color – they are the same.
And then I set up my cutting mat to match exactly what I had set up on the Silhouette software. Check out tips on cutting multiple colors at the same time HERE.
Then I simply weeded the design and pressed the pieces on according to Amy’s instructions. I also cut this design out of cardstock and adhesive vinyl too! The faux leather ornament is on the left and the cardstock ornament is on the right.
Check out Amy Romeu’s YouTube video HERE for instructions on the assembly. Even though she is using a Cricut machine to cut, the process and tips are useful.
I was having so much fun cutting faux leather that I couldn’t stop and wanted to test more!
I followed the same tips as above and taped it securely to my cutting mat.
If you compare this photo to the first one, you’ll notice that the backing differs on the white versus this silver embossed piece. That can affect the cut settings and results. The woven backing texture can be a bit more difficult to cut and may require higher settings and more passes to cut cleanly.
I used the 2 mm Manual blade (equivalent of the Deep Cut blade). Blade depth – 9 Force – 30 Passes – 2-3 however, that was still not a clean cut, so I then increased the Blade depth to 11 and did 2 more passes.
In this case, the Embossed texture on the front is uneven and can affect the cut.
I did not have all the supplies to finish this out as Amy did, so I used what I had on hand and made my own holly berries and leaves. The holly leaves are drawn from scratch in Silhouette Studio. If you want to learn how, I show step-by-step in the Designing in Silhouette Studio – Creating Keepsake Ornaments class HERE. I cut the leaves from cardstock, painted some small craft balls, and then glued it all onto the ornament.
In both the designs shown above, the faux leather was cut for the front and the backside and then glued together so it had a finished look. But for this next project, I used Siser Metal HTV and adhered it to the backside of the white faux leather from Craft Chameleon before cutting.
I pressed it once with the carrier sheet on and then a second time without the carrier sheet for just a few seconds. The second press allows the texture of the faux leather to show through and it is gorgeous! Photos do not do it justice.
But keep in mind, anytime you add something to a material, that can change the cut settings.
I used the 2 mm Manual blade (equivalent to the Premium blade). Blade depth – 10 Force – 30 Passes – 1 And I probably could have done one more pass.
Now, what you’ll notice is that all of the pieces are still attached. However, they easily popped out and I only had a few threads to snip. This actually worked better for the next steps as I could keep it all organized in one place until I was ready to press.
I loved the finished look of the Siser Metal HTV on the backside! And I used up a few scraps of Glitter HTV, not much, but it is the perfect project for those scraps that you might have.
I had so much fun creating along with this event and now have faux leather for many more projects.
I hope those tips help you to be successful with cutting faux leather with your Silhouette machine.
You can still purchase the VIP package for the Faux-La-La Crafting Fun and join in on the fun. You get the files for all the projects, all the videos in one place, a printable guide, and more! Check it out HERE for all the details.
Save this for future reference by pinning the image below.
Enjoy !
THANK YOU for your support! How can you help? Click HERE & buy a coffee. Every little bit helps with the cost of running the site.
Silhouette Classes
Never stop learning! Let me help you take the anxiety out of learning with Silhouette and get to creating faster! My Silhouette classes are heavily focused on software, so you can take the skills & techniques taught and apply them to many future projects!
**This post may contain affiliate links. What that means is that I may receive compensation if you purchase through the links I have provided. The price you pay for the product or service is not higher but I may get compensated for sharing.
Affiliate links may be present in the following blog post and as an Amazon Associate, I earn from qualifying purchases.
I recorded the Electrostatic Bed demo from Silhouette Summit and shared it on the Silhouette Secrets+ YouTube channel HERE. I loved seeing everything first hand and in action at the Silhouette Summit!
But, until you get the equipment in hand and start to use it, you never really know how it’s going to go. This is new technology and it does have to be set up properly. It is designed to work with thin, smooth materials that can maintain a charge between the ES bed and the material while it’s being cut.
This was the first time in Silhouette’s history that they released the new machines and features at Silhouette Summit. Usually, in the past, there has been a 4-6 month gap between the announcement and when the new items are released.
I received my Silhouette Curio 2 and immediately started testing and seeing what it could do. I have cut vellum, 65 lb. cardstock, 110 lb. cardstock, sticker paper, adhesive vinyl, and copy paper with the Electrostatic (ES) bed so far.
Check out the video – Tips for Success with the New Silhouette Electrostatic (ES) Bed – Cameo 5, Curio 2, and Portrait 4 HERE.
I share how you can be successful with the Electrostatic (ES) Bed. These tips will work for the Electrostatic (ES) Bed no matter which Silhouette machine model you are using it with. I’ve also included a few more tips down below this video in this post as well.
Electrostatic (ES) Bed Tips
The Electrostatic (ES) Bed is powered by the Silhouette machine. This is one reason that the Electrostatic (ES) bed is not compatible with older model Silhouette machines. The older machines do not have the technology in them to send power to the ES bed.
The electrostatic charge has to be built up. The ES bed needs to be turned on to start building up the charge. It takes time, usually less than a minute for the electrostatic charge to build. It is not a slap it and go. You have to set it up properly for success! Place Electrostatic (ES) Protective Sheet on the Bed and smooth out any air bubbles. Make sure that the Electrostatic (ES) Bed has not turned off. In early versions of the software with the Silhouette Curio 2, the ES Bed automatically turns off after the cut and the user will need to turn it back on each time.
Not all materials work with the Electrostatic Bed. Materials need to be completely flat and smooth to be able to hold and maintain the electrostatic charge. Textured materials will not work or maintain that charge to hold it in place while it’s being cut. Smooth materials down on top of the ES Protective Sheet and allow time to build the charge.
Test the materials with your fingertips to see if the materials move. If it moves, it’s not ready. Start again & take the time to build the charge. If the charge is broken at any time while it’s being cut, it will be a lost cut.
Keep the design away from the edges of the materials. If the cut goes over the edge of the material, it can break the electrostatic charge and the material may move.
Not all designs will work well with this new technology. Keep in mind that the smaller the cut pieces are, the less surface area there is for the material to maintain the electrostatic charge. Pieces that are completely cut may move out of place. This may or may not affect the entire cut. If a loose piece of material gets stuck on the blade as it’s cutting, it may hinder the cutting of the blade.
Get extra materials! It is going to take time and practice to learn a new skill and new equipment.
Silhouette Electrostatic Protector Sheets *Free shipping at CrafterCuts with a $35 purchase **Use code SECRETS to save 10% on supplies at CrafterCuts – does not apply to new machine models
And here is one that I just completed this week cutting copy paper using the new IPT technology to cut 2 sheets that are stacked on top of each other. Yes, you read that right! Stacked materials cut at the same time with the Electrostatic Bed. I’ll be sharing more on that soon!
I’ll be adding more information to the blog and Silhouette Secrets+ YouTube channel as I create projects and play with this new technology. Stay tuned for more!
I hope those tips help you get started and creating with your new Silhouette model machines and the Electrostatic (ES) Bed.
Save this for future reference by pinning the image below.
Enjoy !
THANK YOU for your support! How can you help? Click HERE & buy a coffee. Every little bit helps with the cost of running the site.
Silhouette Classes
Never stop learning! Let me help you take the anxiety out of learning with Silhouette and get to creating faster! My Silhouette classes are heavily focused on software, so you can take the skills & techniques taught and apply them to many future projects!
**This post may contain affiliate links. What that means is that I may receive compensation if you purchase through the links I have provided. The price you pay for the product or service is not higher but I may get compensated for sharing.
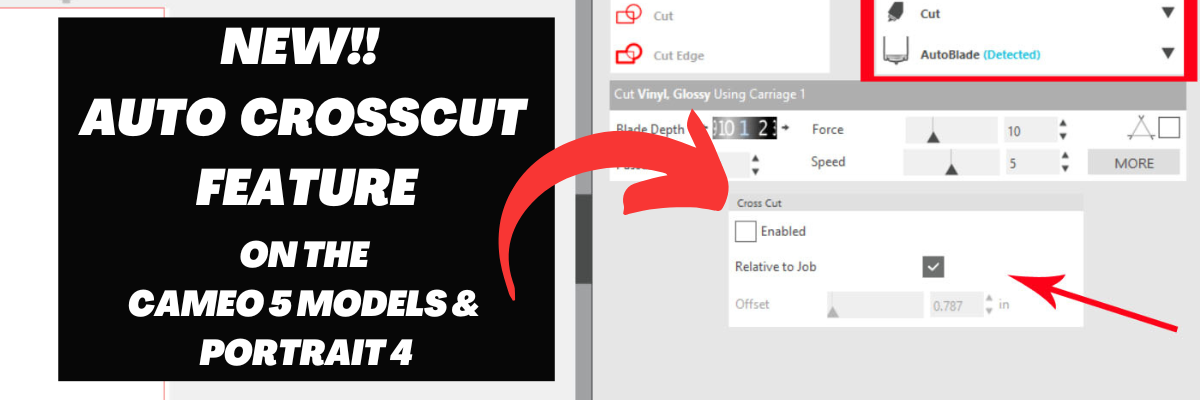
Check out the new video on the Silhouette Secrets+ YouTube channel HERE showing how to set up in the Silhouette Studio software for the auto crosscut and watch the machine in action and continue reading below for more information below the video link.
Affiliate links may be present in the following blog post and as an Amazon Associate, I earn from qualifying purchases.
The Silhouette Portrait 4 and Silhouette Cameo 5 models are now equipped to cut the vinyl off using the Autoblade after a cut has been completed for certain materials when set up properly.
The setup for the Auto Crosscut is very specific. It is for use with the Autoblade and when cutting off of a material roll such as adhesive vinyl or HTV.
Note: you should never cut completely through a material such as cardstock, etc. without the proper setup for pop-out cutting or when using the Auto Crosscut feature. Cutting through a material without the proper setup can damage your machine. The reason you can cut matless with adhesive vinyl, HTV, and kiss-cut sticker sheets is because you are only cutting through the top layer and not completely through.
On the Page Setup Panel – Tab 1, choose No Mat under #3 and set the custom media height size to the length of the roll you are cutting from on #4.
Click on the Send tab in the top right corner.
Then the following will need to be set up in order for this feature to show up:
Compatible material selected such as Vinyl – Glossy or Heat Transfer Vinyl
Once those things are completed, you will see a Cross Cut window show up below the cut settings on the Simple Tab where this feature can be enabled and adjusted.
Note: if a custom cut setting is used, the Crosscut option will show under the Cut Settings area when setup to cut without a mat.
After the cut is complete, the Silhouette Autoblade will adjust the blade depth for a complete cut through. The Crosscut action will be performed in several cuts so it can keep the material in place while it cuts through. Once complete, the cut vinyl can be pulled from the backside of the machine.
The Crosscut feature is performed in the channel that runs underneath the blade housing, so it does not damage the machine when it cuts completely through.
Save this for future reference by pinning the image below.
Enjoy !
THANK YOU for your support! How can you help? Click HERE & buy a coffee. Every little bit helps with the cost of running the site.
Silhouette Classes
Never stop learning! Let me help you take the anxiety out of learning with Silhouette and get to creating faster! My Silhouette classes are heavily focused on software, so you can take the skills & techniques taught and apply them to many future projects!
**This post may contain affiliate links. What that means is that I may receive compensation if you purchase through the links I have provided. The price you pay for the product or service is not higher but I may get compensated for sharing.
The Silhouette Portrait is a great little machine, especially if you are looking to travel with a cutting machine. It’s light weight and very portable.
Affiliate links may be present in the following blog post and as an Amazon Associate, I earn from qualifying purchases.
I was asked about a storage tote for traveling with the Silhouette Portrait 4 machine and it took me a bit of time to order and find one that worked to fit not just the machine, but also supplies and keep them safe as well.
Silhouette Portrait 4 Cutting mat – NEW! sizing is different than older model Portrait mats *it will take time for all retailers to stock the new cutting mats
The Silhouette Portrait 4 now has a cutting width of 8.5″, which is a change from the older model Silhouette Portrait machines. This does make a difference and the cutting mat looks different, it has a different size adhesive area, and the actual dimensions of the cutting mat are different than older Portrait cutting mats.
The photo below shows a comparison of the older cutting mat and the new Portrait 4 cutting mat. You can see the difference in the design area and the actual size of the cutting mat is different.
This means that if you use an older model cutting mat in the new Silhouette Portrait 4, it will NOT line up with the on screen cutting mat that you see in the Silhouette Software.
This WILL affect your cut placement and print and cut projects!!!
Make sure when you are order additional cutting mats that you are ordering the correct one for your particular Silhouette Portrait model!
Find the Silhouette Portrait 4 cutting mats HERE. It will take time for retailers world wide to get these new cutting mats in stock and have availability.
Find more information on the Silhouette Portrait 4 HERE.
I hope these tips have helped and I can’t wait to see what everyone is creating with their Silhouette machines!
Save this for future reference by pinning the image below.
Enjoy !
THANK YOU for your support! How can you help? Click HERE & buy a coffee. Every little bit helps with the cost of running the site.
Silhouette Classes
Never stop learning! Let me help you take the anxiety out of learning with Silhouette and get to creating faster! My Silhouette classes are heavily focused on software, so you can take the skills & techniques taught and apply them to many future projects!
**This post may contain affiliate links. What that means is that I may receive compensation if you purchase through the links I have provided. The price you pay for the product or service is not higher but I may get compensated for sharing.
This lightweight and portable Silhouette Portrait 4 model cutting machine was announced at the Silhouette Summit in September 2023. It has many improvements over older Portrait model machines.
Affiliate links may be present in the following blog post and as an Amazon Associate, I earn from qualifying purchases.
Find Silhouette supplies at CrafterCuts or Silhouette America – links provided below *user code SECRETS at CrafterCuts to save 10% on supplies (excludes new machines) & free shipping on orders over $35
The right roller can now be moved to multiple locations. To move, lift the lever on top of the right roller and slide it along the roller bar. Close your eyes and slide it and you will feel where it can be locked in place. I find this is the easiest way for a user to actually feel that roller settle in the locations it can be locked in place. Sometimes our eyes can deceive us to think it’s in the position but it’s not quite there.
If cutting a smaller width of material, slide the middle spring guides to the left and position evenly across the width of the material. These spring guides also look different than they did on previous models, but they are designed to help the materials not bubble up in between the rollers. They do NOT provide any actual pressure or downward force, but are there as guides.
The left roller is a stationary roller. Do not force it or you could break the machine.
Here is a closer look at the right roller on the Silhouette Portrait 4. The new design has the rollers behind the roller bar. I would highly recommend keeping the rollers clean and free of adhesive residue as they will be more difficult to clean. Adhesive residue or build up on the rollers can affect the mat and materials feeding properly, which will affect your cut quality as well.
With the new design of the machine and rollers, this also means that the rollers are NOT rolling on the material or the adhesive of the cutting mat! Wahoo! This was one of the things that I did not like on the older Portrait models. My first cut, it cemented my cardstock to the cutting mat because the rollers were on top of the material and the adhesive.
On the right side of the machine are the operational buttons to run the machine.
Repeat Job
Repeat job is back!!!! This was a highly requested feature and it’s back. I rarely used this before, but I did have to test it out and it worked great!
The middle buttons will move the housing location and the pause button in the middle. If you’ve ever tried to pause a cut with a Silhouette machine, you may have noticed that it is NOT automatic. This is because the data has already been sent to the machine and the machine has to complete the cut line that is in process or the data that it has already received before it can pause.
Emergency Stop
Want the job to stop immediately?
Press the power button on the side of the machine quickly and the machine will immediately stop the job. The job is lost and cannot be restarted, but it will immediately stop the cut.
With the implementation of the Emergency Stop, this means that the Power button also operates a bit differently than older models. You will need to hold the power button in for 3 seconds for the machine to turn on and off. This feature is available on the Silhouette Portrait 4, Cameo 5 models, and the Curio 2.
Blade Installation – do not skip this section!!!
One of the most important steps to setting up any Silhouette machine is proper blade installation. You would be amazed at how many users we troubleshoot weekly with that do not have the blade installed or locked in properly. Until that little thing is fixed, a user will have cut issues. It is not hard to install the Silhouette Autoblade, but it is the #1 cut issue we still see for all Silhouette machines.
Pull the front lock out on the housing.
Carefully slide the Silhouette Autoblade down in the housing. The window on the front of the blade should face forward.
Push the Silhouette Autoblade down and carefully lift up on the front of the lock. This will help the blade settle down in the housing.
There should be NO GAP between the lip of the blade and the housing.
Push the front of the housing in to lock the blade in securely. The hooks on the front of the lock should grab the front of the Silhouette Autoblade.
This is the first thing to look at if you ever have cutting issues too! Most cutting issues can be fixed quickly if the user is willing to start at the beginning.
Blade Adjustment Hole
On the left side of the machine is where the blade adjustment hole is located.
This is not a new feature, but it’s worth mentioning. If debris is in that hole or the hole is blocked by the material or mat, then the Autoblade cannot adjust properly. This is something to be aware of and I hate to think how many Autoblades are in the garbage because a user was not aware of this.
If the Silhouette Autoblade is not hitting the hole properly, it will not adjust properly. I would recommend a blade housing reset.
Blade Housing Reset
Check that the blade is installed and locked properly.
Unplug the Silhouette machine.
Then carefully move the blade housing all the way to the right and all the way to the left. Do this 3 more times.
Leave the housing on the right side.
Plug it back in.
Turn the machine on and the housing will reset.
Type out a capital B and send that as a test cut.
Watch the red line inside the window on the front of the blade. Does the red line adjust to the correct number?
This usually corrects most cut issues, but will only work if the blade is installed properly first. Check out my Troubleshooting video HERE for more details & tips too!
Silhouette Portrait 4 Load Line
The Silhouette Portrait 4 has a new clearly marked load line for the cutting mat and materials. I know that does not sound exciting to most, but this is a major improvement in my opinion.
The new load line now is clearly defined and has an arrow that points to it, just like the Silhouette Cameo models. If you have ever seen an older model Portrait, you will know that the load line was not designated at all. It was very confusing for users to know what line to use to load the mat next to.
NEW!!! 8.5″ Cutting Width on the Silhouette Portrait 4
The Silhouette Portrait 4 now has a cutting width of 8.5″ which is an improvement over older models that are only 8″ wide.
The cutting mat is a specific Silhouette Portrait 4 cutting mat that allows for the new 8.5″ width. Make sure when you are ordering additional cutting mats that you are getting the correct one for your machine model.
Find the Silhouette Portrait 4 cutting mats HERE. It will take time for retailers world wide to get these new cutting mats in stock and have availability.
This does make a difference and the cutting mat looks different. It also has a different size adhesive area and the actual dimensions of the cutting mat are different than older Portrait cutting mats.
The photo above shows a comparison of the older cutting mat and the new Portrait 4 cutting mat. You can see the difference in the design area and the actual size of the cutting mat is different.
This means that if you use an older model cutting mat in the new Portrait 4, it will NOT line up with the on screen cutting mat that you see in the Silhouette Software.
This WILL affect your cut placement and print and cut projects!!!
Included with the Silhouette Portrait 4 is a small power terminal shown in the photo above sitting in front of the machine. DO NOT LOSE THIS!!!!
You will not be able to use the Silhouette Heat Pen tools if you lose this little piece.
This little power terminal plugs into the top of the Portrait 4 tool housing and then the Silhouette Heat Pen can be installed in the housing.
This is a removable part so that the lid on the Silhouette Portrait 4 will close. Do not close the machine lid with the power terminal installed for best results. You do not want to damage this area or the power tools many not work properly.
It will connect on the front of the Silhouette Portrait 4 when the cover is removed. Make sure to switch the unlock button on the bottom of the machine prior to trying to remove the cover on the front.
The setup for the Auto Crosscut is very specific. It is for use with the Autoblade and when cutting off of a material roll such as adhesive vinyl or HTV.
Note: you should never cut completely through a material such as cardstock, etc. without the proper setup for pop-out cutting or when using the Auto Crosscut feature or you can damage your machine. The reason you can cut matless with adhesive vinyl, HTV, and kiss-cut sticker sheets is because you are only cutting through the top layer and not completely through.
On the Page Setup Panel – Tab 1, choose No Mat under #3 and set the custom media height size to the length of the roll you are cutting from on #4.
Click on the Send tab in the top right corner.
Then the following will need to be set up in order for this feature to show up:
Compatible material selected such as Vinyl – Glossy or Heat Transfer Vinyl
Once those things are completed, you will see a Cross Cut window show up below the cut settings on the Simple Tab where this feature can be enabled and adjusted.
Note: if a custom cut setting is used, the Crosscut option will show under the Cut Settings area when setup to cut without a mat.
After the cut is complete, the Silhouette Autoblade will adjust the blade depth for a complete cut through. The Crosscut action will be performed in several cuts so it can keep the material in place while it cuts through. Once complete, the cut vinyl can be pulled from the backside of the machine.
The Crosscut feature is performed in the channel that runs underneath the blade housing, so it does not damage the machine when it cuts completely through.
That is a lot of information and new tips for the Silhouette Portrait 4. I hope it helps you to be successful with your Silhouette machine!
Save this for future reference by pinning the image below.
Enjoy !
THANK YOU for your support! How can you help? Click HERE & buy a coffee. Every little bit helps with the cost of running the site.
Silhouette Classes
Never stop learning! Let me help you take the anxiety out of learning with Silhouette and get to creating faster! My Silhouette classes are heavily focused on software, so you can take the skills & techniques taught and apply them to many future projects!
**This post may contain affiliate links. What that means is that I may receive compensation if you purchase through the links I have provided. The price you pay for the product or service is not higher but I may get compensated for sharing.
We troubleshoot with thousands of users each week and we have seen some very dirty machines. This will affect the lifespan and usage of your Silhouette machines! There is no way to sugar coat that! Especially now with the new technology released.
The #1 biggest thing is to keep your machines clean and free of debris. Especially with the new powered tool housing and power plug on the Cameo 5, Curio 2, and Portrait 4. Any dirt or debris in that power housing plug and it can affect your results and success!
I recommend keeping the lid on your machine for the Silhouette Cameo 5 and Portrait 4 closed when it’s not in use.
A Silhouette machine dust cover is a great idea too, especially if you have a workspace that has a lot of particles in the air. The Cameo 4 dust covers fit nicely over the Cameo 5 machines. They are pretty similar in size, just a few differences in the design.
With the Silhouette Curio 2, keep it free and clear of debris and materials in the way of the housing and channels on the machine. Any dirt, debris, or materials in the channels can interfere with the Curio 2 function and housing moving freely during use.
I do not recommend storing anything on top of the Silhouette Curio 2 or it could affect the machine function.
For my Curio 2 with acrylic etching/engraving, I’ve been using a handheld vacuum to help with the clean up after the etch.
Silhouette Electrostatic (ES) Bed
The Silhouette Electrostatic (ES) Bed is new! It’s awesome! Keep the boxes if you have not already thrown those away. The Electrostatic Bed should be stored completely flat and I do not recommend storing things on top of it.
The Silhouette Electrostatic (ES) Bed is very specific in that it needs to be completely flat in order to function properly and maintain the charge. Any warping of the bed due to improper storage or materials placed on it over time, can affect the success of using it.
Keep the boxes and packing materials for storage on the Silhouette Electrostatic (ES) Bed. This will be the best protection that you can use and you know it is stored safely when it’s placed back in the box with the packaging foam.
Any damage to the Silhouette Electrostatic (ES) Bed and you will need to replace it. Improper storage of the bed is not a machine fault, but is the responsibility of the user.
The new Silhouette Power Tools are a bigger tool housing than previous Silhouette tools. This means that they may not fit in the previous tool storage that a user had.
The storage of these new power tools will be very important because you not only have to protect the Auto Tool Detection metal plate on the backside of the tool, but you also have a Power Plug on the backside of the tool that needs to be protected as well.
I found a couple options for storage for the tools and they are customizable for what each user might need.
Look around your house and see if there is something you can repurpose for tool storage. You may already have an option that works for the tools you have!
Non-power Silhouette Tool Storage Options
This is the tool holder that I’ve been using for several years with the non-power Silhouette tools such as the Autoblade, Rotary blade, and Kraft blades. As you can see, I have gathered a selection of tools over the years as I’m writing tutorials and teaching classes.
This tool holder has worked for me so far with the smaller blade housings.
Additional Care Tips
Keep the rollers clean of adhesive. The rollers of the Cameo 5 and Portrait 4 should not be rolling on the adhesive of the cutting mat or it can pick up adhesive residue and affect your future cut projects.
All of these tips are 100% the user’s responsibility. You have invested in these machines and with proper care, use, and storage the Silhouette machines, tools, and accessories should work well for you.
Save this for future reference by pinning the image below.
Enjoy !
THANK YOU for your support! How can you help? Click HERE & buy a coffee. Every little bit helps with the cost of running the site.
Silhouette Classes
Never stop learning! Let me help you take the anxiety out of learning with Silhouette and get to creating faster! My Silhouette classes are heavily focused on software, so you can take the skills & techniques taught and apply them to many future projects!
**This post may contain affiliate links. What that means is that I may receive compensation if you purchase through the links I have provided. The price you pay for the product or service is not higher but I may get compensated for sharing.
Affiliate links may be present in the following blog post and as an Amazon Associate, I earn from qualifying purchases.
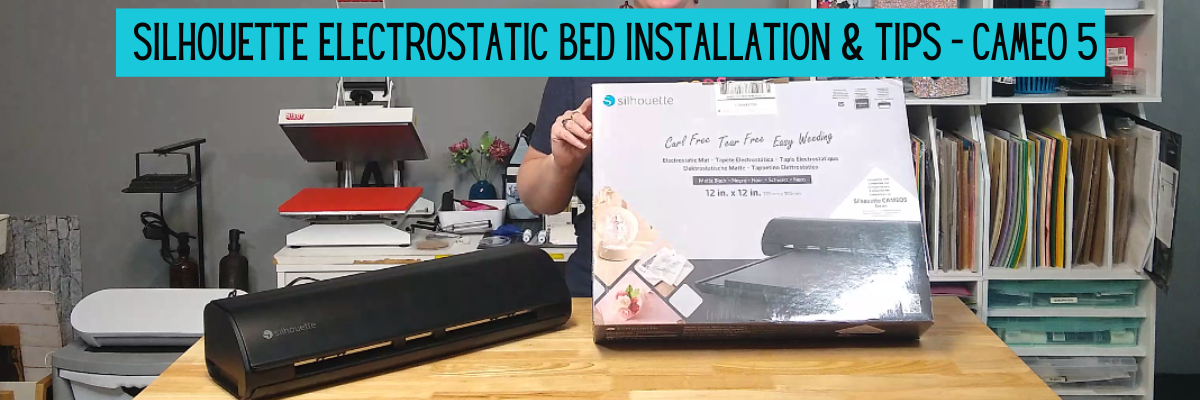
Silhouette Electrostatic Bed Installation & Tips
New equipment is always fun to get to know and play around with. I will admit that when I opened the box for the Silhouette Electrostatic Bed, I had a bit of a questionable moment as I saw something in the box I didn’t know about.
I had no idea what the “guard tape” was. There is an instruction sheet in the box. Make sure to keep the instructions, your box, and this guard tape for future use.
The Electrostatic Bed is awesome! I have loved creating with some delicate materials using it and can’t wait to share more!
If you are a Silhouette Curio 2 owner, the Electrostatic Bed comes with the machine. Check out additional information on the Silhouette Curio 2 HERE.
Save this for future reference by pinning the image below.
Enjoy !
THANK YOU for your support! How can you help? Click HERE & buy a coffee. Every little bit helps with the cost of running the site.
Silhouette Classes
Never stop learning! Let me help you take the anxiety out of learning with Silhouette and get to creating faster! My Silhouette classes are heavily focused on software, so you can take the skills & techniques taught and apply them to many future projects!
**This post may contain affiliate links. What that means is that I may receive compensation if you purchase through the links I have provided. The price you pay for the product or service is not higher but I may get compensated for sharing.
THANK YOU for your support! How can you help? Click the link to buy a coffee. Every little bit helps in the cost of running the site.