Posted on 1 Comment

Silhouette Auto Crosscut Feature – Cameo 5 & Portrait 4

New!!! Auto Crosscut Feature

Check out the new video on the Silhouette Secrets+ YouTube channel HERE showing how to set up in the Silhouette Studio software for the auto crosscut and watch the machine in action and continue reading below for more information below the video link.

Affiliate links may be present in the following blog post and as an Amazon Associate, I earn from qualifying purchases.

The Silhouette Portrait 4 and Silhouette Cameo 5 models are now equipped to cut the vinyl off using the Autoblade after a cut has been completed for certain materials when set up properly.

The setup for the Auto Crosscut is very specific. It is for use with the Autoblade and when cutting off of a material roll such as adhesive vinyl or HTV.

Note: you should never cut completely through a material such as cardstock, etc. without the proper setup for pop-out cutting or when using the Auto Crosscut feature. Cutting through a material without the proper setup can damage your machine. The reason you can cut matless with adhesive vinyl, HTV, and kiss-cut sticker sheets is because you are only cutting through the top layer and not completely through.

On the Page Setup Panel – Tab 1, choose No Mat under #3 and set the custom media height size to the length of the roll you are cutting from on #4.

Silhouette Studio Software Auto Crosscut Setup

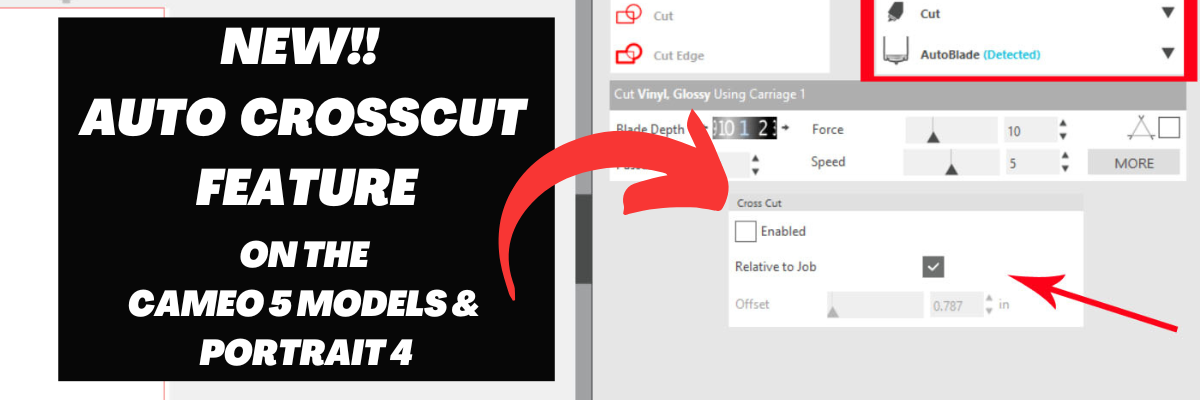
Click on the Send tab in the top right corner.

Silhouette Send Tab Auto Crosscut Setup

Then the following will need to be set up in order for this feature to show up:

  • Silhouette Portrait 4 turned on and recognized by the software
  • Silhouette Autoblade Type B recognized
  • Compatible material selected such as Vinyl – Glossy or Heat Transfer Vinyl

Once those things are completed, you will see a Cross Cut window show up below the cut settings on the Simple Tab where this feature can be enabled and adjusted.

Note: if a custom cut setting is used, the Crosscut option will show under the Cut Settings area when setup to cut without a mat.

After the cut is complete, the Silhouette Autoblade will adjust the blade depth for a complete cut through. The Crosscut action will be performed in several cuts so it can keep the material in place while it cuts through. Once complete, the cut vinyl can be pulled from the backside of the machine.

The Silhouette Portrait 4 is then set up for the next cut to be sent.

Silhouette Portrait 4

The Crosscut feature is performed in the channel that runs underneath the blade housing, so it does not damage the machine when it cuts completely through.

More Silhouette Portrait 4 resources:

Save this for future reference by pinning the image below.

Silhouette Auto Crosscut Pinterest

Enjoy !

THANK YOU for your support! How can you help? Click HERE & buy a coffee.
Every little bit helps with the cost of running the site.

Silhouette Classes

Never stop learning! Let me help you take the anxiety out of learning with Silhouette and get to creating faster! My Silhouette classes are heavily focused on software, so you can take the skills & techniques taught and apply them to many future projects!

Silhouette step-by-step Classes by Silhouette Secrets+

Silhouette Secrets+ by EllyMae
**This post may contain affiliate links. What that means is that I may receive compensation if you purchase through the links I have provided. The price you pay for the product or service is not higher but I may get compensated for sharing.
Posted on 1 Comment

How to Apply Vinyl Straight on Acrylic Panels

Today I’m sharing another acrylic sign décor project and how I made it.

Affiliate links may be present in the below and as an Amazon Associate I earn from qualifying purchases. What that means is that I may receive compensation if you purchase through the links I have provided. The price you pay for the product or service is not higher but I may get compensated for sharing.

Start by gathering your supplies.

Here is a list of the supplies used to create this project:
– Oracal 651 adhesive vinyl in the following colors:
Black, yellow, green, blue, light blue, red

– Oratape MT80P application tape
– Acrylic Panel or sign
– Wood stand (optional for panel)
– Acrylic Paint in your color choice
– Paint brush with bristles
– Paint palette (optional)
– alcohol wipe
– weeding tool
*Note: the acrylic sign I used in this project was from Michaels but is no longer available
These techniques can be applied to any acrylic sign blanks you might find.

Designs & Fonts used:
Christmas Lights svg by Art Boutique Butterfly
BFC Magic Marker Print Font by Blush Fonts – Design #396584

Next, measure the size of the blanks and write down measurements.

Paint backside of acrylics if desired to make it pop.

Using drawing tools to create a shape to use as a template with the measurements taken.

Add your design within the template and adjust as you see fit.

Using shapes as your template helps to visualize the available space you have for the design on your blank and see how might look. I use shapes as templates often in my designing and they also make a great weeding box too!
Check out these other tutorials HERE to see how I use shapes all the time as templates.

I don’t know about you, but most times, the most time consuming part of creating a project for me is choosing a design. I ended up creating a design with a combination of things I had seen.
I used both a design and a font style to create this sign.
Christmas Lights svg by Art Boutique Butterfly
BFC Magic Marker Print Font by Blush Fonts – Design #396584

Draw rectangles and align with the edges of the template to use as alignment tools for aligning on the acrylic blank.

Thanks to Barbara Foster with Let’s Go Silhouetting for this tip!
I used alignment boxes for layering vinyl and lining things up before, but taking a class with Barbara at the All Things Silhouette virtual conference in 2022 was a light bulb moment (no pun intended) to use this when lining it up to make sure it was absolutely straight on acrylic blanks.

Arrange the design to be cut.

I arranged it so that I could cut all of the pieces of the design in all colors on 1 Silhouette mat and 1 time sending it through the machine. I use this technique for all materials I cut.

Look for a step-by-step video tutorial on this coming soon to the Silhouette Secrets+ YouTube Channel!
I’ll update this post with a link once it’s ready.

Weed your vinyl design and then apply to the acrylic blank. I used the rectangles drawn for the layering marks to line it up with the straight edge of the acrylic sign.

Check out the new video on my Silhouette Secrets+ YouTube channel on the application of this design HERE.

And check out this recent post on Creating Fall Decor with Oracal 651 HERE.

Acrylic signs are something that have been very popular the last few years and can be used for all seasons and occasions.

Check out this post HERE for 10 more ideas of what you can create.

I would love to see what you are creating with your Silhouette software or machines!
Feel free to post on my Facebook group at 
Silhouette Secrets with EllyMae.

Save this for future reference by pinning the image below.

Enjoy !

This image has an empty alt attribute; its file name is logo.jpg

THANK YOU for your support! How can you help? Click HERE & buy a coffee.
Every little bit helps with the cost of running the site.

Or if you are looking for more in-depth, step-by-step classes, check out all of my online Silhouette classes on my Teachable site HERE.

SS Logo snip it
**This post may contain affiliate links. What that means is that I may receive compensation if you purchase through the links I have provided. The price you pay for the product or service is not higher but I may get compensated for sharing.
Posted on 1 Comment

Adhesive Vinyl on Acrylic Blanks

It is Back to School here for us and I made a little something to add to my kid’s backpacks. These bag tags are 3″ in size and with the lobster claw, perfect to clip onto their backpack zipper.

DYQL3512_resized

Our school colors are blue and white, so this little paw print acrylic from Craft Chameleon works great. There are many options for colors both solid and glitter, just click on the drop down box for more options.
For the girl’s tags I used the white glitter with Siser PSV in blue and the boy’s are solid white with Oracal 651 blue.

It came with a cut file that is sized perfectly for the acrylic blank, so all you have to do is customize it if needed and set it up to cut.

CC cut file

*Line color added and thickened for visual

How to make the bag tag design

For these bag tags, I wanted to add the first initial into the design. I typed the first initial using the Text Style Tool and then changed the font using the Text Style Panel.
I used Lori Whitlock’s School Font Design #273761 from the Silhouette Design Store because it was a nice bold font.

Girls paws

Once the properties (color, font style, etc) of the first letter is set, then make a copy of the letter and change the text to the next letter. I find this saves time when you are using multiple text designs that are similar. In this case, all of the initials would be the same font, so I just copied and pasted the letter and then changed it for the next one.

Place the letter in the design where you want and you are ready to cut.

Girls paws send tab

The Cameo will cut exactly where you see the bold red cut lines when you click on the Send tab. I chose to Send mine to cut this way with weeding lines between the designs.

If you are creating a design to show to someone, you can make the design look more realistic and having the letter “cut out” or subtracted from the paw print by making it a Compound Path.

Compound path

Both designs will cut the exact same way as you can see from the bold red cut lines on the Send tab.

Compound path send tab

I can’t wait to show the kids when they get home from school.

FZET7724

Here are the supplies I used to create these bag tags:
– 3″ acrylic paw print
– Swivel Lobster Clasp
– 1 inch Silver Tone Links
– Triangle bail (small)
– Bent Nose pliers
Siser PSV adhesive glitter vinyl (blue)
Siser PSV transfer tape
Oracal 651 adhesive vinyl

And here is a quick video on how I applied the vinyl to the acrylic blanks.

I love that with my Silhouette, I can make so many different custom projects.


Enjoy !

THANK YOU for your support! How can you help? Click HERE & buy a coffee. Every little bit helps with the cost of running the site.

Looking for more in-depth, step-by-step classes, check out all of my online Silhouette classes on my Teachable site HERE.

SS Logo snip it
**This post may contain affiliate links. What that means is that I may receive compensation if you purchase through the links I have provided. The price you pay for the product or service is not higher but I may get compensated for sharing.

Posted on 2 Comments

Glass cutting board design

This is a great project for a a great personalized gift. These glass cutting boards are textured on the top. Personally, I don’t think they make a good cutting board as they are textured on top but it makes a great coaster in my craft room. Of course, if you have been following my blog or my Facebook group, you know I like wine designs…. wine decor, wine…. well anything wine – lol.

With these glass cutting boards, you mirror your image on the Silhouette software before you cut it and then apply on the back side of the cutting board. I used Oracal 651 vinyl on this project, so it has a more “permanent” bond.

img_6042 Once you have the design cut, you can carefully weed the design and leave the image you want to transfer onto your project. Using your transfer tape to place your image on the back of the cutting board. Also as a note, vinyl is not food safe, so this is a great reason to apply it to the back of the cutting board. Next, you burnish your design down really good and carefully peel back your transfer tape. Done!

img_6047 There you go – a quick simple project! Now, I found this cutting board at our local Dollar Tree… however, they keep getting harder to find. You can pick up a glass cutting board anywhere and personalize it. These would be hand wash only as vinyl is not dishwasher safe. Also as a note, vinyl is not food safe, so this is a great reason to apply it to the back of the cutting board.

Enjoy !

THANK YOU for your support! How can you help? Click HERE & buy a coffee. Every little bit helps with the cost of running the site.

Looking for more in-depth, step-by-step classes, check out all of my online Silhouette classes on my Teachable site HERE.

SS Logo snip it
**This post may contain affiliate links. What that means is that I may receive compensation if you purchase through the links I have provided. The price you pay for the product or service is not higher but I may get compensated for sharing.
Posted on Leave a comment

New Year – New Mat!!!

I was cutting a few designs out of vinyl and it just seemed to keep tearing….. I powered through and cut a second time & then carefully coaxed it while weeding the design….

You can find that previous blog post with image HERE.

A few days later I sit down to cut a few more and think to myself, “Let’s try a new mat and see if it makes a difference.”

Oh my gosh! I don’t know why I always forget to try this….. It’s probably because I feel that my old mat is still sticky, but it just must not be sticky enough. A new mat, the vinyl doesn’t slip at all and I think that makes all the difference in clear cut lines…. This design below was so easy to weed and on 651, which I seem to have more issues with weeding.

img_5327

New mat = problem solved!

img_5328 I found this design in the Silhouette store and it said “Buy Me”…. well – click… and now I can just place it on my mat, resize it and cut. So simple!

 I wish you all a very Happy New Year & wish you many blessings in 2017!!

Enjoy !

THANK YOU for your support! How can you help? Click HERE & buy a coffee. Every little bit helps with the cost of running the site.

Looking for more in-depth, step-by-step classes, check out all of my online Silhouette classes on my Teachable site HERE.

SS Logo snip it
**This post may contain affiliate links. What that means is that I may receive compensation if you purchase through the links I have provided. The price you pay for the product or service is not higher but I may get compensated for sharing.
Posted on Leave a comment

Personalizing scrapbook album covers 

I love to give these mini albums as gifts, especially to grandparents. But, I like to make them even better by giving it a personal touch and what better way than….. vinyl!!!

To get it centered on the front I used my CTMH mat for measurements & some painters tape to hold my vinyl in place. I am using a method referred to the “hinged” method for applying my vinyl.

This way I can peel the backing off one side, cut the backing off & then smooth one side of the vinyl decal in place. Then I remove the painters tape & backing paper and carefully smooth the rest of the decal down into place. This helps get your design placed exactly where you want it.

img_5345-1

img_5349-1
img_5348-1

I found these cute designs in the Silhouette store and knew they would be perfect to personalize the covers of my gifts!
I love how these turned out!

Enjoy !

THANK YOU for your support! How can you help? Click HERE & buy a coffee.
Every little bit helps with the cost of running the site.

Looking for more in-depth, step-by-step classes, check out all of my online Silhouette classes on my Teachable site HERE.

SS Logo snip it
**This post may contain affiliate links. What that means is that I may receive compensation if you purchase through the links I have provided. The price you pay for the product or service is not higher but I may get compensated for sharing.
Posted on Leave a comment

‘Twas the Night before Christmas

I’ve seen variations of this all over and I just had to try it.

This was a bit difficult to weed the vinyl but I was determined. I wanted this image on my charger plate. I ended up cutting it twice and then coaxing it along while weeding & applying it, but I love the end result.

img_5308 I decided I needed to cut up the words a bit & applied in pieces. It seemed to lay on the charger & go on better with less bubbles.

img_5312 And done….. another Christmas decoration off my to- do list.

I hope you enjoy your Christmas Eve!

Enjoy !

THANK YOU for your support! How can you help? Click HERE & buy a coffee. Every little bit helps with the cost of running the site.

Looking for more in-depth, step-by-step classes, check out all of my online Silhouette classes on my Teachable site HERE.

SS Logo snip it

**This post may contain affiliate links. What that means is that I may receive compensation if you purchase through the links I have provided. The price you pay for the product or service is not higher but I may get compensated for sharing.

Posted on 1 Comment

Vinyl on glass cutting boards

I have seen so many of these glass cutting boards pop up on my newsfeed. Such a nice little touch to make a personalized gift.

I found a design I liked in the Silhouette store & grabbed it before I could convince myself I could design it myself. One thing I’ve realize is, yes – I can design pretty much anything myself. I’ve worked with the software program & I know I can do it, but I can also just buy the design & get to cutting. If I was making these to sell I would either buy the CU (Commercial Use) license or design something myself, but just for my personal use or a gift, the option of purchasing through the Silhouette store saves me time.

img_4068

I reversed the design & cut it from black 651 viny. Then I attached to the backside of this glass cutting board. It turned out great & was the perfect addition to a gift bag I was giving to a friend.

img_4070

 I can see creating many more of these in the future. Next, I’m going to try etching using the vinyl as a stencil. I’m addicted to the glass etching.

You can find this design HERE.

I love that I can personalize an item to make it that much more special!

Enjoy!

Posted on Leave a comment

Simple Santa Ornament

Here is another simple ornament made using basic shapes within the Silhouette Studio program.
I created a long rectangle belt after measuring the circumference of my square ornament, which I then cut out of black 651 vinyl.
Then I made 2 squares and used the Subtract all feature to make the belt, which I cut out of silver 651 vinyl. santa-ornament-copy

I then used transfer tape to place the images onto my ornament.

img_4059-1

And added a few clear rhinestones with some E6000 glue and you have a simple Santa belt ornament.

img_4062-2

Hope you are able to create something today1


Enjoy !

THANK YOU for your support! How can you help? Click HERE & buy a coffee.
Every little bit helps with the cost of running the site.

Looking for more in-depth, step-by-step classes, check out all of my online Silhouette classes on my Teachable site HERE.

SS Logo snip it
**This post may contain affiliate links. What that means is that I may receive compensation if you purchase through the links I have provided. The price you pay for the product or servic
Posted on 3 Comments

Personalizing items

As I approached my first instruction class, I wanted to create a Demo book to show interested Silhouette customers projects that I had completed with my Silhouette Cameo.

img_4033

I took the new Sea Glass photo album from Close to My Heart and decided to add some vinyl to the front cover to personalize it a bit.

img_4043

I took some Oracal 631 Black vinyl, even though it’s temporary, I have great luck with it sticking and if I want to re-design it, I can just peel it off and stick a new one on.
I used the hinge method to apply it to get it positioned where I wanted on the album.
By doing this, you apply a piece of painter’s tape across the center to secure it on the album. Then, lift one half of the vinyl up & peel the backing off and cut the extra backing off.
Then you can lay the vinyl down on the album and burnish to your album.

img_4045

Then you can remove the painter’s tape and are able to work with the other half of the design.

img_4047

Remove the rest of the backing and you can smooth down the vinyl to your album.

img_4048

Burnish it down really well and slowly peel back the transfer tape. This one did take a little bit of finesse to get it off the transfer tape.

img_4049

I ended up applying this design in two pieces as my first cut of my logo was a bit too delicate and didn’t cut correctly. I just changed the font style and cut it again.

img_4050

The finished project turned out great and it shows customers…. the Possibilities really are endless!!!

img_4051

What can you create with a little bit of vinyl?

ss_signature-copy