Posted on Leave a comment

Silhouette IPT (Intelligent Path Technology) – What Is It?

Silhouette Secrets+ with EllyMae

Silhouette IPT is short for Intelligent Path Technology and was first announced to us at the 2023 Silhouette Summit when the Silhouette Cameo 5, Curio 2, and Portrait 4 models were announced.

Affiliate links may be present in the following blog post and as an Amazon Associate, I earn from qualifying purchases.

In this blog post, I am sharing some of the details of the IPT setup and how it works. Read more details below and then watch the video tutorial with even more tips on the Silhouette Secrets+ YouTube channel HERE.

The Silhouette IPT is a patented cutting technology that changes the cut order of a design to “help” it stay in position and complete the cut. Depending on the design you have on the file, when it’s turned on, it will complete the cut of the design in segments versus a continuous cut around the entire design. The photo below shows the standard method of cutting on the left side, that would be from 1 starting point and cut around in one continuous cut back to the starting point on a heart. On the right side, the white dots are points of reference in how the design would be cut in segments, starting on the top right, then moving to the top left and then moving to complete the bottom on each side. This method is designed to “hold” the design in place and not have shifting as it’s being cut.

A graphic showing two versions of a heart shape: on the left, a hand is guiding a dotted outline of a heart, while the right shows a clearer representation with marked points.

This new technology was created to help delicate materials such as vellum be more successful when cutting out designs and to cut through multiple layers of materials at once, such as several sheets of vellum stacked on top of the Silhouette Electrostatic Mat.

Here is the video we were shown at Silhouette Summit 2023 to explain the process.

This is a setting you have to set up and turn on in order for it to use the IPT cutting method and is not an automatic setting. It is compatible with the Silhouette Cameo 5, Curio 2, and Portrait 4 models.

Silhouette IPT settings can be found under the advanced settings on a preset setting, or you can turn it on for a custom cut setting. On the Send tab in Silhouette Studio, select the MORE button and you will see a box next to “Intelligent Path Technology”.

Here is a look at Silhouette Studio version 5

Screenshot of Silhouette Studio Business Edition interface showing material settings and tool holder options with a red arrow pointing towards checkboxes for line segment overcut, track enhancing, and intelligent path technology.
Screenshot Silhouette Studio v5.0.402

And a look at the Advanced Settings in Silhouette Studio version 4

Screenshot of Silhouette Studio software displaying a design workspace with heart and flower shapes, along with material settings on the right panel.
Screenshot Silhouette Studio v4.5.815

If IPT is selected on a preset material setting, you will need to Save As to create a new material in order for it to be activated on the cut setting. If you simply check the box and X out of the preset material, it will not activate the IPT setting.

Screenshot of Silhouette Studio software showing design interface with heart and flower shapes, and material settings for various types of vinyl and vellum.
Screenshot Silhouette Studio v4.5.815

How Silhouette IPT (Intelligent Path Technology) Works

Let’s take a real world look at the IPT cut setting and the order that it takes. Keep in mind that the Silhouette software will change this order for every design, and you do not know what the order will be unless you watch and record the machine behavior.

I’ll be using the Silhouette Curio 2 for this demonstration, but it works the same for the Silhouette Portrait 4 and the Silhouette Curio 2. I am using Silhouette Vellum sheets for this test along with a brand new Silhouette Autoblade.

I used the same shape from the video by Silhouette from 2023. I drew the heart using the Flexishapes tool on the left side in Silhouette.

An interface of Silhouette Studio software displaying two heart shapes on the design canvas, alongside cutting settings for Carriage 1 and Carriage 2.

This was completed as a continuous cut, the blade never lifted.

Then I turned the cut lines off for the first heart and turned the cut lines on for the 2nd heart, which is an exact copy of the first one.

My first attempt at this IPT cut, I used the Vellum preset, checked the box, but then X’d out and found out that it did not activate the IPT setting. A new custom setting is required by clicking on Save As after checking the box.

So I made a 3rd copy of the heart and I clicked on the MORE button and checked the box next to Intelligent Path Technology and chose Save As. Then clicked the X in the top right and chose the new material of Vellum (1) as my setting. I then clicked on the MORE button to double check that IPT setting did save with the new material.

Screenshot of Silhouette Studio software displaying a design workspace with three heart shapes outlined in red. The software tool settings on the right show options for cutting vellum.

The IPT function did work and it cut the heart in 10 different line segments. However, the cut order was a bit different than the video by Silhouette from 2023 and I noticed it started the first cut in the bottom left area of the design. I am using Silhouette Studio version 4.5.815 for this demonstration. The order in which it cuts may vary by software version, which may be why the order is different than what the video shows from 2023.

Here is a diagram of the cut order using IPT with this heart shape

A heart shape template outlined on a piece of paper, with numbered markers around the edge for reference.

This heart with this specific material cut fine both ways. But, that won’t always be the case.

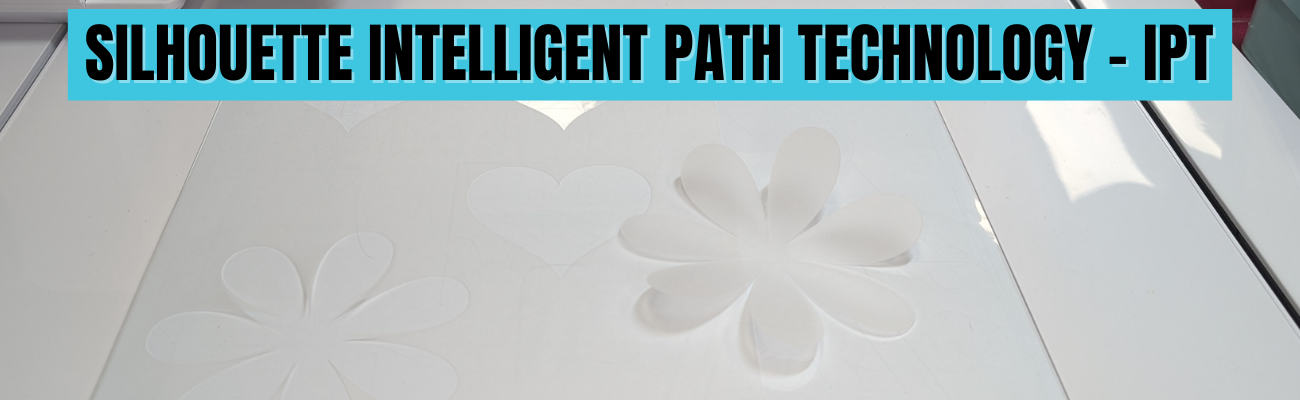
On a more complex design, such as this flower shape drawn with the Flexishapes and the control point adjusted to make a sharper petal, IPT did make a difference in the cut. Instead of tearing, smooshing, or ruining the corners on the interior of the petals, it was a clean sharp point and the design cut well.

Screenshot of Silhouette Studio software showing design tool interface with three heart shapes and a flower shape, and cutting settings for vellum material.

For this flower shape that is approximately 4.3″ tall and 4.2″ wide, it did 51 segmented cuts. I am not going to study the video to diagram all that out, however, it was pretty neat to watch. And it was a success, with no smooshed corners or tears. I did have to “pop” out the flower carefully, but for some designs that extra little bit of care is worth it!

Close-up of a cutting machine mat featuring various cut shapes, including hearts and a flower, with the cutting machine in the background.

Here is a close up look at the interior cuts on the flower shape. Look at those crisp, cut edges! No tearing or smooshing using the IPT feature in Silhouette.

Close-up view of a flower design cut from vellum using Silhouette IPT - Intelligent Path Technology.

Vellum is a very delicate material and can be difficult to cut, especially on an intricate cut. Vellum will also curl as you can see in this photo, the flower immediately started to curl. Humidity can also affect the success of cutting vellum, well, really any paper is affected by humidity. For best results, store vellum in a sealed envelope and completely flat. The Silhouette Electrostatic Mat is awesome for cutting vellum designs and I share even more in the Silhouette Curio 2 – Out of the Box class found HERE.

Here are a few more vellum products I’ve tested with:

Things to Know About the Silhouette IPT Method

  • It is not automatic.
  • It is a setting you can turn on for a preset material, then Save As a new material.
  • It is a setting you can turn on for a custom setting.
  • It does take longer to cut a design because the blade will lift, move, and cut in a different order.
  • It will take longer on the Silhouette Curio 2 versus a Silhouette Portrait 4 or Silhouette Cameo 5 model due to the slower movement of the arm on the Silhouette Curio 2. It may only be a few seconds longer, but it will.
  • IPT is compatible with the Silhouette Curio 2, Portrait 4, and Silhouette Cameo 5 models.
  • IPT setting can be used with both the Silhouette adhesive cutting mat and the Silhouette Electrostatic Mat.
  • Testing is the only way you will know if it will work for a design and material.
  • The Silhouette software decides the order of IPT based on the shape, size, and design. The user does not see the order or know how many segments a design will be cut out in.
  • Don’t believe AI answers on what IPT does or in general how to use a Silhouette. AI has no experience using Silhouette machine and will come back with some very bad advice. Experience using a cutting machine will beat AI hands down – literally.
  • This is NOT the same as Cut Order Sorting options found under the Settings (gear icon) on the Send Tab in Silhouette Studio.
Screenshot of Silhouette Studio Business Edition displaying cut settings on the right side, with options for layer sorting, feed options, and weeding settings. The cutting area is highlighted in red.
Screenshot from version 5 Silhouette Studio

Here is a look at where to find the Cut Order Sorting options in Silhouette Studio version 4

Screenshot of Silhouette Studio software showing design elements including hearts and a flower, with the advanced settings panel open for cut order sorting options.

I have included more details and real time demonstrations in the video below or on the Silhouette Secrets+ YouTube channel too.

It did take more time to cut, but I was able to successfully cut out a rolled flower design using the Silhouette Electrostatic Mat and IPT setting. This has been something I have troubleshot with users several times and the intricate design just couldn’t be held in place to complete the cut using the standard cutting methods with the electrostatic mat.

A crafting workspace featuring a black hole puncher, a yellow paper flower, and various crafting tools on a yellow patterned background.

I am thrilled with how this worked out!

Does Silhouette IPT Work?

Yes – but not for every design, material, or project. I thought it worked great with the flower design above as that is one of those highly likely designs to smoosh and tear on the sharp corners.

Personally, I do not typically like the little tabs it left, similar to pop out cutting. However, it might be beneficial for those materials or designs that just will not cut the standard way. The only way to know is to test it and see what happens. If you do use it, I would recommend a sharp pair of detail scissors to snip the little connections and care when separating it from the full sheet.

The second part of IPT method for cutting through multiple layers of materials, proved to be much more finicky with mixed results. I spent hours and hours testing and was never really impressed with the results. The more layers of material, the less desirable the cut results were. It is not something I’ve spent more time testing. Maybe someday I’ll try again.

I hope those tips give you a better idea of how this new cut path technology works. You never know until you try and hopefully that will help your trials go a bit easier.

Next time you have a design that is just giving you fits with a standard, continuous cut setup – you might try out the IPT setting and see if it makes a difference in the success with your material.

Good luck!

Save this for future reference by pinning the image below.

Screenshot showing the Silhouette software interface with options for Intelligent Path Technology highlighted.

Enjoy !

THANK YOU for your support! How can you help? Click HERE & buy a coffee.
Every little bit helps with the cost of running the site.

Silhouette Classes

Never stop learning! Let me help you take the anxiety out of learning with Silhouette and get to creating faster! My Silhouette classes are heavily focused on software, so you can take the skills & techniques taught and apply them to many future projects!

Silhouette step-by-step Classes by Silhouette Secrets+

Silhouette Secrets+ with EllyMae
**This post may contain affiliate links. What that means is that I may receive compensation if you purchase through the links I have provided. The price you pay for the product or service is not higher but I may get compensated for sharing.

Posted on 2 Comments

Silhouette Electrostatic (ES) Bed Tips

The new Silhouette Electrostatic (ES) Bed for the Silhouette Cameo 5, Curio 2, and Portrait 4 model machines was announced and demonstrated at the Silhouette Summit in September 2023. It was pretty cool to see this new technology in action.

Silhouette Cameo 5 Electrostatic Bed Tips

Affiliate links may be present in the following blog post and as an Amazon Associate, I earn from qualifying purchases.

I recorded the Electrostatic Bed demo from Silhouette Summit and shared it on the Silhouette Secrets+ YouTube channel HERE. I loved seeing everything first hand and in action at the Silhouette Summit!

But, until you get the equipment in hand and start to use it, you never really know how it’s going to go. This is new technology and it does have to be set up properly. It is designed to work with thin, smooth materials that can maintain a charge between the ES bed and the material while it’s being cut.

This was the first time in Silhouette’s history that they released the new machines and features at Silhouette Summit. Usually, in the past, there has been a 4-6 month gap between the announcement and when the new items are released.

The Silhouette Curio 2 was available first and it comes with the Electrostatic (ES) Bed in the box. For the Silhouette Cameo 5 and Portrait 4 models, the Electrostatic (ES) Bed is an additional accessory that can be purchased separately.

I received my Silhouette Curio 2 and immediately started testing and seeing what it could do. I have cut vellum, 65 lb. cardstock, 110 lb. cardstock, sticker paper, adhesive vinyl, and copy paper with the Electrostatic (ES) bed so far.

Check out the video – Tips for Success with the New Silhouette Electrostatic (ES) Bed – Cameo 5, Curio 2, and Portrait 4 HERE.

I share how you can be successful with the Electrostatic (ES) Bed. These tips will work for the Electrostatic (ES) Bed no matter which Silhouette machine model you are using it with. I’ve also included a few more tips down below this video in this post as well.

Electrostatic (ES) Bed Tips

  1. The Electrostatic (ES) Bed is powered by the Silhouette machine.
    This is one reason that the Electrostatic (ES) bed is not compatible with older model Silhouette machines. The older machines do not have the technology in them to send power to the ES bed.
  2. The electrostatic charge has to be built up.
    The ES bed needs to be turned on to start building up the charge. It takes time, usually less than a minute for the electrostatic charge to build. It is not a slap it and go. You have to set it up properly for success!
    Place Electrostatic (ES) Protective Sheet on the Bed and smooth out any air bubbles. Make sure that the Electrostatic (ES) Bed has not turned off.
    In early versions of the software with the Silhouette Curio 2, the ES Bed automatically turns off after the cut and the user will need to turn it back on each time.
  3. Not all materials work with the Electrostatic Bed.
    Materials need to be completely flat and smooth to be able to hold and maintain the electrostatic charge. Textured materials will not work or maintain that charge to hold it in place while it’s being cut.
    Smooth materials down on top of the ES Protective Sheet and allow time to build the charge.
  4. Test the materials with your fingertips to see if the materials move. If it moves, it’s not ready. Start again & take the time to build the charge.
    If the charge is broken at any time while it’s being cut, it will be a lost cut.
  5. Keep the design away from the edges of the materials.
    If the cut goes over the edge of the material, it can break the electrostatic charge and the material may move.
  6. Not all designs will work well with this new technology.
    Keep in mind that the smaller the cut pieces are, the less surface area there is for the material to maintain the electrostatic charge. Pieces that are completely cut may move out of place. This may or may not affect the entire cut. If a loose piece of material gets stuck on the blade as it’s cutting, it may hinder the cutting of the blade.
  7. Get extra materials! It is going to take time and practice to learn a new skill and new equipment.

Supplies used or mentioned in the video:

And I have more tips!!!!

Check out this video HERE to see how to install the Silhouette Electrostatic (ES) Bed on the Silhouette Cameo 5. The installation for the Silhouette Portrait 4 will be the same once the electrostatic bed is available.

I will admit, this is pretty cool technology and not having to remove delicate materials from the adhesive cutting mat is pretty darn awesome!

Will it work for every project? No!

But it is definitely fun to play around with and see what can be done with it!

Here are a few examples of projects I’ve done with the Silhouette Electrostatic (ES) Bed.

Silhouette Curio 2 Electrostatic Bed Tips

Koala sticker paper cut using the Silhouette Electrostatic bed. You can find the Silhouette Curio 2 Print and Cut with the ES (electrostatic) Bed HERE on the Silhouette Secrets+ YouTube channel.

Silhouette Curio 2 Electrostatic Bed Cutting Cardstock

Recollections 65 lb. cardstock 12″ x 12″ print and cut using the Electrostatic (ES) Bed. See this in action on this video Silhouette Curio 2 Print and Cut 12″ x 12″ with the ES Bed HERE.

Vellum Flowers cut with the Silhouette Curio 2 Electrostatic Bed

I cut & created these vellum paper flowers for the Silhouette Curio 2 – Out of the Box class where I share 3+ projects you can complete with the Curio 2 right out of the box. Find more details on that HERE.

Silhouette Tips for Cutting Small Fonts & Designs

This is an example of adhesive vinyl from a class I released called Easily Create Custom Gift Tags & Keepsake Ornaments in Silhouette found HERE. In the class I share a demonstration of cutting adhesive vinyl with the Curio 2 on the Electrostatic Bed.

I also released a tutorial on Silhouette Tips to Cutting Small Fonts and Designs found HERE that can be applied to any Silhouette model machine you are using.

Silhouette Curio 2 Electrostatic Bed cutting copy paper

And here is one that I just completed this week cutting copy paper using the new IPT technology to cut 2 sheets that are stacked on top of each other. Yes, you read that right! Stacked materials cut at the same time with the Electrostatic Bed.
I’ll be sharing more on that soon!

I’ll be adding more information to the blog and Silhouette Secrets+ YouTube channel as I create projects and play with this new technology. Stay tuned for more!

I hope those tips help you get started and creating with your new Silhouette model machines and the Electrostatic (ES) Bed.

Save this for future reference by pinning the image below.

Silhouette Electrostatic Bed Tips

Enjoy !

THANK YOU for your support! How can you help? Click HERE & buy a coffee.
Every little bit helps with the cost of running the site.

Silhouette Classes

Never stop learning! Let me help you take the anxiety out of learning with Silhouette and get to creating faster! My Silhouette classes are heavily focused on software, so you can take the skills & techniques taught and apply them to many future projects!

Silhouette step-by-step Classes by Silhouette Secrets+

Silhouette Secrets+ with EllyMae
**This post may contain affiliate links. What that means is that I may receive compensation if you purchase through the links I have provided. The price you pay for the product or service is not higher but I may get compensated for sharing.
Posted on 2 Comments

Silhouette Curio 2 – Unboxing, First Cuts & More!!!

What an exciting week it’s been! The new Silhouette Curio 2 arrived on my doorstep this week and I’m having a ball playing with it and testing it out!

If you have followed me for any time, you’ll know that I am proficient with the Curio 1 and love all the fantastic projects that can be made with it. It is still a good machine and if you have one, you can still use it! I can help with that too!

On the Silhouette Secrets+ Teachable site you will find 10 step-by-step classes that are all focused on the Curio 1. Check it out HERE.

Now that the Silhouette Curio 2 has been released, I’ll be developing step-by-step classes for that too! So watch the Silhouette Secrets+ Teachable site for future classes.

Affiliate links may be present in the following blog post and as an Amazon Associate I earn from qualifying purchases.

For all the details regarding the 3 new machine models released at the Silhouette Summit 2023, check out this post – New!!! Curio 2, Cameo 5, and Portrait 4

Now, before I go too much farther, I do want to let you know that the Curio 2 is limited in quantity in 2023. What is currently available is what is the inventory for the rest of 2023. But, don’t panic! There will be more coming in 2024 and there is lots of time to learn this new machine.

If you want to add the new Silhouette Curio 2 to your toolbox right now, you can find it at CrafterCuts HERE.

Whether you are diving into using the Silhouette Curio 2 or watching and waiting, I have resources that can help with this new machine.

I have been updating my Silhouette Secrets+ YouTube channel with new videos as I am testing the machine.

And to make it easy to find machine specific information, I’ve created a Silhouette Curio Playlist on the Silhouette Secrets+ YouTube channel. Find that HERE.

The Silhouette Curio 2 is a completely different machine than the first model! It is a large machine too! The footprint of the machine measures in at 20″ x 24″ and will need a dedicated space to function properly. Please consider that before you purchase!

However, I had a group member bring up a really good point. While the Silhouette Curio 2 is a large footprint that needs a dedicated space for it, it does take up less room than if you purchased a Silhouette Cameo 5 and the new Electrostatic Bed for the Cameo 5. It really depends on what your specific situation is and how your workflow is for you! Each user might be different and one machine may work better for one person vs another.

I am having a blast with the new Silhouette Curio 2! It is a new machine and it will take time to learn! I feel that every single person could be successful with this machine IF you take time to learn it and use it properly. If you do not, you will likely hate it. That is not a machine fault, it is simply a personal preference.

I want to share a few projects I’ve been doing with the Silhouette Curio 2.

Here are my first cuts on Vellum paper using the Electrostatic (ES) bed on the Silhouette Curio 2.

Such clean cuts. Check out my Silhouette Curio 2 First Cuts video HERE to see how I did, what issues I encountered, and how I worked through it.

I had several questions about print and cut, so of course I had to test that! Here is a letter size sheet of sticker paper that was cut on the Curio 2 using the new ES bed. The new ES bed means that you no longer have to use a cutting mat for materials that are flat and smooth. The materials can be held in place by static charge. The ES bed is new for the Silhouette Cameo 5, Curio 2, and Portrait 4. It will take time to learn and you will need to set it up properly, but I can see so many new possibilities on projects and successful cuts when using it. The ES bed comes with the Silhouette Curio 2 in the box.

Check out my videos on Silhouette Curio 2 Print and Cut with the ES bed and Tips for Success with the New Electrostatic Mat HERE.

I used Koala sticker paper and a design by Wispy Willow Designs called Small Business Sticker Sheet.

And then of course, once I showed this someone else asked about 12″ x 12″ cardstock, so that was the next project on my list.

This is Recollection Cardstock from Michaels and I used several designs from Diva Watts Designs.

And you probably guessed it, I shared it on YouTube too! Find the video on Silhouette Print and Cut – 12″ x 12″ HERE. See how easy it was with the new ES bed and cutting cardstock.

On a side note, while at the Silhouette Summit 2023, I also was able to meet several of the Silhouette Design Store Designers for the first time – Wispy Willow Designs, Diva Watts Designs, and Sarah Hurley. We spent several meals together and it was a blast. Check out my introduction video direct from Summit HERE. Make sure to follow these amazing designers too, they are a few of my favorites from the Design Store. I look forward to future collaborations with them! Stay tuned!

One of the new features of the Silhouette Curio 2 is it has a clearance of 20 mm. WOW! Yes, 20 mm. This is clearance under the tool housing. It is NOT cutting depth.

It also has auto detection of material thickness. This is awesome!

This means it opens up the possibilities of what projects can be done with the Silhouette Curio 2. Such as sketching on canvas and other thicker materials.

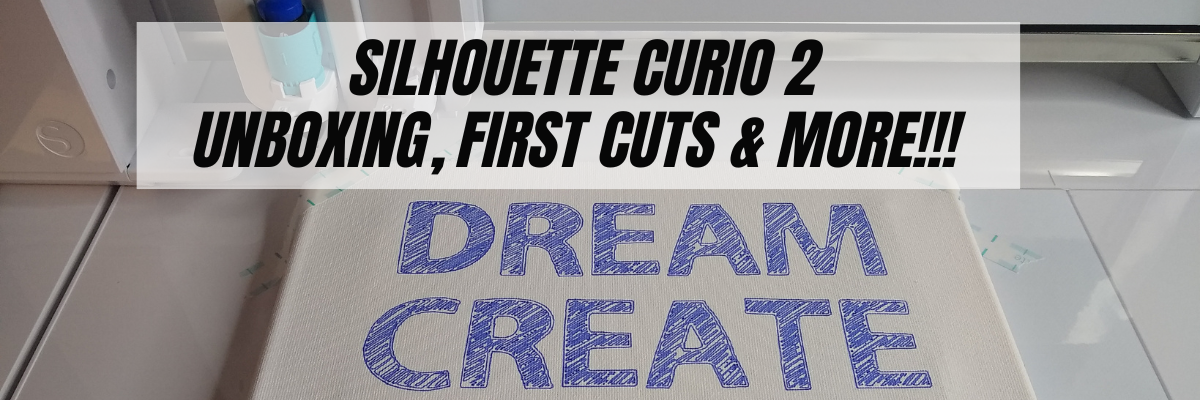
I used a Silhouette sketch pen in the blue sketch pen adapter and sketched out this design on a 8″ x 10″ canvas with a sketch font called SNF Sketchbook by Illustration Ink. There is also a new sketch pen holder (Type C) coming for the Tool 2 housing that will be compatible with the Silhouette Cameo 5 and the Silhouette Curio 2.

You will notice that the canvas is taped down on top of the ES Protective Sheet. I did have the ES bed on so the ES Protective sheet was secure and then taped the canvas to the machine so it would not move. Due to the surface of the backside of the canvas, it will not build up a charge directly on the ES bed to secure it. I also have a piece of wood inside the middle of the canvas for support.

I did try to use the Silhouette Type A pen holder in the Carriage 1 housing, but 3 different pens I tried did not reach the material. I will need to test that some more and figure out why it wasn’t working like it normally would.

Watch for a new video showing the sketch project on the Silhouette Secrets+ YouTube channel soon!

I can’t wait to share more! So many projects, so little time!

Save this for future reference by pinning the image below.

Sign up for the Silhouette Secrets+ Newsletter too! Tips, “secrets”, announcements, tutorials, classes, and more delivered to your inbox each Friday.

Silhouette Secrets+ Newsletter

Never miss out on the news, tips, “secrets”, deals, classes, and more that I share on Silhouette Secrets+. Sign up for the newsletter and get information delivered to your inbox every Friday.
Unsubscribe at anytime.

Enjoy !

THANK YOU for your support! How can you help? Click HERE & buy a coffee.
Every little bit helps with the cost of running the site.

Silhouette Classes

Never stop learning! Let me help you take the anxiety out of learning with Silhouette and get to creating faster! My Silhouette classes are heavily focused on software, so you can take the skills & techniques taught and apply them to many future projects!
Silhouette step-by-step Classes by Silhouette Secrets+

**This post may contain affiliate links. What that means is that I may receive compensation if you purchase through the links I have provided. The price you pay for the product or service is not higher but I may get compensated for sharing.