The Silhouette Curio 2 Leather Carving Knife opens the door to a whole new level of creative possibilities for leather projects—and getting great results starts with knowing how to use it correctly. In this post, I’m sharing my brand new video tutorial that walks through using the Silhouette Leather Carving Knife with the Curio 2, including setting up custom cut settings, what to watch for during carving, and real Day 1 testing results. If you’re curious about carving leather with the Silhouette Curio 2 or want practical tips to avoid common mistakes, this guide will help you get started with confidence.
Affiliate links may be present in the following blog post and as an Amazon Associate, I earn from qualifying purchases.
Ready to see the Silhouette Curio 2 Leather Carving Knife in action? Watch the full video tutorial on the Silhouette Secrets+ YouTube channel to see my real Day 1 results, custom settings, and tips for success—then try it out on your own leather projects!
These were the results after 5-6 hours of testing on a full sheet of tooling leather. I cannot wait to share more!
Save this for future reference by pinning the image below.
Enjoy !
THANK YOU for your support! How can you help? Click HERE & buy a coffee. Every little bit helps with the cost of running the site.
Silhouette Classes
Never stop learning! Let me help you take the anxiety out of learning with Silhouette and get to creating faster! My Silhouette classes are heavily focused on software, so you can take the skills & techniques taught and apply them to many future projects!
**This post may contain affiliate links. What that means is that I may receive compensation if you purchase through the links I have provided. The price you pay for the product or service is not higher but I may get compensated for sharing.
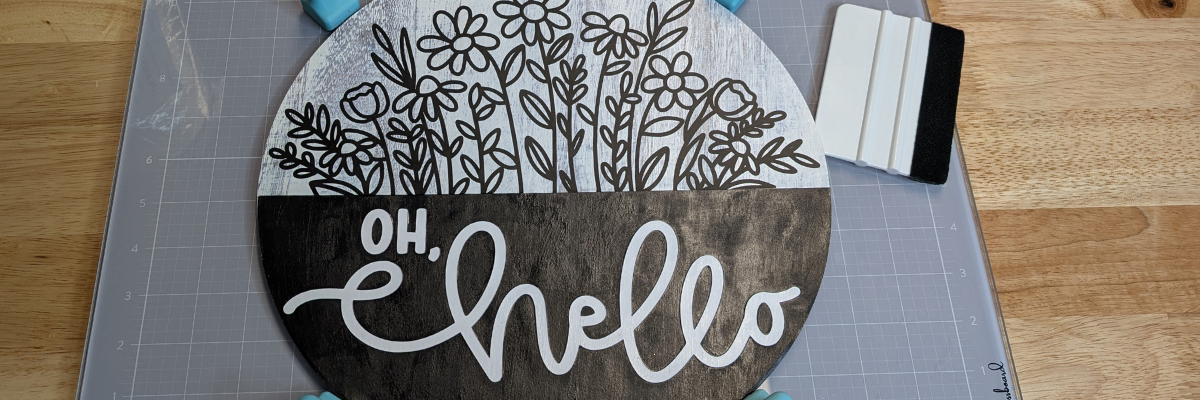
Looking for a creative way to use those gorgeous wood sign designs without needing a laser cutter? In this tutorial, I’m sharing how you can create a stunning door hanger using just cardstock and vinyl—no laser required! I’m using a design by Diva Watts Designs and showing step-by-step how to bring it to life with your Silhouette machine. Whether you’re a beginner or just looking for a new way to use your cutting machine, this is a great project that proves you can make high-impact decor with tools you already have.
Affiliate links may be present in the following blog post and as an Amazon Associate, I earn from qualifying purchases.
Quick Steps to Create Your Cardstock & Vinyl Door Hanger
Want the quick version? Here’s a fast rundown of how I created this layered door hanger using my Silhouette and a design by Diva Watts Designs:
DIY Door Hanger with Cardstock & Vinyl Project Details
First, I started by measuring my wood sign backer. Then, I grouped the Oh Hello design and scaled it up to 11.8″. Next, rather than paint, I printed a Wood White Texture Digital Pattern by Daniela Moscone onto a 12″ x 12″ sheet of cardstock and then cut the background out of the printed paper. I played around with many different color combinations and finally settled on basic black and white.
I added the digital pattern paper to the background to get a feel for how it would look before I printed the page.
If you are printing a large pattern or filling almost the entire sheet of material with a pattern design, skip the print and cut limits and print the entire page or as much as your printer will allow and then simply cut the design from the printed page. If I had used registration marks on this page, I may not have gotten the size circle I needed with my pattern.
I could then simply place the entire sheet on my cutting mat and cut the size circle I needed.
I cut the black piece from a sheet of black cardstock and the “OH, Hello” from white cardstock.
Now here is my next “secret”. I used the negative of the white cardstock as my placement template for the words on top of the black section. I used a couple pieces of washi tape to hold it in place so nothing moved.
Then I could easily add glue and every piece was placed lined up as the original design showed.
To adhere the background paper to the wood sign, I used Maker’s Magic glue and spread it all over the wood sign and on the backside of the printed cardstock. Then smoothed it down onto the wood backing. I’ve had this Maker’s Magic glue in my stash for a while. The first time I used it, I had a few issues, but I think it was me and just like many things, it takes practice. It worked great for this project, and I knew I wanted to not only protect the cardstock but also add it to the top of the entire sign before I applied the adhesive vinyl flowers so the transfer tape wouldn’t tear up my printed design. I did let the Maker’s Magic dry overnight before adding the adhesive vinyl flowers.
Next it was time to apply the adhesive vinyl flower design. I enlisted the help of my new magnetic glass craft mat & magnets helped to hold this sign in place to easily apply the adhesive vinyl in the exact location I needed.
Instead of using the magnets on top of the material, I placed them in 4 places around the edge of the wood sign and it held it securely in place.
I love how this DIY door hanger turned out with cardstock and vinyl!
Think outside the box! Even if a design is shown in a project photo a certain way, start brainstorming how else you can use it. What other materials could you use to create it? Cardstock and vinyl instead of wood cut pieces? This design is so much more than just a wood sign!
Save this for future reference by pinning the image below.
Enjoy !
THANK YOU for your support! How can you help? Click HERE & buy a coffee. Every little bit helps with the cost of running the site.
Silhouette Classes
Never stop learning! Let me help you take the anxiety out of learning with Silhouette and get to creating faster! My Silhouette classes are heavily focused on software, so you can take the skills & techniques taught and apply them to many future projects!
**This post may contain affiliate links. What that means is that I may receive compensation if you purchase through the links I have provided. The price you pay for the product or service is not higher but I may get compensated for sharing.
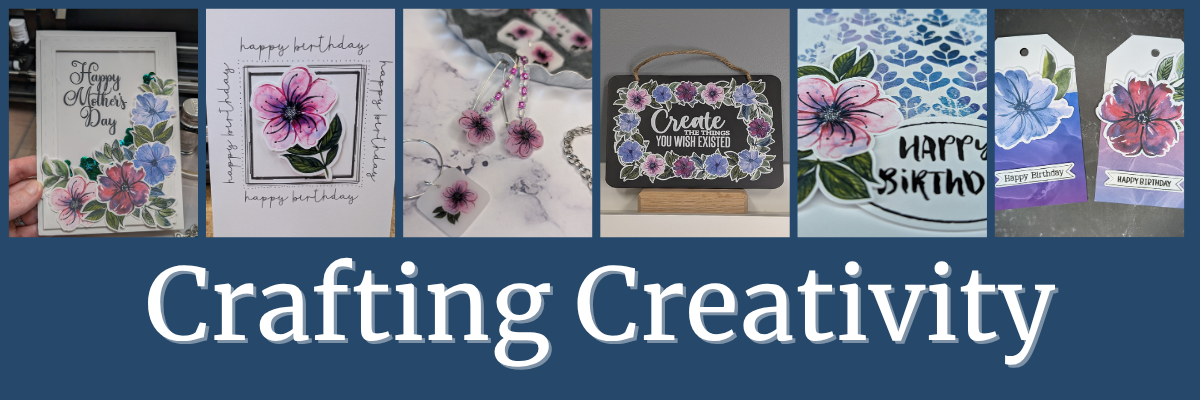
Welcome to this edition of Crafting Creativity, featuring the bold and beautiful abstract floral designs by Clikchic Designs! These eye-catching patterns are the centerpiece of a wide range of creative projects that highlight the versatility of digital designs. From a custom shaker card and sketch-style greeting cards to shrink plastic tool charms, bracelet charms, earrings, wine charms, and a personalized chalkboard sign—these florals bring a fresh and modern flair to every creation. You’ll also see them used in card backgrounds and oversized tags, offering endless possibilities for crafters of all kinds. Get ready to be inspired by how one design collection can do so much!
Affiliate links may be present in the following blog post and as an Amazon Associate, I earn from qualifying purchases.
Crafting Creativity with Clikchic Abstract Florals
Project #1 – Custom Shaker Card
I set this up to print on a 12″ x 12″ sheet of cardstock. The only thing that did not fit on one sheet was the frame. It could easily be cut using letter size cardstock too.
I added a bit of sparkle on top of the flowers with a shimmer pen and love it. The hardest part is getting that to show up well on photos.
My mom loved it!
Don’t forget to add your shaker bits before you adhere the acetate & frame down. I got excited and forgot, so I had to peel up a corner and add them in. Nothing like making a project harder than it needs to be.
I drew out 2 rectangles and applied different Sketch Effects to them to create the sketched squares, then added a sketch sentiment around the outer edge of the border using a font called Flannel Shirt Sketch.
I then added some foam tape on the back of the Abstract Floral designs and added those to the center of the sketched frame to give it some dimension.
Next, I sketched a couple more with a premade frame called Dot Frame Sketched.
I think this one is my favorite of them all, but I think I’m drawn to this pink flower for some reason.
They are all gorgeous when paired with the Abstract Floral designs by Clikchic Designs.
I added the random dots around the edge of the square frames by hand after the card was sketched. I could have set it up in the software and had the machine do it perfectly, but it might have also smooshed the tip of my pen. This gives each card a randomness to it as well and makes it unique.
I used the default settings in the Silhouette Studio software to start with. Here is a look at the Send tab when I sent this page to cut.
Larger shrink plastic designs can be interesting when they shrink and you just have to keep going to get them to flatten out. Sometimes, they will also not be a uniform shape at the end. I think that adds to their uniqueness and can be fun to see what happens.
Custom tool charms are a great way to mark your scissors either for a specific purpose or to identify them when you go craft with friends. They are also handy to help you locate them on your craft table if they like to hide in a “safe” place often.
Any type of plastic will dull the blade quicker than other materials, so it is not uncommon to have to increase the settings the more you cut.
There are several brands of shrink plastic out there and they can all be a bit different. I cut both Silhouette Shrink Plastic and Grafix Shrink Plastic during this process. I was using an older blade and I think it’s about done for now. It was having a hard time cutting through the Grafix Shrink Plastic in clear.
Test cuts are really the only way to know what is going to work with your blade and materials.
Two “secrets” of mine are:
I’ll take a blade that isn’t cutting other materials such as cardstock or HTV well and move it to my shrink plastic blade. I get a bit more life out of my blades this way.
Do not unload the cutting mat after the cut and check it first. If it did not cut through, you can increase the settings and send it again until it does cut.
I started by measuring out the size of this chalkboard sign and then drew a rectangle the same size in Silhouette Studio. Then I just started adding the abstract floral designs and moving them around to create a floral frame.
Did you know that vinyl goes bad? Yep! I started this project using Silhouette Printable Vinyl, which I love for the print quality. However, it must have been an old package because it would not weed properly and was separating. I ended up using Orajet 1917 that I’ve had in my craft stash for many, many years and it cut beautifully.
There is a shelf life for vinyl and other craft products such as pens, paint, string, inks, tape, etc.
What is the lifespan of vinyl? Well, there really isn’t an exact date or time as you never really know how long it’s sat on a retailers shelf or the manufacturer’s shelf, etc. And other factors play into it as well, such as temperature, humidity, etc. You will see many mention 2 years when stored properly. But, you never really know how it was treated before you bought it. I have some vinyl that I still try to cut even though I know it’s like 7 years old. Sometimes it works and sometimes it doesn’t.
How can you tell if it’s gone bad?
The 2 most obvious signs I have found is that it can separate when you try to weed it and it’s a bugger to work with no matter your troubleshooting or cut settings. These 2 things can present themselves by the adhesive can visibly be separating from the actual vinyl or the vinyl will not easily come off the backing paper.
Usually I try to push through and I always end up kicking myself for working so hard to try to salvage it.
However, the final way I know the vinyl has gone bad is when I get a new good piece and it weeds so smoothly. And that’s when I end up kicking myself.
For this project, I lost a few letters of the text in the middle, so I just ended up cutting the text from a scrap of Oracal 651 in white and adding that on to the project. A great use of scraps!
When I do a print and cut page, I will fill the page with extra designs and this month I had a good bunch of the florals left over to create with. So I set about brainstorming what I could do with the left overs.
I was browsing Pinterest and found an idea where they created custom backgrounds with a stencil and inks. Why not do that with a stencil design & digital patterns?
Here is a look at the first ones I created.
The next set, I started playing around with the orientation and mixed it up a bit.
I had so much fun playing around and creating backgrounds with different pattern papers.
Whether you need a design 2″ or 6″, you can do it with your cutting machine. You can create things whatever size you want.
These tags are 3.5″ wide and 6.125″ tall. I used the Project Wizard in Silhouette Studio to create the basic tag design and cut from 110 lb Neenah cardstock.
I used up the last 2 flowers and bits of greenery I had printed on cardstock and combined that with a patterned paper I designed and printed when I shared the tutorial on Creating Custom Background Patterns in Silhouette.
Follow Clikchic Designs for more inspiration on her website, Facebook, and Instagram. I love watching the videos of how the designs are created. I love how she takes something that she has physically painted and turns it into a digital file so we can all enjoy and create with her amazing artwork!
From handmade cards to custom jewelry and home décor, the possibilities with these abstract floral designs by Clikchic Designs are truly endless. Each project in this Crafting Creativity edition showcases how one digital collection can be transformed into a wide variety of unique creations. Whether you’re crafting with paper, shrink plastic, or chalkboard materials, these versatile florals add a bold, artistic touch to every piece. We hope you’re inspired to explore new techniques and think outside the box with your next project.
Save this for future reference by pinning the image below.
Enjoy !
THANK YOU for your support! How can you help? Click HERE & buy a coffee. Every little bit helps with the cost of running the site.
Silhouette Classes
Never stop learning! Let me help you take the anxiety out of learning with Silhouette and get to creating faster! My Silhouette classes are heavily focused on software, so you can take the skills & techniques taught and apply them to many future projects!
**This post may contain affiliate links. What that means is that I may receive compensation if you purchase through the links I have provided. The price you pay for the product or service is not higher but I may get compensated for sharing.
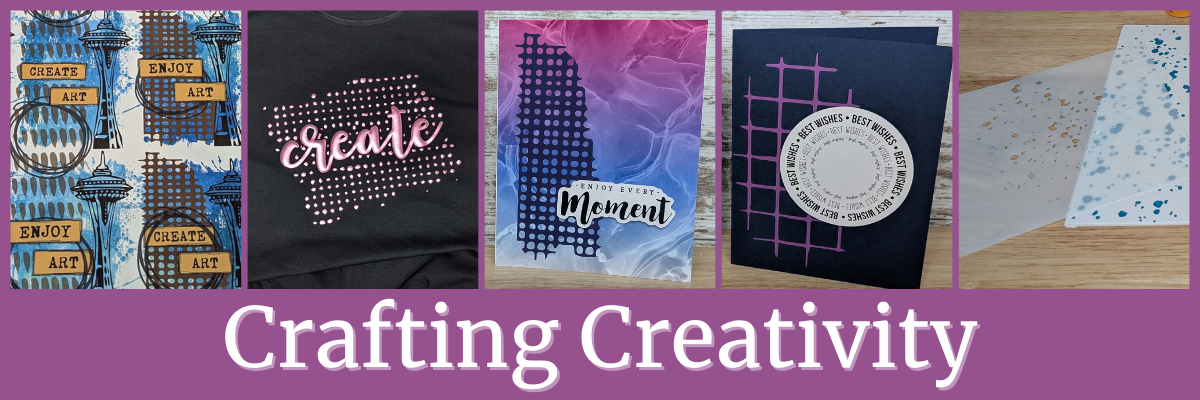
Welcome to this edition of Crafting Creativity! In this edition, I am sharing the vibrant world of mixed media digital design with the talented Sarah Hurley! In this post, we’re spotlighting sharing inspiring ways to incorporate Sarah’s digital elements into your own creative projects. Whether you’re crafting cards, journals, or home décor, you’ll find plenty of ideas to spark your next masterpiece. Let’s explore how digital and traditional techniques can come together to make something truly magical!
Last month was the 2025 Creativation by NAMTA event in Seattle and I was able to connect with Sarah Hurley in person. I’ve known Sarah for a couple years now and always enjoy getting together with her to connect and collaborate.
The Sarah Hurley Academy Pavilion was on the trade show floor and I loved hearing her Trend Report during the event. I was madly typing my notes in my phone during her presentation.
It was the perfect month to collaborate again with Sarah’s designs for the Silhouette Secrets+ newsletter.
Affiliate links may be present in the following blog post and as an Amazon Associate, I earn from qualifying purchases.
Project #1 – Artist Trading Cards– Mixed Media Background Elements
One of the projects the Creative Professionals did at the 2025 Creativation was create “found art” and place them all over the trade show floor for people to find and keep. I designed it all in Silhouette Studio using a collection of different elements, including the mixed media designs by Sarah Hurley.
I am not sure which one I like the most, but I love that I can create in the software and test things out before I print my projects. I wanted each one to be a bit different and I was able to achieve that easily.
I also designed these double sided so I could include my information on the backside.
The biggest thing about doing a double sided print and cut is your printer. Every printer is different and you have to figure out how the printer prints and how to insert the page back in the printer so everything lines up.
I printed these and then used my paper trimmer to cut to the size I needed. Since it was a simple rectangle I felt it was more efficient for this project. I cut between 60-70 cards to “hide” during the event.
Project #2 – T-shirt with Siser Metallic Puff HTV & Mixed Media Designs
This may be my new favorite shirt! Not only is the Siser Tiger Lily Metallic Puff HTV gorgeous, but the mixed media background really made this design unique!
I duplicated the mixed media design, scaled it up, and then subtracted an offset of the text from the background.
Here is a closer look at the design.
I just love how the mixed media design puffed up. I’ll definitely be using more mixed media designs for backgrounds!
Specialty materials with shine are always so difficult to photograph and really capture how beautiful it is. I have had great luck with the Siser Metallic Puff HTV living up to it’s puff. Regular puff HTV and I have had a few issues, but the Metallic Putt HTV is so easy to use.
Project #3 – Digital & Physical Backgrounds – Cards
I added the mixed media files on top of a patterned background and set it up as a print and cut for a 4.25″ x 5.5″ card background.
On the left side I used a pattern called Purple and Rainbow Bubble Background by Sarah Hurley, then placed the mixed media design on top on the left side. I used the eyedropper tool in the Fill Color panel to pull a color from the pattern and then adjusted it just a bit to make it pop.
On the right side, I used the background pattern created using the Gradient Fills in Silhouette from last month’s YouTube videos. I then added a different mixed media design on top and again pulled color from the pattern and adjusted to make it pop.
Check out more on how I created this background pattern in these videos:
I wanted the sentiment to stand out a bit so added that as a separate piece to the print and cut file so I could pop it up with foam tape.
Here is a look at the print and cut file I created in Silhouette.
I used the Enjoy Every Moment by Sarah Hurley sentiment and added an offset around the design. For this design, I first made a larger offset to enclose everything and then made an internal offset to bring it back closer to the design. Once I had the offset as I wanted, I deleted the larger offset as it was not needed.
But I couldn’t stop there! These designs can be used for more than just digital projects too!
I cut these same designs from cardstock using the Silhouette Autoblade with the Cameo 5. Look at those cuts!
Then I added the designs on top of a dark blue card base to make them stand out.
Add a sentiment and you have a quick easy card design.
I did not just want to print and cut 2 designs, so I filled the page and had several options to choose from.
I drew a circle and centered the design inside, then with both the circle and design selected, chose Cut Edge on the Send tab. Once it was cut, I added foam tape to the back of the sentiments to give the card a bit of dimension.
Stencils can be from many different types of materials. I grabbed some scrap cardstock and also cut some plastic stencil material as well.
Scrap cardstock is a very economical way to test out a stencil design and it can hold up and work for many projects too. I know I have a lot of scrap cardstock in my stash, so it’s perfect to test with.
I also see many who want to cut plastic stencil materials and I have both 6 mil and 7 mil stencil material on hand. Something to keep in mind with plastic stencil material is that plastics dull a blade differently and often quicker than other materials. All stencil material will vary in the cut settings that will work well with it.
The one above is 6 mil stencil plastic and I used the Stencil Material setting in the software with a used blade, but increased the passes to 3. I still had to pop the bits out of place, but it actually cut better than some of the smaller areas did on my fibrous cardstock.
And then just have fun! I grabbed some of the DecoArt Paints and a Dynasty EvoArt paint brush and just started stenciling a background. I don’t know how this will turn out yet, but I’m going to keep adding to it and see what speaks to me.
If you are cutting lots of stencil material, I’d recommend having extra blades on hand and also know that you will need to increase the cut settings as the blade dulls.
I am always looking for sales or bundles to stock up on blades or mats. Check out Crafter Cuts for a blade bundle HERE and use coupon code SECRETS to save 10% on supplies too!
I love this background pattern so much and still don’t know what I want to do with it. I asked for suggestions from my community and one of them was to scan it and save it as a digital background. YES! I love this idea.
Bringing mixed media designs by Sarah Hurley into your creative projects is a fantastic way to add personality, depth, and a unique flair to your crafts. Whether you’re layering textures, combining materials, or experimenting with color, these designs offer endless possibilities to explore your creativity. If you’ve enjoyed this project, be sure to check out the full Crafting Creativity series for even more inspiration, step-by-step ideas, and creative ways to make your projects truly stand out. Let your imagination lead the way—there’s always something new to discover! Check out the Crafting Creativity series HERE.
Save this for future reference by pinning the image below.
Enjoy !
THANK YOU for your support! How can you help? Click HERE & buy a coffee. Every little bit helps with the cost of running the site.
Silhouette Classes
Never stop learning! Let me help you take the anxiety out of learning with Silhouette and get to creating faster! My Silhouette classes are heavily focused on software, so you can take the skills & techniques taught and apply them to many future projects!
**This post may contain affiliate links. What that means is that I may receive compensation if you purchase through the links I have provided. The price you pay for the product or service is not higher but I may get compensated for sharing.
Welcome to this edition of Crafting Creativity! This time, we’re diving into the wonderful world of digital kits with an inspiring collection from Nitwit Collections. Their beautifully designed elements and papers make it easy to create stunning projects with Silhouette. From layered cards to custom decor and everything in between, we’ll explore creative ways to bring these digital designs to life. Get ready for a fun and crafty adventure as we showcase projects that highlight the versatility and charm of Nitwit Collections!
Affiliate links may be present in the following blog post and as an Amazon Associate, I earn from qualifying purchases.
If you missed these files in the March newsletter, you can find the Warm Embrace Knick Knack kit HERE. There are so many amazing kits available, make sure to check out the full shop HERE.
I have also released a new print and cut class: Master Print and Cut with Silhouette: Step-by Step Class that is available on my Teachable site HERE. The kit is provided in the class so you can use the same files I do and create amazing projects too!
If you are looking for step-by-step classes to learn more, check out all of the classes that are currently available on my Teachable site HERE.
Crafting Creativity with Nitwit Collections
Project #1 – Creative Card Designs: Make Every Greeting Uniquely Yours
I just started playing around in the software to see what new card idea I could create after I finished the Print and Cut class. I like to make a mock-up in the software of a lot of projects before I actually cut. That means I will add all of the design pieces and play around with placement, elements, colors, and more right in Silhouette Studio.
Here is a look at my design file for this card in Silhouette Studio.
Once I have an idea of the card design layout, I can start cutting and in this case, printing, then cutting all the pieces.
Here is a close up look at the finished card with the 3-D layers.
But, I didn’t stop there! The creative ideas were still flowing and I decided to share how I created this card design in Silhouette with a LIVE tutorial on the Silhouette Secrets+ YouTube channel.
This session covers essential skills and techniques, including drawing tools, scaling tools, pattern fills, the Quick Access toolbar, Flexishapes, Draw Note, and more! Plus, with real-time viewer participation, questions were answered and demonstrated live to help you master these features. Check out the replay HERE on the Silhouette Secrets+ YouTube channel.
Don’t forget to Like and Subscribe if you want to be notified when new videos are released or Live tutorials are scheduled.
I’ve been watching the Nitwit Collections Facebook group and saw that a member, Lisa Shaw, was doing a Live demo and I joined in. I was mesmerized by her demo of a flying seagull card! The moment I saw it, I knew everything else had to wait. I just had to dive in and create this card style as a 5″ x 7″ card!
Immediately following the LIVE demo, I started working out the math to make a prototype of this card. It reminded me how much I love to design and create fun fold and 3-D cards. Now, I can’t say that I got it right the first few times, so there was a few sheets of cardstock that are now in my scraps pile, but I did get there eventually.
After I made the prototype, I could then bring it all together in the Silhouette Studio software to create a cut file.
And then I printed all the pieces and started assembly to see where the elements should go. Here is another behind the scenes look at creating this card.
Here is a collage of how this card looks finished out from a few different angles.
The top photo shows how the card look when completely unfolded. The bottom left shows the card completely closed and then on the right is a top look showing the Seagull Design.
I love using this Sticky Note & Pen Holder file from Lori Whitlock and the Nitwit Collections kits work perfect for creating a custom cover. These make great gifts and work awesome for swaps at events too!
Here is a close up look at the design layered on the front of the sticky note holder.
Unlock endless creative possibilities with a digital kit! In this edition of Crafting Creativity, we showcased a fabulous digital kit from Nitwit Collections and explored how a variety of unique projects. The Crafting Creativity blog series is your ultimate source for fresh ideas, practical tips, and expert techniques to take your crafting to the next level. Whether you’re transforming a go-to design, trying out new materials, or refining your skills, these posts are designed to ignite your creativity and help you bring your ideas to life. Check out the Crafting Creativity series HERE and discover where your imagination can take you!
Save this for future reference by pinning the image below.
Enjoy !
THANK YOU for your support! How can you help? Click HERE & buy a coffee. Every little bit helps with the cost of running the site.
Silhouette Classes
Never stop learning! Let me help you take the anxiety out of learning with Silhouette and get to creating faster! My Silhouette classes are heavily focused on software, so you can take the skills & techniques taught and apply them to many future projects!
**This post may contain affiliate links. What that means is that I may receive compensation if you purchase through the links I have provided. The price you pay for the product or service is not higher but I may get compensated for sharing.
In this edition of Crafting Creativity I’ll be sharing the projects I created through the month with a 3-D Hawaiian Turtle Tote and Tag file and the Tropical Fish pattern. A great big thank you to Suzanne from Quietfire Designs for providing the free file for the Silhouette Secrets+ February newsletter!
Affiliate links may be present in the following blog post and as an Amazon Associate, I earn from qualifying purchases.
If you missed these files in the February newsletter, you can find the Hawaiian Turtle Tote file HERE and the Tropical Fish pattern HERE in the Silhouette Design Store. And then make sure to check out the assembly tutorial HERE on the Quietfire Design website.
Crafting Creativity with One Designby Quietfire Design
Project #1 – Hawaiian Turtle Tote and Tag
I always like to start with creating the design file at the original size it was created at. But I also couldn’t resist to create a mini turtle tote too!
Look at that mini tote! I just love it! I love sharing all the possibilities you can create with 1 file!
Project #2 – Valentine’s Treat Tote or Table Decoration
I scaled the design up as much as I could to still be able to cut it the main piece from a 12″ x 12″ sheet of cardstock. Then cut the main tote part from pink cardstock and used a heart flourish pattern to create this Valentine’s treat tote.
Or you could use it for a table decoration or centerpiece.
Use this design for many different holidays, seasonal decorations, or just every day use.
I used the Silhouette Studio software to design this card and create a mock-up of the project before I even started cutting.
Then used the Tropical Fishes pattern background and print and cut the elements for the waves and the turtle. Foam tape added to the back of the elements such as the waves, matted sentiment, and the turtle gave the card some dimension.
I love that I was able to combine Silhouette, Artesprix, and my new beading hobby!
I measured the size of the Artesprix jewelry pendant and then drew a circle in Silhouette Studio to use as my template to size the turtle in. Tip: hold the Shift key down while you draw to create a perfect circle or rectangle shape.
Once I had the size right, I made a couple copies and then cut the Artesprix Heat Resist Mask with the Silhouette. I love using the heat resist mask to create unique projects.
Other supplies: pencil, scissors, paper towels, copy paper, ruler, brush
Project #5 & 6 – Custom wood button & earrings
There are so many projects that you can create with one design or even just one element of a design.
For this one, I opened the SVG file for the Hawaiian Turtle Tote & Tag design in Silhouette Studio, then ungrouped the file to use only the turtle design.
Next, I released the compound path so I could remove the inside pieces and add in 2 circles in the center. Once I had the circles in place, I selected everything, right clicked and chose Make Compound Path. Then I exported as a SVG file and opened in the Glowforge app to cut a custom button from wood with the laser.
I set it up on the Glowforge to engrave the turtle design and then cut the button shape. Once I had my new button, I was able to string it up on some leather cording and make the rest of this beaded bracelet.
But now, I needed some earrings to wear with it. I started again with the SVG file and used the turtle shape, added a small hole at the top and exported as a SVG file to cut custom earrings with the Glowforge. I just couldn’t decide what color wood to use, so I cut multiples.
If you don’t have a laser machine, don’t let that stop you from creating fabulous projects! Think about what you do have available. There are many materials you could use such as faux leather and more!
If you are creating files to export as SVGs for use with other cutting machines, laser machines, printers, etc. I do have a class sharing showing how to create and export SVGs and what you need to consider when designing in Silhouette Studio for use in other programs.
One design, endless possibilities! The Crafting Creativity blog series is your go-to hub for fresh inspiration, packed with clever ideas, hands-on tips, and expert techniques to elevate your crafting. Whether you’re reinventing a favorite design, experimenting with new materials, or honing your skills, these posts are here to spark your creativity and turn imagination into reality. Dive into the Crafting Creativity series HERE and see where your creativity takes you!
Save this for future reference by pinning the image below.
Enjoy !
THANK YOU for your support! How can you help? Click HERE & buy a coffee. Every little bit helps with the cost of running the site.
Silhouette Classes
Never stop learning! Let me help you take the anxiety out of learning with Silhouette and get to creating faster! My Silhouette classes are heavily focused on software, so you can take the skills & techniques taught and apply them to many future projects!
**This post may contain affiliate links. What that means is that I may receive compensation if you purchase through the links I have provided. The price you pay for the product or service is not higher but I may get compensated for sharing.
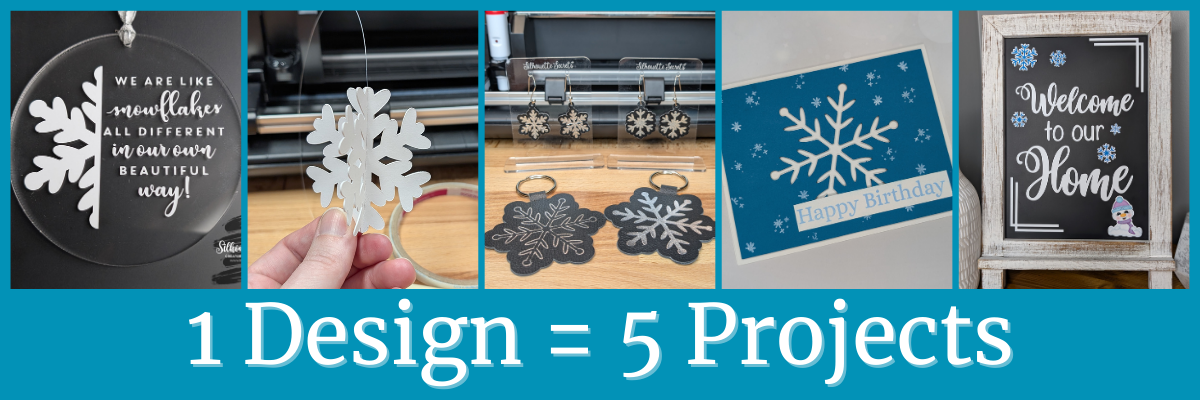
Each month in the Silhouette Secrets+ newsletters, there is a free file offer. I then use that file to create multiple projects, showcasing the endless possibilities you can achieve with just one design. In this blog post I am sharing a variety of creative projects made using snowflakes designs that I created in the Silhouette Studio software. There are so many possibilities when working with just one design and I hope it sparks your creativity to look at your designs differently and think about the possibilities for multiple projects with one file.
Affiliate links may be present in the following blog post and as an Amazon Associate, I earn from qualifying purchases.
The January newsletter files were several snowflake designs that I created in the Silhouette Studio software. This is a great way to learn more about using the tools in the Silhouette Studio software and every single user could create these themselves. Check out the tutorial on the tools I used HERE.
I drew a 3″ circle in the Silhouette Studio software as my template to create within for placement and getting an idea of what the design would look like. Using one of the snowflake designs, I added an offset and then used the Knife tool in Silhouette to cut the snowflake design in half. Next, I opened a snowflake saying, adjusted it at bit, and added that to the design. Then cut everything from Oracal 651 and applied it to the front of a 3″ acrylic circle.
I used the Silhouette Autoblade for these cuts and it did beautifully.
Using the Line Drawing Tools to add weeding lines can help so much when you have intricate designs to weed. This allows you to weed smaller sections of the design and not have the material stick back to itself.
Using one of the snowflake designs, I added a score line down the center and cut 3 for each 3-D snowflake out of cardstock. Then assembled them together to make the 3-D ornaments. The score line helped to fold each of the snowflake sides directly in half for assembly.
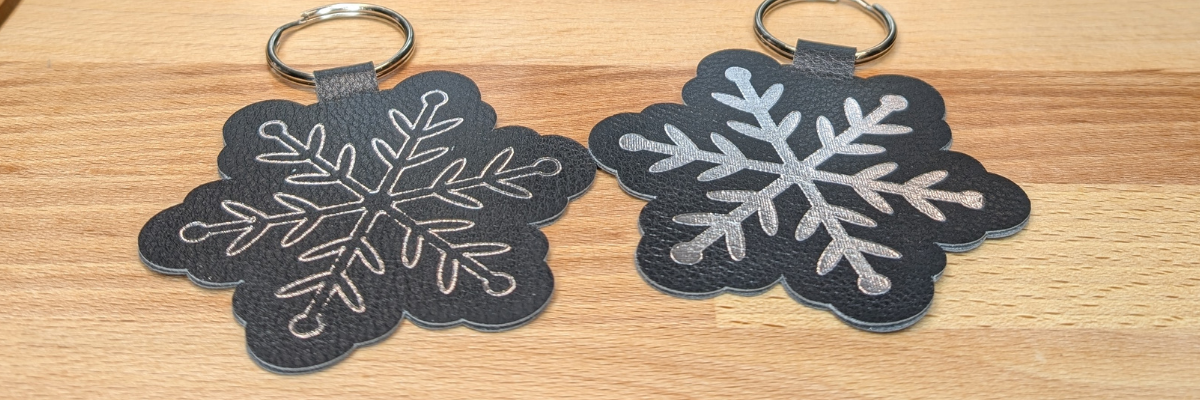
Project #3 – Keychains/Bag Tags and Earrings with Heat Foil on Silhouette Leatherette
This silver foil looks amazing on the Silhouette black leatherette. I highly recommend the Silhouette leatherette for anyone who wants to get started with cutting faux leathers. Create many different projects with the Silhouette heat pen and Silhouette leatherette.
I cut the snowflake design out of a blue sheet of cardstock and then had to walk away for a bit because I wasn’t sure how to finish this out.
I ended up pulling out supplies and stamps just to see what might be good to add on to finish this card out. I stamped some embellishments from a birthday stamp set as snowflakes in white ink and then stamping the sentiment in a light blue and adding it to the card with foam tape for dimension.
Print and cut is so awesome and there are many different material types you can use, such as printable magnet sheets. I filled the snowflake designs with color, added an offset and then a few more shapes to fill the page. These could be used to decorate any magnetic surface.
I used them to give additional ideas for a recent class I taught on creating a custom chalkboard for home decor. This chalkboard is magnetic and has so many options you can play around with.
I love discovering how a single design can spark endless creative possibilities! The Crafting Creativity blog series is your ultimate source of inspiration, filled with innovative ideas, practical tips, and expert techniques to take your crafting to the next level. Whether you’re transforming a favorite design, exploring new materials, or refining your skills, these posts are here to fuel your creativity and bring your ideas to life. Check out more in the Crafting Creativity series HERE and see where your imagination leads you! ✨
Save this for future reference by pinning the image below.
Enjoy !
THANK YOU for your support! How can you help? Click HERE & buy a coffee. Every little bit helps with the cost of running the site.
Silhouette Classes
Never stop learning! Let me help you take the anxiety out of learning with Silhouette and get to creating faster! My Silhouette classes are heavily focused on software, so you can take the skills & techniques taught and apply them to many future projects!
**This post may contain affiliate links. What that means is that I may receive compensation if you purchase through the links I have provided. The price you pay for the product or service is not higher but I may get compensated for sharing.
Ready to take your Silhouette crafting skills to the next level? In our latest LIVE tutorial, we demonstrated the exciting world of working with leatherette, faux leather, and adding dazzling details with heat foiling using the Silhouette Heat Pen. Whether you’re creating personalized accessories, decorative pieces, or custom gifts, these techniques will help you achieve professional-looking results with ease. If you missed it, don’t worry—we’ve got all the tips, tricks, and must-know details right here! And I am sharing more tips below too!
Affiliate links may be present in the following blog post and as an Amazon Associate, I earn from qualifying purchases.
We had such an amazing time during this month’s Live Silhouette Tutorial! The session was packed with valuable tips, tricks, and techniques to help you elevate your crafting game. I walked through the entire process of creating a bookmark shape, adding a design, and using the Silhouette Heat Pen for stunning foiled details. Plus, I shared insider tips on using the Knife Tool and so much more!
Grab your favorite drink, get comfy, and check out the replay on the Silhouette Secrets+ YouTube channel under the Live section. Don’t miss the chance to learn and create along with us! And that’s not all! I have a couple more tips I wanted to elaborate on below to help you be more successful in your Silhouette journey!
What if you don’t have a newer model machine that can utilize the Silhouette Heat Pen? No problem, the same tips, techniques, and tricks I shared in the video and below can still be useful. I’ve included additional resources below as well for users with older model machines.
When I asked the viewers if they wanted to see more, they said yes! They stuck around while I set up another design but this time with a fill option. Don’t believe that little timer in the Silhouette Studio software!!! The filled design took around 10 minutes to foil completely. That was twice as long as the estimated timer in Silhouette.
In the live, I also mentioned some tips about tool storage with the new powered tools and I wanted to share a bit more about that.
If these prongs get damaged, the powered tools will no longer work. The new tools are not cheap, so I would recommend storing them safely where they will not get beat up. In the video, I shared a brief glimpse at the storage I’m using, which is a storage container by Creative Options.
This works well for the storage of many Silhouette tools as you can see. The Silhouette Gold and Silver Foil have their own space so they won’t get damaged. The sections are adjustable so I’m able to partition the Silhouette powered tools off and store them so their prongs are not going to get knocked into anything else that could damage them. I also have my Silhouette Power Engraver in this container along with a couple blades and the Silhouette Embossing Tools.
My Options container is part of a larger Creative Options system that can house even more supplies too! I love the color of it too!
I shared even more storage tips in this blog post HERE.
One of the other tips that I mentioned in the video that is very important for using these new Silhouette powered tools. That is to keep the machine clean and free of dust and debris.
Any dirt or debris that gets in the powered tool housing connection or on the prongs of the powered tools can affect the functionality of those tools.
I want you to be as successful with your Silhouette machines and tools as possible!
And I know I mention that the end of the Live video that I will record another video sharing the tassel creation, however, when I got started making it, I found I’m no expert on this topic. So I’m sharing the video I followed to create my tassels by Notches Sewing found HERE.
Here is a list of the supplies I used for creating these foiled leatherette projects:
Save this for future reference by pinning the image below.
Enjoy !
THANK YOU for your support! How can you help? Click HERE & buy a coffee. Every little bit helps with the cost of running the site.
Silhouette Classes
Never stop learning! Let me help you take the anxiety out of learning with Silhouette and get to creating faster! My Silhouette classes are heavily focused on software, so you can take the skills & techniques taught and apply them to many future projects!
**This post may contain affiliate links. What that means is that I may receive compensation if you purchase through the links I have provided. The price you pay for the product or service is not higher but I may get compensated for sharing.
Heat foil projects are a show-stopping way to add a touch of elegance and shimmer to your designs, whether you’re crafting cards, gifts, or custom decor. With the right tools and techniques, creating stunning heat foil projects can be simple and rewarding. In this guide, we’ll walk you through five easy steps to achieve excellent results using your Silhouette machine. Whether you’re a beginner or looking to enhance your foiling skills, these tips will help you create dazzling projects that shine every time. Let’s get started!
Affiliate links may be present in the following blog post and as an Amazon Associate, I earn from qualifying purchases.
5 Steps for Gorgeous Heat Foil Projects
Create Your Design – design or select your project in Silhouette Studio
Set Up the Foil Action – adjust your settings for the perfect foil application
Prepare the Mat – place the foil on your material in the correct position & secure it
Send to Foil – let your Silhouette machine work it’s magic
Reveal Your Design – carefully remove the foil to unveil your stunning creation
New video on the Silhouette Secrets+ YouTube channel – Additional Tips!
We’ve just released a brand-new video on the Silhouette Secrets+ YouTube channel, Silhouette Heat Foil Pen Dos & Don’ts: Tips for Perfect Foiling Every Time! In this video, we break down the essential tips and common mistakes to avoid when using the Silhouette Heat Foil Pen. You can see the machine in action and what goes right and what did not. Use these tips along with the step-by-step details below for perfecting your foiling techniques.
Don’t forget to like, subscribe, and hit the notification bell to stay up-to-date with all our Silhouette tips and tricks on YouTube.
Your Step-by-Step Guide to Flawless Heat Foil Projects
1 – Create the Heat Foil Design
Choose a design to foil, or create your own custom design in Silhouette Studio.
Decide if you want the outline of the design to be foiled or if you prefer to fill the entire design with foil.
Silhouette Studio is a cutting program, so any design that is on the screen is automatically an outline. Filling it with a color only changes how it looks on the screen and is used for printing through a printer. The design on the left in the photo above is the snowflake design sent without adding any additional steps to it. The design on the right is filled with a cross-hatched fill using the Specialty Tools Panel – Heat Pen Tab.
The best fill and spacing is really dependent on the design and materials that are being used. The only way to really know what will look the best is to test it and see for yourself.
If the fill on your design is too tight, it can cause the foil to be removed from certain areas due to multiple passes over the same spot, leaving blank spaces. On the other hand, if the fill is too loose, it can also result in gaps. The ideal fill depends on the desired final look, and the best way to determine what works is to test it out.
I set my foiling and sketch projects up with blue as the foil/sketch lines and red for the cut line using the Line Color in the QAT or the Line Style Panel. This will be helpful when setting up the foiling settings in the next step.
For those who are using older model Silhouette machines and the Foil Quill, the Sketch/Line Effects Panel can be used to add a fill to the design following the same tips listed above.
2 – Set Up the Heat Foil Action
When using the Silhouette Heat Pen, there is an Action for the Heat Pen that may need to be set up. Click on the Send tab and then select your material such as Cardstock, Plain Cardstock, or Leatherette. If there is no Heat Foil Action that shows up for the material, then a custom setting will need to be created. This is not hard to do and we will go through it below.
On the Send tab, in Silhouette Studio, once the Heat Pen has been recognized in the Silhouette Cameo 5, Portrait 4, or Curio 2, you should see a message asking if you want to turn it on. The Silhouette Heat Pen takes approximately 3 minutes to heat up before it can be used properly.
I use the Cut by Line option on the Send tab, so the different actions can easily be turned on and off, so the design can first be foiled, then the foil removed, and then cut if the project requires.
Select the material setting for the red color cut lines. Test cuts will be the only way you know what the perfect setting is for your material, so don’t skip that step before you start and waste materials.
When using the Cut by Line or Cut by Fill Color options, it’s important to ensure the correct color is selected when adjusting settings in the bottom section of the Send tab. For example, if red is selected at the bottom but isn’t the box check for cutting, any changes made will apply to the red cut lines instead of the intended selection. Always double-check that the selected color matches the cut settings you’re adjusting. More details and a visual example of that in this Silhouette Cutting Issues – Cut by Line or Fill Color video.
The next thing to note is that if there is no Heat Pen action programmed for a material, you will see a Setting not found message. This is not a problem, we will create a custom setting by clicking on the MORE button and then creating our own setting for our material.
Click the + sign at the bottom of the materials list, name your material, and then select the machine model.
Now, the next steps are important so the setting is not created with actions that are not needed.
With the material you added selected, select Carriage 2, then click on the + sign on the right side. Choose Add Foil Action. Adjust the settings for force, speed, etc. The only way to know what settings work will be to test and use those settings.
Now, the important part. Click on the Kraft Action and choose REMOVE ACTION at the bottom of the Send tab.
If the Kraft Action or any other action that is set for a material is not removed, it will show up in the settings when the material is selected and can be confusing and cause future issues for projects.
Next click the drop down shown above and select the material that is closest to what you are using for this setting. I don’t actually know that this does anything other than serve as a reminder to you, but it was added randomly to the software many versions back.
Click SAVE if it’s available and then click the giant X at the top of the Send tab to close this window.
Then select the new material created in the drop down next to the line color you want it applied to. User Created Settings will appear at the bottom of the Materials selection drop box.
Verify that the settings are what you created and look right.
Congratulations! You have created your own custom setting. I would also recommend writing down these settings in a safe place. Sometimes they can disappear out of the software. They can also be exported by clicking on the MORE button and right click on the material and export, however, that file cannot always be successfully imported back in. These are just some things we’ve seen over the years with different software versions.
For older model machines and creating a custom setting, please see this tutorial HERE.
3 – Prepare the Mat
If the material will be cut after the foiling, place the materials at the bottom of the Silhouette cutting mat so it easier to remove the foil before sending the material to be cut.
Apply the foil in the same location on the material and mat that is set up in the Silhouette Studio software. Make sure the foil covers the entire area of the design to be foiled and that the washi tape is not in the areas being foiled or it can interfere with a complete foiled image.
Add the washi tape to one corner and then move to the diagonal corner and apply the washi tape, pulling it taunt. Then add washi tape to the final 2 corners and pull taunt as applied. Adjust as needed so the foil does not have any slack or creases. If it catches or has creases, it can affect the final results.
Once the foil is secured flat on the materials, load the cutting mat in the Silhouette machine.
When the design is placed in the top left corner as we are used to, then it can be difficult to remove the foil without unloading the mat. I got too excited and did that on my first design.
It took a bit more work, but I was able to remove the washi tape and foil without unloading the cutting mat. If this every happens to you, make sure to check for any washi tape that might get stuck under the roller bar or in the machine. I found a small piece that could have been a BIG problem on future projects if I had not seen it.
4 – Send to Foil
Check the box next to the Heat Foil setting and verify it’s set for Tool 2. Make sure the red is unchecked so you have time to remove the foil before it cuts the design. Then click Send in the bottom right and approve any windows that might pop up.
Remove the foil before cutting or the foil can dull the blade faster or get caught up in the machine during the cut and the project can be ruined.
5 – Reveal Your Design
Make sure to carefully remove the washi tape & don’t let the foil touch the adhesive cutting mat. It will stick immediately and then be stuck onto your cutting mat. If you reveal it slowly and it did not foil well, you can try securing the foil back down and run it again to see if it will foil better. You may need to adjust the settings and this is why testing is so important.
Do not unload the cutting mat between the foil and cut action or the design may not cut in the correct location. This is why the location of the design at the bottom is easily to work with.
Next, on the Send tab in Silhouette Studio, uncheck the blue line color and check the red color, then send the design to be cut.
When it’s finished, check the cut before unloading the cutting mat. If it did not cut well, you can send it again. After it’s cut, unload the cutting mat, flip the mat over, and peel the mat away from the material at a sharp angle to help it release.
Keep in mind that anytime you sketch or foil with a fill, the tool is going over the design multiple times depending on your fill options. This can mean that the material will be stuck down to the cutting mat in that area and may need a bit more care to remove without damage.
Finish out the project with any assembly needed and then enjoy!
Make sure to check out the video on the Silhouette Secrets+ YouTube channel for a visual of creating these projects and additional Dos and Don’ts too! Find it HERE.
Additional Resources for Mastering Heat Foiling Techniques
Save this for future reference by pinning the image below.
Enjoy !
THANK YOU for your support! How can you help? Click HERE & buy a coffee. Every little bit helps with the cost of running the site.
Silhouette Classes
Never stop learning! Let me help you take the anxiety out of learning with Silhouette and get to creating faster! My Silhouette classes are heavily focused on software, so you can take the skills & techniques taught and apply them to many future projects!
**This post may contain affiliate links. What that means is that I may receive compensation if you purchase through the links I have provided. The price you pay for the product or service is not higher but I may get compensated for sharing.
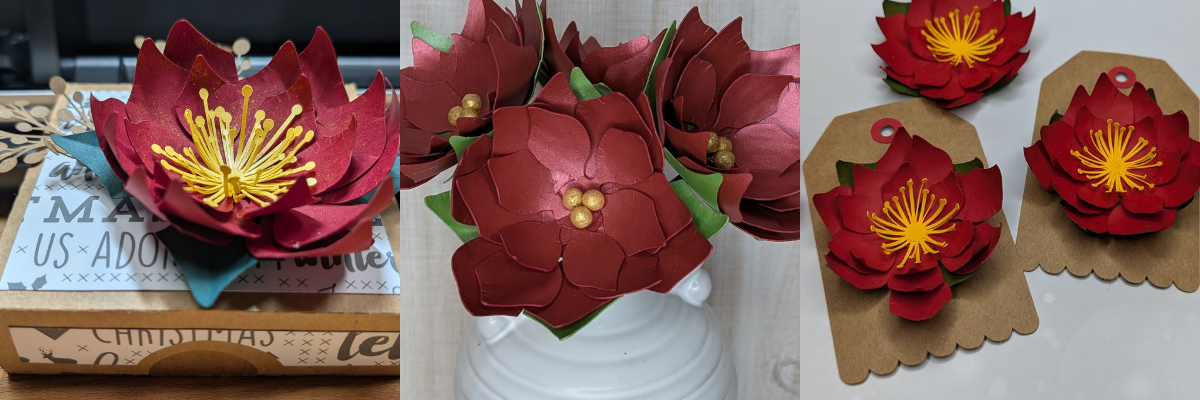
Each month in the Silhouette Secrets+ newsletters, I team up with a talented designer to offer a free file. I then use that file to create multiple projects, showcasing the endless possibilities you can achieve with just one design. In this blog post I am sharing a variety of creative projects made using the Poinsettia Gift Tag file by Jamie Lane Designs.
Affiliate links may be present in the following blog post and as an Amazon Associate, I earn from qualifying purchases.
To start the month off, I cut the design and assembled it for gift tags using kraft cardstock and colored cardstock. I then inked the edges of the cut pieces and used some paper shaping tools to add dimension to the flowers before gluing it all together.
I scaled the flower design down just a bit and used it as an embellishment on our Christmas card.
This one shown isn’t quite mail friendly, so I kept it for myself and used it as decoration for this year.
I added an easel to the back of all the Christmas cards I sent out and the one shown above that I have on display in my home.
The Silhouette LIVE tutorial on the Silhouette Secrets+ YouTube channel from November is what started the entire idea of using this with my Christmas card design. In the live I followed a suggestion from a viewer which began the creation of this years Christmas cards. I also shared sketching tips and a demo using the Silhouette Electrostatic Mat.
I scaled the poinsettia design up a little bit, cut a few more center pieces for the flower and added it on top of a hinged gift box. Added a little bit of gold sparkle spread on the poinsettia and now have a custom made gift box ready to go.
Want to know the perfect cut settings for all cardstock? There isn’t one. There are many factors that affect cut results such as: brand, color, weight, paper finish, blade life, cutting mat adhesion, humidity, the design, and more! Test cuts are the best way to know what will work for your particular cardstock or any material in fact. This will save you time, frustration, money, and supplies.
Over a year ago, I started working on a poinsettia project and crafted these gold-painted wool ball centers for the flowers. While that project was never finished, I kept all the pieces neatly tucked away in a basket, waiting for the right moment to complete it. As I revisited the project, I realized I had used this exact poinsettia flower file from Jamie Lane Designs. Inspired, I decided to pair it with beautiful pearlescent papers from 12 x 12 Cardstock Shop to create a stunning bouquet.
I ordered the cardstock and when I went to use it I was surprised at how thick it was. I wasn’t sure if I would be able to successfully cut it with the Silhouette Electrostatic Mat. After feeling it, I went looking for the weight and found it was 105 cover that’s 285 gsm. Even though I thought it might be too thick, the only way you really know if something will work is to test it! So I did just that. I did have to adjust my cut settings a bit at the beginning and then it cut beautifully!
As I mentioned above, there are no perfect cut settings that work for all cardstock. The faster you can learn to accept that, the less frustrating it will be. You will quickly learn that test cuts will save you time and if you are like me, kick yourself when you don’t do them.
Check out the new video on the Silhouette Secrets+ YouTube channel where I shared how I created this paper flower bouquet with tips to using the Electrostatic Mat too!
I miss counted when I was cutting the flowers out and I had more flower pieces cut than I had wool ball centers, but I wasn’t going to let this one sit unfinished. I had extra center pieces leftover from the previous projects and still finished these out to use for a future project or gift.
What are some ideas you have for projects this year?
I love exploring how one design can inspire multiple creative projects! The Crafting Creativity blog series is your go-to source for endless inspiration, packed with innovative ideas, practical tips, and expert techniques to elevate your crafting. Whether you’re reimagining a favorite design, experimenting with new materials, or mastering advanced skills, these posts are here to ignite your imagination and help you bring your creative visions to life. Head over to the Crafting Creativity series HERE and discover where your creativity can take you!
Save this for future reference by pinning the image below.
Enjoy !
THANK YOU for your support! How can you help? Click HERE & buy a coffee. Every little bit helps with the cost of running the site.
Silhouette Classes
Never stop learning! Let me help you take the anxiety out of learning with Silhouette and get to creating faster! My Silhouette classes are heavily focused on software, so you can take the skills & techniques taught and apply them to many future projects!
**This post may contain affiliate links. What that means is that I may receive compensation if you purchase through the links I have provided. The price you pay for the product or service is not higher but I may get compensated for sharing.
THANK YOU for your support! How can you help? Click the link to buy a coffee. Every little bit helps in the cost of running the site.