

Each month in the Silhouette Secrets+ newsletters, I team up with a talented designer to offer a free file. I then use that file to create multiple projects, showcasing the endless possibilities you can achieve with just one design. In this blog post I am sharing a variety of creative projects made using the Poinsettia Gift Tag file by Jamie Lane Designs.
Affiliate links may be present in the following blog post and as an Amazon Associate, I earn from qualifying purchases.

Make sure to sign up for the Silhouette Secrets+ newsletter HERE for future free files & project inspiration.
Crafting Creativity with Jamie Lane Designs
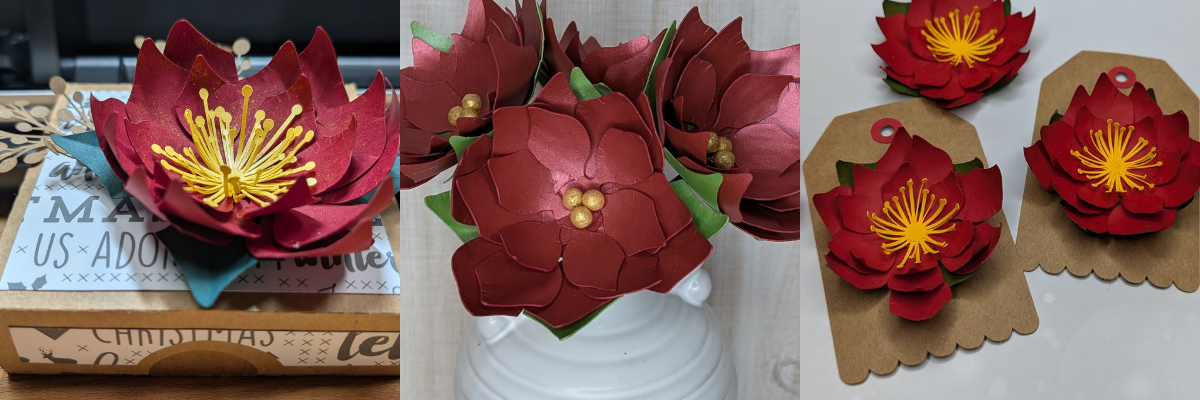
Project #1 – 3-D Poinsettia Gift Tags

To start the month off, I cut the design and assembled it for gift tags using kraft cardstock and colored cardstock. I then inked the edges of the cut pieces and used some paper shaping tools to add dimension to the flowers before gluing it all together.
Additional Resources:
Supplies Used:
- Poinsettia Tag by Jamie Lane Designs – Design #234559
- Recollections Cardstock
- Silhouette Cameo 5 (or other cutting machine model)
- Silhouette Electrostatic Mat
- Silhouette Autoblade
- Inks – colors to match cardstock
- Tim Holtz Shaping Tools
- Fiskars Paper Curler
- Twine
Project #2 – Christmas Card Embellishment/Home Decor
I scaled the flower design down just a bit and used it as an embellishment on our Christmas card.

This one shown isn’t quite mail friendly, so I kept it for myself and used it as decoration for this year.
I added an easel to the back of all the Christmas cards I sent out and the one shown above that I have on display in my home.

The Silhouette LIVE tutorial on the Silhouette Secrets+ YouTube channel from November is what started the entire idea of using this with my Christmas card design. In the live I followed a suggestion from a viewer which began the creation of this years Christmas cards. I also shared sketching tips and a demo using the Silhouette Electrostatic Mat.

Watch that Sketching tutorial video HERE.
Additional Resources:
- Sketching Supplies for Silhouette
- How to Sketch with Silhouette
- Silhouette Sketch Pen & Sketch Pen Design Class
- More on Sketching with Silhouette
Supplies Used:
- Poinsettia Tag by Jamie Lane Designs – Design #234559
- Easel for Back of Card by Lori Whitlock – Design #76159
- Merry Christmas sketch design by Kristen Magee – Design #301185
- Weathered White Wood Texture pattern by Sophie Gallo – Design #422661
- Recollections Cardstock
- Silhouette Cameo 5 (or other cutting machine model)
- Silhouette Electrostatic Mat
- Sakura Gelly Roll White Pen
- Silhouette Type B Pen Holder – Silhouette America or Amazon
- Silhouette Autoblade
- Inks – colors to match cardstock
- Tim Holtz Shaping Tools
- Fiskars Paper Curler
Project #3 – Gift Box Topper

I scaled the poinsettia design up a little bit, cut a few more center pieces for the flower and added it on top of a hinged gift box. Added a little bit of gold sparkle spread on the poinsettia and now have a custom made gift box ready to go.

Want to know the perfect cut settings for all cardstock? There isn’t one. There are many factors that affect cut results such as: brand, color, weight, paper finish, blade life, cutting mat adhesion, humidity, the design, and more! Test cuts are the best way to know what will work for your particular cardstock or any material in fact. This will save you time, frustration, money, and supplies.
Additional Resources:
Supplies Used:
- Poinsettia Tag by Jamie Lane Designs – Design #234559
- Cardstock
- Patterned Paper
- 3-D Hinged Box by Jamie Lane Designs – Design #92230
- Branch by Your Magic Line – Design #382981
- Doubled sided tape for box
- SuperTite Precision Craft Glue
- Zig Wink of Stella Brush Pen Gold
- Tim Holtz Shaping Kit
- Fiskars Paper Curling Tool
Project #4 – Poinsettia Bouquet
Over a year ago, I started working on a poinsettia project and crafted these gold-painted wool ball centers for the flowers. While that project was never finished, I kept all the pieces neatly tucked away in a basket, waiting for the right moment to complete it. As I revisited the project, I realized I had used this exact poinsettia flower file from Jamie Lane Designs. Inspired, I decided to pair it with beautiful pearlescent papers from 12 x 12 Cardstock Shop to create a stunning bouquet.

I ordered the cardstock and when I went to use it I was surprised at how thick it was. I wasn’t sure if I would be able to successfully cut it with the Silhouette Electrostatic Mat. After feeling it, I went looking for the weight and found it was 105 cover that’s 285 gsm. Even though I thought it might be too thick, the only way you really know if something will work is to test it! So I did just that. I did have to adjust my cut settings a bit at the beginning and then it cut beautifully!
As I mentioned above, there are no perfect cut settings that work for all cardstock. The faster you can learn to accept that, the less frustrating it will be. You will quickly learn that test cuts will save you time and if you are like me, kick yourself when you don’t do them.
Check out the new video on the Silhouette Secrets+ YouTube channel where I shared how I created this paper flower bouquet with tips to using the Electrostatic Mat too!

Additional Resources:
Supplies Used:
- Poinsettia Tag by Jamie Lane Designs – Design #234559
- Neenah Stardream Pearlecent Smooth Cardstock
- Spun Cotton Balls
- Floral Wire
- Gold Acrylic Paint
- Tim Holtz Shaping Kit
- Fiskars Paper Curling Tool
- Surebonder Fine Tip Hot Glue Gun
- Hot Glue Sticks

I miss counted when I was cutting the flowers out and I had more flower pieces cut than I had wool ball centers, but I wasn’t going to let this one sit unfinished. I had extra center pieces leftover from the previous projects and still finished these out to use for a future project or gift.
What are some ideas you have for projects this year?
Find more designs by Jamie Lane Designs at the Silhouette Design Store.
I love exploring how one design can inspire multiple creative projects! The Crafting Creativity blog series is your go-to source for endless inspiration, packed with innovative ideas, practical tips, and expert techniques to elevate your crafting. Whether you’re reimagining a favorite design, experimenting with new materials, or mastering advanced skills, these posts are here to ignite your imagination and help you bring your creative visions to life. Head over to the Crafting Creativity series HERE and discover where your creativity can take you!
Save this for future reference by pinning the image below.

Enjoy !
THANK YOU for your support! How can you help? Click HERE & buy a coffee.
Every little bit helps with the cost of running the site.
Silhouette Classes
Never stop learning! Let me help you take the anxiety out of learning with Silhouette and get to creating faster! My Silhouette classes are heavily focused on software, so you can take the skills & techniques taught and apply them to many future projects!


**This post may contain affiliate links. What that means is that I may receive compensation if you purchase through the links I have provided. The price you pay for the product or service is not higher but I may get compensated for sharing.
Discover more from Silhouette Secrets-Swift Creek Customs
Subscribe to get the latest posts sent to your email.


Thank you Elly – just amazed by how many ways you used that design!
Inspiring as always!
Luv
T x
Thank you!