Have you ever tried tracing an image in Silhouette Studio only to find the result wasn’t as clean or precise as you’d hoped? You’re not alone! Many users struggle with getting a smooth, accurate trace that leads to a successful cut file. We see questions about this all the time, and that’s why I’ve created an in-depth tutorial to help you master tracing and cleaning up your designs in Silhouette. Whether you’re working with complex images or simple shapes, these tips and techniques will help you put the tools in the Silhouette Studio software to work for you!
Find this FREE in-depth video tutorial on the Silhouette Secrets+ YouTube channel HERE.
Every single image that you trace can be different because each one is made up of different colors, gradients, shading, etc. In the video tutorial, I take you along for the journey and it is step-by-step exactly how I would work with a file that needs clean up. The only way to actually know if the file will be a successful cut file in the end is to cut it, so I included my tips after cutting and shared exactly what I would change after I finished the cut to make it even more successful for the final project.
The original traced image started with 24,528 edit nodes and through the clean up process, I was able to get that down to 1,848. That makes a huge difference in the cuttability of a file.
My goal through the entire process was to maintain as much of the character of the image as possible. This makes a great way to make unique projects & gift ideas.
Check out the full in-depth video to learn more about how you can make the tools in the Silhouette Studio software do what you want.
I hope you pick up a few tips to mastering tracing in Silhouette Studio and how to clean up a file for a cuttable design!
Silhouette Tutorial: In-Depth Guide to Tracing & Cleaning Up Detailed Images – Step-by-Step Video on the Silhouette Secrets+ YouTube channel HERE
For more in-depth tutorials and inspiring projects, explore our comprehensive A to Z of Silhouette section on the website HERE, where you’ll find years of creative resources to help you master your Silhouette skills!
Save this for future reference by pinning the image below.
Enjoy !
THANK YOU for your support! How can you help? Click HERE & buy a coffee. Every little bit helps with the cost of running the site.
Silhouette Classes
Never stop learning! Let me help you take the anxiety out of learning with Silhouette and get to creating faster! My Silhouette classes are heavily focused on software, so you can take the skills & techniques taught and apply them to many future projects!
**This post may contain affiliate links. What that means is that I may receive compensation if you purchase through the links I have provided. The price you pay for the product or service is not higher but I may get compensated for sharing.
Have you ever wondered what tools are compatible with the Silhouette Curio 2? The Silhouette Curio 2 flatbed cutting machine can use a few additional tools that are not designed for the Silhouette Cameo 5 models. Let’s take a look at those today!
Affiliate links may be present in the following blog post and as an Amazon Associate, I earn from qualifying purchases.
I have created a free PDF chart of all the tools that can be used in the Silhouette Curio 2 . This chart is available as a free download exclusively for confirmed newsletter subscribers.
I always recommend stocking up on extra blades and cutting mats to have on hand. It can be very frustrating to be in the middle of a project with a dull blade or and adhesive mat that is no longer sticky. It is also one of the fastest ways to rule out a cutting issue you might have.
For some of the specialty tools listed below I’ve also included links for tutorials and more information on their usage as well.
Silhouette Blades
Silhouette Autoblade – Type B Carriage 1 Used for paper, cardstock, sticker sheets, adhesive vinyl, HTV, Chipboard, Acetate, and select specialty materials. Materials under 1 mm thick Available at Silhouette America or Crafter Cuts *This is the blade I use most often. Most cut issues occurring with this blade can be fixed by following the steps in this video HERE – Troubleshooting Cut Issues
Silhouette 1 mm Manual Blade Carriage 1 Used for paper, cardstock, sticker sheets, adhesive vinyl, HTV, Chipboard, Acetate, and select specialty materials. Materials under 1 mm thick
Silhouette 2 mm Manual Blade Carriage 1 Used for paper, cardstock, sticker sheets, adhesive vinyl, HTV, Chipboard, Acetate, Craft Foam, and select specialty materials. Materials under 2 mm thick
Silhouette 2 mm Kraft Blade – Type B Carriage 1 Used for chipboard, acetate, craft Foam, leather, and select specialty materials Materials up to 2 mm thick *15+ Tips for using the Kraft blade foundHERE
Silhouette Tool Adapter Set Carriage 1 Adapters are color coded for specific blades/tools Black adapter = Silhouette blade (ratchet) & Premium blade White adapter = 2 mm Kraft blade Gray adapter = Deep Cut blade Blue adapter = Silhouette Sketch pens
Silhouette Blade – often referred to as a “ratchet” blade but the official name is Silhouette blade Carriage 1 with black adapter Used for paper, cardstock, sticker sheets, adhesive vinyl, HTV, Chipboard, Acetate, and select specialty materials. Materials under 1 mm thick
Silhouette Premium Blade Carriage 1 with black adapter Used for paper, cardstock, sticker sheets, adhesive vinyl, HTV, Chipboard, Acetate, and select specialty materials. Materials under 1 mm thick
Silhouette Deep Cut Blade Carriage 1 with gray adapter Used for paper, cardstock, sticker sheets, adhesive vinyl, HTV, Chipboard, Acetate, Craft Foam, and select specialty materials. Materials under 2 mm thick
Silhouette 2 mm Kraft Blade Carriage 1 with white adapter Used for chipboard, acetate, craft Foam, leather, and select specialty materials Materials up to 2 mm thick *15+ Tips for using the Kraft blade foundHERE
Silhouette 3 mm Kraft Blade Carriage 2 Used for chipboard, acetate, craft Foam, leather, and select specialty materials Materials up to 3 mm thick *15+ Tips for using the Kraft blade foundHERE
Silhouette Rotary blade Carriage 2 Used for fabrics, crepe paper, felt, wool, and select specialty materials *Rotary Blade TutorialHERE
Additional Silhouette Tools
Silhouette Pen Holder Type B Carriage 1 Use with a variety of pen styles to sketch onto materials such as cardstock, paper, faux leather paper, etc. *Step-by-step Sketching ClassHERE **More tutorials on sketchingHERE
Silhouette Punch Tool Carriage 2 Used with adhesive vinyl or HTV to punch a hole to designate where to weed the material out. Also used with the Cameo 5 for etching on Silhouette metal sheets. *12+ Tips for Etching with the Silhouette Cameo 5HERE
Silhouette black bodied sketch pens Carriage 1 with blue adapter Used to sketch onto materials such as cardstock, paper, faux leather paper, etc. *Step-by-step Sketching ClassHERE **More tutorials on sketchingHERE
Silhouette Pen Holder – Type C Carriage 2 Use with a variety of pen styles to sketch onto materials such as cardstock, paper, faux leather paper, etc. Type C Pen Holder has a broader barrel on the end so you can use wider bodied pens and markers
Silhouette Heat Pen Set – Powered Tool Carriage 2 Applies foil transfer material to surfaces of many materials such as cardstock, faux leather, etc. Cordless design and powered by the Cameo 5 Tool 2 housing *Heat Pen Setup & Foiling tutorials HERE
Silhouette Heat Pen Super-Fine Carriage 2 Applies foil transfer material to surfaces of many materials such as cardstock, faux leather, etc. Cordless design and powered by the Cameo 5 Tool 2 housing 0.5 mm Super Fine Tip
Silhouette Power Engraver Carriage 2 Surface engraves on materials such as metal sheets, acrylic, etc. To be used with the Silhouette Curio Debris Tray *Beginner Acrylic Etching Class with Power EngraverHERE **Additional Silhouette Curio 2 InformationHERE
Grab the free PDF chart of all the Silhouette Curio 2 tools for future reference when you subscribe to the Silhouette Secrets+ newsletter. *chart is the current tools available for the Silhouette Curio 2January 2024
Find even more information on the Silhouette Curio 2 HERE including an unboxing, setup, first cuts, and the Electrostatic Bed.
Please let me know if you have any questions in the comments below.
Save this for future reference by pinning the image below.
Enjoy !
THANK YOU for your support! How can you help? Click HERE & buy a coffee. Every little bit helps with the cost of running the site.
Silhouette Classes
Never stop learning! Let me help you take the anxiety out of learning with Silhouette and get to creating faster! My Silhouette classes are heavily focused on software, so you can take the skills & techniques taught and apply them to many future projects!
**This post may contain affiliate links. What that means is that I may receive compensation if you purchase through the links I have provided. The price you pay for the product or service is not higher but I may get compensated for sharing.
Let’s talk tools. Tools for the Silhouette Cameo 5 and Cameo 5 Plus model machines specifically in this post.
Affiliate links may be present in the following blog post and as an Amazon Associate, I earn from qualifying purchases.
With the release of the Silhouette Cameo 5, a couple new tools were released that can be used with the new machines. These include the Embossing tools, Heat Pen Set, and Pen Holder Type C.
I’ve created a free PDF chart listing all the tools compatible with the Silhouette Cameo 5 and Cameo 5 Plus. This chart is available as a free download exclusively for confirmed newsletter subscribers.
I always recommend stocking up on extra blades and cutting mats to have on hand. It can be very frustrating to be in the middle of a project with a dull blade or and adhesive mat that is no longer sticky. It is also one of the fastest ways to rule out a cutting issue you might have.
Let’s take a look at all the blades and tools that can be used in the Silhouette Cameo 5. For some of the specialty tools listed below I have also included links for tutorials and more information on their usage as well.
Silhouette Blades
Silhouette Autoblade – Type B Carriage 1 Used for paper, cardstock, sticker sheets, adhesive vinyl, HTV, Chipboard, Acetate, and select specialty materials. Materials under 1 mm thick Available at Silhouette America or Crafter Cuts *This is the blade I use most often. Most cut issues occurring with this blade can be fixed by following the steps in this video HERE – Troubleshooting Cut Issues
Silhouette 1 mm Manual Blade Carriage 1 Used for paper, cardstock, sticker sheets, adhesive vinyl, HTV, Chipboard, Acetate, and select specialty materials. Materials under 1 mm thick
Silhouette 2 mm Manual Blade Carriage 1 Used for paper, cardstock, sticker sheets, adhesive vinyl, HTV, Chipboard, Acetate, Craft Foam, and select specialty materials. Materials under 2 mm thick
Silhouette 2 mm Kraft Blade – Type B Carriage 1 Used for chipboard, acetate, craft Foam, leather, and select specialty materials Materials up to 2 mm thick *15+ Tips for using the Kraft blade foundHERE
Silhouette Tool Adapter Set Carriage 1 Adapters are color coded for specific blades/tools Black adapter = Silhouette blade (ratchet) & Premium blade White adapter = 2 mm Kraft blade Gray adapter = Deep Cut blade Blue adapter = Silhouette Sketch pens
Silhouette Blade – often referred to as a “ratchet” blade but the official name is Silhouette blade Carriage 1 with black adapter Used for paper, cardstock, sticker sheets, adhesive vinyl, HTV, Chipboard, Acetate, and select specialty materials. Materials under 1 mm thick
Silhouette Premium Blade Carriage 1 with black adapter Used for paper, cardstock, sticker sheets, adhesive vinyl, HTV, Chipboard, Acetate, and select specialty materials. Materials under 1 mm thick
Silhouette Deep Cut Blade Carriage 1 with gray adapter Used for paper, cardstock, sticker sheets, adhesive vinyl, HTV, Chipboard, Acetate, Craft Foam, and select specialty materials. Materials under 2 mm thick
Silhouette 2 mm Kraft Blade Carriage 1 with white adapter Used for chipboard, acetate, craft Foam, leather, and select specialty materials Materials up to 2 mm thick *15+ Tips for using the Kraft blade foundHERE
Silhouette 3 mm Kraft Blade Carriage 2 Used for chipboard, acetate, craft Foam, leather, and select specialty materials Materials up to 3 mm thick *15+ Tips for using the Kraft blade foundHERE
Silhouette Rotary blade Carriage 2 Used for fabrics, crepe paper, felt, wool, and select specialty materials *Rotary Blade TutorialHERE
Additional Silhouette Tools
Silhouette Pen Holder Type B Carriage 1 Use with a variety of pen styles to sketch onto materials such as cardstock, paper, faux leather paper, etc. *Step-by-step Sketching ClassHERE **More tutorials on sketchingHERE
Silhouette Punch Tool Carriage 2 Used with adhesive vinyl or HTV to punch a hole to designate where to weed the material out. Also used with the Cameo 5 for etching on Silhouette metal sheets. *12+ Tips for Etching with the Silhouette Cameo 5HERE
Silhouette black bodied sketch pens Carriage 1 with blue adapter Used to sketch onto materials such as cardstock, paper, faux leather paper, etc. *Step-by-step Sketching ClassHERE **More tutorials on sketchingHERE
Silhouette Pen Holder – Type C Carriage 2 Use with a variety of pen styles to sketch onto materials such as cardstock, paper, faux leather paper, etc. Type C Pen Holder has a broader barrel on the end so you can use wider bodied pens and markers
Silhouette Embossing Tool Set – Type C Carriage 2 Embosses onto materials such as cardstock, embossable foil, etc. Set includes a fine and wide tip.
Silhouette Heat Pen Set – Powered Tool Carriage 2 Applies foil transfer material to surfaces of many materials such as cardstock, faux leather, etc. Cordless design and powered by the Cameo 5 Tool 2 housing – 1 mm & 2.5 mm tip *Heat Pen Setup & Foiling tutorials HERE
Silhouette Heat Pen Super-Fine Carriage 2 Applies foil transfer material to surfaces of many materials such as cardstock, faux leather, etc. Cordless design and powered by the Cameo 5 Tool 2 housing 0.5 mm Super Fine Tip
Additional Supplies
There are a few additional supplies for use with some of the specialty tools listed above.
Silhouette 12″ x 12″ Embossing Mat For use with the Silhouette Embossing Tools
Silhouette Heat Transfer Foil – Gold & Silver For use with the Silhouette Heat Pen Set 2 heat foil rolls (3 in x 33 feet) *Heat Pen Setup & Foiling tutorials HERE
Silhouette Electrostatic Bed Uses static electricity to hold materials in place while being cut with the Cameo 5 models *Tips for using the Silhouette Electrostatic BedHERE
Silhouette Electrostatic Protection Sheet 12″ x 12″ – 2 per pack Protects the Electrostatic Bed from damage.
There are a lot of options now available with the Silhouette Cameo 5 and Cameo 5 Plus.
Grab the free PDF chart of all Silhouette Cameo 5 tools for future reference when you subscribe to the Silhouette Secrets+ newsletter. *chart is the current tools available for the Cameo 5 and Cameo 5 Plus January 2024
Find even more information on the Silhouette Cameo 5 HERE including an unboxing, setup, first cuts, and the Electrostatic Bed.
Please let me know if you have any questions in the comments below.
Save this for future reference by pinning the image below.
Enjoy !
THANK YOU for your support! How can you help? Click HERE & buy a coffee. Every little bit helps with the cost of running the site.
Silhouette Classes
Never stop learning! Let me help you take the anxiety out of learning with Silhouette and get to creating faster! My Silhouette classes are heavily focused on software, so you can take the skills & techniques taught and apply them to many future projects!
**This post may contain affiliate links. What that means is that I may receive compensation if you purchase through the links I have provided. The price you pay for the product or service is not higher but I may get compensated for sharing.
We troubleshoot with thousands of users each week and we have seen some very dirty machines. This will affect the lifespan and usage of your Silhouette machines! There is no way to sugar coat that! Especially now with the new technology released.
The #1 biggest thing is to keep your machines clean and free of debris. Especially with the new powered tool housing and power plug on the Cameo 5, Curio 2, and Portrait 4. Any dirt or debris in that power housing plug and it can affect your results and success!
I recommend keeping the lid on your machine for the Silhouette Cameo 5 and Portrait 4 closed when it’s not in use.
A Silhouette machine dust cover is a great idea too, especially if you have a workspace that has a lot of particles in the air. The Cameo 4 dust covers fit nicely over the Cameo 5 machines. They are pretty similar in size, just a few differences in the design.
With the Silhouette Curio 2, keep it free and clear of debris and materials in the way of the housing and channels on the machine. Any dirt, debris, or materials in the channels can interfere with the Curio 2 function and housing moving freely during use.
I do not recommend storing anything on top of the Silhouette Curio 2 or it could affect the machine function.
For my Curio 2 with acrylic etching/engraving, I’ve been using a handheld vacuum to help with the clean up after the etch.
Silhouette Electrostatic (ES) Bed
The Silhouette Electrostatic (ES) Bed is new! It’s awesome! Keep the boxes if you have not already thrown those away. The Electrostatic Bed should be stored completely flat and I do not recommend storing things on top of it.
The Silhouette Electrostatic (ES) Bed is very specific in that it needs to be completely flat in order to function properly and maintain the charge. Any warping of the bed due to improper storage or materials placed on it over time, can affect the success of using it.
Keep the boxes and packing materials for storage on the Silhouette Electrostatic (ES) Bed. This will be the best protection that you can use and you know it is stored safely when it’s placed back in the box with the packaging foam.
Any damage to the Silhouette Electrostatic (ES) Bed and you will need to replace it. Improper storage of the bed is not a machine fault, but is the responsibility of the user.
The new Silhouette Power Tools are a bigger tool housing than previous Silhouette tools. This means that they may not fit in the previous tool storage that a user had.
The storage of these new power tools will be very important because you not only have to protect the Auto Tool Detection metal plate on the backside of the tool, but you also have a Power Plug on the backside of the tool that needs to be protected as well.
I found a couple options for storage for the tools and they are customizable for what each user might need.
Look around your house and see if there is something you can repurpose for tool storage. You may already have an option that works for the tools you have!
Non-power Silhouette Tool Storage Options
This is the tool holder that I’ve been using for several years with the non-power Silhouette tools such as the Autoblade, Rotary blade, and Kraft blades. As you can see, I have gathered a selection of tools over the years as I’m writing tutorials and teaching classes.
This tool holder has worked for me so far with the smaller blade housings.
Additional Care Tips
Keep the rollers clean of adhesive. The rollers of the Cameo 5 and Portrait 4 should not be rolling on the adhesive of the cutting mat or it can pick up adhesive residue and affect your future cut projects.
All of these tips are 100% the user’s responsibility. You have invested in these machines and with proper care, use, and storage the Silhouette machines, tools, and accessories should work well for you.
Save this for future reference by pinning the image below.
Enjoy !
THANK YOU for your support! How can you help? Click HERE & buy a coffee. Every little bit helps with the cost of running the site.
Silhouette Classes
Never stop learning! Let me help you take the anxiety out of learning with Silhouette and get to creating faster! My Silhouette classes are heavily focused on software, so you can take the skills & techniques taught and apply them to many future projects!
**This post may contain affiliate links. What that means is that I may receive compensation if you purchase through the links I have provided. The price you pay for the product or service is not higher but I may get compensated for sharing.
Have you ever wanted a handy chart that shows what blades are what? What is each blade used for? Does it need an adapter or does it fit with no adapter? What materials is each designed to cut?
Today I wanted to share a free resource that I’ve created that gives information on the current blades and tools available for the Cameo 4 , Cameo Plus, and Cameo Pro.
Cameo 4 , Cameo Plus, and Cameo Pro Tool Chart
This free PDF chart is is available as a free download exclusively for confirmed newsletter subscribers.
Download this to your computer and open it. Click the blue links in the chart for more resources on that particular tool.
Print the PDF file out for visual reference as well.
Don’t forget to check out the Silhouette classes on my Teachable site while you are there! Step-by-step classes taught for many Silhouette projects and software techniques. And the best part – once registered, you can access any time and as many times as you need to take the class! Never stop learning & creating!
**Please note that these may be affiliate links which means that by using these links and/or codes, I may received a small compensation for sharing the links with you. The price you pay for the product or service is not higher. Thank you for using affiliate links as it provides a way for me to continue doing what I do as an Instructor, blogger, and event organizer.
I hope this helps you get to know your Silhouette Cameo machine a little bit better!
I have lots more things on my project list to share in the future!
I would love to see what you are creating with your Silhouette software or machines! Feel free to post on my Facebook group at Silhouette Secrets with EllyMae.
Save this for future reference by pinning the image below.
Enjoy !
THANK YOU for your support! How can you help? Click HERE & buy a coffee. Every little bit helps with the cost of running the site.
Silhouette Classes
Never stop learning! Let me help you take the anxiety out of learning with Silhouette and get to creating faster! My Silhouette classes are heavily focused on software, so you can take the skills & techniques taught and apply them to many future projects!
**This post may contain affiliate links. What that means is that I may receive compensation if you purchase through the links I have provided. The price you pay for the product or service is not higher but I may get compensated for sharing.
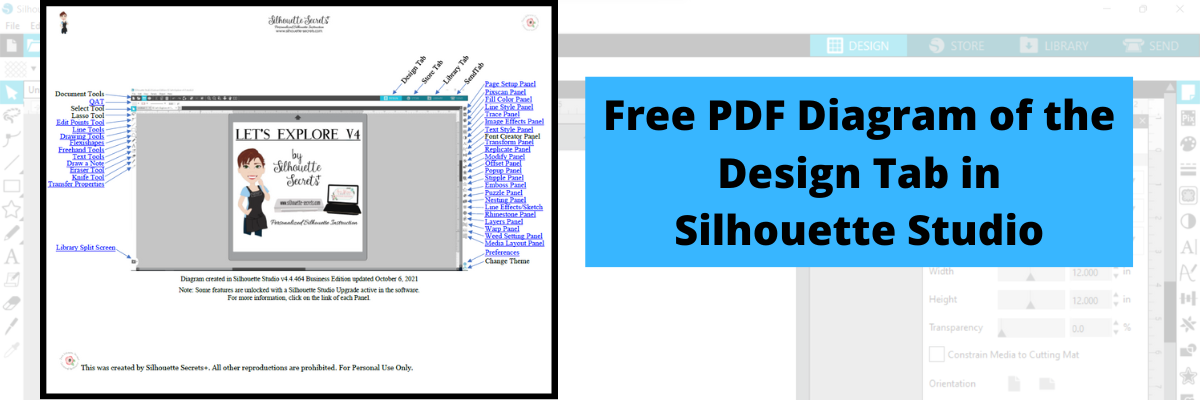
Download this to your computer and open it. Then click on the blue links to be taken to more in-depth information on each of the tools or features.
Print it for a visual reference while working in the software too!
Grab the free PDF file HERE or click the image below.
I have had many comment with feedback that this is very helpful to them when getting familiar with the Silhouette Studio v4 software. All of the information provided is part of the “Let’s Explore v4 series” on the blog HERE.
We love seeing what you are creating with your Silhouette machines or software. Feel free to post photos or questions on my Facebook group at Silhouette Secrets with EllyMae.
Save this for future reference by pinning the image below.
Enjoy!
THANK YOU for your support! How can you help? Click HERE & buy a coffee. Every little bit helps with the cost of running the site.
Or if you are looking for more in-depth, step-by-step classes, check out all of my online Silhouette classes on my Teachable site HERE.
**This post may contain affiliate links. What that means is that I may receive compensation if you purchase through the links I have provided. The price you pay for the product or service is not higher but I may get compensated for sharing.
There are so many neat tools in the Silhouette software and one of those is called Transfer Properties.
It is found on the left side of the Silhouette Studio software. The Transfer Properties feature is a Designer Edition or higher upgrade feature. For more about software upgrades check out this post Software Upgrades – My Favorite Features
This is a neat feature in the software when you get to creating and designing. You are able to take the properties that are added to one design and then transfer them to the next design you have selected without starting over.
The keyboard shortcut for Transfer Properties is the Ctrl button on a Windows computer and the Command key on a MAC. MAC users, if your right click keyboard shortcut includes the Command key, you may have experienced changes in your design and not know how you activated that. By pressing the Command key, it is activated and if you have another object selected when you click, it will now transfer those properties. It can definitely be an odd behavior if you are not aware of this keyboard shortcut.
Here is a quick video showing how this neat feature works.
You never know what new and exciting thing you might learn by just pressing a few buttons. I know that may sound scary, but sometimes it’s the best way to learn.
Save this for future reference by pinning the image below.
Enjoy!
THANK YOU for your support! How can you help? Click HERE & buy a coffee. Every little bit helps with the cost of running the site.
Or if you are looking for more in-depth, step-by-step classes, check out all of my online Silhouette classes on my Teachable site HERE.
**This post may contain affiliate links. What that means is that I may receive compensation if you purchase through the links I have provided. The price you pay for the product or service is not higher but I may get compensated for sharing.
The Quick Access Toolbar (QAT) is quick way to access many of the panels on the right side of the Silhouette software.
I am more comfortable using the panels on the right because I like the expanded window and am just not in the habit of using the quick icons at the top. This is probably because I started in the software before the QAT was around and old habits are hard to change. But, I am getting better at it.
This is a fluid tool bar that will change depending on what you have selected on the design mat. You will notice that the icons will be the same as the panels on the right side.
With objects selected on the design screen these are the icons you might see in the QAT bar.
Look at all the information in the Quick Access Toolbar (QAT). All of this information can also be found on the right side in the Panels, but these are quick buttons to access it as well. There are multiple ways to do things in the software, no one way is right or wrong, but the best way is what works for you.
This fluid tool bar, changes depending on what is selected. If you have text selected on the design screen, then you will see text options in the tool bar.
If a design is selected you will see the most commonly used options for an object in the QAT.
Let’s look at the Alignment options as an example.
Or the same icon can be found in the top QAT when an object is selected.
Note: the spacing options may not show in the QAT on older software versions. It was later added into the QAT options.
If no object is selected, the toolbar will not show.
The other thing to mention here, is what you see or what you might see on someone else’s screen may be expanded or condensed. This depends on the screen size of the user’s computer.
On a smaller screen the options will be condensed and you will have little gray corners on the icons that will expand when you move the cursor over the icon.
On a larger screen the options for the icons can expand more across the top of the software and not have as many fly-out menus.
Either way the options are all still there just depends on what you have on the screen selected.
I am finding that I use the QAT more and more, just a matter of getting used to clicking on the little button in the top menu vs opening the panel on the right side. There is no right or wrong way to use those tools.
Which do you use most often?
Feel free to post on my Facebook group Silhouette Secrets with EllyMae. If you have questions feel free to post below or on the Facebook group too!
Save this for future reference by pinning the image below.
Enjoy!
THANK YOU for your support! How can you help? Click HERE & buy a coffee. Every little bit helps with the cost of running the site.
Or if you are looking for more in-depth, step-by-step classes, check out all of my online Silhouette classes on my Teachable site HERE.
**This post may contain affiliate links. What that means is that I may receive compensation if you purchase through the links I have provided. The price you pay for the product or service is not higher but I may get compensated for sharing.
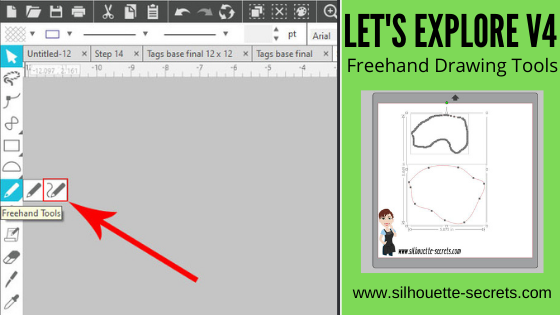
Who can freehand draw? Well, typically not me, but it can come in handy for certain projects. My freehand drawing is something to laugh at these days. I will say that it is something that takes practice. I use a trackball mouse, so it can be a bit easier than a regular mouse, but you will still be able to use this tool no matter what tool you use. If you have a touchscreen, you may be able to use a stylus or your finger to draw.
On the left hand side of the Silhouette Studio software you will find the Tools. Under the Freehand tool here are 2 options: Draw Freehand and Draw Smooth Freehand
Check out the video below to see the difference between the two tools
If viewing in email please click on the image above to view the video.
Notice that the Smooth Freehand Drawing tool will “smooth” out the design between the red dots that appear. This gives you less edit points on the line you are drawing but will affect the final shape. Each tool can have it’s useful purposes.
Here is a closer look at how the Smooth Freehand Drawing tool works in action around a design
If viewing in email please click on the image above to view the video.
And after the drawing is done, you can then make additional changes by adjusting the Edit Points as shown in the video above.
I love that there are so many options in the Silhouette software! It can definitely be a handy tool to have.
So many options in the Silhouette software and there is just no way to remember them all! Check out the full Let’s Explore v4 series on the blog HERE!
What are you creating with your Silhouette machine?
I would love to see and hear about it on my Facebook group at Silhouette Secrets with EllyMae. If you have questions feel free to post below or on the Facebook group too!
Save this for future reference by pinning the image below.
Enjoy!
THANK YOU for your support! How can you help? Click HERE & buy a coffee. Every little bit helps with the cost of running the site.
Or if you are looking for more in-depth, step-by-step classes, check out all of my online Silhouette classes on my Teachable site HERE.
**This post may contain affiliate links. What that means is that I may receive compensation if you purchase through the links I have provided. The price you pay for the product or service is not higher but I may get compensated for sharing.
THANK YOU for your support! How can you help? Click the link to buy a coffee. Every little bit helps in the cost of running the site.