Have you ever tried tracing an image in Silhouette Studio only to find the result wasn’t as clean or precise as you’d hoped? You’re not alone! Many users struggle with getting a smooth, accurate trace that leads to a successful cut file. We see questions about this all the time, and that’s why I’ve created an in-depth tutorial to help you master tracing and cleaning up your designs in Silhouette. Whether you’re working with complex images or simple shapes, these tips and techniques will help you put the tools in the Silhouette Studio software to work for you!
Find this FREE in-depth video tutorial on the Silhouette Secrets+ YouTube channel HERE.
Every single image that you trace can be different because each one is made up of different colors, gradients, shading, etc. In the video tutorial, I take you along for the journey and it is step-by-step exactly how I would work with a file that needs clean up. The only way to actually know if the file will be a successful cut file in the end is to cut it, so I included my tips after cutting and shared exactly what I would change after I finished the cut to make it even more successful for the final project.
The original traced image started with 24,528 edit nodes and through the clean up process, I was able to get that down to 1,848. That makes a huge difference in the cuttability of a file.
My goal through the entire process was to maintain as much of the character of the image as possible. This makes a great way to make unique projects & gift ideas.
Check out the full in-depth video to learn more about how you can make the tools in the Silhouette Studio software do what you want.
I hope you pick up a few tips to mastering tracing in Silhouette Studio and how to clean up a file for a cuttable design!
Silhouette Tutorial: In-Depth Guide to Tracing & Cleaning Up Detailed Images – Step-by-Step Video on the Silhouette Secrets+ YouTube channel HERE
For more in-depth tutorials and inspiring projects, explore our comprehensive A to Z of Silhouette section on the website HERE, where you’ll find years of creative resources to help you master your Silhouette skills!
Save this for future reference by pinning the image below.
Enjoy !
THANK YOU for your support! How can you help? Click HERE & buy a coffee. Every little bit helps with the cost of running the site.
Silhouette Classes
Never stop learning! Let me help you take the anxiety out of learning with Silhouette and get to creating faster! My Silhouette classes are heavily focused on software, so you can take the skills & techniques taught and apply them to many future projects!
**This post may contain affiliate links. What that means is that I may receive compensation if you purchase through the links I have provided. The price you pay for the product or service is not higher but I may get compensated for sharing.
In this tutorial, I’m going to share how I created what’s called an “Off the Edge” die cut card with my Silhouette machine. This can add an interesting element to any card design and is fun to create.
Affiliate links may be present in the following blog post and as an Amazon Associate, I earn from qualifying purchases.
I recently attended the Card Maker Success Challenge hosted by Brandi Mahon of Stamp Me Some Love and was so inspired by her card ideas. I took the card ideas she was sharing and modified them to be used with my Silhouette software and machine. If you are looking for card making inspiration, I recommend you check out her monthly Card Maker’s Success Subscription.
I have a Canon TS9521C that is a borderless printer, but you can do the same even without a borderless printer.
Then, I will use a paper trimmer to cut the page down to the size I need for my cards front. But, I won’t know the size until I have the other pieces cut out, so I just set this aside.
Designing in Silhouette Studio
Drawing the Card Pieces
Next, in the Silhouette software, using the Drawing Tools on the left side, draw out a rectangle and then scale it to 4.25″ x 5.5″ or whatever card size you are wanting. Unlock the lock to be able to change the height and width of the rectangle individually. Type the number and press Enter to set the dimension. Find more on the Scale Tools HERE.
Select the rectangle and then choose Align Left in the Alignment tools. With only 1 object selected it will align it to the left side of the page. This will help us in just a minute with our design.
Choosing a Sentiment
Next, open the sentiment design you want to use or with the Text Tool and type out the sentiment you want. If you type out the text, make sure to weld any overlapping pieces.
I used Hello by Diva Watts Designs found HERE for this card design.
Scale the hello down to fit within the card base and use the green dot at the top to rotate it to the desired angle. Or you can use the Rotate Panel and rotate to 45 degrees and adjust from there.
This is going to allow us to adjust the rectangle and maintain straight lines.
Double click on the red line of the rectangle to bring up the Edit Points. Drag the top left edit point (gray dot) down.
Grab the top right edit point and drag it down, so the top of the rectangle is angled as desired to run through the middle of the sentiment.
With the Snap to Grid tool activated, it snaps the edit points to specific locations and easily allows the design to be manipulated and maintain the straight lines of the card edges.
Once the edges are how we want, Show Grid and Snap to Grid can be toggled off on the Page Setup Panel – Tab 2 again. I find the grid lines distracting when designing, but they can easily be turned back on if needed.
Create a Copy for Future Templates
Make a copy of the card base and you can use it for future cards as a starting point.
Select both the card base and the sentiment and Align the Center in Silhouette. Depending on the design, center aligned may not look centered to the eye. Use the arrow keys to adjust if needed in small increments any direction.
Adding an Offset
Next, click on the sentiment to select it and open the Offset Panel on the right side. Click Offset and adjust the distance of the Offset as desired, then click Apply or press Enter. The distance of the offset will all depend on the sentiment and the size you are using. There is no magic number.
The offset should overlap the angled rectangle securely and not have too many tiny bits to be cut out.
Welding the Offset to the Card Front
After clicking on Apply, the offset will be selected. Hold the Shift key down and click on the angled rectangle so that both are selected, then right click and choose Weld.
This now combines the angled rectangle and the offset into 1 cut and creates the off-the-edge design. If there are any tiny bits like what the red arrow points to above, those are not needed in the design. Move the sentiment off of the design.
Then right click on the design and choose Release Compound path. Click off of it to deselect and click back on the little bit, press delete. When all the pieces you want are deleted, select the entire design again, right click and choose Make Compound Path.
Use the drag select method to select all the pieces at the same time. Left click the mouse and hold it down in the top left corner above the design and drag it all the way through the design to the bottom right corner. Anything that the selection box touches, should be selected.
Cutting the Card Pieces & Assembly
Now you have your pieces for the Off-the-Edge card design designed and ready to cut in Silhouette.
I cut the sentiments from Oracal 651 Black vinyl and applied it to the off-the-edge piece that I cut from white cardstock. I reused a piece of transfer tape to apply it and was careful that it didn’t stick to the cardstock too much. You could also cut from cardstock and glue to the front, but adhesive vinyl makes it a bit quicker to assemble and the glossy sentiment made it pop with the photo paper background too!
Then I took the printed sheet of the alcohol background paper and cut it to 4.25″ x approximately 3.5″ with my paper trimmer. This size depends on how far the left side of the off-the-edge cut comes down. I used a Scrapbook tape runner to adhered the alcohol background to the front of a card base at the top.
You can either buy ready made card bases or make your own. In this card tutorial HERE at 32:30, I show how I cut my own card bases from a letter size sheet of paper.
Then used foam tape to add the off-the-edge cut piece to the front of the card at the bottom.
Off-the-Edge Die Cut Cards with Silhouette
Once you have the basics of the card creation down, you can modify it for different sentiments. Save the angled rectangle as a template for future card cuts.
The first card will take the longest to design, but then you will have all the steps and if you save the files, you can easily open in the future and get to cutting.
You will also notice that a couple of mine got a bit close to the edge and really did go off-the-edge. For these I can just snip that part off before placing in the envelope, but in the future I’ll adjust the design a bit smaller so the offset doesn’t go outside the bounds. Something like that is easily corrected in the software when it happens to you.
Save this for future reference by pinning the image below.
Enjoy !
THANK YOU for your support! How can you help? Click HERE & buy a coffee. Every little bit helps with the cost of running the site.
Silhouette Classes
Never stop learning! Let me help you take the anxiety out of learning with Silhouette and get to creating faster! My Silhouette classes are heavily focused on software, so you can take the skills & techniques taught and apply them to many future projects!
**This post may contain affiliate links. What that means is that I may receive compensation if you purchase through the links I have provided. The price you pay for the product or service is not higher but I may get compensated for sharing.
Have you ever wanted to connect 2 lines together in the Silhouette Studio software?
Two shapes are pretty easy with the Weld tool. Since they are closed shapes, when the shapes overlap, weld can be used to join those shapes and make them cut as one continuous line. But what happens when it’s just line objects and not closed shapes?
Let’s start with a simple example. Using the Line drawing tool on the left side, draw a line. Tip: hold down the Shift key to draw a straight line Then either make a copy of the line or draw another line.
Next select both lines together. Tip: Either left click and hold the mouse button down. Then drag across both objects to drag select. Or click on one object, hold the Shift key down and click on the next objects you want selected.
When multiple objects are selected, you will see selection boxes around each object that is selected.
With both lines still selected, right click and choose Make Compound Path.
Tip: Make Compound Path can also be found under the top menu Object > Make Compound Path or the Modify Panel on the right side
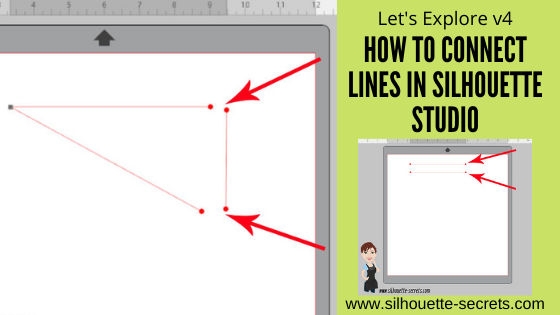
Next, double click on the lines and it should bring up the Edit Points. You will see red dots at the ends of the lines. Red dots mean an end point.
If you ever see a red dot in a design once the edit points have been brought up, that means it’s a broken line. The cut will stop where that red dot is and lift to go to the next cut line.
To connect the 2 lines, double click the red dot to activate it and drag one red dot to another. They will snap together and close.
Once they connect, the dot changes from a red dot to a square, gray edit point.
And that’s it. Now, in this example the 2 lines are connected. It is still not a closed shape, since there are 2 red dots.
Draw another line to connect those 2 lines together.
Follow the steps above to connect the red dots to make a closed shape.
Now the shape is fully closed and will cut as one solid line.
Using Edit Points can increase what you can do with designing. Check out this post – Let’s Explore v4 – Edit Points for more details on edit points and the Edit Points Panel.
The best way you can remember this is to practice. Just draw out a couple of lines on the design screen and connect them together.
Save this for future reference by pinning the image below.
Enjoy !
THANK YOU for your support! How can you help? Click HERE & buy a coffee. Every little bit helps with the cost of running the site.
Silhouette Classes
Never stop learning! Let me help you take the anxiety out of learning with Silhouette and get to creating faster! My Silhouette classes are heavily focused on software, so you can take the skills & techniques taught and apply them to many future projects!
**This post may contain affiliate links. What that means is that I may receive compensation if you purchase through the links I have provided. The price you pay for the product or service is not higher, but I may get compensated for sharing. not higher but I may get compensated for sharing.
Whether you are a beginner or experienced with the Silhouette software, there is always something new to learn in it. I don’t think any one person can remember every single thing this software is capable of. And speaking from my own personal experience, I think all users get in a routine of doing the same things with the same tools and sometimes we don’t even think of a “new” way to do things.
For example, using the Quick Access Toolbar (QAT) versus the panels on the right side.
I am more comfortable using the panels on the right because I like the expanded panel and am just not in the habit of using the quick icons at the top. But, I am getting better at it.
Going through this series, I have learned a lot of new features that I just didn’t use on a regular basis. This is a very powerful graphics program!
Now, if the software seems overwhelming, I would suggest grabbing this free PDF and downloading it to your computer. When you open it and click on the titles, it will take you to a corresponding blog post with more details on that feature.
Today let’s look at the top 10 posts from the “Let’s Explore v4” series that I think will help you learn the software and get you started or more comfortable with designing in the software.
Silhouette Secrets+ Top 10 Let’s Explore v4 Tools
1 – Text Tool & Text Style Panel
Text is one of the first things any user will work with in the Silhouette software. The Text Tools are found on the left side of the software and the Text Style Panel, which allows you to change the properties of the text is on the right side.
2 – Fill Color Panel
I use the fill color panel every single time I open the Silhouette software. Not only does it help you see the design better and give you an idea of how the finished project will look, but it can also make it easier to select the object if it is filled with color.
3 – Line Style Panel
This panel can be very helpful if you want to change the line color of the design so it doesn’t show as a red line or if you are printing a design. Cut lines do not have any weight to them, so if you want to print the lines you would either need to increase the line thickness or choose to “print lines of selected shapes”.
4 – Align Tools
This is another tool that I use every single time I open the software. I like to have my designs and text perfectly aligned and centered in my object. The Align tools are found under the Transform Panel on the right side.
5 – Trace Panel
The trace panel can come in handy for many projects from creating basic designs to print and cut projects with jpeg or png files.
6 – Drawing Tools
These tools can come in handy when you want to create something yourself add your own weeding lines around a design, draw a frame around the design, and many other things. The more comfortable that you get with the software, the more options you will find to create things in it.
7 – Replicate Panel
Want to create an exact copy of the design you just drew or make several copies with the click of 1 button? This can happen under the Replicate Panel.
8 – Offset Panel
Want to make that font a little thicker? The Offset Panel can help with that and so much more.
9 – QAT – Quick Access Tool bar
This is a fluid tool bar that will change depending on what you have selected on the design mat. You will notice that the icons will be the same as the panels on the right side.
With objects selected on the design screen these are the icons you might see in the QAT bar.
Look at all the information in the Quick Access Toolbar. All of this information can also be found on the right side in the Panels, but these are quick buttons to access it as well. There are multiple ways to do things in the software, no one way is right or wrong, but the best way is what works for you.
It is a fluid tool bar, which means that it changes depending on what is selected. If you have text selected on the design screen, then you will see text options in the tool bar.
10 – Edit Points
While this isn’t something that I would label as a beginner tool. I do think knowing what those gray dots are when they pop up is a relief. You don’t need to understand how to work with them right now, but understanding why they appear & how to make them disappear is something I believe is very helpful.
There are so many different tools in the Silhouette software. The best thing you can do is just get started. Play, play, play. Start with 1 project and get that down and then move on to new things.
Save this for future reference by pinning the image below.
Enjoy !
THANK YOU for your support! How can you help? Click HERE & buy a coffee.
Every little bit helps with the cost of running the site.
Silhouette Classes
Never stop learning! Let me help you take the anxiety out of learning with Silhouette and get to creating faster! My Silhouette classes are heavily focused on software, so you can take the skills & techniques taught and apply them to many future projects!
**This post may contain affiliate links. What that means is that I may receive compensation if you purchase through the links I have provided. The price you pay for the product or service is not higher but I may get compensated for sharing.
Have you seen edit points pop up in Silhouette Studio before? Do they intimidate you? Well let’s see if we can change that.
Affiliate links may be present in the following blog post and as an Amazon Associate, I earn from qualifying purchases.
What are Edit points?
Edit points are basically the data points the Silhouette reads to make a particular shape of the object. Each edit point has qualities on how it is supposed to act such as straight line, corner, curved, etc. and this is how a shape is made up.
The edit points will come up on an object if you double click on the object or use the keyboard shortcut letter “A” with the object selected.
If you draw a circle, it is made up of 4 edit points.
A square also has 4 edit points but the type of edit point are different than the above circle.
By clicking on an edit point, you can see what property it has in the Point Editing Panel.
Why Edit Points Might Not Show
In order for the edit points to appear, the object has to be a single object and an ungrouped object.
For instance, if I type out text, it is not treated as a design. So the edit points won’t appear.
If it is converted to a path, the edit points still will not appear because even though it’s acting as a design, it is still grouped together. If the design is ungrouped the edit points will appear because all the pieces are now separate.
Or if the design is made into a Compound Path, then the edit points will appear.
Altering Edit Points
There are many ways to change the edit points.
By clicking on an existing point, it turns white, indicating that it is the point selected.
It will tell you what kind of edit point it is. This one is a corner. Grab the blue squares on either end and this will adjust the outcome of this edit point.
To select multiple edit points, hold down the Shift key & drag the selection box around all the points you would like to select. Then make changes to a group of edit points all at one time by moving or choosing a new property for those selected.
All edit points that are selected will show as white points.
Point Editing Panel
When the editing points are active, the Point Editing Panel should pop up or click on the Edit Points tool on the left side menu.
This panel has many options for how you can alter an edit point(s). The name of each tells you exactly what behavior it will have. Each design you work with will react differently to what is changed.
Remember, edit points are the data points that your Silhouette software relays to your Silhouette machine to connect the cut.
The Cameo machine needs to hit every single one of those edit points in order to make the cut. Some files such as dxf files or traced images can have lots of edit points and this can make the Cameo sound odd when cutting. The Cameo is not broken, but has to connect each of those edit points to make the cut.
Simplifying Edit Points
Some files can have the edit points simplified without changing the look of the design. For instance, this Leafy Mandala by Rhonna Farrer from the Silhouette Design Store has a lot of edit points when I first opened it.
In the Edit Points Panel, select Simplify.
You should notice less edit points in the design.
In this case, the design did not change in the look at all, but the edit points are now much less.
The best way to learn how edit points act is to find a design and just play around with the different options.
While they can look intimidating when they pop up on the screen, once you understand their purpose and how they work, I think it makes it seems a lot less daunting when you see them.
Save this post for future reference by pinning the image below.
Enjoy !
THANK YOU for your support! How can you help? Click HERE & buy a coffee. Every little bit helps with the cost of running the site.
Silhouette Classes
Never stop learning! Let me help you take the anxiety out of learning with Silhouette and get to creating faster! My Silhouette classes are heavily focused on software, so you can take the skills & techniques taught and apply them to many future projects!
**This post may contain affiliate links. What that means is that I may receive compensation if you purchase through the links I have provided. The price you pay for the product or service is not higher but I may get compensated for sharing.
THANK YOU for your support! How can you help? Click the link to buy a coffee. Every little bit helps in the cost of running the site.