Affiliate links may be present in the following blog post and as an Amazon Associate I earn from qualifying purchases.
We are seeing some cooler temperatures here and in a short time the kids will be headed back to school. The summer has gone too fast!
Although I do enjoy Fall and the cooler temperatures, maybe we can hang onto that summer feeling a little bit longer….
The Summer Days of Downloads hosted by Heat Transfer Warehouse
I’m so excited to be participating in this! Heat Transfer Warehouse sent out a request and I’m so glad I answered the call. I love a good challenge and I love learning new things! I’ve been designing in the Silhouette Studio software for over 10 years now and I love to create things!
Grab free designs on the Heat Transfer Warehouse website that are created by other crafters and influencers like me and have fun!
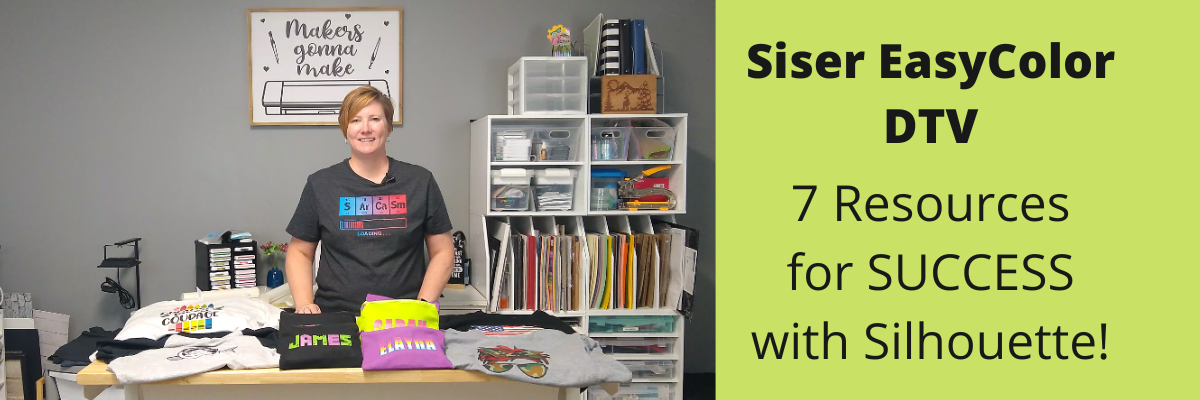
I used Siser EasyColor DTV and print and cut with the Silhouette to create my design, but you can use the SVG file for any materials you want to cut it out of! Adhesive vinyl, HTV, cardstock, and more!
I am sharing it all!!! I ran into some issues and things did not go perfect, but I’m going to share how I made it a successful project in the end. From printer issues to user error, I’ll show you how I fixed both!
I love Siser EasyColor DTV and have been using it for over a year now! My shirts have been through 30+ washes and still look awesome! I wear some of them almost weekly. The biggest thing is to follow the directions for Siser EasyColor DTV exactly! I have several tutorials and updates on my Siser EasyColor DTV results HERE.
Behind-the-Scenes Look
I’ll be sharing a how-to video soon showing the exact steps I took to create this design in the Silhouette Studio software. The hardest part is coming up with the design idea, well…. actually, the hardest part is picking fonts for me. And in this case, I had to use fonts that I knew had a commercial use license and allowed designs to be created and shared. Make sure to read those terms of use for the fonts and designs you get and know exactly what they can be used for!!!
Here is a behind-the-scenes look at my creation process.
I save my work in many steps along the way in case I mess up or change my mind. Now, this is my working file and I started saving as a back up file along the way too! This way if anything happened, I had something to fall back on and I didn’t lose all the hours of work.
It did take time, but I loved it! I love being able to create things and sometimes I lose track of that in all the hustle and bustle!!! I thrive off of being able to create!
Now, let’s zoom in and did you see these color palettes next to my design?
These color palettes helped me to choose colors for my design! So simple!
Check out this tutorial – Create Custom Color Palettes in Silhouette HERE I show you exactly how you can use color palettes in your creations! Want to change up the colors of my SVG file? You can! And you can use color palettes to help too!
Want to create something with this design or simply collect it – grab the file HERE
And stay tuned for a how-to video coming soon! I’ll post the link here when it’s complete!
Save this for future reference by pinning the image below.
Enjoy !
THANK YOU for your support! How can you help? Click HERE & buy a coffee. Every little bit helps with the cost of running the site.
Silhouette Classes
Never stop learning! Let me help you take the anxiety out of learning with Silhouette and get to creating faster! My Silhouette classes are heavily focused on software, so you can take the skills & techniques taught and apply them to many future projects!
**This post may contain affiliate links. What that means is that I may receive compensation if you purchase through the links I have provided. The price you pay for the product or service is not higher but I may get compensated for sharing.
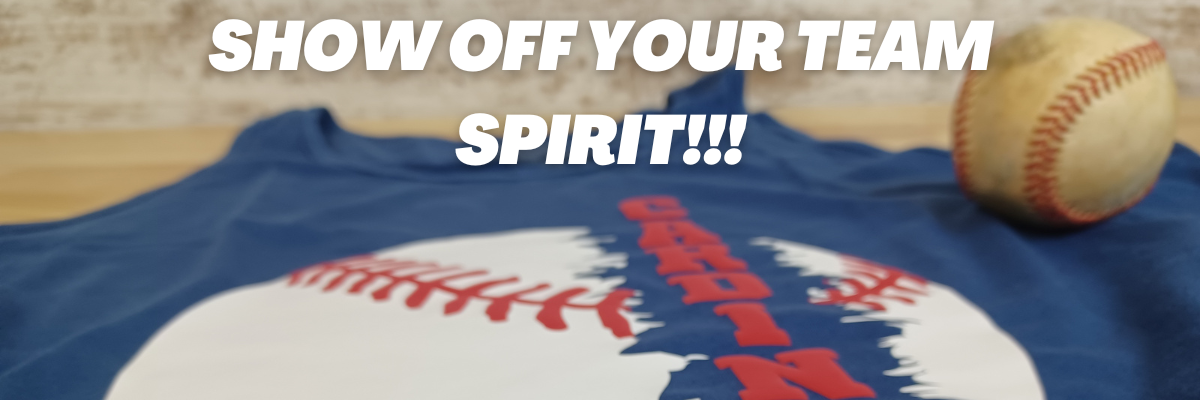
If you have a cutting machine, the possibilities are wide open for being able to show off your team spirit! You could make or embellish anything from shirts, bags, earrings, decals, and so much more!!!
And you can do it without using any trademarked images too! I see so many trademark infringements daily and it’s such as hot topic that I wanted to share some ways that you can show your team spirit with other design ideas.
I have always been a sports fan and played several different sports growing up. Moving locations across the U.S. over the years we have gotten into supporting the local teams where we move. When we moved to the St. Louis region, my friends warned me… Don’t become a Cardinals fan! I had no idea what they were talking about. I didn’t really follow baseball.
And then the first thing the Orthodontist told us was, “The only thing to do around here is watch baseball.” And that the rest is history!
Now I am a baseball fan. In fact, I’m watching right now as I type this post.
No matter what your team or sport, we can still be friends and you can find designs that you like and will show your team spirit off.
I hope this sparks some creative thinking for your future projects! Here are just a few that I’ve created.
Affiliate links may be present in the following blog post and as an Amazon Associate I earn from qualifying purchases.
I am so excited for this one! Like jump up and down, spin around in a happy dance excited!!! I have tried and tried to get Siser Easy Puff to look good and puff up correctly. And I did it! Yay! I think my past problems were my press and getting accurate temperature.
This time I used my new Siser Heat Press and it worked! Even when I had to press it a 2nd time, I didn’t lose the puff completely!
It would probably be a bit puffier if I didn’t have to press that 2nd time, but I am still doing a happy dance that I got it to puff up. I know what errors I was making and I will continue to “perfect the puff”.
Siser Easy Puff is such a neat texture on blanks and I cannot wait to make more!
Don’t give up! If you’ve had issues with a project, just keep trying. Figure out what might be wrong and then try again. The Siser Easy Puff does require a very specific temperature, time, and pressure. But, I knew someday I would get it, if I just kept trying.
I actually have this one already printed on Siser Easycolor DTV but just haven’t settled on what to put it on or how to position it.
Anyone else get something cut and then have a hard time committing? Or maybe you get hung up deciding on a design to cut, that’s also what takes me a long time to decide on. I really don’t know what my hold up is. It is just a t-shirt and I could always print and cut more Siser EasyColor DTV. I just have to do it!
If you have not played with Siser EasyColor DTV, I love it! I have made quite a few shirts with it and have had great results. Find more information on Siser EasyColor DTV HERE.
But you may not like my style or you may find other designs that catch your eye or are looking for a completely different sport! Check out the list of recommended design sites HERE and search for your topic of choice at each. Add them to your wishlist if you don’t want to buy right now so you can come back to easily find them later.
Save this for future reference by pinning the image below.
THANK YOU for your support! How can you help? Click HERE & buy a coffee. Every little bit helps with the cost of running the site.
Silhouette Classes
Never stop learning! Let me help you take the anxiety out of learning with Silhouette and get to creating faster! My Silhouette classes are heavily focused on software, so you can take the skills & techniques taught and apply them to many future projects!
**This post may contain affiliate links. What that means is that I may receive compensation if you purchase through the links I have provided. The price you pay for the product or service is not higher but I may get compensated for sharing.
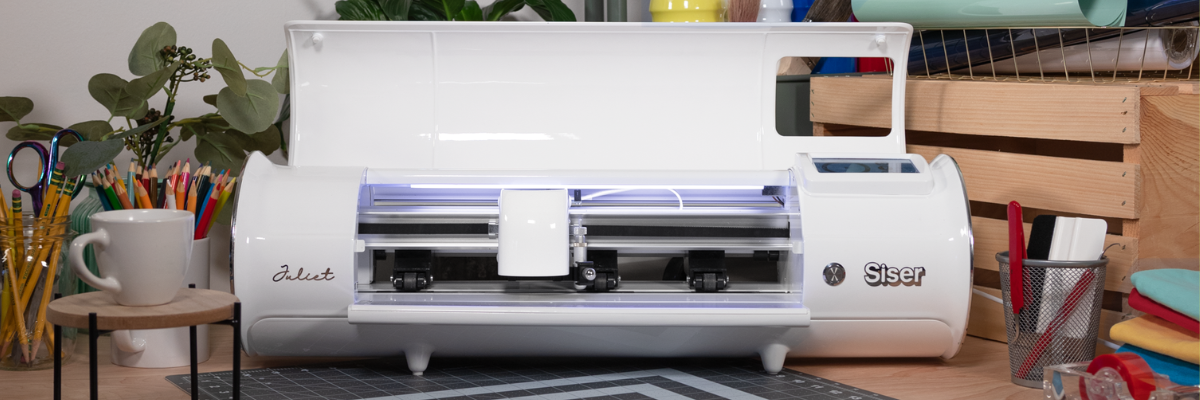
As many of you know, I was invited by Siser to Italy in September 2022 for a product launch. We were given a tour of the Siser headquarters in Italy and a first glance at their new cutting machines. I have been using the Siser Juliet and Romeo machines in my craft projects since last fall when they were released.
Before we go farther, yes, I am still using my Silhouette machines too! I am using both. Sometimes even together for some projects!
This opportunity presented itself at a great time for me and I’ve enjoyed the challenge of learning something new. For me, this is continuing education. I love to find out how things tick and I love new tools!
If you want to see more about my trip seeing the Siser HQ, check out this post – New Release from Siser HERE. I love behind-the-scenes looks at how companies in the industry work!
Since returning from Italy last fall, I have been testing and putting these new machines through the paces. Basically, anything I do with my Silhouette machines, I then try with the Siser Juliet or Romeo. I dive in and really watch how the machine works and what it can do. I’ve learned a lot and feel comfortable sharing that now with others. Check out the Swift Creek Customs YouTube channel to see that side of things!
But, one of the big questions that was asked from the very beginning was – how does it compare to the Silhouette or Cricut machines?
So the first thing I want to say is that it takes time to learn a new machine and the software that runs it. Opening the box and giving a comparison may not reflect accurately on either machine. Now that Siser Juliet and Romeo have been out and I am very familiar with the machine and the Leonardo Design Studio software, I have a few things to share.
A few weeks back I published a new video on the Swift Creek Customs YouTube channel sharing a bit more information. Well, really, I focused on 5 specific topics and demonstrate the differences of each with both brands. I had an ever growing list, but I had to narrow it down to a few key factors.
Do I think the Siser Juliet & Romeo machines are for everyone? No Do I think the Silhouette Cameo machines are for everyone? No To be honest, there are some users that do not have the patience to learn either one or any cutting machine for that matter. Do I think that anyone can learn to use a Silhouette Cameo or Siser Juliet/Romeo machine? YES! If you are willing to take the time to learn, anyone can do it!
But, and a big but here…. YOU are the only one that can determine what machine is good for you and your projects!!! That could be multiple brands of cutting machines that have their strengths in different areas or it could be one model machine only or it could be none at all. But only YOU can decide!
The 5 topics I cover in the video are: – Craft Cutting Machine vs More Professional Machine – Software – Machine Rollers – Print and Cut – Blades, Tools & Cutting Mats
Save this for future reference by pinning the image below.
Enjoy !
THANK YOU for your support! How can you help? Click HERE & buy a coffee. Every little bit helps with the cost of running the site.
Silhouette Classes
Never stop learning! Let me help you take the anxiety out of learning with Silhouette and get to creating faster! My Silhouette classes are heavily focused on software, so you can take the skills & techniques taught and apply them to many future projects!
**This post may contain affiliate links. What that means is that I may receive compensation if you purchase through the links I have provided. The price you pay for the product
Just a quick post to share a very neat tool that I find is going to save me a lot of time in the future!
Affiliate links may be present in the below and as an Amazon Associate I earn from qualifying purchases.What that means is that I may receive compensation if you purchase through the links I have provided. The price you pay for the product or service is not higher but I may get compensated for sharing.
If you have not heard about this awesome company called Dreaming Tree, they are a company that has files for paper crafters of all kinds. A lot of 3-D paper crafting projects, but also flat ones as well!
They have lots of FREE files too in case you just want to play and test whether you will like the files or not.
Make sure to scroll down on each file to see the assembly video that they record for every single svg file they create!
Now, the Dreaming Tree website is not the main news I wanted to share, but it is an awesome site and brings me to the neat tool!
When you download Dreaming Tree files, you will notice that the pieces to each file are saved individually and not all in one svg file. This may seem odd at first, but here is why. This makes the files compatible with many different cutting machines. In the past, some programs changed the way they opened svg files and when the pieces were saved all as one file, it caused issues. This meant that Dreaming Tree had to redesign every single file to be compatible with those changes for certain programs. So instead, they now offer each piece as an individual file. Dreaming Tree has a vast collection of files and some of those can have a lot of pieces. They are so neat when they are constructed!
This also means that you have to open each piece and then merge them onto one file if you so choose.
I have seen so many cool ideas done with this crate on the Dreaming Tree Facebook Group HERE. There are often times that I may not be jumping to grab the design right away when it’s released, like this Father’s Day Crate, but then I see all the amazing pieces of artwork that other users are creating with it in the group and I HAVE to get it!
I also have all the pieces cut to build myself a snowman, but just need to take the time to do that. Hopefully soon!
I hope you have a great day and get to be creative!
Save this for future reference by pinning the image below.
Enjoy !
THANK YOU for your support! How can you help? Click HERE & buy a coffee. Every little bit helps with the cost of running the site.
Looking for more in-depth, step-by-step classes, check out all of my online Silhouette classes on my Teachable site HERE.
**This post may contain affiliate links. What that means is that I may receive compensation if you purchase through the links I have provided. The price you pay for the product or service is not higher but I may get compensated for sharing.
If you follow me on social media you may have seen that I’ve been testing a new machine called the Siser Juliet cutting machine.
While I’ve been bringing you Silhouette information for years, my experience in the craft industry has also lead to new connections and I’ve been getting requests to test products because of my experience. When I was asked by Siser North America if I’d like to test the Leonardo® Design Studio software and the Siser Juliet machine, I was honored. I chose to do so for several reasons but the 2 biggest ones were that I knew I would get questions about a new cutting machine on the market and I know that there are some Silhouette users who are looking to move to the next level. In order to be able to answer those questions, I knew I’d need experience to answer accurately.
Siser invited me to the official launch of Siser Juliet (and Romeo®) in Italy and I jumped on the opportunity. I didn’t even have a passport, but I started the process and all the puzzle pieces fell into place. Which means it was meant to be! Italy was amazing and I loved seeing the behind the scenes of the Siser headquarters. I hope to share more of that coming soon!
In addition to seeing Siser headquarters, we toured Venice, Verona, wandered around Vicenza, made connections in the industry, ate Italian meals, drank wine, laughed, celebrated, danced (if you can call what this gal did as dancing – more like wiggled and moved) and gave each other a hard time!
Selfies with Siser Joe and Sarah Clark (Silhouette Made)
I do think Venice was my favorite, but I think it was because of our tour guide. She was born and raised in Venice. She was amazing! She had personal stories from the city and shared that over the years of touring she had been asked many, many times how she knew certain things. She said she finally settled on an answer “Experience”. I loved that!
It was an amazing trip and hearing from the Siser family directly about how passionate they are about this new launch but also about all of their products. They love what they do! When I was first told about this new machine and how they wanted to romanticize it and incorporate their Italian heritage, I was kind of like… what? But, the more I talked with the Siser folks, I got it! I had the same feelings. I know that will be hard to pass on to you, but I cherish the experience and seeing what I saw.
Photo by Siser at the Castelli di Giulietta & Romeo – Castle Juliet
I have been playing and testing with the Siser Juliet for the last couple of weeks and I have enjoyed the process of learning something new. I do want to disclose that Siser did send me a Juliet cutting machine to test and I am also on the Siser Beta team so I can report feedback to them directly. I am under no obligation from them and my opinions are my own.
Affiliate links may be present in the below and as an Amazon Associate I earn from qualifying purchases.What that means is that I may receive compensation if you purchase through the links I have provided. The price you pay for the product or service is not higher but I may get compensated for sharing.
Now, that I told you where you can find Siser Juliet, let’s take a closer look at her.
Siser Juliet is coming into the market to bridge a gap. This is a gap between the “craft” cutting machines and someone who is looking at a more professional machine which is a large investment & jump.
Siser is a company that manufactures materials that can be used with a wide variety of cutting machines, so they are not trying to come into the market to compete with any machine. Their products are used world wide by all kinds of cutting machine users from small to large.
Siser headquarters warehouse
I even tried to bring a roll home, but was caught in the act by a Siser employee.
Not only did we get a tour of the manufacturing side of things, but we also saw their lab and the testing room too!
This is a glimpse into the testing room. As I mentioned, Siser products are used with a variety of machines from the smallest craft cutter to the largest commercial machines.
I wished that I had counted the number of machines that they had in this one room.
Personally, I love the behind-the-scenes and learning more about different facets of the industry.
This is photo of what was on the testing table when we went through. That stack of materials is all labeled and tested with different machines in their testing room.
Ok, I could go on and on with photos and I hope to share a video tour here soon on the Swift Creek Customs YouTube channel and give a behind-the-scenes view of what I saw.
My goal is not to convince you that you need Siser Juliet, but to provide feedback and experience from working with her to be able to provide educated answers.
The biggest factor in the entire equations of using Siser Juliet will be YOU! Juliet allows you to have more control over things, but YOU will need to learn how she works.
There are several differences in how Siser Juliet work. She operates more like a professional cutting machine vs a “craft” cutting machine.
I do NOT feel that at this time there is any way to accurately and fairly compare Siser Juliet to other machines. There are just too many variables and points to control in order to compare side-by-side. And one of the biggest factors is YOU!
Here are a few differences: – Blade style is a more professional style blade much like a CB09 blade. You replace only the blade tip and not the entire housing. – You set the blade depth. There are no numbers. You measure against your materials and set the depth manually according to what is needed. – Juliet (and Romeo) are a WYSIWYG (what you see is what you get) when you go to load the material and cut. Where you leave the the blade housing is where she will cut. It is NOT in relation to where the design shows on the screen.
Are you seeing a theme here?
YOU are in control of how she works and how successful she cuts. She works, she cuts, she is a zippy little thing!
This is going to be the biggest factor in my opinion and experience with cutting machines in the last 17 years.
This is NOT going to be a cutting machine for everyone! I’ll be 100% honest and up front about that right now. Don’t get me wrong, Juliet is a machine that anyone can learn to use, as well as Leonardo Design Studio. It is not hard! Anyone can do it! But YOU will need to invest the time into learning how to use her properly!
I go into more details about the machine and how it differs from a “craft” cutter in the video. This way you can actually see what I’m referencing about the blade and how to load the cutting mat.
Updated: 11/6/24 – Find more information and 100+ tutorials on Siser Juliet, Romeo & Leonardo Design Studio on the Swift Creek Customs Landing Page HERE
You can also find more details on the Siser website too! Check it out HERE!
No matter what brand of cutting machine you have, I hope YOU use it!
Save this for future reference by pinning the image below.
Enjoy !
THANK YOU for your support! How can you help? Click HERE & buy a coffee. Every little bit helps with the cost of running the site.
Silhouette Classes
Never stop learning! Let me help you take the anxiety out of learning with Silhouette and get to creating faster! My Silhouette classes are heavily focused on software, so you can take the skills & techniques taught and apply them to many future projects!
**This post may contain affiliate links. What that means is that I may receive compensation if you purchase through the links I have provided. The price you pay for the product or service is not higher but I may get compensated for sharing.
Have you heard? If you have been following me on my Facebook or YouTube channels I hope you haven’t missed it!
Affiliate links may be present in the below and as an Amazon Associate I earn from qualifying purchases.What that means is that I may receive compensation if you purchase through the links I have provided. The price you pay for the product or service is not higher but I may get compensated for sharing.
I have been having a ball playing with the NEW Siser EasyColor DTV – printable heat transfer vinyl!
This combines one of my favorite features of Silhouette – Print and Cut – with the possibilities to put full color graphics on garments and objects with a home inkjet printer.
Yes, you read that right! Your home inkjet printer will work. What printer do you need? Any high quality photo printer should work.
I do like this printer because I have the capability to print on 12″ x 12″ cardstock, other large formats, and it has the rear feed tray. Check out this post on How To Print & Cut Larger for more tips.
I wanted to drop in and share some of the tutorials and demos I’ve been doing with this Siser EasyColor DTV.
I ordered mine from The Vinyl Spectrum who has super fast shipping and I added a few Silhouette Autoblades to my order to reach that free shipping minimum. For the super fast shipping I get, I’m happy to pay the shipping, however, I needed a few new blades anyhow.
Now, let’s get on to the EasyColor Information! Check out each video description for more details and links to all the supplies used in each video.
Let’s start with the update after washing because I know many are wondering about the lifespan. First wash and the colors look the same and no lifting on the vinyl. I did follow the care instructions on the Siser website.
Siser has said that they were seeing 20-25 washes before they saw changes in the colors. It will take me awhile to get up to 20 washes, so I’ll update every so often.
Now that you’ve seen the update and how it held up, let’s take a look at how I did this.
I am using a process called Print and Cut with the Silhouette. I released a new video tutorial on Print and Cut in less than 15 minutes to share how I set up the file and was successful in my cutting.
I also shared more tips on print and cut with Silhouette in this video, Tips for Silhouette & Siser EasyColor DTV. In the video, I share some of the most common reasons we see for cutting issues with Silhouette when using print and cut.
Now, this new material is not limited to shirts even though that might be what you see in the majority of testing going on right now. I also used it on these cotton canvas zipper bags and I shared that HERE Back-to-School Goody Bags with Siser DTV.
As you can tell, I’ve had a lot of fun with this new product! I have used several other brands in the past and even taught classes with printable heat transfer paper. The major difference here is that this is actual heat transfer vinyl (not paper) that is printable AND I’ve been successful in getting it to mask and transfer without losing ink.
Make sure to check out the links in each video for the specific supplies I used and for more tips and tutorials on each one. I want you to be successful with this product!
Grab some and just start playing with it!
Check out the Siser Application Instructions HERE.
I would love to see what you are creating with your Silhouette software or machines! Feel free to post on my Facebook group at Silhouette Secrets with EllyMae.
Save this for future reference by pinning the image below.
Enjoy !
THANK YOU for your support! How can you help? Click HERE & buy a coffee. Every little bit helps with the cost of running the site.
Or if you are looking for more in-depth, step-by-step classes, check out all of my online Silhouette classes on my Teachable site HERE.
**This post may contain affiliate links. What that means is that I may receive compensation if you purchase through the links I have provided. The price you pay for the product or service is not higher but I may get compensated for sharing.
Today I wanted to share the Back-to-School goody bags that I made up for my kids friends group! They have been a hit!
This is something that could easily be done for teachers, birthday gifts, girls night out, teenager go bags, a moms gift, or many more ideas!
I loaded these up with a few fun goodies for the kids to enjoy. Not necessarily to take to school with them, but just to have for fun.
Affiliate links may be present in the below and as an Amazon Associate I earn from qualifying purchases.What that means is that I may receive compensation if you purchase through the links I have provided. The price you pay for the product or service is not higher but I may get compensated for sharing.
DO NOT forget to add the TTD Easy Mask to your order also if you are planning to do a print and cut around designs. Solid color designs do not need the mask, but if your design has multiple pieces, you do need the mask to transfer it to your garment.
My daughter picked out the Color fonts to use for the boys and girls bags. If you have never used Color Fonts before, they are fun to play with. Check out the Let’s Explore v4 – Color Fonts tutorial HERE.
I set up the design as a print and cut project and rotated the names to fit as many as I could on the page.
Print and cut is one of my favorite things to do with Silhouette. The color fonts are designed for print and cut projects and are not individual cut pieces. Grab some and start playing!
For more tips on Print and Cut, check out these new videos I released on YouTube
I would highly recommend when working with a product such as the Siser DTV which has a white background, that you utilize the Print Bleed feature in the Silhouette software. This adds a bit of color (called a bleed) around the outside edge of the design, so when you cut around the image, you shouldn’t be left with a white edge. Each design will vary in what print bleed distance works and looks good.
As a note: print bleed is currently broken in the v4.4.9xx series of software versions as of this publishing date. I mention this a few times in the video tutorials above. You can always create your own print bleed by using the Offset Tool around your design. Adjust the distance of the offset as needed and fill it with color.
I would recommend software version v4.4.554 found under the Legacy section if you do want a version that it works properly in.
After printing, I weeded the designs. The Siser EasyColor DTV weeds so smooth with a good cut – it really is like butter.
Next is to cut apart.
Time to mask and press each of the names to the bags. I used a folded up towel inside the zipper bags to help bump up the area being pressed so the seams did not interfere with the pressure on the DTV.
Then I lint rolled the bags, hung the edge of the zipper off the edge of the heat press platen, pre-pressed the bag, and then pressed the Siser DTV onto the bag using the recommended settings from the Siser website.
The Siser EasyColor mask can be reused if no color has transferred from the print or fibers from the garment. I knew to watch for the ink, but the fibers caught me off guard. These black canvas bags, even when lint rolled, left fibers on the mask. These fibers then will transfer over to the next image being pressed. Just something to keep in mind!
What would you use these gift bags for? Leave a comment below or share on the Facebook group at Silhouette Secrets with EllyMae.
Save this for future reference by pinning the image below.
Enjoy !
THANK YOU for your support! How can you help? Click HERE & buy a coffee. Every little bit helps with the cost of running the site.
Or if you are looking for more in-depth, step-by-step classes, check out all of my online Silhouette classes on my Teachable site HERE.
**This post may contain affiliate links. What that means is that I may receive compensation if you purchase through the links I have provided. The price you pay for the product or service is not higher but I may get compensated for sharing.
Affiliate links may be present in the below and as an Amazon Associate I earn from qualifying purchases.What that means is that I may receive compensation if you purchase through the links I have provided. The price you pay for the product or service is not higher but I may get compensated for sharing.
Last week Siser announced a new product called Siser EasyColor DTV. This new product is an actual Heat Transfer Vinyl that can be printed with a home, inkjet printer.
Up until now there has been a product on the market called Heat Transfer Paper, which many users get confused by and call printable HTV. But, it’s really not. It is paper, not actual vinyl. I’ve used several brands and had success with it and have even taught classes using it. Each brand may have different results.
Now, there is a new option out there. Siser EasyColor DTV and I’ve been testing it this past week. So far, I am loving it!
I wanted to share a bit about that process so I made up a “quick” video. I say “quick” because it is longer than I intended as I give a lot of tips about print and cut in the video. We troubleshoot thousands of Silhouette issues each week on social media and most times it is something that can easily be fixed to get successful print and cuts. So I shared several of those tips in the video. I want YOU to be successful and it’s always best to practice the print and cut technique on copy paper or cardstock before using your more expensive materials such as EasyColor DTV.
I have so many ideas to use this material with and cannot wait to share more!
I would love to see what you are creating with your Silhouette software or machines! Feel free to post on my Facebook group at Silhouette Secrets with EllyMae.
Save this for future reference by pinning the image below.
Enjoy !
THANK YOU for your support! How can you help? Click HERE & buy a coffee. Every little bit helps with the cost of running the site.
Or if you are looking for more in-depth, step-by-step classes, check out all of my online Silhouette classes on my Teachable site HERE.
**This post may contain affiliate links. What that means is that I may receive compensation if you purchase through the links I have provided. The price you pay for the product or service is not higher but I may get compensated for sharing.
THANK YOU for your support! How can you help? Click the link to buy a coffee. Every little bit helps in the cost of running the site.