Posted on 3 Comments

Gift Idea for a Crafter

Just popping in really quick to share a new video I released on YouTube sharing some new tools from Crafter Cuts that would be a perfect gift idea for a crafter friend or even yourself!
Who doesn’t need more tools handy when creating?

Check out the video HERE on my Silhouette Secrets+ YouTube Channel to see which tool I’m most excited about!

Affiliate links may be present in the below and as an Amazon Associate I earn from qualifying purchases. What that means is that I may receive compensation if you purchase through the links I have provided. The price you pay for the product or service is not higher but I may get compensated for sharing.

Here is a close up of each of the tool kits I received from Crafter Cuts and what each includes.

Crafter Cuts 7 Piece Vinyl Tool Kit – available in black, blue, or pink

Includes: Scraper, 3″ x 4″ Vinyl Squeegee with felt, 3″ x 2″ Small Vinyl Squeegee, Angled Anti Static Weeding Tweezers, Hook Tool, Pin Tipped Pen with replacement pin, precision knife with 5 replacement blades

Crafter Cuts Deluxe Vinyl Tool Kit

Includes: All Felt 3M Squeegee, Blue Vinyl Squeegee with Felt edge, White Squeegee, Lil’ Chizler Precision Tweezer, Precision knife with 5 replacements, and Crafter Cuts Pick Tools

I’ll have more gift ideas soon!
Now I’m off to play with my new tools and give them a talk about not hiding in “safe” places.

Save this for future reference by pinning the image below.

Enjoy !

This image has an empty alt attribute; its file name is logo.jpg

THANK YOU for your support! How can you help? Click HERE & buy a coffee.
Every little bit helps with the cost of running the site.

Or if you are looking for more in-depth, step-by-step classes, check out all of my online Silhouette classes on my Teachable site HERE.

SS Logo snip it
**This post may contain affiliate links. What that means is that I may receive compensation if you purchase through the links I have provided. The price you pay for the product or service is not higher but I may get compensated for sharing.
Posted on 1 Comment

Back-to-School Goody Bags with Siser DTV

Today I wanted to share the Back-to-School goody bags that I made up for my kids friends group! They have been a hit!

This is something that could easily be done for teachers, birthday gifts, girls night out, teenager go bags, a moms gift, or many more ideas!

I loaded these up with a few fun goodies for the kids to enjoy. Not necessarily to take to school with them, but just to have for fun.

Affiliate links may be present in the below and as an Amazon Associate I earn from qualifying purchases. What that means is that I may receive compensation if you purchase through the links I have provided. The price you pay for the product or service is not higher but I may get compensated for sharing.

I’ve been having lots of fun with this Siser DTV printable heat transfer vinyl and had to give it a try on the canvas bags.

Siser EasyColor DTV can be used with a home inkjet printer and is vinyl, not paper.
It can be found at authorized Siser Distributors and has been very popular since it’s release a few weeks ago.
Here are a few suppliers that I recommend:
Expressions Vinyl
H & H Sign Supply
Sparkleberry Ink – use code SILSECRETS to save 10%
The Vinyl Spectrum

DO NOT forget to add the TTD Easy Mask to your order also if you are planning to do a print and cut around designs. Solid color designs do not need the mask, but if your design has multiple pieces, you do need the mask to transfer it to your garment.

Check out my YouTube channels at Silhouette Secrets+ & Swift Creek Customs for more information and demos on the Siser EasyColor DTV.

Supplies used for this project:
Siser EasyColor DTV – printable heat transfer vinyl
TTDE Mask
Cotton canvas zipper bags
PixelCraft Color Font by Illustration Ink – Design #316342
PickPocket Color Font by Illustration Ink – Design #330129
Lint roller
Heat Press or other heat source
– Assorted Goodies to fill the bags

My daughter picked out the Color fonts to use for the boys and girls bags. If you have never used Color Fonts before, they are fun to play with.
Check out the Let’s Explore v4 – Color Fonts tutorial HERE.

I set up the design as a print and cut project and rotated the names to fit as many as I could on the page.

Print and cut is one of my favorite things to do with Silhouette. The color fonts are designed for print and cut projects and are not individual cut pieces.
Grab some and start playing!

For more tips on Print and Cut, check out these new videos I released on YouTube

I would highly recommend when working with a product such as the Siser DTV which has a white background, that you utilize the Print Bleed feature in the Silhouette software. This adds a bit of color (called a bleed) around the outside edge of the design, so when you cut around the image, you shouldn’t be left with a white edge.
Each design will vary in what print bleed distance works and looks good.

As a note: print bleed is currently broken in the v4.4.9xx series of software versions as of this publishing date. I mention this a few times in the video tutorials above.
You can always create your own print bleed by using the Offset Tool around your design. Adjust the distance of the offset as needed and fill it with color.

I would recommend software version v4.4.554 found under the Legacy section if you do want a version that it works properly in.

After printing, I weeded the designs. The Siser EasyColor DTV weeds so smooth with a good cut – it really is like butter.

Next is to cut apart.

Time to mask and press each of the names to the bags. I used a folded up towel inside the zipper bags to help bump up the area being pressed so the seams did not interfere with the pressure on the DTV.

Then I lint rolled the bags, hung the edge of the zipper off the edge of the heat press platen, pre-pressed the bag, and then pressed the Siser DTV onto the bag using the recommended settings from the Siser website.

I am using a Craft Pro 15″ x 15″ heat press with a slide out bottom platen.
I love this thing!

Ta-Da!

Fill the bag with goodies and gift it to someone!

The Siser EasyColor mask can be reused if no color has transferred from the print or fibers from the garment. I knew to watch for the ink, but the fibers caught me off guard. These black canvas bags, even when lint rolled, left fibers on the mask. These fibers then will transfer over to the next image being pressed.
Just something to keep in mind!

I shared this in my recent
5 Tips for using Siser EasyColor DTV – Printable Heat Transfer Vinyl
video too!

These gift bags could be customized with regular htv, glitter htv, rhinestones, or even a combination of materials too!

Check out the Creating a Rhinestone Design in Silhouette Studio video class HERE.

What would you use these gift bags for?
Leave a comment below or share on the Facebook group at 
Silhouette Secrets with EllyMae.

Save this for future reference by pinning the image below.

Enjoy !

This image has an empty alt attribute; its file name is logo.jpg

THANK YOU for your support! How can you help? Click HERE & buy a coffee.
Every little bit helps with the cost of running the site.

Or if you are looking for more in-depth, step-by-step classes, check out all of my online Silhouette classes on my Teachable site HERE.

SS Logo snip it
**This post may contain affiliate links. What that means is that I may receive compensation if you purchase through the links I have provided. The price you pay for the product or service is not higher but I may get compensated for sharing.
Posted on 1 Comment

Snowman TP File

At the beginning of this year I did a a couple blog posts on how to create these TP Snowman.
These were such a fun neighbor gift to create!
And they were a big hit!

In the first post I published – Designing in Silhouette, I show how you create your own snowman using the tools in the Silhouette Studio software. This is a great way to learn how to use your software and the tools available.
I shared the steps in both written and video format for the post.

A group member requested the file I created, so I have made it available to download
If you would like to use the exact file I created for your own TP Snowman, you can download that file
HERE

In the second blog post tutorial – Building a TP Snowman, I shared how I embellished my TP snowman with a 3-D top hat, different snowman faces, and added a custom print and cut tag to the backside.

I’d love seeing what you are creating with your Silhouette machines or software.
Feel free to post photos or questions on my Facebook group at 
Silhouette Secrets with EllyMae.

Save this for future reference by pinning the image below.

Enjoy!

This image has an empty alt attribute; its file name is logo.jpg

THANK YOU for your support! How can you help? Click HERE & buy a coffee.
Every little bit helps with the cost of running the site.

Or if you are looking for more in-depth, step-by-step classes, check out all of my online Silhouette classes on my Teachable site HERE.

SS Logo snip it
**This post may contain affiliate links. What that means is that I may receive compensation if you purchase through the links I have provided. The price you pay for the product or service is not higher but I may get compensated for sharing.
Posted on 4 Comments

Gift ideas with your Silhouette Curio machine

I love that with the Silhouette machines you can create custom gifts that are unique to be given out. Or if you end up really liking it, keeping if for yourself – shhhhh!

A few weeks back I did a post on gift ideas you can create with your Silhouette Cameo or Portrait. Well the great news is, all of those ideas could also be completed with a Curio as well, since the Curio can cut all the same materials that the Cameo or Portrait can.
Check out that post here:
5 Gift ideas created with Your Silhouette

Today, I have more gift ideas that can be created with your Silhouette Curio machine.
These gift ideas are specific to the Curio as the Cameo and the Portrait are not designed for etching. For a little bit more information on that check out this post here:
Etching with your Silhouette machine

Instead of rushing at the end of the year, let’s start thinking about it, making lists, gathering supplies, and getting things done now.
Then we can enjoy the time later!
Just make a list of the gifts you have already done and put the list & gifts in a safe place.
Just remember where that “safe” place is.

Affiliate links may be present in the following blog post and as an Amazon Associate I earn from qualifying purchases.

Gifts with the Silhouette Curio

1 – Acrylic etched ornament or decor

Noel Design by Sweet Afton – Design #334940

Supplies used:
Silhouette Etching tool
3″ round Acrylic disc from Craft Chameleon found HERE
3″ round Curio Template from Craft Chameleon found HERE
Oracal 651 Green adhesive Vinyl
Oracal 651 Red adhesive Vinyl
Vinyl retailers:
Expressions Vinyl, Heat Press Nation, Swing Design,
U.S. Cutter, The Vinyl Spectrum

Beach Blessing by Deborah Stine – Design #62386
Snowflake Wonder Circle Poem by Snapdragon Snippets – Design #72245

Supplies used:
Silhouette Etching tool
5″ Round acrylic disc from Craft Chameleon found HERE
5″ Circle Curio Template from Craft Chameleon found HERE
Oracal 651 Teal adhesive Vinyl for Beach Blessing decor
Etched Vinyl for Snowflake decor
Vinyl retailers:
Expressions Vinyl, Heat Press Nation, Swing Design,
U.S. Cutter, The Vinyl Spectrum

Acrylic Etching classes:
Basic Acrylic Etching Class
Basic Acrylic Etching & Design Class

Supplies used:
Silhouette etching tool
4″ x 6″ acrylic photo panel from Craft Chameleon found HERE
Wood blank
Screws
Paint or stain

Class:
Heart Mandala Acrylic Etched Silhouette video course

2 – Acrylic etched light base

Supplies used:
Silhouette Etching tool
Lighted base for Curio with round insert by Craft Chameleon found HERE
Curio Template by Craft Chameleon found HERE

Acrylic Etching classes:
Basic Acrylic Etching Class
Basic Acrylic Etching & Design Class

3 – Acrylic etched coasters

Supplies used:
Silhouette Etching Tool
Acrylic coaster from Craft Chameleon found HERE
Coaster Curio template from Craft Chameleon found HERE
Eat, Sleep, Coffee Repeat by Sophie Gallo – Design #230872
Less Monday More Coffee by Tanya Batrak – Design #209927
Yes. Coffee by Kolette Hall – Design #171334
But first Coffee by Lilium Pixel Svg – Design #242962

4 – Wine themed set

Supplies used:
Silhouette Etching Tool
Wine Caddy
Acrylic Wine Caddy from Craft Chameleon – found HERE
Curio wine caddy template from Craft Chameleon – found HERE
Silhouette Curio Large Base – Silhouette America, Swing Design, or Amazon
Wine Charms
15/16″ acrylic disc from Craft Chameleon – found HERE
Wine Charm Rings from Craft Chameleon – found HERE
15/16″ Curio Template from Craft Chameleon – found HERE
Wine themed coasters
Acrylic Coaster from Craft Chameleon – found HERE
Coaster Curio template from Craft Chameleon found HERE
Mom’s Fidget Spinner by Sweet Afton – Design #202772
Uncork & Unwind by Sarah Hurley- Design #236620
Wine Goes in Wisdom Comes Out by Sarah Hurley- Design #279372
When in Doubt Add More Wine by Megan Hardy Designs – Design #124514

Acrylic Etching classes:
Basic Acrylic Etching Class
Basic Acrylic Etching & Design Class

5 – Embossed key fob & earrings

Flower by Wild Pilot – Design #274519

Supplies used:
ReaLeather Tooling Leather – Hobby Lobby
Silhouette Fine Embossing Tool – comes with the Curio
Key ring
Rivets – screw rivet or hammer set rivets by Tandy (I do not recommend cheap ones)
Rivet Setter if needed – Amazon
Leather Punch – Michaels or Amazon – highly recommend if working with leather
Jump rings
Fishhook earrings
Bent Nose pliers (2)
Eco Flo Gel Antique – Tan
Wool Dauber
Sponge – Michaels or Amazon

Class:
Leather Embossing class with Silhouette Curio

6. Personalized etched metal sheet in a frame

Anniversary gift

Supplies used:
Silhouette etching tool
Silhouette metal etching sheets
5″ x 7″ black frame

Metal Etching classes:
Beginner Metal Etching class
Advanced Beginner Metal Etching with placement

7. Etched Metal Bottle Openers

Supplies used:
Silhouette Etching Tool
Stainless Steel Bottle Openers from Craft Chameleon – found HERE
Curio Bottle Opener template from Craft Chameleon – found HERE

Hopefully this have given you some ideas of things you can create with your Silhouette Curio and give as gifts and the resources to find the supplies. These are things that you could personalize with all kinds of ideas and give through out the year for all occassions.
I love that I can make custom creations with my Silhouette machines!

I love to see what you are creating with your Silhouette machines! Feel free post on the
Silhouette Secrets+ Facebook Group.
We love to see what you are doing and creating with your Silhouette machines!

Save this for future reference by pinning the image below.

Enjoy!

This image has an empty alt attribute; its file name is logo.jpg

THANK YOU for your support! How can you help? Click HERE & buy a coffee.
Every little bit helps with the cost of running the site.

Or if you are looking for more in-depth, step-by-step classes, check out all of my online Silhouette classes on my Teachable site HERE.

SS Logo snip it
**This post may contain affiliate links. What that means is that I may receive compensation if you purchase through the links I have provided. The price you pay for the product or service is not higher but I may get compensated for sharing.
Posted on 4 Comments

Bus Driver Appreciation gift

Over on the Silhouette School blog today I showed how to use the Cut by Fill Color option to create a layered vinyl decal for perfect placement.

 IMG_2823

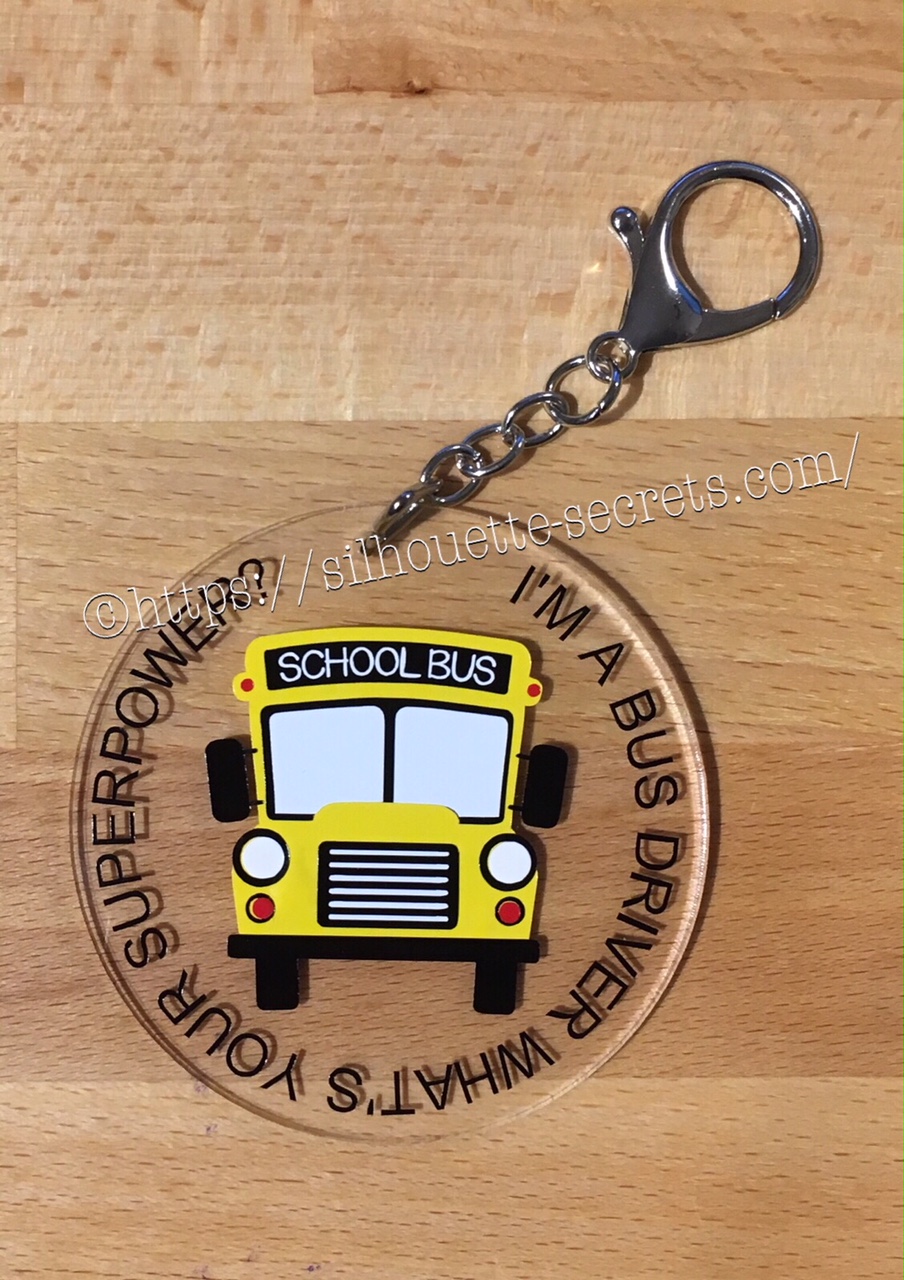
Now I’m going to show you how I took that design, shrunk it down and used the same technique to create a bag tag for our Bus Driver.

I started with a 3″ clear acrylic circle blank from Craft Chameleon.

IMG_2824

I love that Craft Chameleon acrylics come with a cut file included. I opened up the template for this shape and copied and pasted it to a new design mat to use as my base. Or you could draw a perfect circle by holding down the Shift key and then resizing the circle to the exact dimensions under the Transform Panel – Scale tab.

Base Template

Now, I can use this to create my design in.

I took the School bus design by Kelly Lollar Designs that I used as an example in my guest post, and shrunk it down with the registration (layering) marks. I wanted to make sure that the bus fit in the center of the acrylic shape with space around the edges for text.

 Bus centered

Now, I duplicated my circle and made it a little bit smaller. This is so the text will fit down inside of the acrylic shape better. Move the original 3″ circle off the mat as it’s not needed any longer or you can delete it.

Then select just the bus and the circle and use the Align Tab in the Transform Panel to Align Center or from the QAT (Quick Access Toolbar). Do not include the registration (layering) marks in this, as it is just the bus and circle we want to center together.

Align center copy

Now, type out the text, select the font style and size. Double click back on the text to get the circle in the bottom left corner. Grab that circle and drag it to your circle shape.

Typing text copy

As you drag it to the circle you will notice it attaches to the circle. Play around with the alignment of the text to your liking and then use the slider bar to increase the distance from the circle either inside or outside of the circle.

Text to shape copy

Now, I decided to increase the Character Spacing under the Text Style Panel, just a bit on my letters to spread it out a bit. And then readjust your words around the circle. Each Font style that you choose will give you different looks, so you will need to adjust for whatever you choose.

Character spacing copy

Now, once the text is modified, it will no longer be editable text. This is a good time to make a copy of the text & circle and pull it off the mat, just in case you want to edit it later. If you select only the text to pull it off, it will release from the shape, so you want to select both the text and the shape and make a copy.

In order to separate the text from the circle, right click on the text and choose Convert to Path.

Convert to Path copy

And now, move the circle off the mat as we do not want it to cut.

Circle released

Now, we are ready to cut out decal just as I detailed in the Silhouette School guest post.

Once we have our decal cut out and layered together, we are ready to apply to the acrylic shape.

I went ahead and placed the shape on my Silhouette cutting mat on the sticky side, so it wouldn’t move while I applied the decal. The acrylic blanks come with a protective covering on them to prevent scratching before use, so make sure to peel that off before you add your decal.

IMG_2814

And then I lined the decal up and placed it down, burnishing it well and took the transfer tape off.

IMG_2815_edited

And with any project there’s always 1 piece that may not work just right. As you can see I’m missing the School bus title on it. This did not weed well when I was layering the decal and after messing with it, I decided I’d just re-cut it and apply.

I duplicated the design and then un-grouped everything and deleted all but the School Bus. Then I duplicated the School bus 3 times just in case…. if I had only cut it once you know it wouldn’t have weeded correctly, but since I cut it 3 times….. all 3 weeded beautifully with reverse weeding.

IMG_2817_edited2

Then I gathered the rest of the tools to attach the pieces of the bag tag.

IMG_2819

I just received these bent nose pliers from Craft Chameleon and using them 1 time, I’m in love with them. They are one of those tools like my Close to My Heart nonstick scissors that will be my go to tools. Now, I could have just gone to the garage and “borrowed” a couple pairs of pliers from there, but these were the perfect size for my hands and worked wonderfully. I am so glad I ordered them after watching Craft Chameleon’s live FB video a few weeks ago.

And now I have a little gift to give to the bus driver.

temp

Can you think of things you might layer with adhesive vinyl? Those first few times you attempt it can seem daunting, but it is another project that takes practice and the layering (registration) marks make it much more manageable to layer a design. What will you design and cut?

Enjoy !

THANK YOU for your support! How can you help? Click HERE & buy a coffee. Every little bit helps with the cost of running the site.

Looking for more in-depth, step-by-step classes, check out all of my online Silhouette classes on my Teachable site HERE.

SS Logo snip it

**This post may contain affiliate links. What that means is that I may receive compensation if you purchase through the links I have provided. The price you pay for the product or service is not higher but I may get compensated for sharing.

Posted on Leave a comment

Quick gifts

I love being able to whip up a quick gift to send to a friend.

I had a towel in my stash & it seemed to be whispering my name. So I went shopping in the Silhouette Design store to find a cut file I liked.

After a measurement error & my 2nd scrap of black HTV, I ended up with a nice, simple gift I could throw in my care package.

Yes, even seasoned Silhouette users make mistakes. And do you know, often times you learn more from making a mistake than not. At least in my experience, I remember things better the next time when I’ve made a mistake or had to research how to do something. Does that mean I won’t make the same mistake again? No! But I may laugh at myself more the next time!

How do you learn to use the machine? You play, you practice, you research, you create!

I love learning what new technique or new project I can do with my Silhouette Cameo.

Enjoy !

THANK YOU for your support! How can you help? Click HERE & buy a coffee. Every little bit helps with the cost of running the site.

Looking for more in-depth, step-by-step classes, check out all of my online Silhouette classes on my Teachable site HERE.

SS Logo snip it

**This post may contain affiliate links. What that means is that I may receive compensation if you purchase through the links I have provided. The price you pay for the product or service is not higher but I may get compensated for sharing.

Posted on Leave a comment

Personalized Christmas gifts

After one of my retreats with Terri Johnson Creates this summer, I brought home my finished glass etching ornaments and my husband asked if I could make something for a few of his co-workers. It started as a personalized ornament, but then we changed it to beer glasses….. I love that I can personalize an item with my Silhouette and a few basic supplies.

He thought of the individualization he wanted on each and that is what I worked with.
I found images of what he wanted and traced them and then worked with a font that would be bold and readable.

Here are the designs I came up with:
christmas-glasses

I cut these out of vinyl and then we applied them to the glasses. Hubby wanted to help with the project and remembered to grab a couple photos of the process.

img_5165

Hubby is applying the vinyl to the glass above and smoothing it out to make sure it has a tight seal around the edges where we want to apply the etching cream.

img_5166

Then we apply painters tape around the edges of the design, just in case the etching cream goes outside the area of the vinyl.

img_5188

And I am amazed each time I rinse that etching cream off and peel back my stencil. I love this etched glass look and it really adds to these plain ole glasses.
Now, I wish I had remembered to take photos of the rest of them before he took them with him to work.
There’s always something I forget!!!

Another Christmas gift complete!

Enjoy !

THANK YOU for your support! How can you help? Click HERE & buy a coffee.
Every little bit helps with the cost of running the site.

Looking for more in-depth, step-by-step classes, check out all of my online Silhouette classes on my Teachable site HERE.

SS Logo snip it
**This post may contain affiliate links. What that means is that I may receive compensation if you purchase through the links I have provided. The price you pay for the product or service is not higher but I may get compensated for sharing.