At the beginning of this year I did a a couple blog posts on how to create these TP Snowman. These were such a fun neighbor gift to create! And they were a big hit!
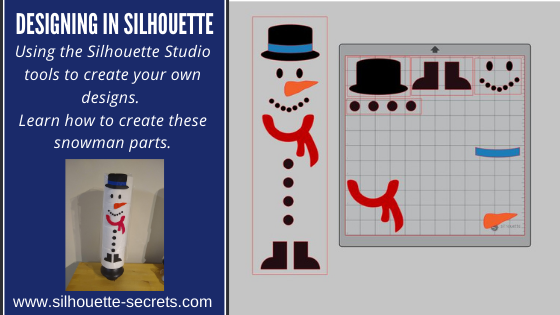
In the first post I published – Designing in Silhouette, I show how you create your own snowman using the tools in the Silhouette Studio software. This is a great way to learn how to use your software and the tools available. I shared the steps in both written and video format for the post.
A group member requested the file I created, so I have made it available to download If you would like to use the exact file I created for your own TP Snowman, you can download that file HERE
In the second blog post tutorial – Building a TP Snowman, I shared how I embellished my TP snowman with a 3-D top hat, different snowman faces, and added a custom print and cut tag to the backside.
I’d love seeing what you are creating with your Silhouette machines or software. Feel free to post photos or questions on my Facebook group at Silhouette Secrets with EllyMae.
Save this for future reference by pinning the image below.
Enjoy!
THANK YOU for your support! How can you help? Click HERE & buy a coffee. Every little bit helps with the cost of running the site.
Or if you are looking for more in-depth, step-by-step classes, check out all of my online Silhouette classes on my Teachable site HERE.
**This post may contain affiliate links. What that means is that I may receive compensation if you purchase through the links I have provided. The price you pay for the product or service is not higher but I may get compensated for sharing.
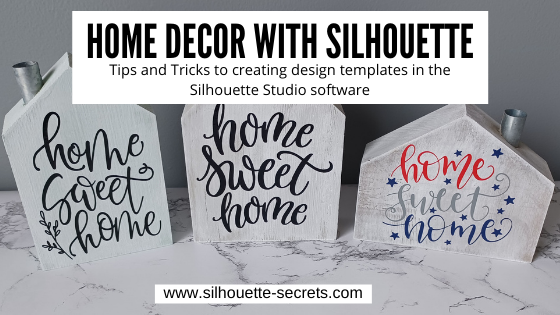
Using the Silhouette Software to Help Design Home Décor
I always have my eye out for things that I can use in creating with my Silhouette machine. Target had these little wooden houses available in their Dollar section.
After debating with my inner self, I finally picked up a set. I always have this inner dialog on – can I make that? Will I make that? Yes, I can cut the wood, but when will I get it done? Right now, in the process of moving, our wood shop is not set up, so I did it. I bought wood shapes.
If you have access to a saw, you could create your own shapes. This tutorial is not limited to these little house shapes, but think about the supplies you have on hand and you can use this same technique for any blanks you use.
Affiliate links may be present in the following blog post and as an Amazon Associate I earn from qualifying purchases.
Next, gather the rest of the supplies. – Paint – Foam brush – Paint palette or small dish – Sponge – Painters Tape – Adhesive Vinyl – Transfer Tape – Squeegee – Weeding tool
Tape off any sections needed with the painters tape. In this case, each house has a metal chimney.
Paint the houses any color you want. I chose to paint a solid color of gray, light blue, or dark gray as the first coat and then used the white chalk paint with the sponge on top of that to give it a distressed look.
Let the wood blanks dry completely.
Next, measure the space of each blank and write that down.
This is just a rough draft and does not have to be perfect or to scale.
Using the information from your measurements and drawing, draw shapes in the Silhouette software to design use as “design templates”.
For these houses I started by using a rectangle under the Drawing Tool on the left side and then used the Edit Points to pull up a point in the roof.
Check out this video tutorial showing the full process of drawing the shapes in Silhouette Studio.
Once all the designs are sized how you want them to cut, move the designs around on the virtual mat to cut out each color vinyl you want them in.
Then send to the Silhouette machine to cut all the adhesive vinyl pieces. I cut everything from Oracal 651 adhesive vinyl. I have been having an issue with the vinyl cutting too deep into the backing using the preset settings, so I am using the settings of: Blade depth – 2 Force – 5 Speed – 5 With a Silhouette Autoblade and it is cutting, weeding, and transferring beautifully.
Cut settings depend on many variables and test cuts will be the way to find out what is going to work best with your material and blade. For more tips on cut settings check out this post – Perfect Cut Setting in Silhouette.
Carefully weed the excess vinyl from around the designs.
This takes practice and the cut settings can make a big difference in the ease of weeding. Do not rip it off like a bandaid.
After all the weeding is done, apply vinyl to blanks
Here is a quick real time video of the application process on one of the wood blanks.
In the above video, I reference a recent tutorial on the Smart Snapping lines. This can be a very helpful tool as shown in the video. Check out the Let’s Explore v4 – Smart Snapping post HERE
And now you have some seasonal or year round décor.
Double sided means that they can pull double duty in your seasonal decorations.
And if I were to ever want to change the designs out, I would just carefully remove the vinyl. Sand it if needed and repaint, then cut and place new vinyl designs on them.
Keep in mind that you can use these tips & techniques for any blanks you might have!
Save this for future reference by pinning the image below.
Enjoy!
THANK YOU for your support! How can you help? Click HERE & buy a coffee. Every little bit helps with the cost of running the site.
Or if you are looking for more in-depth, step-by-step classes, check out all of my online Silhouette classes on my Teachable site HERE.
**This post may contain affiliate links. What that means is that I may receive compensation if you purchase through the links I have provided. The price you pay for the product or service is not higher but I may get compensated for sharing.
The Knife Tool in Silhouette Studio can be an awesome tool to add into created and editing designs.
One thing to keep in mind is that the Knife tool can be data heavy because you are asking the software to reorganize all the data of the file or the area that you are trying to “cut” through.
If you are not familiar with using the Knife Tool, I recommend reading through this tutorial explaining all of the features on the Knife Tool Let’s Explore v4 – Knife Tool post HERE
Depending on the project that you are working on you may want to increase the size of the Knife Line that is going to be cut. For instance, if you are cutting a “bridge” for a stencil, you could increase the Knife Line width in order to make it a little wider “bridge”.
I am going to use the stencil project as an example.
If I want to create a “bridge” on the R and the A in the word CREATE, I can use the Knife Tool to draw a line. By holding the Shift key down when using the Knife Tool, it draws a straight line. When increasing the Knife line thickness, make sure to uncheck the Auto Apply box. This will allow us to make changes to the Knife line before they actually “cut” through the design.
Let’s take a closer look at the size of the default Knife line.
The width of this line is really small. If we were to cut this line, it would just make a slice through the R and not create an actual “bridge” with any width to it.
With the Knife line selected, open the Line Style Panel on the right side.
Next to the Thickness in the Panel, increase pt size and you will see the Knife line grow in thickness.
Next, click Apply in the top Knife Toolbar.
It will now “cut” a thicker line where we have placed the Knife line.
Here is a comparison of the default knife size versus the thicker line we created.
On the left is the thicker knife line we just created and on the right is the default line.
Play with the pt thickness of the line. Each design or project may vary. Larger designs may need larger size “bridges” or cut lines.
Try different line thicknesses or even rotate the line in order to create different effects for your design.
Once you are done editing the text, make a copy of everything and pull it off to the side. It’s always a good idea to have an original. Then select the entire design and text, right click and choose Make Compound Path, then fill it with color. It will give you an idea of what the stencil will look like.
I challenge you to just open the software and just play! We would love to see what you are creating or learning with! Feel free post on the Silhouette Secrets+ Facebook Group.
Save this for future reference by pinning the image below.
Enjoy!
THANK YOU for your support! How can you help? Click HERE & buy a coffee. Every little bit helps with the cost of running the site.
Or if you are looking for more in-depth, step-by-step classes, check out all of my online Silhouette classes on my Teachable site HERE.
**This post may contain affiliate links. What that means is that I may receive compensation if you purchase through the links I have provided. The price you pay for the product or service is not higher but I may get compensated for sharing.
So you want to learn to design in the Silhouette software? I see user’s asking how to create their own designs in Silhouette often. And it can be done. The more familiar you can become with the tools in the software, the easier things will be for you to create designs. The more you do it the more you will start to use those tools without even knowing you are doing it! The absolute best thing you can do to learn the software is to dive in. Follow this step-by-step, even if you never make the finished physical project. You will have created the design yourself, used many tools in the Silhouette software, and learn new things as you do it.
Affiliate links may be present in the following blog post and as an Amazon Associate, I earn from qualifying purchases.
A group member had sent a message asking if I knew where to buy a file. I did not find the exact file, but I started looking at it and decided it was a great way to show how you can create your own designs. After all, if you think about it, designs are just shapes combined to make up an image. This little snowman are created from stacking toilet paper on a new toilet plunger. It has a cellophane gift bag that the adhesive vinyl is applied to and then it is slid down over top of the toilet paper rolls.
The first one I created, I wanted it to be all from creating the entire design in Silhouette.
First, measure the 4 rolls of TP or the blank that you are going to be applying it to. My TP rolls are 5″ x 17.25″ when stacked on top of each other. Using the Draw Rectangle tool & Scale tab, draw a rectangle 5″ x 17.25″ so you know what area you have to design within.
Next, let’s draw the boots. Using the drawing tools again, draw a rectangle. Then using the Flexishape tools, draw a half circle. Flexishapes are a Designer Plus or Business Edition upgrade feature. It is one reason I would highly recommend upgrading the software. Hold the Shift key down when you draw the flexishape and it will snap to 0 degrees. Align the half circle with the bottom of the rectangle using the Align tools. Select both shapes and make a copy. Move it off to the side, just in case it is needed later. Select both the original rectangle and the half circle. Right click and choose weld. Fill with color using the Fill color Panel.
Use the Replicate Mirrored tool to make a 2nd copy. Then use the Align tools to line the boots together at the bottom. Once aligned, right click and choose Group.
Now let’s draw the buttons. Choose the Draw Ellipse tool on the left side. Then hold the Shift key down to draw a perfect circle. Fill the circle with black using the Fill Color Panel or QAT (Quick Access Toolbar). Duplicate the circle 3 times up. Move the top circle up a bit. Select all 4 circles – choose Align Center. Then choose Vertical Spacing. Group together once Aligned.
Working up, the scarf is next. Under the Flexishapes, click on the draw arc tool. Then click in the middle of the rectangle and draw a line to the right a little ways. Move the mouse to the left and it will draw the arc. Adjust the middle arrows to make it thinner or wider.
Once done, right click and choose Convert to Path. Double click on the design to bring up edit points. Click on the corners of the arc and choose Make Curve in the Edit Points Panel.
Choose the Draw a Curved Shape tool. Then draw a “tail” for the scarf. Play around with it until you like it. When finished, select both the arc and the tail, right click and choose Weld.
Fill it with red color from the Fill Color Panel on the right side or in the QAT (Quick Access Toolbar).
Next, let’s draw the mouth. Using the Draw Ellipse tool on the left side, hold down the Shift key and draw a small circle. Fill the circle with black using the Fill Color Panel. Use the Replicate Panel to replicate the circle 5-6 times.
Arrange the circles in the shape of a smile by clicking on each and moving. Select all of mouth pieces. Use the Align tools to space them Horizontally from each other. Arrange how you like. Select all the mouth pieces, right click and choose group.
Now let’s draw the carrot nose shape. Click on the Flexishape lighting bolt. Draw a small shape. Then adjust using the red dots as desired. Right click on the shape and choose Convert to Path.
Then double click to bring up the Edit Points. Hold the Shift key down and drag to select across the entire design. This will select all of the edit points at once. Choose Make Curve.
Click on individual edit points to delete a few on the inside. Adjust the design as desired.
And now the eyes, choose the Draw Ellipse tool and draw a small oval. Fill it with black from the Fill Color Panel/QAT. Then duplicate and move to the right. Select both of the ovals, use the Align Middle tool and group them together.
The final piece to design is the hat. To do this we will use the Draw ellipse and rounded rectangle tool. Draw one oval for the bottom brim. Make a copy and move it above the first. Scale the 2nd oval down for the top of the hat by grabbing the corner bounding box and moving it in. Use the Align tools to center the ovals together. Then draw a rounded rectangle between the ovals. Use the Align tools to center the shapes together.
Make a copy and pull it off to the side. Select both ovals and the rounded rectangle, right click and choose Weld.
Make a copy of the welded design and pull it to the side. Then fill the original design with black using the Fill Color Panel.
Next, make a copy of the bottom oval on the hat shapes copy. Bring it over to the and place it were the brim meets the stack of the hat as shown.
Select the hat and the 2nd oval and use the Align tools to align the middle.
Next, with both objects still selected, open the Modify Panel and choose Crop.
Make a copy of the bottom oval again and drag it to the top of the cropped section. Use the Align tools to align the middle of the 2 shapes.
With both shapes selected, choose Subtract under the Modify Panel.
Fill the hat band with color and move it on top of the original hat. Use the Align tools to make sure it’s aligned middle.
Arrange the snowman pieces as desired to see how it will fit on your space.
Congratulations! You created your own design! Now, that may seem like a lot of steps or using a lot of tools, but like I said above, it is a design you have drawn yourself and the more you use the tools in the software, you will start to use them without even thinking about it. Hopefully you picked up on the fact that we continued to use the same basic tools over and over.
If you are cutting the finished design, arrange all the pieces to cut out of the different colors of vinyl.
Check out this video showing all of the steps to create the snowman as well.
If viewing by email, please click the photo to open up the YouTube video.
Supplies used: 4 rolls of TP per snowman New plunger – Target $4.99 Clear gift basket bag Adhesive Vinyl Silhouette Studio Software
The more you use the tools, the better you will get. And sometimes, I’ll be honest, the only way to know what is going to work for the design you are creating is to push the buttons and use the UNDO button.
Or use Ctrl+Z on PC or Command+Z on Mac for the keyboard shortcut
I would highly recommend getting into the software and just start creating!
Even if you do not cut the snowman, I would love to see the snowmen design that you make or any other design you have created using the tools in the software!
Feel free to post on my Facebook group at Silhouette Secrets with EllyMae. If you have questions feel free to post below or on the Facebook group too!
Save this for future reference by pinning the image below.
Enjoy!
**This post may contain affiliate links. What that means is that I may receive compensation if you purchase through the links I have provided. The price you pay for the product or service is not higher but I may get compensated for sharing.
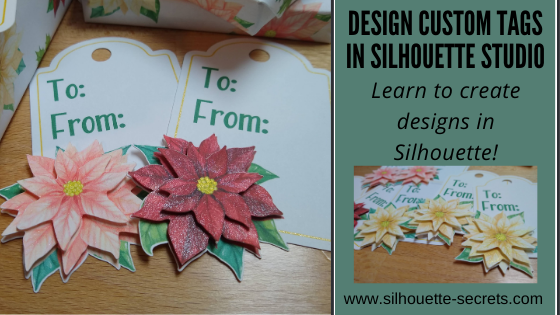
The gift tag was created from scratch in the Silhouette Studio software with just a few basic shapes.
Step 1 – Using the Drawing Tools on the left side, draw a rounded rectangle and a oval. Place the oval at the top of the rounded rectangle. Use the Align Center tool to center the oval with the rounded rectangle.
Quick Tip: The QAT or Quick Access Toolbar contains the most common used tool quick keys at the top of the software. This is dependent on what objects are selected. You will see the quick keys change depending on the type of object – for instance, text versus designs.
Step 2 – Select the rounded rectangle and oval, right click and choose Weld. Use the Drawing Tools on the left side, draw a small circle. Hold the Shift key down while drawing to draw a perfect circle. Place the circle towards the top middle of the tab. Use the Align Tools to center it with the tag shape.
Step 3 – Select the tag shape and then choose the Offset Panel and choose Internal Offset. Adjust the Offset distance if desired – I used the default. This is creating the line to draw using a sketch pen around the inside of the tag.
Step 4 – Select the Internal Offset and then change the line color to blue in the Line Style Panel. This will be the sketch line to be done with the gold pen.
At this point I would make a copy of the entire design and move it to the left side of the cutting mat in the holding area, so you have an original to go back to if needed.
Double click on the file from the library and depending on the software version you are using it may open on the same design mat. If not, right click on the design in the Library tab, then choose Merge and it will be added to the current design mat.
Step 6 – Scale the design down to the size needed by grabbing the corner bounding box and dragging it in. Move the design to where you would like it placed on the tag.
Step 7 – Right click on the tag and choose Ungroup. This will separate the cut line from the image. Make a copy of the image and pull it off to the left side.
Step 8 – Select the inner blue sketch line, open the Offset Panel, and click internal offset. Change the distance to .005. Click Apply. This will create a small, very thin frame which will be important in the next step.
Step 9 – Select both of the inner blue lines. Again, the easiest way may be to drag select as described above and then hold down the Shift key and de-select the items you do not want. Once those 2 blue lines are selected, right click and choose Make Compound Path.
Step 10 – Next, select only the inner blue line and the cut line around the flower. The easiest way to do this is to select all of the design, then hold the Shift key down and click on the cut lines you do not want selected. In this case, the hole at the top of the tag, the outer tag cut line, and the flower graphic should not be selected. There will be a gray “selection box” around each piece that is currently selected.
Step 11 – Open the Modify Panel on the right side. With the inner blue sketch line and the outside cut line of the flower selected, choose Subtract All. This will cut the blue line out from behind the flower, so the sketch line will end where the flower starts.
This is why we created the “frame” with the blue sketch line when we made the internal offset and then selected the 2 blue lines and made it a compound path.
Move the design away from the tag to see the blue line was “subtracted” from behind the flower design. Make sure to hit the “Undo” button if you do this to move the design back into place again.
Or press the Ctrl+Z (PC) buttons on the keyboard for the keyboard shortcut. (MAC = Command+Z)
Step 12 – Next, select only the outer tag shape and the cut line around the flower. The easiest way to do this is to select all of the design, then hold the Shift key down and click on the cut lines you do not want selected. In this case, the hole at the top of the tag, the blue sketch line, and the flower image. Again, there will be a gray “selection box” around each piece that is currently selected.
Step 13 – Once those are selected, right click and choose Weld or select Weld from the Modify Panel. This should combine the outer edge of the tag and the cut line of the flower, so the Silhouette will cut around both.
Move the design away to see how the lines have welded together. Then hit Undo again to move the flower back.
Step 14 – Select the outer tag shape and the inside circle, right click and choose Make Compound Path. This will “punch out” the circle from the tag.
Another way to select multiple objects at once is to click on the 1st object, hold the Shift key down and click on the next object. In this case, the outer tag line and the inside tag circle a the top.
Make a copy of the tag and pull it off to the left side for safe keeping.
Now, you have a custom tag that could be printed, then sketched, and cut around.
Repeat these steps if you have different designs you want to use. The more you do it, the more comfortable you will get with it and the software.
Step 15 – Set up the tags to print. For all print and cut projects, I follow the same steps and use all the defaults for the best results. Check out this Print and Cut Basics blog post on how to set it up step-by-step or my video course HERE.
Then click on the Page Setup Panel – Tab 3 and turn the registration marks on. Click the Restore Defaults button. Position the designs on the page between the registration marks and not in the cross-hatched areas.
Step 16 – Print the design and then set it up in the top left corner of the Silhouette cutting mat exactly as you see it on the screen, completely covering the grid lines on the cutting mat.
Step 17 – Set up the sketch action first. Install the sketch pen in the Silhouette machine. I used a Silhouette gold sketch pen. Click on the Send tab – choose by Line Color under the top right header.
Set up the Materials, Action, and Tool. Uncheck the red color and leave the blue color checked. This means that the machine will first sketch the lines in bold blue.
Step 18 – Set up the Cut lines. Uncheck the blue and check the red box. Install the Silhouette blade to cut the tags.
And you have a custom tag created.
You could stop there, but why not keep going? Now, it’s time to embellish these a bit more! Let’s add some dimension to the tags.
Have you ever heard of fussy cutting? It’s a common term in the paper crafting world that means to hand cut around a design with scissors. I did fussy cut the first few I did as samples just to see how this would work and I had thought for a brief moment that I would do that for all of them. But, why? Let’s “fussy cut” around these flowers and let the software and Silhouette machine do all the work! Yes, it may take a little bit to set the file up, but it would take time to fussy cut all of them and let’s save our hands some aching!
I am using the Freehand drawing tool in the Silhouette software on the left side to “fussy cut” or draw around my design in the exact place I want it to cut.
I chose the Draw Smooth Freehand tool on the left side panel in Silhouette Studio.
Watch in this video how it works to draw around the Poinsettia flower on the right side to get the different layers on the flowers.
If viewing in email, please click the image above to view video.
I love that with Point Editing you can adjust the image even after it’s cropped and still bring back or take out areas as needed.
Here is another video showing Point Editing up close on the designs and how you can adjust the image even after it’s cropped to fine tune it.
If viewing in email, please click the image above to view video.
Once you have the design cropped how you like, duplicate the design, set it up as Print and Cut page, and print out all the designs to “fussy cut” around the design.
Perfect “fussy cut” around the design!
You will notice that I have my page set up as a 12″ x 12″ print and cut. This is all dependent on how large your printer can print. I still use all the same defaults and tips for Print and Cut, no matter the size I create. Check out the Print and Cut Basics post HERE and the Print and Cut Large Format post HERE.
Once all the designs are cut out, I used a clear & gold CTMH shimmer brush to give the flowers a bit of sparkle.
Then I used foam tape to stack the flower pieces on top of each other for dimension.
While you may not make the exact same tags, you can choose your own design and complete the same steps above. This is great practice for using the tools in the Silhouette Studio software.
Is that a lot? When you list it, yes! But, you use so many tools in the software without even knowing you are actually “using tools”. The more familiar you become with the software, the more comfortable you will be with your Silhouette and tackling future projects.
I would love to see what you are creating with your Silhouette machines! Feel free to post on my Facebook group at Silhouette Secrets with EllyMae. If you have questions feel free to post below or on the Facebook group too!
Save this for future reference by pinning the image below.
Enjoy!
THANK YOU for your support! How can you help? Click HERE & buy a coffee. Every little bit helps with the cost of running the site.
Or if you are looking for more in-depth, step-by-step classes, check out all of my online Silhouette classes on my Teachable site HERE.
**This post may contain affiliate links. What that means is that I may receive compensation if you purchase through the links I have provided. The price you pay for the product or service is not higher but I may get compensated for sharing.
In October of 2018, I put up a vinyl skeleton on our front door. After Halloween, my kids & husband asked me to leave it up because they thought it would be fun to decorate all year long.
They tell me the ideas that they would like to accessorize the skeleton with and I cut and apply it from vinyl.
While I was cutting the eggs for the door, I had 3 shapes from the Silhouette Design Store but I wanted a fourth egg with a different design.
With the Silhouette software and the tools in it, you can create pretty much anything you can imagine.
Part 1 – Drawing the Egg
Let’s start with the egg shape.
Now, the easiest way would be to use the Flexi-shapes with the v4.2 software. But, we will discuss both ways.
Next, double click on the welded shape and this will bring up the edit points. By deleting a few edit points we can change the shape of this design.
Alter the edit points to achieve the desired effect.
Still not the exact shape or as symmetrical as you’d like? Take it one step farther.
Open the Page Setup – Panel Grid Options.
Move the oval shape so that the top bounding box is centered on one of the grid lines.
Click on the Knife Tool on the left tool bar.
Make sure the Solid option is selected in the Quick Access Toolbar at the top left.
Hold down the Shift key and draw a line from the top to the bottom on the grid line with the bounding box.
Select the right side of the oval and delete it.
Open the Replicate Panel. Select the left side of the oval and choose Mirror Right.
Select the right side and press the left arrow key 1 time. This will move the design slightly so it is overlapping the left side of the oval.
Select both sides, right click and choose Weld.
The weld option can also be found under the Modify Panel on the right side too.
Now you have a symmetrical shape.
This can be done with all kinds of designs. You can create and draw anything in the software by breaking it down into basic shapes or using the Flexi-shapes.
How about a heart? Draw your own with 2 circles & a square and then edit using the same techniques listed above or use the Flexi-shape if available.
Or a flower?
Draw an oval and use the Advanced Replicate Panel to replicate and rotate the oval.
I chose 8 copies and 30 degrees for the rotation.
In the next blog post, we will take a look at how to create shapes to decorate the egg. Part II – Decorating the Egg Shape
What will you use the software to draw and experiment with today?
**This post may contain affiliate links. What that means is that I may receive compensation if you purchase through the links I have provided. The price you pay for the product or service is not higher but I may get compensated for sharing.
I am a big Pinterest lover. I pin a lot of things of all categories and sometimes just sit and pin ideas for hours. I find it relaxing. Do I make all the pins I save?
No – but I have made quite a few.
Check out my Pinterest boards HERE and maybe you’ll get some ideas.
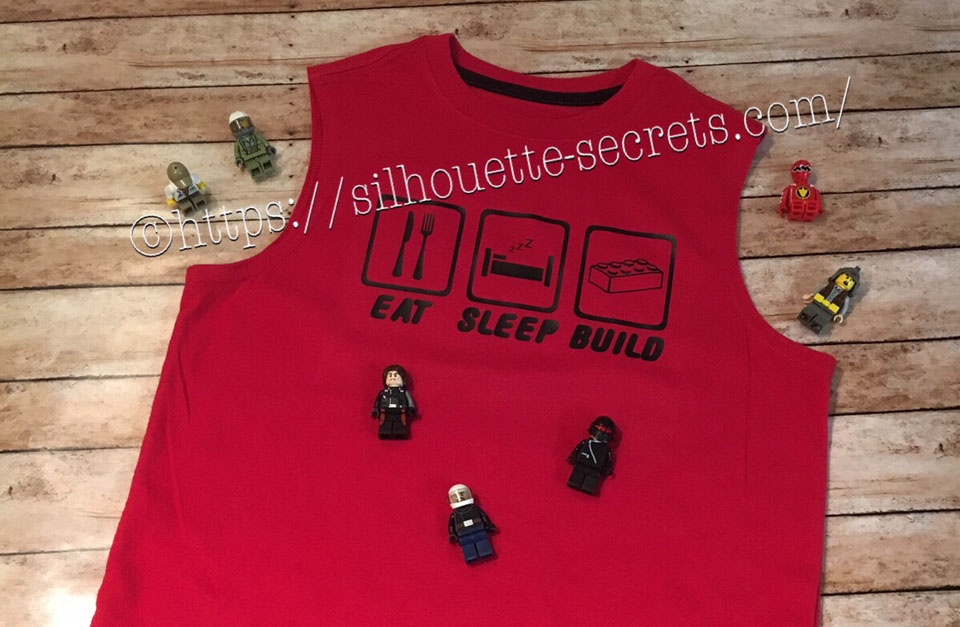
My son was looking for something to put on a shirt and he found one he really liked. I realized I could re-create it with designs from the Silhouette Design Store. My son loves Legos. He will wake up and create something before his eyes are fully opened. And he is good! I have to have directions to follow to make something and that goes for anything – I just don’t have that engineering mind. He can just imagine something and then create it out of Legos. It’s amazing and love that at 6 years old, he is doing that.
While creating this shirt, I used many of the features we have already reviewed in the “Let’s Explore v4” series. Watch for links throughout this post that will explain more about each function I used in designing the shirt.
You can find more information on Compound Paths HERE.
I like to fill all my designs with color as it makes it easier to work with the design and you can see it better. Check out more information on the Fill Color Panel HERE.
Next, I took the drawing tools on the left side and drew a rounded rectangle.
Then I right clicked on the rectangle and chose “Convert to Path”.
This will set the design as a solid rectangle. Before convert to path is chosen, the red dots can still be moved in the top left corner and this will change the angle of the rounded rectangle corners.
Now, make an offset of the rounded rectangle. Find more information on creating an Offset HERE.
Then select both rectangles, right click and choose “Make Compound Path“. Then fill with color and now there is a rectangle outline.
Then the rectangle can be replicated 2 more times for design. Check out more information on the Replicate Panel HERE.
I accessed the Dingbat font in the Text Style Panel under the Glyphs panel and double clicked on the character I wanted.
For more information on accessing glyphs directly in the software click HERE.
Then I right clicked and chose “Release Compound Path“, deleted the spoon, moved the fork to the right side, selected both and grouped them back together.
Now I have all my designs and just need to resize them to fit inside the rectangles.
Now that the designs are sized how I like, I can use the Transform Panel – Align tools to make sure they are centered and the spacing between each section is the same.
Check out more information on using the Align tools HERE.
Once I have everything centered and aligned how I want it, I select it all and then Group it together, so it moves as one object.
Then I right clicked on the design and chose “Flip Horizontal”, since I am cutting this from Heat Transfer Vinyl. I prefer to flip the image myself and then tell the software to “Send As Is” when it gives me the pop up after clicking on Send, so there is no issue with it flipping it to the wrong side of my mat.
And now you are ready to send this to cut after making sure you blade is installed right and choosing the correct material.
My son loved his shirt and I loved creating it by combining several designs.
Are you not finding the exact design that you envision for a project?
Why not create your own?
Combine designs that you buy, create your own or a combination of both.
THANK YOU for your support! How can you help? Click HERE & buy a coffee.
Every little bit helps with the cost of running the site.
Looking for more in-depth, step-by-step classes, check out all of my online Silhouette classes on my Teachable site HERE.
**This post may contain affiliate links. What that means is that I may receive compensation if you purchase through the links I have provided. The price you pay for the product or service is not higher but I may get compensated for sharing.
THANK YOU for your support! How can you help? Click the link to buy a coffee. Every little bit helps in the cost of running the site.