Just a quick post to share something I stumbled upon yesterday while I was writing the weekly Silhouette Secrets+ newsletter. There is now a Silhouette Design Store direct download search feature!!!!
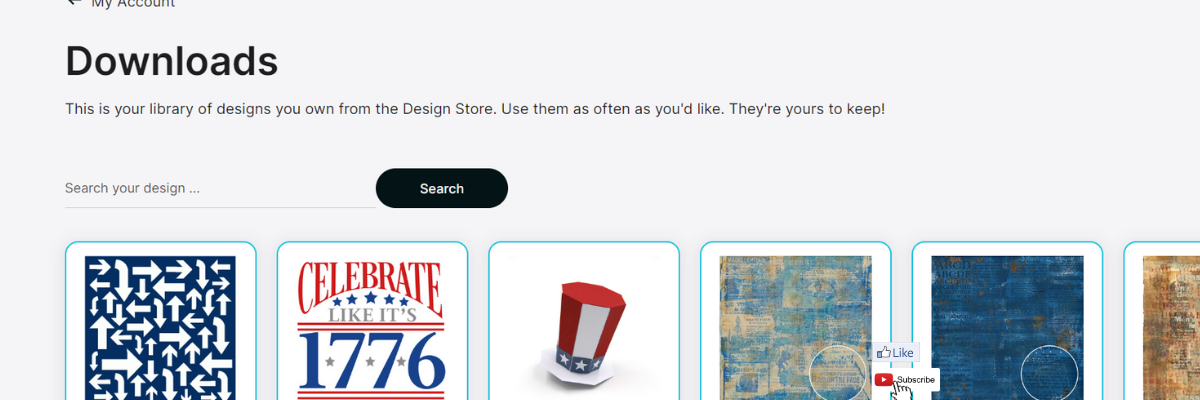
Silhouette Design Store – Direct Download Search
If you have been following along we are now 70+ days after the Silhouette website started to be migrated. The migration started on May 22, 2024 and it’s been well… a mess. It did not go as planned and it’s still ongoing. Little by little there are small improvements such as a new search is now available under the Downloads section on your Silhouette Account. This is BIG! For more than 70 days users have had to direct download if their Silhouette library was not working properly. However, that has had major issues too. For users like myself, who have thousands of designs, it was impossible to view them.
In the video I share how the Silhouette Design Store direct download search currently works and also options for accessing direct downloads too! Slowly, one step at a time, the website is improving… it might be baby steps, but at least it’s progress in the right direction.
I have more tips in the Silhouette Library & Account Issues: What to Do? Recommendations video HERE too.
Sign up for the Silhouette Secrets+ Newsletter for tips delivered weekly to your inbox and a new free file each month too! Subscribe HERE. Then make sure to confirm your subscription too!
Want to learn more? Check out the Silhouette A to Z Guide on the website HERE.
Save this for future reference by pinning the image below.
Hope that helps!
THANK YOU for your support! How can you help? Click HERE & buy a coffee. Every little bit helps with the cost of running the site.
Silhouette Classes
Never stop learning! Let me help you take the anxiety out of learning with Silhouette and get to creating faster! My Silhouette classes are heavily focused on software, so you can take the skills & techniques taught and apply them to many future projects!
**This post may contain affiliate links. What that means is that I may receive compensation if you purchase through the links I have provided. The price you pay for the product or service is not higher but I may get compensated for sharing.
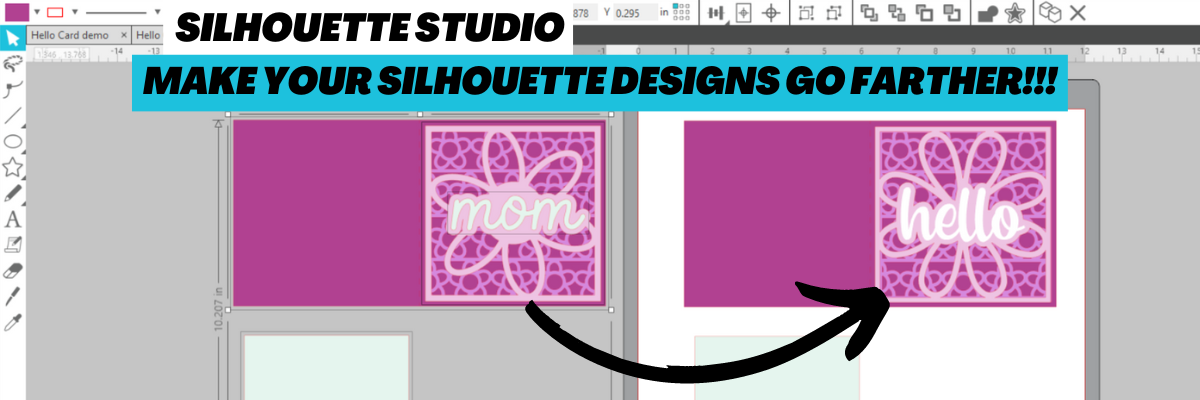
In today’s video tutorial on the Silhouette Secrets+ YouTube channel, I am sharing how you can take a design and using some of the tools in Silhouette Studio, alter the design to fit your needs.
I love all the possibilities in the Silhouette Studio software!
Save this for future reference by pinning the image below.
Enjoy !
THANK YOU for your support! How can you help? Click HERE & buy a coffee. Every little bit helps with the cost of running the site.
Looking for more in-depth, step-by-step classes, check out all of my online Silhouette classes on my Teachable site HERE.
**This post may contain affiliate links. What that means is that I may receive compensation if you purchase through the links I have provided. The price you pay for the product or service is not higher but I may get compensated for sharing.
Creating your own designs in the Silhouette Studio software
Let’s use some of the Silhouette Studio tools to create our own designs. We will be using the text, rotate, offset, and subtract tools to create this design.
Affiliate links may be present in the following blog post and as an Amazon Associate I earn from qualifying purchases.
Start by selecting the Text Tool on the left side and click on the design mat to type out a letter.
Using the Fill Color Panel, fill it with a color. This will help to work with it easier, but mostly it is just to be able to see it better.
Click off the text to deselect it and then click back on it one time. Then open the Text Style Panel and choose the font style. I am using LW Game Day font by Lori Whitlock – Design #205489.
Make a copy of the text and move it off the mat to the holding area, so there is always an original to go back to.
Right click on the design and choose Convert to Path. This will change the design from editable text to a vector design.
When it is in editable text mode, the font has to account for all characters in the font file. This will included any special characters, flourishes, glyphs, etc. in that font file and it has to account for that in the spacing you see around the design. This is why you will see excess space on the top and the bottom of a letter between the letter and the selection box. Each font will vary since each font file is different. What it has to do is account for the spacing, in case you decide to change the text.
Once the Convert to Path is chosen, it is now considered a vector design. It is no longer editable text and the selection box and measurements around the image are more accurate.
Grab the corner bounding box and increase the size of the letter as desired. By using the corner bounding box, the design is scaled proportionally. If you would rather have exact sizes, you could also use the Transform Panel – Scale tab or the Scale icon in the top Quick Access Toolbar.
The size of the design will depend on what type of project you are making. After the entire design is created, it can all be selected and resized to get the final size for your cuts.
Next, click on the Text Tool on the left side again and then type out the word you want. Fill the text with color using the Fill Color Panel. In the Text Style Panel, choose the font style. I used the All Stars font by Erin Doran – Design #307688. Make a copy of it and enlarge it just a bit. Then right click on it and choose Weld so that any overlapping letters weld together and cut as one piece. Then right click and choose Group or use Ctrl+G as the keyboard shortcut. This will allow the entire design to move as one piece.
Move the text word onto the design mat. Using the Transform Panel – Rotate Tab, rotate the word 90 degrees. Then using the corner bounding box, scale it up as desired. Once the text word is placed where you like it, select both the background letter and the word together and use the Align – Middle tool either in the Quick Access Toolbar (QAT) or in the Transform Panel – Align Tab.
To select multiple objects, left click in the top left above the design and hold the left mouse button down and drag across the entire design. Anything the mouse touches will be selected together. Or click on one object, hold down the Shift key on the keyboard and click on another object. As long as the Shift key is held down, everything that is clicked on will be selected together.
Click off the design to deselect it and then click back on the word only to select only it.
With only the word selected, open the Offset Panel and click Offset. The default distance is 0.125″ and this is what I used and clicked Apply. When the offset is applied, it will weld any overlapping parts of the offset together automatically and the offset will now be the object selected on the screen. The distance on the offset can be adjusted as you desire and what works for the design can vary according to your taste and the design being created.
Since the Offset is already selected, hold down the Shift key and then click on the background letter. Now, the offset and the big letter should be selected together. Open the Modify Panel and choose Subtract. This will subtract the offset shape from the background letter. Now all the little pieces will be individual designs. The design will need to be grouped together so it moves as one piece. Either press Ctrl+G on the keyboard or right click on the big letter and choose Group.
Ta-da! You have created your own design.
Move the design around as needed to cut out of the material you are using.
I cut mine from Siser Easyweed Heat Transfer Vinyl so I moved the Bobcats off the mat, right clicked on the B and chose Flip > Horizontal and then placed it in the top left corner of the mat to cut.
Once that was cut, I moved the B off the mat and moved the Bobcats onto the mat, rotated it back 90 degrees, right clicked and chose Flip > Horizontal and cut it.
I love my new shirt and of course, my kids asked for their own too! I love being able to create custom shirts with my Silhouette and they love wearing them!
But, I’m not going to tell them I like mine better.
Each design may turn out a little bit different depending on the letters, text, and font style chosen. Grab your favorite drink and get to creating! Here are a couple more that I created using the same steps above.
I’ve also created this as a video tutorial that can be found on my YouTube channel.
Save this for future reference by pinning the image below.
Enjoy!
THANK YOU for your support! How can you help? Click HERE & buy a coffee. Every little bit helps with the cost of running the site.
Or if you are looking for more in-depth, step-by-step classes, check out all of my online Silhouette classes on my Teachable site HERE.
**This post may contain affiliate links. What that means is that I may receive compensation if you purchase through the links I have provided. The price you pay for the product or service is not higher but I may get compensated for sharing.
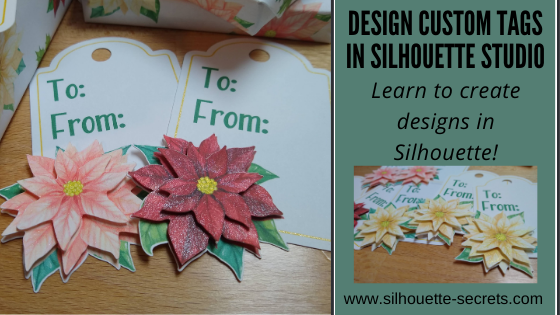
The gift tag was created from scratch in the Silhouette Studio software with just a few basic shapes.
Step 1 – Using the Drawing Tools on the left side, draw a rounded rectangle and a oval. Place the oval at the top of the rounded rectangle. Use the Align Center tool to center the oval with the rounded rectangle.
Quick Tip: The QAT or Quick Access Toolbar contains the most common used tool quick keys at the top of the software. This is dependent on what objects are selected. You will see the quick keys change depending on the type of object – for instance, text versus designs.
Step 2 – Select the rounded rectangle and oval, right click and choose Weld. Use the Drawing Tools on the left side, draw a small circle. Hold the Shift key down while drawing to draw a perfect circle. Place the circle towards the top middle of the tab. Use the Align Tools to center it with the tag shape.
Step 3 – Select the tag shape and then choose the Offset Panel and choose Internal Offset. Adjust the Offset distance if desired – I used the default. This is creating the line to draw using a sketch pen around the inside of the tag.
Step 4 – Select the Internal Offset and then change the line color to blue in the Line Style Panel. This will be the sketch line to be done with the gold pen.
At this point I would make a copy of the entire design and move it to the left side of the cutting mat in the holding area, so you have an original to go back to if needed.
Double click on the file from the library and depending on the software version you are using it may open on the same design mat. If not, right click on the design in the Library tab, then choose Merge and it will be added to the current design mat.
Step 6 – Scale the design down to the size needed by grabbing the corner bounding box and dragging it in. Move the design to where you would like it placed on the tag.
Step 7 – Right click on the tag and choose Ungroup. This will separate the cut line from the image. Make a copy of the image and pull it off to the left side.
Step 8 – Select the inner blue sketch line, open the Offset Panel, and click internal offset. Change the distance to .005. Click Apply. This will create a small, very thin frame which will be important in the next step.
Step 9 – Select both of the inner blue lines. Again, the easiest way may be to drag select as described above and then hold down the Shift key and de-select the items you do not want. Once those 2 blue lines are selected, right click and choose Make Compound Path.
Step 10 – Next, select only the inner blue line and the cut line around the flower. The easiest way to do this is to select all of the design, then hold the Shift key down and click on the cut lines you do not want selected. In this case, the hole at the top of the tag, the outer tag cut line, and the flower graphic should not be selected. There will be a gray “selection box” around each piece that is currently selected.
Step 11 – Open the Modify Panel on the right side. With the inner blue sketch line and the outside cut line of the flower selected, choose Subtract All. This will cut the blue line out from behind the flower, so the sketch line will end where the flower starts.
This is why we created the “frame” with the blue sketch line when we made the internal offset and then selected the 2 blue lines and made it a compound path.
Move the design away from the tag to see the blue line was “subtracted” from behind the flower design. Make sure to hit the “Undo” button if you do this to move the design back into place again.
Or press the Ctrl+Z (PC) buttons on the keyboard for the keyboard shortcut. (MAC = Command+Z)
Step 12 – Next, select only the outer tag shape and the cut line around the flower. The easiest way to do this is to select all of the design, then hold the Shift key down and click on the cut lines you do not want selected. In this case, the hole at the top of the tag, the blue sketch line, and the flower image. Again, there will be a gray “selection box” around each piece that is currently selected.
Step 13 – Once those are selected, right click and choose Weld or select Weld from the Modify Panel. This should combine the outer edge of the tag and the cut line of the flower, so the Silhouette will cut around both.
Move the design away to see how the lines have welded together. Then hit Undo again to move the flower back.
Step 14 – Select the outer tag shape and the inside circle, right click and choose Make Compound Path. This will “punch out” the circle from the tag.
Another way to select multiple objects at once is to click on the 1st object, hold the Shift key down and click on the next object. In this case, the outer tag line and the inside tag circle a the top.
Make a copy of the tag and pull it off to the left side for safe keeping.
Now, you have a custom tag that could be printed, then sketched, and cut around.
Repeat these steps if you have different designs you want to use. The more you do it, the more comfortable you will get with it and the software.
Step 15 – Set up the tags to print. For all print and cut projects, I follow the same steps and use all the defaults for the best results. Check out this Print and Cut Basics blog post on how to set it up step-by-step or my video course HERE.
Then click on the Page Setup Panel – Tab 3 and turn the registration marks on. Click the Restore Defaults button. Position the designs on the page between the registration marks and not in the cross-hatched areas.
Step 16 – Print the design and then set it up in the top left corner of the Silhouette cutting mat exactly as you see it on the screen, completely covering the grid lines on the cutting mat.
Step 17 – Set up the sketch action first. Install the sketch pen in the Silhouette machine. I used a Silhouette gold sketch pen. Click on the Send tab – choose by Line Color under the top right header.
Set up the Materials, Action, and Tool. Uncheck the red color and leave the blue color checked. This means that the machine will first sketch the lines in bold blue.
Step 18 – Set up the Cut lines. Uncheck the blue and check the red box. Install the Silhouette blade to cut the tags.
And you have a custom tag created.
You could stop there, but why not keep going? Now, it’s time to embellish these a bit more! Let’s add some dimension to the tags.
Have you ever heard of fussy cutting? It’s a common term in the paper crafting world that means to hand cut around a design with scissors. I did fussy cut the first few I did as samples just to see how this would work and I had thought for a brief moment that I would do that for all of them. But, why? Let’s “fussy cut” around these flowers and let the software and Silhouette machine do all the work! Yes, it may take a little bit to set the file up, but it would take time to fussy cut all of them and let’s save our hands some aching!
I am using the Freehand drawing tool in the Silhouette software on the left side to “fussy cut” or draw around my design in the exact place I want it to cut.
I chose the Draw Smooth Freehand tool on the left side panel in Silhouette Studio.
Watch in this video how it works to draw around the Poinsettia flower on the right side to get the different layers on the flowers.
If viewing in email, please click the image above to view video.
I love that with Point Editing you can adjust the image even after it’s cropped and still bring back or take out areas as needed.
Here is another video showing Point Editing up close on the designs and how you can adjust the image even after it’s cropped to fine tune it.
If viewing in email, please click the image above to view video.
Once you have the design cropped how you like, duplicate the design, set it up as Print and Cut page, and print out all the designs to “fussy cut” around the design.
Perfect “fussy cut” around the design!
You will notice that I have my page set up as a 12″ x 12″ print and cut. This is all dependent on how large your printer can print. I still use all the same defaults and tips for Print and Cut, no matter the size I create. Check out the Print and Cut Basics post HERE and the Print and Cut Large Format post HERE.
Once all the designs are cut out, I used a clear & gold CTMH shimmer brush to give the flowers a bit of sparkle.
Then I used foam tape to stack the flower pieces on top of each other for dimension.
While you may not make the exact same tags, you can choose your own design and complete the same steps above. This is great practice for using the tools in the Silhouette Studio software.
Is that a lot? When you list it, yes! But, you use so many tools in the software without even knowing you are actually “using tools”. The more familiar you become with the software, the more comfortable you will be with your Silhouette and tackling future projects.
I would love to see what you are creating with your Silhouette machines! Feel free to post on my Facebook group at Silhouette Secrets with EllyMae. If you have questions feel free to post below or on the Facebook group too!
Save this for future reference by pinning the image below.
Enjoy!
THANK YOU for your support! How can you help? Click HERE & buy a coffee. Every little bit helps with the cost of running the site.
Or if you are looking for more in-depth, step-by-step classes, check out all of my online Silhouette classes on my Teachable site HERE.
**This post may contain affiliate links. What that means is that I may receive compensation if you purchase through the links I have provided. The price you pay for the product or service is not higher but I may get compensated for sharing.
The Silhouette Studio software is so powerful in what it can do and what you can create with it. The biggest limit is YOU! The more time you take to learn about the Silhouette software and how to do things in it, the more you can expand your skills and apply those to your future Silhouette projects. This is why I have the “Let’s Explore v4” series and most of my blog posts focus on tools and techniques in the software. It is the key to it all!
If you learn how one tool functions and all it can do in the software, then you can take that knowledge and apply it to so many future projects.
Affiliate links may be present in the following blog post and as an Amazon Associate, I earn from qualifying purchases. This is a sponsored post.
Today I’m going to share how I created a custom pattern that could be used for gift wrapping and making a matching gift tag.
As you may know from reading the blog, I am a Silhouette Elite Affiliate, and occasionally they will ask if we want to participate in an activity. This month it was a gift wrap & tag challenge.
The only supplies needed to create this pattern are cardstock/paper, designs from the Silhouette Design Store, and a printer.
Once you have the pattern created, you can create all kinds of projects with it.
Print on a light weight paper like copy paper and use it as wrapping paper.
I also used it to create the bow to add to the top of the package to match. This bow is called Layered Gift Bow by Jamie Lane Designs – Design #284007. The bow is originally 2 layers and I printed the pattern on copy paper cut it, then did an offset of the pattern layer and cut out of Close to My Heart gold glitter cardstock.
And then the final layer was the red cardstock. I followed the assembly instructions and put it together. I would recommend if you are doing 2 or 3 layers of cardstock to use a really strong glue.
Print the pattern on cardstock and use it to create gift boxes where no wrapping paper is needed.
I had so much fun creating this idea and putting it into action. It’s amazing how when you get involved with a project hours can go by and you don’t even realize it.
Creating a custom pattern with designs
Now, let’s take a look at how I created this. It is actually very simple.
I started by opening up each design and placing it on the design mat. To open multiple designs on the same design mat, right click on the file in the library and choose Merge.
If you are opening the file from outside the software, use File > Merge to bring a design onto the current design mat. Or drag and drop the design from the Windows Explorer or Finder window.
Once all of the designs are on the same design mat, select them all and scale them to the size you would like. This will ultimately depend on the designs that you are using, but in this case, I wanted all of the flower designs to be proportional to each other and the holly sprigs to be smaller to fit in between.
Rearrange and duplicate the designs on the page as desired. Each user is going to find what they prefer and like in designing. However, the one thing that I have found that is common among all users is that we are often most critical of our own work. If you are feeling like something is not quite right, don’t scrap it. Save the design file and then come back to it at a later moment. You might find that given some time you open up that file and it is just perfect the way it is!
I started by creating a 12″ x 12″ page size and then I also created a separate 11″ x 17″ page size as well. How large you can print is going to be determined by your printer capabilities.
When I am doing a print project, I always use the Print Preview before I send to my printer. This has saved me on so many occasions to catch something that doesn’t look right before it prints.
For instance, one time while creating this design, I sent it to print and a 3″ section at the bottom showed up blank. The design was on the screen, but it didn’t show up in the print preview. It just turned out to be a glitch and a save and software restart solved it, but if it had printed that way, it would have not been good.
And wahlah! You have a custom designed patterned to print and use in projects!
Save this for future reference by pinning the image below.
Enjoy!
THANK YOU for your support! How can you help? Click HERE & buy a coffee. Every little bit helps with the cost of running the site.
Or if you are looking for more in-depth, step-by-step classes, check out all of my online Silhouette classes on my Teachable site HERE.
**This post may contain affiliate links. What that means is that I may receive compensation if you purchase through the links I have provided. The price you pay for the product or service is not higher but I may get compensated for sharing.
As I write this post, it is Friday. And I need Friday! It’s been a long week and sometimes I just sit down and the only thing I want to do it turn my brain off and scroll through the new designs in the Silhouette Design Store. No thinking, no schedules, no late assignment notifications for virtual school – just mindless shopping. Maybe there are a few more of you out there with me today!
So today I’m going to quick share a few designs that caught my eye just because!
Affiliate links may be present in the following blog post and as an Amazon Associate I earn from qualifying purchases.
In the Silhouette Design Store is a “New” category and I sit down a couple of times a week, during “mind-less” time and browse it. This section is reset every Monday morning to feature the new items that are released into the store during the week. If I like something, I’ll click on the heart and if I love it and want it now, I add it to my cart.
This week there are almost 500 new designs in the “New” category and why I sometimes shop several times a week.
I grabbed this one earlier this week thinking ahead to a Fall banner after the Halloween decor comes down.
Those are just a couple of the designs that caught my eye this week. I find I like to relax and check out the store “New” category each week, so I don’t have to scroll through so many pages when a really super sale comes up. If they are in my Wishlist, I can find them easily.
And don’t forget about the weekly FREE design! Grab it with the svg and the Commercial Use license for FREE each week! This week is It’s Spooky Season by Silhouette – Design #331926
I would love to see which design have caught your eye in the Silhouette Design Store recently. Feel free to share on my Facebook group at Silhouette Secrets with EllyMae.
Save this for future reference by pinning the image below.
Enjoy!
**This post may contain affiliate links. What that means is that I may receive compensation if you purchase through the links I have provided. The price you pay for the product or service is not higher but I may get compensated for sharing.
Today I’m going to show you how to make the most out of your designs that you purchase. Now, each design will be different because all designs are created differently, but let’s take a look at how we can make a few changes to the designs and get a different look.
Last year, I cut out this position-able skeleton and put him up on my front door for the “Let’s Explore v4 – Warp Panel” post – HERE.
And for the Spring, he debuted as a ball player helping me show how to change the Selection Preferences in the software and helping hold our No Soliciting sign. What a great helper! Since putting up this sign we do not have constant sales people knocking on our door. No one has brought wine or done my laundry but I’m ok with that if I don’t have to listen to sales pitches.
Now, he has decided he is a Pirate. He has gone almost a full year without a name, so I think I’ll call him Jack.
**Tutorial written in Silhouette Studio v4.3.263 – you may see additional icons or options on my screen that are available in v4.3. All techniques are available in previous versions of the software.
One way to get your money out of a design is to keep it up all year long. But, that wasn’t actually the reason I started writing this post.
I’ll take one of these (Design #274430) and use it to show how you can alter it to get a couple different looks using some of the features we’ve covered in the “Let’s Explore v4” series.
I always fill my designs or text with color using the Fill Color Panel to see how it will look when cut or if there are additional things I need to do, such as Make a Compound Path of the design.
The design must be selected in order to change the property of it. Click on the red line of the design and the Selection box should appear around the image, then click on a color in the Fill Color Panel to add a color.
Once the design is filled with color, it can be selected by clicking anywhere in the color of the object. You do not have to be as precise in clicking on the red line of the design to select it. This is another reason I fill my designs with color as it makes
You can see in the above photo that if I cut this out exactly as it opens, it will cut the outline of the pumpkin and the face features inside. There is no background to the pumpkin and that can work for many designs, but I wanted a background.
I made a copy of the pumpkin so you will see the comparison.
This takes the design and releases all the pieces that make up the design. This will allow us to work with the pieces of the design individually and change it how we want.
You will notice that since we have filled it with color, it is now all the same color.
Click on the Fill Color Panel and choose the Transparent option to take the color back out.
Each file may be different in the exact steps you will need to take on how you get it all broken down into pieces. However the same features and tools will work, but they may need to be completed in a different order. This is dependent on how the designer created the file. But, knowing how each feature works will help you in deciding what steps you need to try to get it to the results you want.
You will notice in the photo above, that after the compound path is released, the selection box is still 1 around the entire design. This file is all grouped together. Right click on the design and choose Ungroup.
Now, the design is broken up into some pieces.
Left click on the mouse in the top left corner above the design, hold the left mouse button and drag across the entire design. All the objects that the drag box covers will be selected.
Hold the Shift key on the keyboard down and then click on the outer edge of the pumpkin and the 2 stem pieces. This will deselect those pieces.
Next, right click and choose Make Compound Path. This will compress all of those pieces back into 1 object.
Next, to see how the compound path worked, use the Fill Color Panel again and fill that section with color.
Select the stem pieces. Click on 1 piece of the stem and hold down the Shift key on the keyboard, then select the 2nd piece of the stem. Right click and choose Group. Then fill the stem with green.
Select the outer edge of the pumpkin and fill that with black.
Now you can see that we have taken a few additional steps and have a design that is more than just an outline of the pumpkin.
Compound paths can be something that takes a little bit of working with to really understand how they work. Check out this post on the Modify Panel – Part 2 to see more examples of Compound Paths.
The best way to reinforce the concept is to take a design and just play with it.
I did the same thing for all 3 of these happy pumpkins and these not-so-happy jack-o-lanterns.
Don’t look too close or you will see that my bottom jack-o-lantern decided to mess with me and not follow the rules. He decided to go rogue and not to lay in his designated spot.
It happens!
Next week, we will explore how I stacked the pumpkins all together, combined the black backgrounds to cut it all out of one piece of black vinyl, and how I pieced it together.
Find Part 2 HERE – Silhouette Designs – Part 2.
I love that I can take one design and turn it into another or modify it in a way that I can use bits and pieces if I want. With a few of the tools in the Silhouette software the possibilities of what you can do are endless.
As I mentioned above, each design may vary in the steps that it may take to alter it and this is dependent on how the designer saved the design.
But, it sure is fun to play around with!
**This post may contain affiliate links. What that means is that I may receive compensation if you purchase through the links I have provided. The price you pay for the product or service is not higher but I may get compensated for sharing.
THANK YOU for your support! How can you help? Click the link to buy a coffee. Every little bit helps in the cost of running the site.