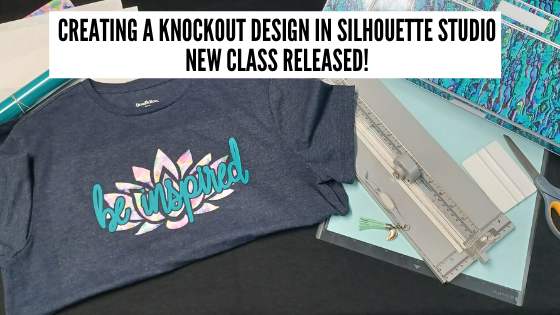
Come join me in learning about your Silhouette software and cutting HTV to create a knock out design. We will use several tools in the Silhouette Studio software to create this design.
This is a step-by-step class from creating the knockout design, cutting patterned & solid HTV, pressing 2 layers of HTV, and bonus design tips for alternate designs ideas.
Class Supplies list
Affiliate links are present in the following supply list and as an Amazon Associate, I earn from qualifying purchases The cost to you is no different, but I may earn a commission by you using the links provided.
I would love to see what you are creating with your Silhouette software or machines! Or if you have any questions, feel free to post photos or questions on my Facebook group at Silhouette Secrets with EllyMae.
Save this for future reference by pinning the image below.
Enjoy !
THANK YOU for your support! How can you help? Click HERE & buy a coffee. Every little bit helps with the cost of running the site.
Or if you are looking for more in-depth, step-by-step classes, check out all of my online Silhouette classes on my Teachable site HERE.
**This post may contain affiliate links. What that means is that I may receive compensation if you purchase through the links I have provided. The price you pay for the product or service is not higher but I may get compensated for sharing.
Getting started with HTV can be overwhelming, but it doesn’t have to be.
One of the questions I see asked most often is, “What size should I cut the design for my shirt?”
Affiliate links may be present in the following blog post and as an Amazon Associate I earn from qualifying purchases.
Basically, you can do any size you want since you can cut it on the Silhouette machine and adjust it as needed.
But there are a few things to keep in mind when you are doing it. For instance, the design itself. Each design can vary in what might look good. Another is, the size of the shirt you are adding the design too. Larger is not always better.
Today I wanted to share a chart from Expressions Vinyl that can help in giving you an idea of what might look good.
Expressions Vinyl is an awesome company that offers a great selection of adhesive and HTV products. I’ve worked with them in the past at the All Things Silhouette Conference and have had great success with my orders through them.
Today, I thought I’d share the HTV sizing chart that I am often referring to my students when they ask. This will give you an idea of what to start with.
Now, a few things to keep in mind. This is a general idea to start with. The design itself can make a difference in what might look good or not. Every design can vary because it is made up of different aspects.
You may also notice that this sizing chart only goes up to a Large. What about bigger than that?
For shirts size of XL and up, I really do not go much larger. The largest design I tend to use is just under 12″ x 12″, if it looks ok. Why? I was regularly making 3XL to 5XL shirts for my husband and most times I would ask him what he thought before I cut it. In our discussion he mentioned that for those larger size shirts, think of the person who is wearing it. He said he wanted the design to be front and center. He didn’t want people to have to walk around him to see the full design. When explained like this, it made complete sense. The design should be completely visible when looking straight at the person who is wearing it.
Just something to keep in mind when making your own personal shirts.
Another thing to keep in mind when placing designs is busty women or in general a women’s bust area. I’ve seen some designs popping up in the past year or two that are very specific to a bust area such as this Hey Check Out My Pumpkins by Petra Studio Art – Design #384455.
In this design, the placement is very specific and on purpose. However, what if that is not what you are going for.
I made this shirt with design Wine Tasting Team Captain by Megan Hardy Designs – Design #322093 but I was not thinking about the placement of the design aspects when I made it.
Now I just laugh about it when I wear it.
One other thing that I just purchased to hopefully help me get better placement of HTV is this T-shirt Ruler Placement guide.
Note: you do not press this in the heat press, it is only used for lining things up.
I was in the Craft Chameleon store for an event and thought it might be worth giving a try to see if it helps me get the design on straighter. It is a hard acrylic ruler and I’m hoping it helps me. It never fails that I eyeball it and my design is just a little bit crooked, even if I press the center of the shirt. The ruler will hopefully give me that straight edge to line up the design with. Or I’ll just continue standing a little bit off center so no one notices. Things happen to us all! Practice, practice, practice! And have fun!
I hope those tips have helped in getting started with HTV cutting and your Silhouette! Here are a few more posts with information and tips on cutting HTV:
I’d love seeing what you are creating with your Silhouette machines or software. Feel free to post photos or questions on my Facebook group at Silhouette Secrets with EllyMae.
Save this for future reference by pinning the image below.
Enjoy!
THANK YOU for your support! How can you help? Click HERE & buy a coffee. Every little bit helps with the cost of running the site.
Or if you are looking for more in-depth, step-by-step classes, check out all of my online Silhouette classes on my Teachable site HERE.
**This post may contain affiliate links. What that means is that I may receive compensation if you purchase through the links I have provided. The price you pay for the product or service is not higher but I may get compensated for sharing.
Having issues with mirroring HTV and it not cutting right? Did you let the software mirror it for you and it still didn’t cut right? Did it cut what was off the cutting mat in the holding area and not your design?
I’ve been seeing this pop up a lot and I originally posted this information at the bottom of an HTV troubleshooting post called Cutting HTV with the Cameo 4, Plus, or Pro – Troubleshooting However, it is at the end of the post and I am seeing many user’s post with questions on why it’s not mirroring it correctly. Hopefully these details below will explain why and how to fix it for your project so you can get back to creating.
Affiliate links may be present in the following blog post and as an Amazon Associate I earn from qualifying purchases.
I would suggest reading through this next section entirely so you understand how this one works and also how to “fix” it.
In 2016, there was a new “pop-up” message that was released into the software for Heat Transfer materials called the Mirror pop up.
For heat transfer materials you are generally placing the material face down on the cutting mat and then cutting through the backside of the material. This means that you have to “mirror” the design so it will cut properly. How many times have you cut heat transfer material only to have that “head smack” moment after when you realized you forgot to mirror the image? So the idea behind the “pop-up” message is great!
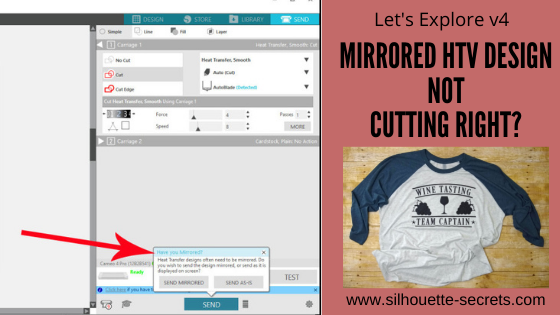
However, this “new” Mirror pop-up released in 2016, did not just mirror the design in the exact place that it was on the design mat. It flipped the entire mat when it mirrored the image, but it does not show that on the screen. So the design that shows on the screen on the left side of the mat/material, is really going to cut on the right side if you choose “Send Mirrored” and let the software mirror it for you.
If you choose “Send As Is” it will send it to cut in the exact location and exactly as you see it on the screen.
Now, I know that may seem like “old news” since this “bug” has been in the software since 2016. Some users got used to it this way while other users would learn to flip the design themselves and just choose “send as is”.
Now, let’s move to the present. A few months back, I started to notice users commenting that their HTV was not cutting as it should. They would tell the software to mirror it and it wasn’t cutting in the right spot. I reported the issue and found out that the old mirror “bug” was changed in February 2020 the software release. Now, it would flip the design in the exact location you have it placed on the mat, but still does not show you that on the screen. However, if you have anything else on the design file, it will mirror all of the objects. Whether they are in the “holding area” off the cutting mat or not.
If you choose “Send Mirrored“, it could mirror all of the designs on the file. So when it flips it, this is how it would cut.
Now that would come as a complete surprise when you cut and it’s not what you thought it would be. Note: the above screen shot is a representation of how it may cut, you do not see this change on the software screen at all.
This is present in the software versions from v4.4.247 until v4.4.438.
From v4.4.438 and higher, the software now is back to mirroring the design on the opposite side of the design mat than what shows on the screen.
How to work with this?
In the grand scheme of things, this is not a big deal, if you know about it and know how to work with it.
My suggestion to you is to mirror the design yourself.
The fastest way to do that is to right click on the design on the Design tab before you go to cut and choose Flip > Horizontal.
This will flip the image on the screen, in front of your eyes.
And it will then cut in that exact spot if you choose “Send As Is” on the Send tab.
If you do not have right click menus enabled on your computer, you can also find this in the top menus under Object > Mirror > Flip Horizontally too.
I use the Mirror Pop up as my final reminder and it has caught me several times when I forgot to mirror the design. Then I go back and mirror it myself before I’ve sent the design to cut.
Hopefully with those tips above, you will be well on your way to cutting HTV smoothly and being able to troubleshoot when you do have an issue.
Save this for future reference by pinning the image below.
Enjoy!
THANK YOU for your support! How can you help? Click HERE & buy a coffee. Every little bit helps with the cost of running the site.
Or if you are looking for more in-depth, step-by-step classes, check out all of my online Silhouette classes on my Teachable site HERE.
**This post may contain affiliate links. What that means is that I may receive compensation if you purchase through the links I have provided. The price you pay for the product or service is not higher but I may get compensated for sharing.
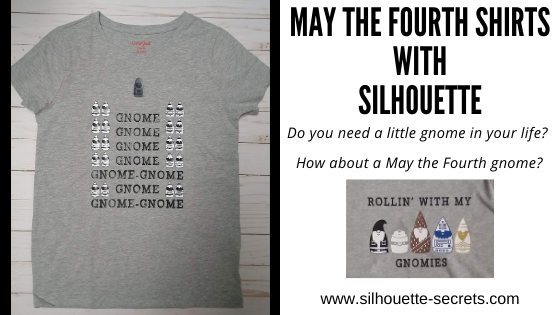
The Silhouette Design Store released this cute May the Fourth gnome inspired bundle in the store today and when they asked if I wanted to play with it, I said yes of course! My husband and I have been brainstorming ideas, thinking “outside the box”. This was the perfect “team” project as he could make design suggestions and I could put them into action.
Affiliate links may be present in the following blog post and as an Amazon Associate I earn from qualifying purchases.
Check out all of the Silhouette Design Store bundles HERE.
Here are a few that I have made so far.
I showed my son his new gnome shirt and he loved it! The expression on his face was so worth it when he read it out loud. I used the May the Fourth bundle and Gnome font by Lori Whitlock – Design #307096
Here is one I made for my husband. I used Siser Easyweed HTV with the PN In A Galaxy Far Away font by Illustration Ink – Design #111259 on the text. The red and blue are Siser Electric HTV.
And it’s a good thing that I only make shirts for my family, they don’t seem to mind that they might be a bit crooked. I really though I had it with this one, but I guess I was just too excited when I went to press it. I’ll just tell them to stand a bit crooked.
I have so many ideas still on my list and I’m really considering declaring May the Fourth an “official” holiday in our house this year. We all need something to look forward to and celebrate I think. I know the kid’s will be happy to have a break from virtual school and wear their new shirts for a movie marathon.
This gnome design bundle is so cute and these designs are exclusive to this bundle for the next month. After that you can pick up the designs individually in the store. Grab the May the Fourth bundle HERE to make a May the Fourth design for yourself. As a bonus, if you grab it in the first 24 hours, you get an additional 25% discount. This applies to all new bundle releases, so keep your eyes out for one that fits your needs.
I love to see what you are creating with your Silhouette machines! Feel free post on the Silhouette Secrets+ Facebook Group. We love to see what you are doing and creating with your Silhouette machines!
Save this for future reference by pinning the image below.
Enjoy!
THANK YOU for your support! How can you help? Click HERE & buy a coffee. Every little bit helps with the cost of running the site.
Or if you are looking for more in-depth, step-by-step classes, check out all of my online Silhouette classes on my Teachable site HERE.
**This post may contain affiliate links. What that means is that I may receive compensation if you purchase through the links I have provided. The price you pay for the product or service is not higher but I may get compensated for sharing.
Creating your own designs in the Silhouette Studio software
Let’s use some of the Silhouette Studio tools to create our own designs. We will be using the text, rotate, offset, and subtract tools to create this design.
Affiliate links may be present in the following blog post and as an Amazon Associate I earn from qualifying purchases.
Start by selecting the Text Tool on the left side and click on the design mat to type out a letter.
Using the Fill Color Panel, fill it with a color. This will help to work with it easier, but mostly it is just to be able to see it better.
Click off the text to deselect it and then click back on it one time. Then open the Text Style Panel and choose the font style. I am using LW Game Day font by Lori Whitlock – Design #205489.
Make a copy of the text and move it off the mat to the holding area, so there is always an original to go back to.
Right click on the design and choose Convert to Path. This will change the design from editable text to a vector design.
When it is in editable text mode, the font has to account for all characters in the font file. This will included any special characters, flourishes, glyphs, etc. in that font file and it has to account for that in the spacing you see around the design. This is why you will see excess space on the top and the bottom of a letter between the letter and the selection box. Each font will vary since each font file is different. What it has to do is account for the spacing, in case you decide to change the text.
Once the Convert to Path is chosen, it is now considered a vector design. It is no longer editable text and the selection box and measurements around the image are more accurate.
Grab the corner bounding box and increase the size of the letter as desired. By using the corner bounding box, the design is scaled proportionally. If you would rather have exact sizes, you could also use the Transform Panel – Scale tab or the Scale icon in the top Quick Access Toolbar.
The size of the design will depend on what type of project you are making. After the entire design is created, it can all be selected and resized to get the final size for your cuts.
Next, click on the Text Tool on the left side again and then type out the word you want. Fill the text with color using the Fill Color Panel. In the Text Style Panel, choose the font style. I used the All Stars font by Erin Doran – Design #307688. Make a copy of it and enlarge it just a bit. Then right click on it and choose Weld so that any overlapping letters weld together and cut as one piece. Then right click and choose Group or use Ctrl+G as the keyboard shortcut. This will allow the entire design to move as one piece.
Move the text word onto the design mat. Using the Transform Panel – Rotate Tab, rotate the word 90 degrees. Then using the corner bounding box, scale it up as desired. Once the text word is placed where you like it, select both the background letter and the word together and use the Align – Middle tool either in the Quick Access Toolbar (QAT) or in the Transform Panel – Align Tab.
To select multiple objects, left click in the top left above the design and hold the left mouse button down and drag across the entire design. Anything the mouse touches will be selected together. Or click on one object, hold down the Shift key on the keyboard and click on another object. As long as the Shift key is held down, everything that is clicked on will be selected together.
Click off the design to deselect it and then click back on the word only to select only it.
With only the word selected, open the Offset Panel and click Offset. The default distance is 0.125″ and this is what I used and clicked Apply. When the offset is applied, it will weld any overlapping parts of the offset together automatically and the offset will now be the object selected on the screen. The distance on the offset can be adjusted as you desire and what works for the design can vary according to your taste and the design being created.
Since the Offset is already selected, hold down the Shift key and then click on the background letter. Now, the offset and the big letter should be selected together. Open the Modify Panel and choose Subtract. This will subtract the offset shape from the background letter. Now all the little pieces will be individual designs. The design will need to be grouped together so it moves as one piece. Either press Ctrl+G on the keyboard or right click on the big letter and choose Group.
Ta-da! You have created your own design.
Move the design around as needed to cut out of the material you are using.
I cut mine from Siser Easyweed Heat Transfer Vinyl so I moved the Bobcats off the mat, right clicked on the B and chose Flip > Horizontal and then placed it in the top left corner of the mat to cut.
Once that was cut, I moved the B off the mat and moved the Bobcats onto the mat, rotated it back 90 degrees, right clicked and chose Flip > Horizontal and cut it.
I love my new shirt and of course, my kids asked for their own too! I love being able to create custom shirts with my Silhouette and they love wearing them!
But, I’m not going to tell them I like mine better.
Each design may turn out a little bit different depending on the letters, text, and font style chosen. Grab your favorite drink and get to creating! Here are a couple more that I created using the same steps above.
I’ve also created this as a video tutorial that can be found on my YouTube channel.
Save this for future reference by pinning the image below.
Enjoy!
THANK YOU for your support! How can you help? Click HERE & buy a coffee. Every little bit helps with the cost of running the site.
Or if you are looking for more in-depth, step-by-step classes, check out all of my online Silhouette classes on my Teachable site HERE.
**This post may contain affiliate links. What that means is that I may receive compensation if you purchase through the links I have provided. The price you pay for the product or service is not higher but I may get compensated for sharing.
THANK YOU for your support! How can you help? Click the link to buy a coffee. Every little bit helps in the cost of running the site.