Posted on 2 Comments

DIY Halloween Decor with Silhouette

The first thing I’ll say is I don’t like painting very much. And I have been doing a lot of painting. I am not a patient person in some areas. And watching and waiting for paint to dry is one of them. But, I cannot wait to show you all the projects happening behind the scenes here.

This year we decided to decorate for the month of October and Halloween. Our house is at the entrance to the neighborhood, so everyone has to drive by to enter and leave their house. With all of the craziness of the year, we decided to do something fun to hopefully give a few laughs.

I am not sure how your projects start, but this one started as a small idea where I was going to alter a few (6) Styrofoam gravestones and stick them in the yard. Well, that didn’t work and it ended up growing into a much larger project than I originally thought.
But my kids loved it, so it’s all worth it.

Note: this blog post is photo heavy

Affiliate links may be present in the following blog post and as an Amazon Associate I earn from qualifying purchases.

My Silhouette machine was a big help in this project and it would not have been completed without it.

Since altering the Styrofoam gravestones did not work out, we ended up getting a sheet of plywood and some gray paint. I invaded my husband’s workshop (with his permission) and started prepping the plywood. I used a gray exterior paint from Sherwin Williams and painted both sides, so hopefully this decor will last a few years.

After the paint was dry, we started cutting it down to gravestone sizes. Each of the gravestones is an approximately 10″-11″ wide and 12″-14″ tall.

In the end, we ended up with 14 gravestones of varying sizes and shapes. After the stone shapes were cut, they needed another coat of paint in some areas on the edges and the stakes to help seal them.

During the entire process, I was working on the designs and getting the stencils cut out of Oramask 813 stencil vinyl. Remember I said I do not like painting and waiting for it to dry, well this was one way to keep working while waiting for the paint to dry completely, which took several hours per coat.

Here is a quick time lapse video of applying the Oramask 813 stencils.

Keep in mind that this video is a time lapse and in real life it is much slower. Take your time taking the backing off and you can see if there are any areas that do not stick and can push those back down.

I used the font LW Vintage Sign Font by Lori Whitlock – Design #252472 for all of the designs.

And then came the process of taping the signs off and spray painting them.

Each sign was a little bit different in what worked to cover it for painting. In the end, making the stencil cover the majority of the wood and then taping off the edges was the fastest method.

This was one of the first ones I painted and only used cardboard as my barrier around the stencil and you can see how it sprayed in under the cardboard pieces.

Once the spray paint was dry, then came removing the stencils and letting the signs dry completely.

Once they were all complete, we had a gorgeous day to set up the yard and the kids enjoyed helping lay it all out.

The kids added in some skeleton arms coming out of a few graves. These are from the Dollar Tree and supposed to glow in the dark. Here is the left side of the cemetery.

And then the right side of the cemetery.

It is definitely hard to get photos of them at night.

And this year “Jack” our skeleton came back to visit after going on vacation when the pandemic hit.

Check out this post from last October on Silhouette Designs – Part 1 to see some of Jack’s various disguises.

Each time we decorate the door, the kids get to help in selecting what goes on it.
This time my youngest said she wanted Jack to have a thought bubble.
Here are the designs used to create the door decor:
Thought Bubble by Calli Arroyo – Design #223173
LW Bones font by Lori Whitlock – Design #277409
Fence from Halloween Elements font by Sarah Hurley – Design #274612
Tombstone and Crow by Loni Stevens – Design #33479
Jack the Positionable Skeleton by Samantha Walker – Design #4828
and the No Soliciting sign is up year round
No Soliciting by Jillibean Soup – Design #276179
This one has really cut down on the sales people knocking on our door.

A few more things added to the yard decor and I am calling this project finished for this year.

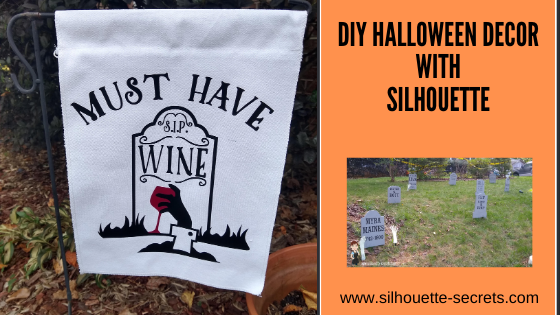
I had been looking for a design for the garden flag that fit in with the rest of the Cemetery theme and knew as soon as I saw this one that it was perfect.
Must Have Wine Design by Megan Hardy – Design #303383

We had a white corrugated sign that was blank on the backside, so I used Oramask 813 as a mask and added my text, then spray painted the entire thing black and removed the Oramask so the white could show through.

This is what the neighbors see as they drive out.

I used Oramask 813 to create a stencil for the signs.

Make sure to let the paint dry well before removing the Oramask 813 stencil. There were a few areas that bled because of the wood roughness and it was easily touched up with a small brush.

And it’s done! The kid’s are already planning things to add to it next year.
I am not ready for that.

Do you have any small projects that morphed into a much bigger project than you thought it would be?
I would love to hear or see it on my Facebook group at 
Silhouette Secrets with EllyMae.

Save this for future reference by pinning the image below.

Enjoy!

This image has an empty alt attribute; its file name is logo.jpg

THANK YOU for your support! How can you help? Click HERE & buy a coffee.
Every little bit helps with the cost of running the site.

Or if you are looking for more in-depth, step-by-step classes, check out all of my online Silhouette classes on my Teachable site HERE.

SS Logo snip it
**This post may contain affiliate links. What that means is that I may receive compensation if you purchase through the links I have provided. The price you pay for the product or service is not higher but I may get compensated for sharing.
Posted on 3 Comments

Let’s Explore v4 – Silhouette Designs – Part 1

Today I’m going to show you how to make the most out of your designs that you purchase. Now, each design will be different because all designs are created differently, but let’s take a look at how we can make a few changes to the designs and get a different look.

Last year, I cut out this position-able skeleton and put him up on my front door for the “Let’s Explore v4 – Warp Panel” post – HERE.

Skeleton door sign
Position-able Skeleton by Samantha Walker – Design #4828

Well, the kids did not want me to take him down, but they decided that we should decorate him all year long.

For the holidays, he received a new hat.

IMG_6844 copy
Santa hat from Santa & Friends Photo Props by Kolette Hall – Design #35760

For Easter he received a make over and dressed up as a bunny.
Check out these posts Designing with ShapesCreating Your Own Designs.

Silhouette_Secrets_skeleton

And for the Spring, he debuted as a ball player helping me show how to change the Selection Preferences in the software and helping hold our No Soliciting sign. What a great helper! Since putting up this sign we do not have constant sales people knocking on our door. No one has brought wine or done my laundry but I’m ok with that if I don’t have to listen to sales pitches.

IMG_20190429_144932346_HDR

Now, he has decided he is a Pirate. He has gone almost a full year without a name, so I think I’ll call him Jack.

Sil_Secrets_FallDoor copy
Pirate Photobooth Props by Rivka Wilkins – Design #49887

How to Make Your Designs Go Farther

**Tutorial written in Silhouette Studio v4.3.263 – you may see additional icons or options on my screen that are available in v4.3. All techniques are available in previous versions of the software. 

One way to get your money out of a design is to keep it up all year long. But, that wasn’t actually the reason I started writing this post.

I try to ask the kids what they would like when we change out the door decorations each season. This time they said jack-o-lanterns in addition to dressing “Jack” up as a pirate.
So I grabbed these designs from the Silhouette Design Store.
Pumpkin by Wild Pilot – Design #274430
Pumpkin by Wild Pilot – Design #274429
Pumpkin by Wild Pilot – Design #274427
Pumpkin by FoxSister – Design #273881
Pumpkin by FoxSister – Design #273880
Pumpkin by FoxSister – Design #273879

I’ll take one of these (Design #274430) and use it to show how you can alter it to get a couple different looks using some of the features we’ve covered in the
“Let’s Explore v4” series.

When Pumpkin – Design #274430 is opened, this is what you will see.

Pumpkin 274430 copy

I always fill my designs or text with color using the Fill Color Panel to see how it will look when cut or if there are additional things I need to do, such as Make a Compound Path of the design.

Fill Color Panel copy

The design must be selected in order to change the property of it. Click on the red line of the design and the Selection box should appear around the image, then click on a color in the Fill Color Panel to add a color.

Once the design is filled with color, it can be selected by clicking anywhere in the color of the object. You do not have to be as precise in clicking on the red line of the design to select it. This is another reason I fill my designs with color as it makes

You can see in the above photo that if I cut this out exactly as it opens, it will cut the outline of the pumpkin and the face features inside. There is no background to the pumpkin and that can work for many designs, but I wanted a background.

I made a copy of the pumpkin so you will see the comparison.

Right click on the Pumpkin – Design #274430 and choose Release Compound Path.

Release Compound Path copy

This takes the design and releases all the pieces that make up the design. This will allow us to work with the pieces of the design individually and change it how we want.
You will notice that since we have filled it with color, it is now all the same color.

Release CP color copy

Click on the Fill Color Panel and choose the Transparent option to take the color back out.

Each file may be different in the exact steps you will need to take on how you get it all broken down into pieces. However the same features and tools will work, but they may need to be completed in a different order. This is dependent on how the designer created the file. But, knowing how each feature works will help you in deciding what steps you need to try to get it to the results you want.

You will notice in the photo above, that after the compound path is released, the selection box is still 1 around the entire design. This file is all grouped together. Right click on the design and choose Ungroup.

Ungroup copy

Now, the design is broken up into some pieces.

Left click on the mouse in the top left corner above the design, hold the left mouse button and drag across the entire design. All the objects that the drag box covers will be selected.
Hold the Shift key on the keyboard down and then click on the outer edge of the pumpkin and the 2 stem pieces. This will deselect those pieces.
Next, right click and choose Make Compound Path. This will compress all of those pieces back into 1 object.

Next, to see how the compound path worked, use the Fill Color Panel again and fill that section with color.

Select the stem pieces. Click on 1 piece of the stem and hold down the Shift key on the keyboard, then select the 2nd piece of the stem. Right click and choose Group. Then fill the stem with green.

2nd copy copy.jpg

Select the outer edge of the pumpkin and fill that with black.

Now you can see that we have taken a few additional steps and have a design that is more than just an outline of the pumpkin.

Compound paths can be something that takes a little bit of working with to really understand how they work. Check out this post on the Modify Panel – Part 2 to see more examples of Compound Paths.
The best way to reinforce the concept is to take a design and just play with it.

eZy_watermark_23-09-2019_01-03-40 copy

I did the same thing for all 3 of these happy pumpkins and these not-so-happy jack-o-lanterns.

eZy_watermark_23-09-2019_01-03-20 copy

Don’t look too close or you will see that my bottom jack-o-lantern decided to mess with me and not follow the rules. He decided to go rogue and not to lay in his designated spot.
It happens!

Next week, we will explore how I stacked the pumpkins all together, combined the black backgrounds to cut it all out of one piece of black vinyl, and how I pieced it together.
Find Part 2 HERE – Silhouette Designs – Part 2.

I love that I can take one design and turn it into another or modify it in a way that I can use bits and pieces if I want. With a few of the tools in the Silhouette software the possibilities of what you can do are endless.

As I mentioned above, each design may vary in the steps that it may take to alter it and this is dependent on how the designer saved the design.
But, it sure is fun to play around with!

I would love to see your projects feel free to post on my Facebook group at Silhouette Secrets with EllyMae.

Enjoy!

SS_Signature copySS Logo snip it

**This post may contain affiliate links. What that means is that I may receive compensation if you purchase through the links I have provided. The price you pay for the product or service is not higher but I may get compensated for sharing.