Posted on 1 Comment

Building a TP Snowman with Silhouette

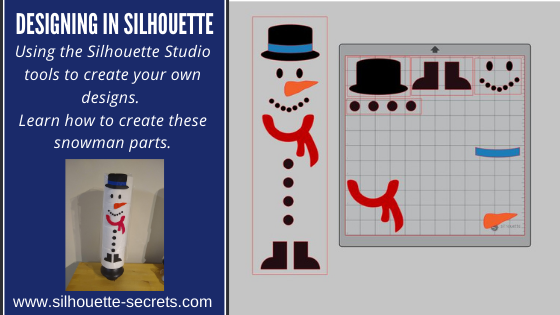
This idea was born off of a message a group member sent me asking about a file. I shared how I created the original prototype using the tools in the Silhouette software in this post
Designing in Silhouette – Snowman Pieces.

But, I just couldn’t stop with that one and thought I could add my own touch to it.

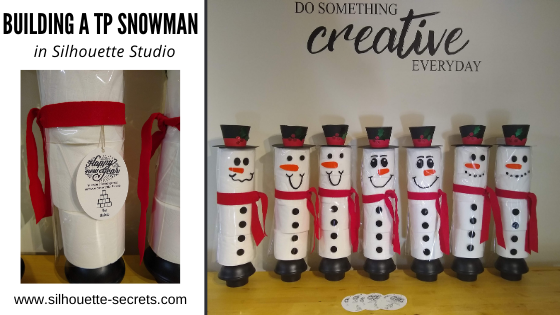
This year I didn’t get holiday cards out or neighbor gifts before Christmas. But, after Christmas was over, I decided this little snowman would be the perfect gift for neighbors and close friends to welcome in the New Year!

Affiliate links may be present in the following blog post and as an Amazon Associate, I earn from qualifying purchases.

First gather the supplies:

4 rolls of TP
New plunger – Target $4.99
Clear gift basket bag
Designs (listed see below)
Adhesive Vinyl
Cardstock
Felt for the scarf

How to design the snowman

First, measure the 4 rolls of TP or the blank that you are going to be applying it to.
My TP rolls are 5″ x 17.25″ when stacked on top of each other.
Using the Draw Rectangle tool & Scale tab, draw a rectangle 5″ x 17.25″ so you know what area you have to design within.

Then came the buttons.
I had already drawn them from the previous snowman so I copied and pasted those to a new design mat.

To draw them.
Choose the Draw Ellipse tool on the left side.
Then hold the Shift key down to draw a perfect circle.
Fill the circle with black using the Fill Color Panel or QAT (Quick Access Toolbar).
Duplicate the circle 3 times up. Move the top circle up a bit.
Select all 4 circles – choose Align Center. Then choose Vertical Spacing.
Group together once Aligned.

I used the Snowman Faces Dingbat Font by Sweet Afton – Design #303061 and it had so many options to choose different faces.

The hardest part was deciding on the faces to use.

I duplicated and arranged all the pieces to be cut out of Oracal 651 adhesive vinyl.

I used the Draw a Curved Shape and the Rectangle tool to draw Weeding Boxes around the designs to make it easier to weed in smaller sections.
Check out this post HERE on weeding lines for more information on how it can help.

Then I cut out all the noses from Oracal 651 orange.

Using Oracal transfer tape, I applied the vinyl to the cellophane gift bags. Make sure to measure about 3-1/2″ from the top of the bag, so you can account for the area that forms over the top of the toilet paper when the bag goes on top.

Next came the hats. I used the 3-D Snowman Top Hat file by Amanda McGee – Design #308002 .

All the pieces are cut from plain cardstock, glitter cardstock for the berries, and a metallic cardstock for the leaves.

I cut all the pieces and then assembled them all while watching a movie one night. I used Scrappy Tape and Glue dots to hold the pieces together.

I then set up a print and cut to create tags.

I combined a couple of designs to make the tag. The first was a sentiment from the
4-Step Card – Happy New Year by Lori Whitlock – Design #283956.

And then I used the TP tree from the 2020 Christmas Tree design by Megan Hardy
Design #338817.

I added text using the Text Tool and Text Style Panel. Then using the Draw Ellipse tool drew an oval around it the size I wanted.

Perfect print and cut tags!

For more tips on Print and Cut check out this Basics post HERE.
Or check out the full step-by-step Print and Cut Class with bonus troubleshooting HERE.

Stack the toilet paper on the plunger, cover it with the cellophane bag with the snowman design facing front, cut a piece of red felt to tie around as the scarf, and add the top hat to top it off!

I did tape the corners of the cellophane bag down so they laid flat before gluing the top hat down. I just added a couple of glue dots to the bottom side of the top hat to secure to the top.

I placed the tag on some twine and then taped it underneath the backside of the scarf.

They were a hit!
Such a relevant year for the Toilet paper snowmen!
Perfect for a bit of winter decor and useful as well, if needed.

I would love to see what you are creating with your Silhouette machine.
Feel free to post on my Facebook group
Silhouette Secrets with EllyMae.
If you have questions feel free to post below or on the Facebook group too!

Save this for future reference by pinning the image below.

Enjoy!

This image has an empty alt attribute; its file name is logo.jpg

THANK YOU for your support! How can you help? Click HERE & buy a coffee.
Every little bit helps with the cost of running the site.

Or if you are looking for more in-depth, step-by-step classes, check out all of my online Silhouette classes on my Teachable site HERE.

SS Logo snip it
**This post may contain affiliate links. What that means is that I may receive compensation if you purchase through the links I have provided. The price you pay for the product or service is not higher but I may get compensated for sharing.
Posted on 7 Comments

Designing in Silhouette – Snowman pieces

Designing in Silhouette

So you want to learn to design in the Silhouette software?
I see user’s asking how to create their own designs in Silhouette often. And it can be done. The more familiar you can become with the tools in the software, the easier things will be for you to create designs.
The more you do it the more you will start to use those tools without even knowing you are doing it! The absolute best thing you can do to learn the software is to dive in.
Follow this step-by-step, even if you never make the finished physical project.
You will have created the design yourself, used many tools in the Silhouette software, and learn new things as you do it.

Affiliate links may be present in the following blog post and as an Amazon Associate, I earn from qualifying purchases.

A group member had sent a message asking if I knew where to buy a file. I did not find the exact file, but I started looking at it and decided it was a great way to show how you can create your own designs. After all, if you think about it, designs are just shapes combined to make up an image.
This little snowman are created from stacking toilet paper on a new toilet plunger. It has a cellophane gift bag that the adhesive vinyl is applied to and then it is slid down over top of the toilet paper rolls.

The first one I created, I wanted it to be all from creating the entire design in Silhouette.

First, measure the 4 rolls of TP or the blank that you are going to be applying it to.
My TP rolls are 5″ x 17.25″ when stacked on top of each other.
Using the Draw Rectangle tool & Scale tab, draw a rectangle 5″ x 17.25″ so you know what area you have to design within.

Next, let’s draw the boots.
Using the drawing tools again, draw a rectangle.
Then using the Flexishape tools, draw a half circle.
Flexishapes are a Designer Plus or Business Edition upgrade feature.
It is one reason I would highly recommend upgrading the software.
Hold the Shift key down when you draw the flexishape and it will snap to 0 degrees.
Align the half circle with the bottom of the rectangle using the Align tools.
Select both shapes and make a copy.
Move it off to the side, just in case it is needed later.
Select both the original rectangle and the half circle. Right click and choose weld.
Fill with color using the Fill color Panel.

Use the Replicate Mirrored tool to make a 2nd copy. Then use the Align tools to line the boots together at the bottom. Once aligned, right click and choose Group.

Now let’s draw the buttons.
Choose the Draw Ellipse tool on the left side.
Then hold the Shift key down to draw a perfect circle.
Fill the circle with black using the Fill Color Panel or QAT (Quick Access Toolbar).
Duplicate the circle 3 times up. Move the top circle up a bit.
Select all 4 circles – choose Align Center. Then choose Vertical Spacing.
Group together once Aligned.

Working up, the scarf is next.
Under the Flexishapes, click on the draw arc tool. Then click in the middle of the rectangle and draw a line to the right a little ways. Move the mouse to the left and it will draw the arc. Adjust the middle arrows to make it thinner or wider.

Once done, right click and choose Convert to Path.
Double click on the design to bring up edit points.
Click on the corners of the arc and choose Make Curve in the Edit Points Panel.

Choose the Draw a Curved Shape tool.
Then draw a “tail” for the scarf. Play around with it until you like it.
When finished, select both the arc and the tail, right click and choose Weld.

Fill it with red color from the Fill Color Panel on the right side or in the QAT (Quick Access Toolbar).

Next, let’s draw the mouth.
Using the Draw Ellipse tool on the left side, hold down the Shift key and draw a small circle.
Fill the circle with black using the Fill Color Panel.
Use the Replicate Panel to replicate the circle 5-6 times.

Arrange the circles in the shape of a smile by clicking on each and moving.
Select all of mouth pieces. Use the Align tools to space them Horizontally from each other.
Arrange how you like. Select all the mouth pieces, right click and choose group.

Now let’s draw the carrot nose shape.
Click on the Flexishape lighting bolt. Draw a small shape.
Then adjust using the red dots as desired.
Right click on the shape and choose Convert to Path.

Then double click to bring up the Edit Points.
Hold the Shift key down and drag to select across the entire design.
This will select all of the edit points at once.
Choose Make Curve.

Click on individual edit points to delete a few on the inside. Adjust the design as desired.

Fill with Orange from the Fill Color Panel.

And now the eyes, choose the Draw Ellipse tool and draw a small oval.
Fill it with black from the Fill Color Panel/QAT.
Then duplicate and move to the right.
Select both of the ovals, use the Align Middle tool and group them together.

The final piece to design is the hat.
To do this we will use the Draw ellipse and rounded rectangle tool.
Draw one oval for the bottom brim.
Make a copy and move it above the first.
Scale the 2nd oval down for the top of the hat by grabbing the corner bounding box and moving it in.
Use the Align tools to center the ovals together.
Then draw a rounded rectangle between the ovals.
Use the Align tools to center the shapes together.

Make a copy and pull it off to the side.
Select both ovals and the rounded rectangle, right click and choose Weld.

Make a copy of the welded design and pull it to the side.
Then fill the original design with black using the Fill Color Panel.

Next, make a copy of the bottom oval on the hat shapes copy.
Bring it over to the and place it were the brim meets the stack of the hat as shown.

Select the hat and the 2nd oval and use the Align tools to align the middle.

Next, with both objects still selected, open the Modify Panel and choose Crop.

Make a copy of the bottom oval again and drag it to the top of the cropped section. Use the Align tools to align the middle of the 2 shapes.

With both shapes selected, choose Subtract under the Modify Panel.

Fill the hat band with color and move it on top of the original hat.
Use the Align tools to make sure it’s aligned middle.

Arrange the snowman pieces as desired to see how it will fit on your space.

Congratulations! You created your own design!
Now, that may seem like a lot of steps or using a lot of tools, but like I said above, it is a design you have drawn yourself and the more you use the tools in the software, you will start to use them without even thinking about it.
Hopefully you picked up on the fact that we continued to use the same basic tools over and over.

If you are cutting the finished design, arrange all the pieces to cut out of the different colors of vinyl.

Check out this video showing all of the steps to create the snowman as well.

If viewing by email, please click the photo to open up the YouTube video.

Supplies used:
4 rolls of TP per snowman
New plunger – Target $4.99
Clear gift basket bag
Adhesive Vinyl
Silhouette Studio Software

The more you use the tools, the better you will get. And sometimes, I’ll be honest, the only way to know what is going to work for the design you are creating is to push the buttons and use the UNDO button.

Or use Ctrl+Z on PC or Command+Z on Mac for the keyboard shortcut

I would highly recommend getting into the software and just start creating!

Even if you do not cut the snowman, I would love to see the snowmen design that you make or any other design you have created using the tools in the software!

Feel free to post on my Facebook group at 
Silhouette Secrets with EllyMae.
If you have questions feel free to post below or on the Facebook group too!

Save this for future reference by pinning the image below.

Enjoy!

SS Logo snip it
**This post may contain affiliate links. What that means is that I may receive compensation if you purchase through the links I have provided. The price you pay for the product or service is not higher but I may get compensated for sharing.