Looking for a creative way to personalize your home decor projects? Glass etching is a fun and easy technique that can completely transform simple glass surfaces into beautiful custom pieces! In this post, I’m sharing how I used Etchall etching creme on a floating glass floral frame to create a unique one-of-a-kind decor project perfect for displaying photos, pressed flowers, inspirational quotes, and more. The frosted etched finish adds an elegant touch while still allowing the beauty of the floating frame design to shine through. Whether you’re new to glass etching or looking for fresh DIY project ideas, this custom etched glass frame is a great way to create personalized decor with a professional look.
Affiliate links may be present in the following blog post and as an Amazon Associate, I earn from qualifying purchases.
Steps to Etched Glass Projects
Create a stencil for etching.
Clean glass blank with alcohol and allow to dry.
Apply stencil.
Mask off edge of stencil to prevent bleeding
Apply Etchall Etching Creme and allow to sit for 20 minutes.
Remove any excess Etching Creme and place back in the bottle.
Wipe off remaining excess with a paper towel and safely discard paper towel.
Run water in the sink and rinse off decal thoroughly.
Remove masking tape and adhesive vinyl under running water.
Gather the supplies. I am using a floating frame which has 2 panels of glass and the photos will be sandwiched in between the glass panels.
I cut the adhesive vinyl with the Silhouette Cameo and weeded out the design for my stencil. Then applied it to the backside of the glass frame. I also taped off the glass panel edges with painters tape to make it easier to handle and not cut myself.
Since there were some small details and pieces, I did apply a bit of heat to set the adhesive vinyl and give it a good seal. Be very careful here and let the glass cool before handling.
Then apply a generous layer of Etchall etching creme and let it sit for 20 minutes.
Scrape off any excess Etchall creme and put it back in the bottle. I scrape as much as I can and then use a paper towel carefully to wipe away any excess. Then rinse with a generous amount of running water until the glass is clean. Remove the adhesive vinyl stencil and rinse again.
I add some of the bright, colorful flower photos that I had taken from my front yard a few years ago and it really made it pop!
Take this idea and make it your own! What supplies do you have in your craft stash that you could make a custom glass etched
Save this for future reference by pinning the image below.
Enjoy !
THANK YOU for your support! How can you help? Click HERE & buy a coffee. Every little bit helps with the cost of running the site.
Silhouette Classes
Never stop learning! Let me help you take the anxiety out of learning with Silhouette and get to creating faster! My Silhouette classes are heavily focused on software, so you can take the skills & techniques taught and apply them to many future projects!
**This post may contain affiliate links. What that means is that I may receive compensation if you purchase through the links I have provided. The price you pay for the product or service is not higher, but I may get compensated for sharing.
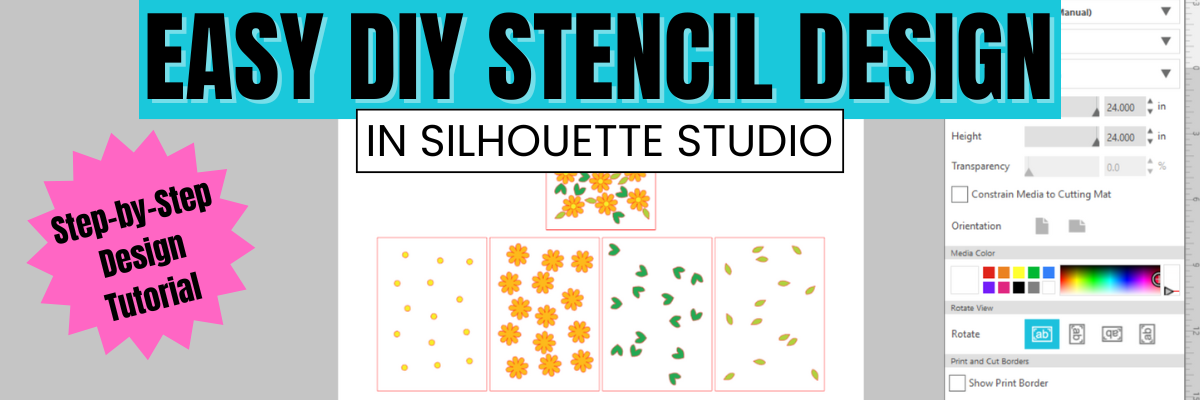
Ready to unlock the full potential of your Silhouette machine? Whether you’re a seasoned crafter or just starting out, stenciling is a fun and versatile technique that can transform almost any project. In this post, I’m sharing creative stencil ideas you can cut right now with your Silhouette—think custom doormats, etched glass, painted wood signs, fabric decor, layered art journaling, and more. You’ll also find must-know tips for designing stencils, multiple stencil materials that can be cut, and step-by-step tutorials below too! This blog post is packed with Silhouette information, tips, and tutorials—so make sure to bookmark it for future reference.
Affiliate links may be present in the following blog post and as an Amazon Associate, I earn from qualifying purchases.
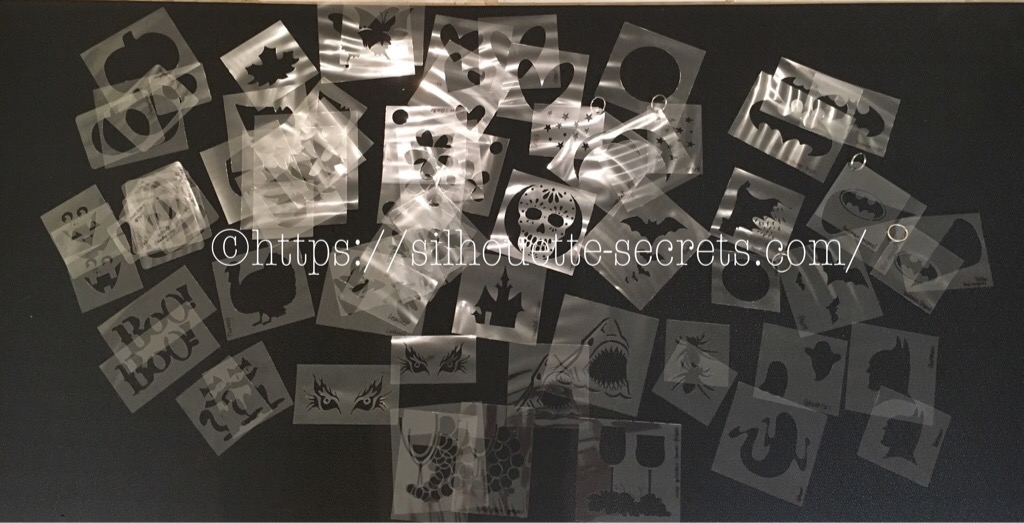
Stencils can be created from many different materials. Cardstock, adhesive vinyl, plastic stencil materials, and more! I’m sharing some of those materials below with tips and tutorials to help you design and create in Silhouette Studio.
Project #1 – Custom Stencils with Silhouette Stencil Material
Create your own stencils with basic shapes and patterns in the Silhouette Studio software.
I created these 2 stencil patterns and cut them from the Silhouette non-adhesive stencil material using the Silhouette Autoblade.
Silhouette has both adhesive backed and non-adhesive backed stencil material as shown above. One might work better for your projects versus another. Since my plan was to use the stencil on a flat material like mixed media paper, I didn’t really need it to be sticky on the backside.
I also kept all the negative bits that were cut out from this stencil for a possible future project. They could be used as elements on a card, creating a pattern on a card, as a stencil by itself, and more!
Then I pressed a piece of bubble wrap into the stencil butter to give it even more texture.
Make sure to let the stencil butter dry completely before touching it. I sometimes get impatient, so having a heat gun can be handy to help speed up the process too.
I use adhesive vinyl for many different projects as a stencil such as glass etching, painting, or in this project below – I was trying it with a Scorch marker for wood burning.
When creating a stencil with adhesive vinyl, weed out the design and that creates the stencil. In the photo below, I have weeded the flower design out of the black adhesive vinyl. I use basic shapes such as a rectangle around the design to create the outer edge of the stencil. The actual project I’m creating will determine the size of the shape I place around my design for the stencil outer edge. For projects such as painting or glass etching, I will give myself plenty of space around the design. For something smaller, as shown below, I don’t need as much extra space since it will be close to the edge of the blank being used.
Now, in this case, my project failed, but I’m still sharing it with you because it happens! Projects don’t turn out, projects fail and what you see on social media is not always reality.
These wood earring blanks were a bit too porous, and the Scorch marker liquid just bled too much. It looks more like those therapy cards – What shape do you see?
And that’s just how it goes sometimes. Some projects fail!
Here is another example of adhesive vinyl cut for stencils that I was using for glass etching.
And this one turned out fabulous!
Additional Resources for the tools I used to create the design:
Project #3 – Layered Stencil with Plastic Stencil Material
We see a lot of questions by users on cutting stencil materials. Typically, it is in reference to plastic materials that a user is trying to cut. While Silhouette machines can cut a lot of different materials, there are limits and it is not just about thickness, but also density and composition.
Another thing to keep in mind is that stencil material is plastic and plastic will dull the blade quicker than other materials. It is perfectly normal to have to increase the blade settings or passes the more that is cut. And if you are cutting this material a lot, you may go through more blades than other thinner, easier to cut materials.
I cut this 6 mil stencil material using the preset for Stencil Material in the Silhouette Studio software. All I changed was to increase the passes to 2 and then when that started having a few hang ups, I increased it to 3 passes.
The settings that work for you will depend on the blade sharpness, material, and your machine. There is no perfect setting that works for all users magically.
I do recommend cutting one stencil design at a time. This way you can catch any issues before you’ve wasted time and materials.
Do not unload the cutting mat before you check the cut and if it did not cut through you can send it again.
I was using the same Autoblade that I used with the Silhouette Stencil material mentioned above and it’s still going strong with the settings pictured above on the 6 mil stencil material.
The hardest part for me was that I had to stop the design and creation process and move on to other things. Once you get started cutting, it is easy to get wrapped up in the projects. Here are a couple more I cut before I moved on to the next phase – using the stencils.
And there is more!!! A follower asked for more design tutorials after seeing the video above. So I also shared how to quickly design a flower and a heart in Silhouette too!
Click the images above or the links below to watch these quick tutorials:
When working with stencils whether it is a design or a font, the pieces have to all remain in the stencil somehow. If a piece is completely cut out, it will fall out of the stencil.
For instance, for letters A, B, D, O, P, Q, and R, they all have “counters”, which are the centers of the design that would fall out when cut. In order to cut as a stencil and remain in place, the letter needs a “bridge” so it can be held in place when cut.
I typed in “stencil font” to the Silhouette Design Store search and many options come up. All kinds of styles and the perfect one will vary based on your project and taste.
You can see my taste varies and some of these will cut better at larger sizes than smaller. Each project may vary and you never really know until you test it.
The fastest way to create a stencil font is to use a premade font file, but you can also create your own from a font. This works best with a bold font where you can make “bridges” to help hold the centers (counters) of the letters in place.
I used a font style called Grossura to create the stencil quote shown above.
There is so many different projects you can create with stencils! And you can apply the same techniques and design steps to other projects as well. I hope you’ve picked up a few new ideas and techniques!
Looking for more creative ideas and inspiration? Check out the Crafting Creativity blog posts for a treasure trove of fun and unique projects! Each month, I share a fresh collection of craft ideas designed to spark your imagination and help you expand your skills with confidence. Don’t miss out—your next favorite project could be just a click away!
Save this for future reference by pinning the image below.
Enjoy !
THANK YOU for your support! How can you help? Click HERE & buy a coffee. Every little bit helps with the cost of running the site.
Silhouette Classes
Never stop learning! Let me help you take the anxiety out of learning with Silhouette and get to creating faster! My Silhouette classes are heavily focused on software, so you can take the skills & techniques taught and apply them to many future projects!
**This post may contain affiliate links. What that means is that I may receive compensation if you purchase through the links I have provided. The price you pay for the product or service is not higher but I may get compensated for sharing.
Did you miss this video tutorial? Don’t worry — I’ve got you covered! In this step-by-step tutorial from the Silhouette Secrets+ YouTube channel, I walk you through exactly how to create a layered stencil design in Silhouette Studio. Whether you’re a beginner or just looking to level up your stencil projects, this video will show you how to break a design into layers, align them perfectly, and prep each one for cutting. Layered stencils are perfect for multi-color painting, mixed media, and more — and with these tips, you’ll be designing your own in no time! Watch the full video and start crafting with confidence.
Affiliate links may be present in the following blog post and as an Amazon Associate, I earn from qualifying purchases.
What would you use stencils for? Let us know in the comments below.
Save this for future reference by pinning the image below.
Enjoy !
THANK YOU for your support! How can you help? Click HERE & buy a coffee. Every little bit helps with the cost of running the site.
Silhouette Classes
Never stop learning! Let me help you take the anxiety out of learning with Silhouette and get to creating faster! My Silhouette classes are heavily focused on software, so you can take the skills & techniques taught and apply them to many future projects!
**This post may contain affiliate links. What that means is that I may receive compensation if you purchase through the links I have provided. The price you pay for the product or service is not higher but I may get compensated for sharing.
If you’re anything like me, finding the right tools for your creative space can make all the difference—and I just added a new one to my studio: the Magnetic Glass Craft Mat. I am loving it! From its sleek, sturdy surface to the strong magnets that keep materials perfectly in place, this mat has quickly become one of my absolute favorite tools. Whether you’re a paper crafter, vinyl user, or mixed media enthusiast, this is one studio upgrade you may find useful too!
Affiliate links may be present in the following blog post and as an Amazon Associate, I earn from qualifying purchases.
I have seen these craft mats advertised previously, but I got an in-person look at them at the 2025 Creativation in Seatle. I’ll be honest, I am usually anti-glass in my studio because you just never know what I will stumble across or drop. But I took a chance, and I bought this, and I love it!
This post is not sponsored by Glassboard Crafts or an advertisement for them. I am sharing a new tool I invested in and added to my craft space. I am asked often about tools I use and after requests by followers created a page on the website for “EllyMae’s Craft Supplies” – Find it at the top of the Silhouette Secrets+ website or click HERE.
In full disclosure, I am now an affiliate with Glassboard Crafts, and I do have a coupon code that can save you 15% on your order. Bonus for you if you decide to add this to your tools.
Use code SILHOUETTESECRETS to save 15% on your order HERE.
I knew I wanted a solid color because I record videos and a design can be distracting in the videos and white makes my camera go crazy trying to auto focus, so I chose a solid that I thought would be good. But I am drooling over all the patterns, and they just keep coming out with more.
One thing I didn’t think about until I tried to take photos to share is the reflection. Reflections always get the better of me. The surface reflects very, very well as you can see with my recording lights.
But I’ll work around that and adapt.
How I’ve Used My Magnetic Glass Craft Mat
Does everyone need this? Probably not, but I am loving it for 2 reasons – the heavy-duty magnets and the ease of cleaning up.
Lately I seem to be creating with more products that can be messy such as mixed media gel sticks, paints, paint markers, watercolors, and more. I am expanding my wheelhouse and loving the experimentation. But that can be messy too! At least for me.
Here are a few ways I’ve used it so far in the month since I received it.
This was for a video tutorial on creating a layered stencil in Silhouette (find that HERE). The magnets worked to hold the mixed media paper in place while working with the stencils. It could also be used to hold the stencils in place too; it would just depend on the thickness of your stencils and what magnets you have available to use. I ordered a 6″ magnetic ruler and have 4 of the mini pawn magnets.
I also used it as a palette to test some different techniques. I just scribbled the mixed media gel sticks on the glass surface, added a bit of water, and then used a paint brush to pick up the color. When my images didn’t turn out quite how I wanted, I simply used a paper towel to wipe up the water & remaining color.
I was using a combination of Posca Paint Markers and acrylic paint on this sign. The smaller pieces were easily colored with the markers, while larger pieces were a bit messier and needed more coverage.
I used the glass mat as my paint palette and to catch my mess when painting the larger pieces.
I love how this sign turned out. The tiki is a bit dark in the photos but shows up better in person.
And one project leads to another. While the sign was drying, I was already on to cutting the pieces of a larger tiki on the left side. No paint needed with this one, just two types of wood. And he quickly disappeared after being glued together as my husband claimed it for his office at work.
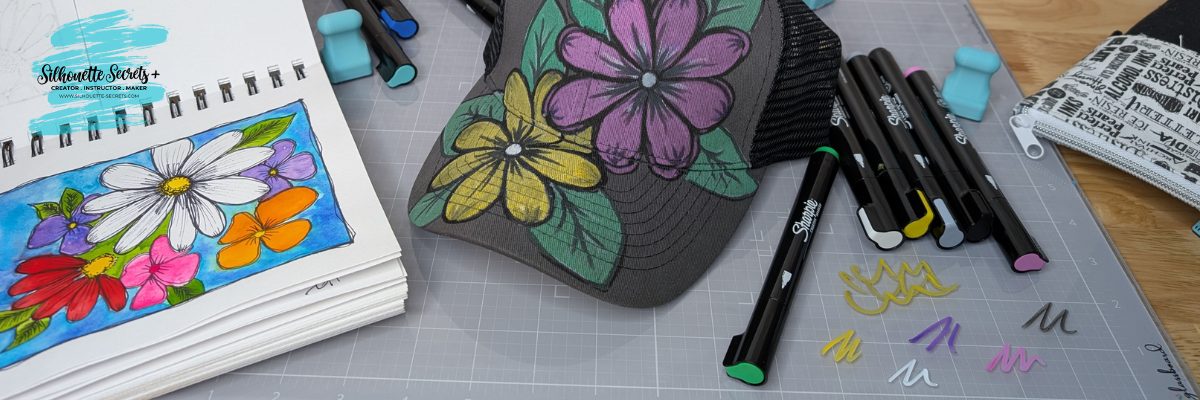
Next up was more paint markers – this time Sharpie Creative Markers on glass. This is the messy side of things. I applied adhesive vinyl to the backside of a glass frame, then colored in sections of the design with the Sharpie Creative Markers.
I could have used the magnets to hold the glass in place, which is completely an after thought. Instead, I was using the magnets to hold the rest of my markers from escaping, which you can’t see in this photo.
And while I had the Sharpie Creative Markers out, I really stepped outside my comfort zone and did a little doodling on a hat. Before I used each marker on the hat, I would scribble to make sure it was flowing well on the glass mat. A wet paper towel will make this easy clean up.
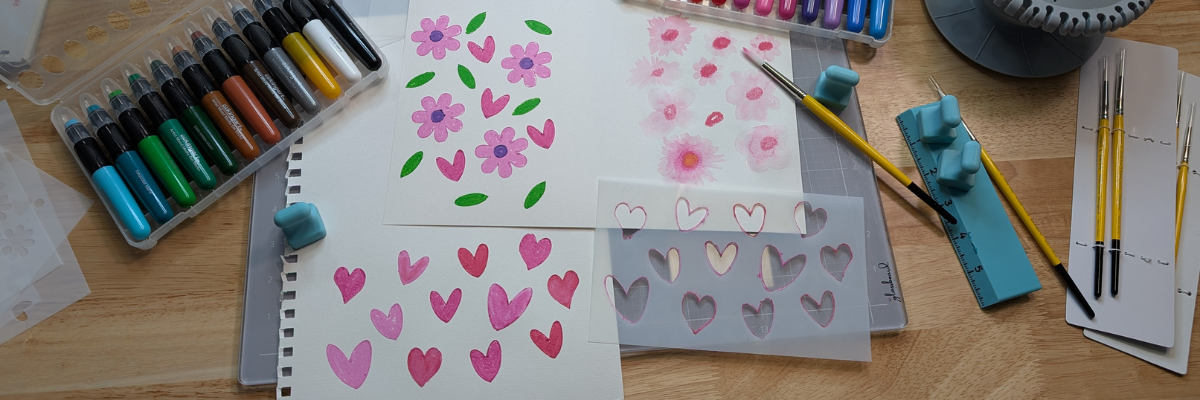
I took a watercolor class from Tracy Weinzafel earlier this year and ever since have been experimenting with different mediums and drawing the flowers taught at the event over and over for multiple projects.
I love new tools and craft supplies! Check out other supplies I use to create with HERE.
Watch for new patterns released and I’d love to hear your favorite below, even if you are just window shopping and dreaming. That’s how it all started for me!
Save this for future reference by pinning the image below.
Enjoy !
THANK YOU for your support! How can you help? Click HERE & buy a coffee. Every little bit helps with the cost of running the site.
Silhouette Classes
Never stop learning! Let me help you take the anxiety out of learning with Silhouette and get to creating faster! My Silhouette classes are heavily focused on software, so you can take the skills & techniques taught and apply them to many future projects!
**This post may contain affiliate links. What that means is that I may receive compensation if you purchase through the links I have provided. The price you pay for the product or service is not higher but I may get compensated for sharing.
I had so much fun playing with alcohol inks and the Grafix Dura-Bright White creating a background that I used for several different projects!
Affiliate links may be present in the following blog post and as an Amazon Associate, I earn from qualifying purchases.
This project took on a life of it’s own as I went. I started with the idea to create a card and a bookmark, but ended up letting the art talk to me and see where it went. I love it!!!!
Anyone can do this! I used alcohol ink and dropped it onto the Dura-Bright White and moved it around with an air blower. While the background was drying, I cut some designs out of Oracal 651 white adhesive vinyl. After the Dura-Bright was fully dry, I cut it up into several sizes for the projects, then added a laminate overlay on top to protect the alcohol ink design. Finished off the designs with the adhesive vinyl decal on top.
While creating the intended designs, another idea was born, and I just rolled with it. Now I have a framed piece of art for my desk. I love it!!!!
Save this for future reference by pinning the image below.
Enjoy !
THANK YOU for your support! How can you help? Click HERE & buy a coffee. Every little bit helps with the cost of running the site.
Silhouette Classes
Never stop learning! Let me help you take the anxiety out of learning with Silhouette and get to creating faster! My Silhouette classes are heavily focused on software, so you can take the skills & techniques taught and apply them to many future projects!
**This post may contain affiliate links. What that means is that I may receive compensation if you purchase through the links I have provided. The price you pay for the product or service is not higher but I may get compensated for sharing.
There are so many possibilities when you have a cutting machine and can cut any design that you want. Combine that with the Grafix Frisket Film and wow! Endless card designs and projects you can create. I’m sharing a few cards I created below and I hope it sparks some ideas of projects you could create too!
Affiliate links may be present in the following blog post and as an Amazon Associate, I earn from qualifying purchases.
For this project I used several flower designs in Silhouette Studio and cut those from the Grafix Frisket Film on the Silhouette Cameo 5. You could use any brand of cutting machine or a die cut machine as well to cut the Grafix Frisket Film.
Cut settings for materials can vary by machine, blade life, material, and more! Test cuts are the only way you will know for sure what will work best and not waste materials.
For the Grafix Frisket Film, I used Silhouette settings of: Blade Depth – 2, Force – 10, and Speed – 5
Take a look at these stunning cards—yes, you can create them too! I am sharing the video tutorial and supply list below to start crafting your own beautiful designs today!
Find the new video on the Grafix Arts YouTube channel where I share how I did this HERE and I’ve included a supply list below too!
Supplies used for Creating Cards with Grafix Frisket Film:
Every card you create can be unique and you can use the Grafix Frisket Film over and over again or cut new designs to use too!
Save this for future reference by pinning the image below.
Enjoy !
THANK YOU for your support! How can you help? Click HERE & buy a coffee. Every little bit helps with the cost of running the site.
Silhouette Classes
Never stop learning! Let me help you take the anxiety out of learning with Silhouette and get to creating faster! My Silhouette classes are heavily focused on software, so you can take the skills & techniques taught and apply them to many future projects!
**This post may contain affiliate links. What that means is that I may receive compensation if you purchase through the links I have provided. The price you pay for the product or service is not higher but I may get compensated for sharing.
Have you ever made your own custom stencils? Combining Grafix Stencil Film with a Silhouette cutting machine opens up endless possibilities for creative projects and designs. You can easily create a wide variety of customized pieces! Using the Silhouette, a design by Sarah Hurley, and Grafix Stencil Film, I created a custom stencil that can be used over and over again.
Affiliate links may be present in the following blog post and as an Amazon Associate, I earn from qualifying purchases.
I would recommend having a dedicated blade for cutting different materials. This will help to increase the lifespan on the blades, as well as help with future cut issues. Each material will dull the blade differently and stencil material is plastic, so that does affect it differently than say cutting a much thinner material such as adhesive vinyl.
The best thing you can do is test cut to determine what settings are going to work for your blade, machine model, and the materials being used.
After the cut is finished, check the cut to see if it cut completely through before unloading the mat from the machine. I have to tell myself this constantly because I’m so quick to press that unload button, but it can save you time and materials if you get in the habit of checking the cut first and if it did not cut through, then you can send it again and it should cut in the same exact location.
Or use with any inks or paints to create amazing projects!
What kind of projects would you create with your own custom stencils? Let us know in the comments below, we would love to hear from you!
Save this for future reference by pinning the image below.
Enjoy !
THANK YOU for your support! How can you help? Click HERE & buy a coffee. Every little bit helps with the cost of running the site.
Silhouette Classes
Never stop learning! Let me help you take the anxiety out of learning with Silhouette and get to creating faster! My Silhouette classes are heavily focused on software, so you can take the skills & techniques taught and apply them to many future projects!
**This post may contain affiliate links. What that means is that I may receive compensation if you purchase through the links I have provided. The price you pay for the product or service is not higher but I may get compensated for sharing.
I knew you could do it… but I’d never done it…. then I opened my mouth & volunteered to make stencils for my son’s preschool class fundraiser…..
After my offer was confirmed, I started researching…. usually I would recommend doing it the other way around and volunteering for something that you already know for sure you can do….. But, that’s another story.
My first idea was to use my Cameo machine & cut stencils from chipboard…. we were applying them to flower pots and it was for preschool & younger children.
Then I started looking into it and thought there would be better materials to use….
Amazon Prime to my rescue… I ordered some Silhouette Stencil material and a box of laminating pouches.
After my supplies were delivered, I broke out my laminating machine I picked up many, many years ago…. Had to blow some dust off that box!
Once heated up, I ran the laminating sheets through the machine and it became a hard plastic “stencil” material. This was still flexible enough to apply to a round surface, like the pots we were using.
Then I got to work cutting lots & lots of designs from my Silhouette library and other things I traced or drew myself.
I had to make a demo pot to make sure the stencils would work…. There was some bleed through… but less paint is better!!
And I may have gone a bit crazy with the stencils I made… at least I thought I might have.
I was so worried the day of the event that these wouldn’t work & no one would want to use them…. but, I was wrong… everyone LOVED them!
It turned out wonderful and so many pots were painted with unique designs….
It was great seeing people take the stencils and make their own designs and have a keepsake to take home with them.
There are so many possibilities to create using your Silhouette Cameo and this machine amazes me at what materials it can cut… I am forever testing it out!
THANK YOU for your support! How can you help? Click the link to buy a coffee. Every little bit helps in the cost of running the site.