

If you’re anything like me, finding the right tools for your creative space can make all the difference—and I just added a new one to my studio: the Magnetic Glass Craft Mat. I am loving it! From its sleek, sturdy surface to the strong magnets that keep materials perfectly in place, this mat has quickly become one of my absolute favorite tools. Whether you’re a paper crafter, vinyl user, or mixed media enthusiast, this is one studio upgrade you may find useful too!
Affiliate links may be present in the following blog post and as an Amazon Associate, I earn from qualifying purchases.
I have seen these craft mats advertised previously, but I got an in-person look at them at the 2025 Creativation in Seatle. I’ll be honest, I am usually anti-glass in my studio because you just never know what I will stumble across or drop. But I took a chance, and I bought this, and I love it!
This post is not sponsored by Glassboard Crafts or an advertisement for them. I am sharing a new tool I invested in and added to my craft space. I am asked often about tools I use and after requests by followers created a page on the website for “EllyMae’s Craft Supplies” – Find it at the top of the Silhouette Secrets+ website or click HERE.
In full disclosure, I am now an affiliate with Glassboard Crafts, and I do have a coupon code that can save you 15% on your order. Bonus for you if you decide to add this to your tools.
Use code SILHOUETTESECRETS to save 15% on your order HERE.

I knew I wanted a solid color because I record videos and a design can be distracting in the videos and white makes my camera go crazy trying to auto focus, so I chose a solid that I thought would be good. But I am drooling over all the patterns, and they just keep coming out with more.
One thing I didn’t think about until I tried to take photos to share is the reflection. Reflections always get the better of me. The surface reflects very, very well as you can see with my recording lights.

But I’ll work around that and adapt.
How I’ve Used My Magnetic Glass Craft Mat
Does everyone need this? Probably not, but I am loving it for 2 reasons – the heavy-duty magnets and the ease of cleaning up.
Lately I seem to be creating with more products that can be messy such as mixed media gel sticks, paints, paint markers, watercolors, and more. I am expanding my wheelhouse and loving the experimentation. But that can be messy too! At least for me.
Here are a few ways I’ve used it so far in the month since I received it.
First, I was working with stencils, Kingart mixed media gel sticks, and mixed media paper.

This was for a video tutorial on creating a layered stencil in Silhouette (find that HERE). The magnets worked to hold the mixed media paper in place while working with the stencils. It could also be used to hold the stencils in place too; it would just depend on the thickness of your stencils and what magnets you have available to use. I ordered a 6″ magnetic ruler and have 4 of the mini pawn magnets.

I also used it as a palette to test some different techniques. I just scribbled the mixed media gel sticks on the glass surface, added a bit of water, and then used a paint brush to pick up the color. When my images didn’t turn out quite how I wanted, I simply used a paper towel to wipe up the water & remaining color.
Next up was painting pieces for a wood sign.

I was using a combination of Posca Paint Markers and acrylic paint on this sign. The smaller pieces were easily colored with the markers, while larger pieces were a bit messier and needed more coverage.
I used the glass mat as my paint palette and to catch my mess when painting the larger pieces.

I love how this sign turned out. The tiki is a bit dark in the photos but shows up better in person.

And one project leads to another. While the sign was drying, I was already on to cutting the pieces of a larger tiki on the left side. No paint needed with this one, just two types of wood. And he quickly disappeared after being glued together as my husband claimed it for his office at work.
Next up was more paint markers – this time Sharpie Creative Markers on glass. This is the messy side of things. I applied adhesive vinyl to the backside of a glass frame, then colored in sections of the design with the Sharpie Creative Markers.

I could have used the magnets to hold the glass in place, which is completely an after thought. Instead, I was using the magnets to hold the rest of my markers from escaping, which you can’t see in this photo.
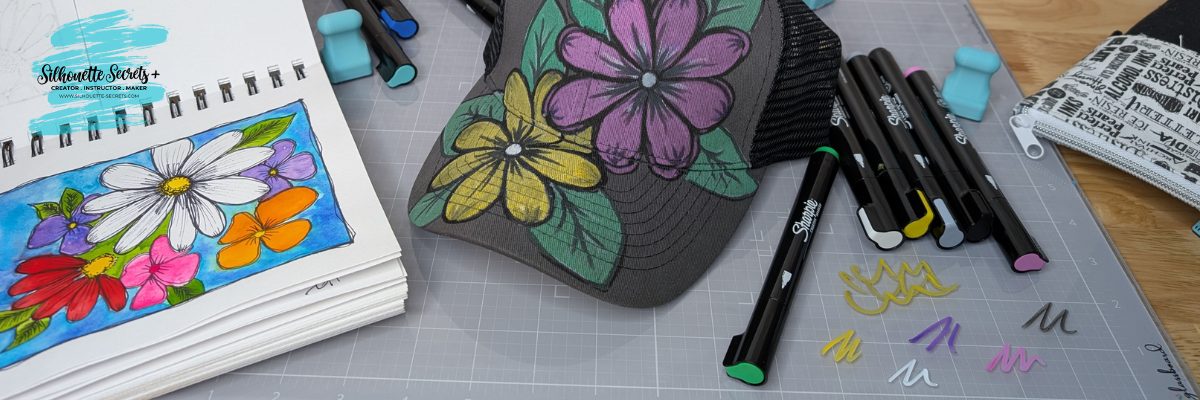
And while I had the Sharpie Creative Markers out, I really stepped outside my comfort zone and did a little doodling on a hat. Before I used each marker on the hat, I would scribble to make sure it was flowing well on the glass mat. A wet paper towel will make this easy clean up.

I took a watercolor class from Tracy Weinzafel earlier this year and ever since have been experimenting with different mediums and drawing the flowers taught at the event over and over for multiple projects.
I love new tools and craft supplies! Check out other supplies I use to create with HERE.
Find these Magnetic Glass Craft Mats at GlassBoard Studio HERE. If you decide to add this tool to your toolbox, use code SILHOUETTESECRETS to save 15% on your order.
Watch for new patterns released and I’d love to hear your favorite below, even if you are just window shopping and dreaming. That’s how it all started for me!
Save this for future reference by pinning the image below.

Enjoy !
THANK YOU for your support! How can you help? Click HERE & buy a coffee.
Every little bit helps with the cost of running the site.
Silhouette Classes
Never stop learning! Let me help you take the anxiety out of learning with Silhouette and get to creating faster! My Silhouette classes are heavily focused on software, so you can take the skills & techniques taught and apply them to many future projects!


