
A few weeks back I shared how I created a custom gift wrap in Silhouette Studio with just a few basic supplies. Check out that post HERE.

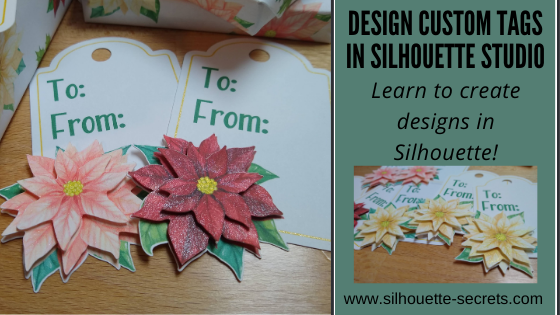
Today, let’s take a look at how I created these custom gift tags to match.
In this blog post I am using a couple designs from the Silhouette Design Store.
If you want to practice and follow along using the same designs they are:
White Poinsettia Flower Watercolor by Little Luxuries Loft – Design #334862
Pink Poinsettia Flower Watercolor by Little Luxuries Loft – Design #334859
Dark Red Poinsettia Flower Watercolor by Little Luxuries Loft – Design #334858
Creating Custom Gift Tags
The gift tag was created from scratch in the Silhouette Studio software with just a few basic shapes.
Step 1 – Using the Drawing Tools on the left side, draw a rounded rectangle and a oval.
Place the oval at the top of the rounded rectangle.
Use the Align Center tool to center the oval with the rounded rectangle.

Quick Tip: The QAT or Quick Access Toolbar contains the most common used tool quick keys at the top of the software. This is dependent on what objects are selected. You will see the quick keys change depending on the type of object – for instance, text versus designs.

For more details on the QAT check out #9 in this post
10 Let’s Explore v4 posts to Get Started.
Step 2 – Select the rounded rectangle and oval, right click and choose Weld.
Use the Drawing Tools on the left side, draw a small circle.
Hold the Shift key down while drawing to draw a perfect circle.
Place the circle towards the top middle of the tab.
Use the Align Tools to center it with the tag shape.
Step 3 – Select the tag shape and then choose the Offset Panel and choose Internal Offset.
Adjust the Offset distance if desired – I used the default.
This is creating the line to draw using a sketch pen around the inside of the tag.
Step 4 – Select the Internal Offset and then change the line color to blue in the
Line Style Panel.
This will be the sketch line to be done with the gold pen.

At this point I would make a copy of the entire design and move it to the left side of the cutting mat in the holding area, so you have an original to go back to if needed.
Step 5 – Open the design to add to the tag.
Design shown is Dark Red Poinsettia Flower Watercolor by Little Luxuries Loft – Design #334858

Double click on the file from the library and depending on the software version you are using it may open on the same design mat.
If not, right click on the design in the Library tab, then choose Merge and it will be added to the current design mat.

Step 6 – Scale the design down to the size needed by grabbing the corner bounding box and dragging it in. Move the design to where you would like it placed on the tag.

Step 7 – Right click on the tag and choose Ungroup.
This will separate the cut line from the image.
Make a copy of the image and pull it off to the left side.

Step 8 – Select the inner blue sketch line, open the Offset Panel, and click internal offset. Change the distance to .005. Click Apply.
This will create a small, very thin frame which will be important in the next step.

Step 9 – Select both of the inner blue lines.
Again, the easiest way may be to drag select as described above and then hold down the Shift key and de-select the items you do not want.
Once those 2 blue lines are selected, right click and choose Make Compound Path.

Step 10 – Next, select only the inner blue line and the cut line around the flower.
The easiest way to do this is to select all of the design, then hold the Shift key down and click on the cut lines you do not want selected.
In this case, the hole at the top of the tag, the outer tag cut line, and the flower graphic should not be selected.
There will be a gray “selection box” around each piece that is currently selected.

Step 11 – Open the Modify Panel on the right side.
With the inner blue sketch line and the outside cut line of the flower selected, choose Subtract All.
This will cut the blue line out from behind the flower, so the sketch line will end where the flower starts.

This is why we created the “frame” with the blue sketch line when we made the internal offset and then selected the 2 blue lines and made it a compound path.
Move the design away from the tag to see the blue line was “subtracted” from behind the flower design. Make sure to hit the “Undo” button if you do this to move the design back into place again.

Or press the Ctrl+Z (PC) buttons on the keyboard for the keyboard shortcut.
(MAC = Command+Z)
Step 12 – Next, select only the outer tag shape and the cut line around the flower.
The easiest way to do this is to select all of the design, then hold the Shift key down and click on the cut lines you do not want selected.
In this case, the hole at the top of the tag, the blue sketch line, and the flower image.
Again, there will be a gray “selection box” around each piece that is currently selected.

Step 13 – Once those are selected, right click and choose Weld
or select Weld from the Modify Panel.
This should combine the outer edge of the tag and the cut line of the flower, so the Silhouette will cut around both.

Move the design away to see how the lines have welded together.
Then hit Undo again to move the flower back.
Step 14 – Select the outer tag shape and the inside circle, right click and choose
Make Compound Path. This will “punch out” the circle from the tag.

Another way to select multiple objects at once is to click on the 1st object, hold the Shift key down and click on the next object. In this case, the outer tag line and the inside tag circle a the top.
Make a copy of the tag and pull it off to the left side for safe keeping.
Now, you have a custom tag that could be printed, then sketched, and cut around.
Repeat these steps if you have different designs you want to use. The more you do it, the more comfortable you will get with it and the software.
Step 15 – Set up the tags to print.
For all print and cut projects, I follow the same steps and use all the defaults for the best results. Check out this Print and Cut Basics blog post on how to set it up step-by-step or my video course HERE.
Open the Page Setup Panel, set the Media Size to Printer.
Then click on the Page Setup Panel – Tab 3 and turn the registration marks on. Click the Restore Defaults button.
Position the designs on the page between the registration marks and not in the cross-hatched areas.

Step 16 – Print the design and then set it up in the top left corner of the Silhouette cutting mat exactly as you see it on the screen, completely covering the grid lines on the cutting mat.

Step 17 – Set up the sketch action first.
Install the sketch pen in the Silhouette machine. I used a Silhouette gold sketch pen.
Click on the Send tab – choose by Line Color under the top right header.

Set up the Materials, Action, and Tool. Uncheck the red color and leave the blue color checked. This means that the machine will first sketch the lines in bold blue.
Step 18 – Set up the Cut lines.
Uncheck the blue and check the red box. Install the Silhouette blade to cut the tags.

And you have a custom tag created.

You could stop there, but why not keep going?
Now, it’s time to embellish these a bit more!
Let’s add some dimension to the tags.

Have you ever heard of fussy cutting?
It’s a common term in the paper crafting world that means to hand cut around a design with scissors. I did fussy cut the first few I did as samples just to see how this would work and I had thought for a brief moment that I would do that for all of them. But, why?
Let’s “fussy cut” around these flowers and let the software and Silhouette machine do all the work! Yes, it may take a little bit to set the file up, but it would take time to fussy cut all of them and let’s save our hands some aching!
I am using the Freehand drawing tool in the Silhouette software on the left side to “fussy cut” or draw around my design in the exact place I want it to cut.
I chose the Draw Smooth Freehand tool on the left side panel in Silhouette Studio.

Watch in this video how it works to draw around the Poinsettia flower on the right side to get the different layers on the flowers.
I love that with Point Editing you can adjust the image even after it’s cropped and still bring back or take out areas as needed.
Here is another video showing Point Editing up close on the designs and how you can adjust the image even after it’s cropped to fine tune it.
Once you have the design cropped how you like, duplicate the design, set it up as Print and Cut page, and print out all the designs to “fussy cut” around the design.

Perfect “fussy cut” around the design!

You will notice that I have my page set up as a 12″ x 12″ print and cut. This is all dependent on how large your printer can print.
I still use all the same defaults and tips for Print and Cut, no matter the size I create.
Check out the Print and Cut Basics post HERE
and the Print and Cut Large Format post HERE.
Once all the designs are cut out, I used a clear & gold CTMH shimmer brush to give the flowers a bit of sparkle.

Then I used foam tape to stack the flower pieces on top of each other for dimension.


While you may not make the exact same tags, you can choose your own design and complete the same steps above. This is great practice for using the tools in the Silhouette Studio software.
So often you use more things in the Silhouette Software than you realize.
In this tutorial we used:
Drawing Tools
Transform – Align Tab tools
Welding
Offset Panel
Line Style Panel
Ungroup
Make Compound Path
Modify Panel – Subtract All
Undo (your best friend)
Print & Cut
Page Setup Panel – Tab 1
Page Setup Panel – Tab 3 – Registration Marks
Send Tab – by Line Color
Freehand Drawing Tool
Modify Panel – Crop
Point Editing
Is that a lot? When you list it, yes! But, you use so many tools in the software without even knowing you are actually “using tools”. The more familiar you become with the software, the more comfortable you will be with your Silhouette and tackling future projects.
I would love to see what you are creating with your Silhouette machines! Feel free to post on my Facebook group at
Silhouette Secrets with EllyMae.
If you have questions feel free to post below or on the Facebook group too!
Save this for future reference by pinning the image below.

Enjoy!
THANK YOU for your support! How can you help? Click HERE & buy a coffee.
Every little bit helps with the cost of running the site.
Or if you are looking for more in-depth, step-by-step classes, check out all of my online Silhouette classes on my Teachable site HERE.

**This post may contain affiliate links. What that means is that I may receive compensation if you purchase through the links I have provided. The price you pay for the product or service is not higher but I may get compensated for sharing.
Discover more from Silhouette Secrets-Swift Creek Customs
Subscribe to get the latest posts sent to your email.


