Posted on 2 Comments

Procreate & Silhouette – Basic tutorial

Today we are going to cover a very, very basic tutorial on bringing an outside image into Silhouette and turning it into a cut design.

Note: I am using the iPad and Procreate app, however, you can use this same technique in the tutorial in any other tablet drawing program as well.

Basic Tutorial using the Procreate App & Silhouette

I mentioned above, this is going to be very basic. I am not an artist and I am many years out of practice in my drawing techniques, but there are just times you want to add a hand made element to a design. This was the case a few months back when I was working on a design.

I needed a bee path that I would be able to share with students & that would fit within a certain space on the acrylic.

So I turned to my drawing app & thought I’d share how I did it.
Now, this is not an in-depth tutorial in how to use Procreate or any other design program, but it is about exporting that design in a format you can open in Silhouette that can be used for a cut file. Or in my case, an etch file for the Curio.

Tip: Black is going to be the color that the Silhouette Studio software traces the best. I would highly recommend practicing with black designs to get the hang of tracing. Colors can be traced, but may need more adjustments to get that traced properly.

Draw and Exporting Designs from Drawing App

Open your drawing app program.

Draw your design.

Turn the background color off in the drawing app.

Export the design as a transparent png file. Export from Procreate as a png, test your file to make sure that it exports with a transparent background. I was able to use either the png option under Share Image or Share Layers and they both exported as transparent.

When exporting the design, choose a method that you know how to access the files from. I emailed the image to myself as you’ll see in the video clip below, however, you could use any method you are familiar with. A few options you may have in your drawing app are: email, google drive, cloud storage, air drop, etc.

Find the file you shared with yourself and download it to a safe place on your computer.

Open the file in Silhouette Studio.

2 Ways to Trace a PNG file in Silhouette Studio

Autotrace Feature

Autotrace is a new feature introduced in the v4.4 software starting in v4.4.247. This is a feature that will automatically trace any transparent png file that is opened.

Now, the first thing to note about this feature is that there are still some “bugs” in it. In early versions of v4.4, the software could crash when a png file was opened as it was too data heavy. It has been improved and in later versions there are different “bugs”. These included png files opening up larger than the actual design size and because of this being very data heavy so they take longer to process or can crash the software.

If you have experienced either one of these when opening png files, it could be because of Autotrace. The easiest thing to do is to turn it off under the Preference > Import tab.

But, for this tutorial, it should work for all users if you are in v4.4.

How It Works

Open the file in Silhouette and TA-DA!
Red cut lines are around the outer edge of the png file.

When you click on the Send tab in the top right, you can see those bold red cut lines around the design.

Now, I say TA-DA but also keep in mind that Autotrace is a data heavy tool and processing time can vary by computer. Some computers may not handle it well. If you think about it, opening a photo file in itself can be a larger than usual file size and then you add on the “autotrace” adding more data at the same time, that makes it a little more interesting.

But, you never know until you try!

Find more on the Autotrace feature HERELet’s Explore v4 – Autotrace.

Tracing Panel

Now, “old school”.
When I say that, I just mean doing it without the fancy new tools and how we’ve done it in the software for the 9+ (and more) years that I’ve been in the Silhouette world.
The Trace Panel – either it looks like a butterfly or a piece of toast – depends on who you are.

Open the png file in Silhouette Studio.

Click on the Trace Panel icon.

Keep in mind that black color traces the best.

Click on “Select Trace Area“, then left click & hold the mouse button down. Drag a box around the area that you want to trace.

Increase the Threshold to get as solid of a yellow as you can.

When you have it like you want, click on the Trace option at the bottom of the panel. Then move the original image away from the Trace.

Fill the traced image with color and it should look like your original image.

TA-DA! Now you have a cut line.

This technique can be applied to any jpeg or png file that you would open. Each design will vary in the trace techniques and the adjustments needed in order to get the trace how you’d like. But, a simple black design should trace well. Make sure to keep the size in mind as well when you are tracing. Trace at the size the image opens at for best results. This is due to those pixels of a photo image. When it’s enlarged, those pixels enlarge as well and the trace feature picks up every single pixel around the edge, which can result in a choppy trace.

Check out this video tutorial showing the above steps on my YouTube channel

Now, it’s your turn!

Practice Time

I have drawn this simple flower design in Procreate.

Download this file and the bee design to practice with HERE.
Unzip/extract the folder after you download and test it out.

If you are on a software version of v4.4 or higher, test it out with both the Autotrace turned on and off. It is great to practice both ways so you know how it works.

Tips on Tracing Designs

Edit Points

Edit Points are the data points that the Silhouette reads in order to connect a cut. The Silhouette machine has to connect the dots and hit every single edit point when it’s cutting.

Double click on the traced line to bring up the gray edit points.

How many edit points are around the image will vary based on the image that was traced. A traced image always has more data points than if compared to a svg file because a trace picks up every single pixel in that image.

Simplifying the edit points on a trace can help make it a cleaner cut file.
With the Edit Points activated, click on the Simplify button in the Edit Points panel and watch those gray dots change.

Here is a close up of the Edit Points before they are simplified.

And here is a close up of the Edit Points after it’s simplified.

Working with Edit Points is a great tool to have in your tool box. Check out more information on Edit Points and how they can help you in your Silhouette creations HERE
Let’s Explore v4 – Edit Points

Ownership & Rights

Now, this is the one that most users do not want to hear and many may stop reading here, but it is just an important as all the rest.

Just because you can download images from the internet, does not give you the rights to trace and use those designs. They have an owner and obtaining the rights to use the images is your responsibility.

If an image is in public domain, then it is free to use. All other images are subject to copyright or trademark and you would need to research the image itself to find out if you can legally use it. It does not matter if it’s for personal use or commercial use. Someone owns it.

This is why I provided my own files to you to use for practice. I drew them, they are mine, and I can give you permission to use those files.

All Images Will Vary

And if you are still with me reading, one final tip on tracing. All images will vary in how they trace and what steps or adjustments will be needed.

Photographic images with shadows, colors, gradients, etc. will be more difficult to trace than a black and white image.

I would love see your practice & hear what you learned in this tutorial!
Feel free to post on the
Silhouette Secrets+ Facebook Group.

Save this for future reference by pinning the image below.

Want to learn more on Procreate?

Even though this blog post has been planned for several months, this past week I found a few great videos on YouTube that have just been fantastic!

Check out these videos to get started:
Procreate Tutorial: Color Wheel by Create with Christie
Procreate Tutorial: Brushes by Create with Christie
Procreate Tutorial: Designing Using iPad Pro by Create with Christie
*after watching these, I was able to draw the flower design that I shared with you for the practice file. It took a few practice flowers until I was happy with one to share, but that’s the best way to learn!
Play, play, play!

Enjoy!

THANK YOU for your support! How can you help? Click HERE & buy a coffee.
Every little bit helps with the cost of running the site.

Or if you are looking for more in-depth, step-by-step classes, check out all of my online Silhouette classes on my Teachable site HERE.

SS Logo snip it
**This post may contain affiliate links. What that means is that I may receive compensation if you purchase through the links I have provided. The price you pay for the product or service is not higher but I may get compensated for sharing.
Posted on Leave a comment

Holiday decor with Silhouette

This year has definitely been an interesting one. I haven’t really felt like pulling all of the Christmas decorations out, but still wanted to do something.

While cruising on Pinterest one night, I saw this and thought it would be perfect for a bit different look on our buffet in our dining area this year.

Affiliate links may be present in the following blog post and as an Amazon Associate, I earn from qualifying purchases.

This is a Christmas village that is constructed out of black cardstock and the window inserts on printable vellum. So it was fairly easy to put together.
The file can be found HERE – on the Adventure in a Box website.
I purchased the full file so I was able to get right to the project instead of creating my own images.

Now, they hand cut all of the files, but I’m not much up for that. Since you can open PDF files in the Silhouette software directly with the Designer Edition upgrade or higher, you can bring it right into the Silhouette software to set up to cut for you.

Let’s take a look at how that is done.

Make sure you are using the PDF file for this design. I used the png images for the silhouette parts and it was not the same size as the PDF file silhouettes, so they were a little bit big for the cutouts of the houses.

First, like I said above, you will need at least the Designer Edition upgrade or higher to open the pdf file.

Download the file, save it to a safe place, and then unzip/extract the file.
Next, in the top left corner of the software choose File > Open in the Silhouette software and choose the PDF file.

When you open a PDF file, it will give you a couple of options. I always try the
Import as vector” first because in some cases, depending on how the file was created, it may open up with cut lines already done. The only way to know is to open as a vector and click on the Send tab to see if the cut lines are there.

If the PDF file has more than 1 page to it, you will want to choose which page to open first.

In this case, the first 3 pages are instructions, so we don’t need those at the moment. They can be handy for assembly if you need them. I chose Page 4 and then click on Import in the bottom right corner to open the file.

Now, use the Basic Trace, increase the threshold until it turns as smooth of yellow on the black as possible.

Now click Trace and then move the original design away. Since the original design does not have “score” lines to fold the building on for it to stand up, I added those in myself.

Using the Line Drawing tool on the left side, hold the Shift key down and draw a line that almost touches from one end to the next. I didn’t want the score line to cut edge to edge, so I made the line a little bit smaller.
Next, on the Line Style Panel on the right side, change the Style of the line to a dashed line. This will act like a score line and not be fully cut through and the cardstock can easily be folded on this line. Adjust the line between the outer cut lines as needed.

Select the entire design and the score lines and then right click and choose Group, so the entire design moves as one piece. Using the Transform Panel – Rotate Tab, rotate the design 90 degrees on the page.

Fill it with color to see what it will look like when cut. Now, save the design.

You will do this for all of the pages with the house designs.
Then I cut each out of black cardstock.

Next, we will open the next page of the PDF file for the silhouettes in the windows. Using File > Open once again, choose the PDF file, then page 5, and choose open as a vector.

This is how it will open up.

Next, using the Draw Rectangle tool on the left side, draw a rectangle around each of these window images. We do not need all of the black grid lines to print, only the images.
Make sure to give yourself some clearance around the images so there is area to add glue to.

Now, select the entire design and drawn rectangles.
You can either hit Ctrl+A to select all on the page or left click and hold the mouse button down and drag it across the entire design touching each object you want to select.
Then open the Modify Panel on the right side and choose Crop.

Now, let’s use the Transform Panel – Rotate Tab to turn the designs to work with a little bit easier.

Now, save this file.

I then opened up all of the silhouette files and cropped the images down. Then copied and pasted them all onto one design mat. And then we can set this file up as a Print and Cut project. I would suggest saving each Print and Cut page as a new design, just in case you have to go back and recut the pieces for some reason.

For tips on setting up a Print and Cut projects, check out this Print and Cut Basics post HERE.
I recommend printing using all of the defaults for the print and cut, for the best results.

Once you have the page setup with the registration marks, print each page on printable vellum. I used this I found on Amazon HERE.
I printed using the photo quality for matte paper. Printing at photo quality allows the ink to be laid down on the paper at a slower rate and allows it to dry better when working with specialty papers.

The first 2 pages I cut with had no issues what so ever and then the 3rd page would not cut correctly. I ended up printing it 5 times, just trying it over and over.
When I should have done this little trick in the first place.
Place white paper underneath the registration marks in each corner. This allows the optical eye a better chance at picking up only the registration marks printed and not other interference. Make sure the white paper is cut large enough that it would be the same size as the cross-hatched area for best results.

Keep in mind that the Silhouette optical eye is just a laser that turns on when you have registration marks on your page. This laser eye is looking for black marks on the page. However, it’s just a laser eye, it will pick up any black marks on the page. This includes the Silhouette grid lines if the paper is translucent or clear. This is also why the cross-hatched area around the registration marks is so important! And why, for the best results you should not have your design or cut lines in the cross-hatched area. As I said, it worked for the first 2 pages, but it didn’t like that 3rd page.

And that little trick was all it took for it to pick up the registration marks and cut accurately. Again, this is only something that might need to be added if the paper you are using is translucent or clear.

Once it’s all cut out of the black paper and the printable vellum, I used a bit of Scrapbook tape runner adhesive to glue it to the backside of the black cardstock, folded the score lines, and set it up.

I added some tea lights behind the designs to let it shine through and I have a new piece of holiday décor in our dining room.

Supplies used:
Christmas Village file – Adventure in a Box
Black Cardstock
Printable Vellum
Scrapbook Adhesive tape runner
Tealights

Whether you create the same file, design your own silhouette images to fit in the Christmas Village, or follow the same techniques as I used above for another project; I hope you will share that on my Facebook group here
Silhouette Secrets with EllyMae.
If you have questions feel free to post below or on the Facebook group too!

Save this for future reference by pinning the image below.

Enjoy!

This image has an empty alt attribute; its file name is logo.jpg

THANK YOU for your support! How can you help? Click HERE & buy a coffee.
Every little bit helps with the cost of running the site.

Or if you are looking for more in-depth, step-by-step classes, check out all of my online Silhouette classes on my Teachable site HERE.

SS Logo snip it
**This post may contain affiliate links. What that means is that I may receive compensation if you purchase through the links I have provided. The price you pay for the product or service is not higher but I may get compensated for sharing.
Posted on 19 Comments

Let’s Explore v4 – Tracing Panel

If you are just joining in, we have explored our way through several of the icons on the v4 Silhouette software – you can find all of those HERE – starting with the Page Setup Panel.

And our next step in the Let’s Explore v4 series is the Tracing Panel – Tab 1.

This is a very popular Panel and there is so much that you can do with it from tracing an image to tracing a photo. But, I will say right from the get-go, it is not a one size fits all Panel. Each image you trace is going to require you to adjust it differently than the last one. So while the concepts can be taught, the technique varies some each time a trace is done.

You will find the Trace Panel on the right side of the v4 software and it resembles a butterfly or a piece of bread.

Trace Panel copy

Now, let’s take a look at the Trace Panel. Tutorial written in version 4.1.441 Updated 6/8/21 – trace panel has not changed since original post

Trace Panel detail v4.1

  1. Select Trace Area – Click on Select Trace Area and then draw a rectangle around the image you want to trace. A gray box shows up around the image and you should see some yellow show for your trace. For a good trace, you want as much yellow and as crisp, clear lines as possible. Select Trace v4.1.441
  2. Trace Preview – Choose between Solid Fill (as shown above) or Outline fill.Outline Fill v4.1.441 
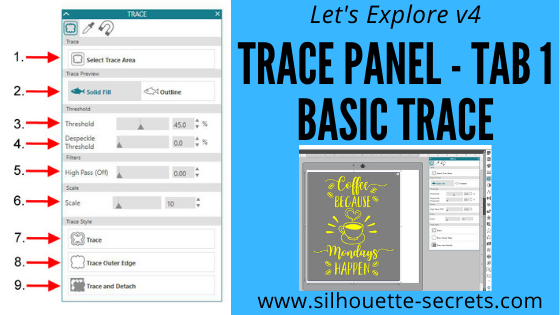
I prefer to use the Solid Fill so I know exactly where it will trace.
  3. Threshold – Determines how the trace filters are applied to your image.
  4. Despeckle Threshold – Eliminates noise in your trace. *
  5. High Pass Filter – Trace lines begin from the outside and work to the center of your image. *
  6. Scale –  Scale the trace up or down to get the look you want ** Each image will be different in how it traces and you will need to adjust the Threshold & filters to what works best for you particular image.
  7. Trace – Click on this when you want to trace around all the yellow of the design. This is the most common Trace and the one that I use the most often. After clicking trace, move your design away and the cut lines will be there around the area traced.Trace Style
  8. Trace Outer – This traces the outside edge of a design on your screen. If you stamped an image and wanted to trace around the outside edge of it, this is the option you choose. Then your cut lines will only generate on the outside of the image and as you can see below, it did not trace the 2 circles on the inside of my image. Trace Outer Edge 2 v4.1.441
  9. Trace and Detach – This will trace the image and then detach it from the background. It works great if you have a jpeg image. For instance, if I wanted to use this little guy for a Print and Cut Valentine. Trace and Detach v4.1

For a basic trace, black traces the absolute best. The resolution of your image also plays a big factor in your trace. If the file you are tracing is very pixelated, then it will trace all of those pixels. This results in a very choppy cut line and a lot of edit points.

And there you have your Trace Panel – Tab 1. It is a fun option to play around with and I suggest practicing with it and seeing what works best for you. A lot of it is moving the filters and finding out what works best for the image you are working with.

Affiliate links may be present in the following blog post and as an Amazon Associate I earn from qualifying purchases.

For my information on the filters, I consulted the Silhouette Handbook that is available in the Silhouette store.

Make sure to check out all the other sections of Let’s Explore v4 and learn more about what you can do in the software.

The images used in this post can be found here: CoffeeMondays by Scout and Rose Designs Stinkin Cute by Scout and Rose Designs Love Frog by MissKateCuttables

We would love to see what you are working on! Feel free post on the Silhouette Secrets+ Facebook Group.

Save this for future reference by pinning the image below.

Trace panel Pin

**This has been updated on 4-12-18 to reflect the changes released with the v4.1.441 software version.** *Updated 6/8/21 – the Trace panel has not changed since the original post was written.

Enjoy !

THANK YOU for your support! How can you help? Click HERE & buy a coffee. Every little bit helps with the cost of running the site.

Looking for more in-depth, step-by-step classes, check out all of my online Silhouette classes on my Teachable site HERE.

SS Logo snip it

**This post may contain affiliate links. What that means is that I may receive compensation if you purchase through the links I have provided. The price you pay for the product or service is not higher but I may get compensated for sharing.