
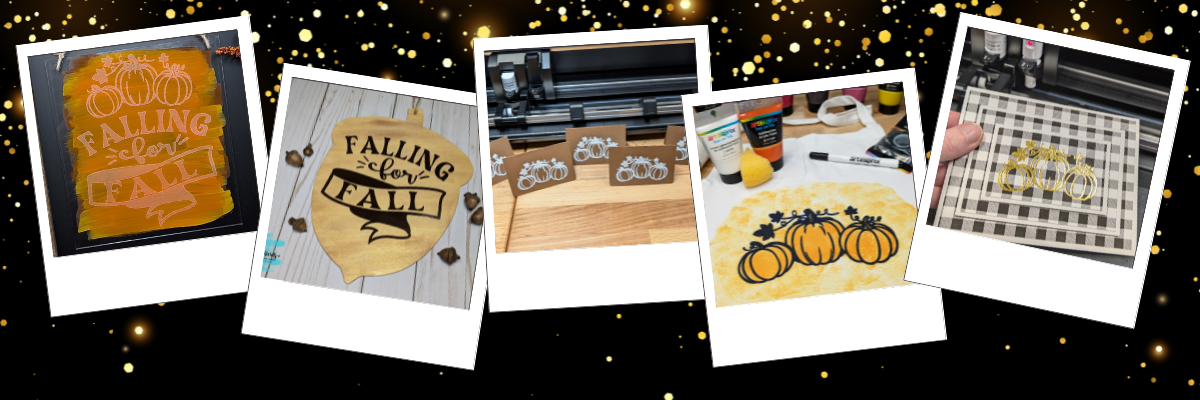

Discover the magic of versatility with Megan Hardy’s creative designs! In this post, we’ll show you how you can transform a single design into five unique projects that are perfect for any occasion. From an etched acrylic sign with the Silhouette Curio 2 to a wood sign using adhesive vinyl, a personalized apron using Artesprix sublimation markers and paints, a sketched place card for stylish gatherings, and a dazzling foiled card featuring the triple mat stacked technique—this post is packed with inspiration and tips to make the most of your crafting tools. Do more with your designs and bring your creativity to life!
Affiliate links may be present in the following blog post and as an Amazon Associate, I earn from qualifying purchases.
Each month in the Silhouette Secrets+ newsletters, I collaborate with an amazing designer to bring you a free file. Throughout the month, I work with the newsletter file to create and share a variety of projects, showcasing the many ways it can be used.
Make sure to sign up for the Silhouette Secrets+ newsletter HERE for future free files & project inspiration.
Crafting Creativity with Megan Hardy
Project #1 – Etched Acrylic Sign with the Silhouette Curio 2

I used the Silhouette Curio 2 with the Power Engraver to etch on a clear acrylic sign.

In most cases, I prefer to etch on the backside of acrylic, however, I knew I want to paint on the back, so I etched the front for this design. The Silhouette Power Engraver leaves a pretty smooth finish, but that will also vary based on the actual acrylic being used and the fill options chosen. The only way to know how it will turn out is to test.
I use shapes in the Silhouette Studio software to create a “template” in order to align the design where I want on the blank I’m using. Just make sure to turn the “cut” line off for the template before you send it to etch or it will also etch the outer edge of your blank as well.

Also make sure to keep the design away from the taped edges or it could affect the etch results. I got lucky in this etching and it still etched through the painters tape, however, that can also gum up the Power Engraver tool too with the tape particles and adhesive.

Additional Resources:
- Beautifully Etched Acrylic Clipboard with Silhouette Curio 2
- Silhouette Curio 2 step-by-step classes
- Silhouette Curio 2 Engraving/Etching on Acrylic with the Power Engraver step-by-step class
- Silhouette Curio 2 Playlist on the Silhouette Secrets+ YouTube channel
- Using Shapes as Templates for Placement
Don’t have a Silhouette Curio 2 to etch with? No problem!
Check out these other ideas for Acrylic Sign Decor with Silhouette HERE.
Supplies Used:
- Falling for Fall by Megan Hardy – Design #328205
- Make Market Acrylic Blank Sign
- Silhouette Curio 2 – Crafter Cuts, Amazon
- Silhouette Debris Tray – Crafter Cuts, Amazon
- Silhouette Power Engraver – Crafter Cuts, Amazon
- Bundle: Silhouette Curio 2, Debris Tray, Power Engraver, and more – check it out HERE
- Silhouette Cutting mat – Crafter Cuts, Amazon
- Washi tape or low tack tape
- Painter’s Tape
- Lint Roller
- Twine
Project #2 – Wood Sign with Adhesive Vinyl

I grabbed a plain wood sign from my stash that I had picked up years ago in a Target dollar spot. Added a couple layers of paint to the sign and let it dry. Then measured the inside of the blank and used a rectangle as a template to size the design. Once I had the design sized, I moved my rectangle off to the left side and drew in some weeding lines with the line tools so it was easier to weed in pieces.

I also cut my material down to the size I need so I can save the adhesive on my cutting mat and don’t have to peel a full sheet of material off the mat each time. To do this I decrease the Transparency on the Page Setup Panel so I can reveal the cutting grid and know what size to cut my material down to.

Now I am not using the adhesive on the rest of the mat and it will increase the lifespan on the cutting mat.

Adding weeding lines in the Silhouette software may take a couple extra seconds before you send the design to cut, but can save you frustration when weeding adhesive vinyl.
Additional Resources:
- Let’s Explore v4 – Line Tools
- Weeding Lines
- Tips for Cutting Small Fonts or Designs
- Tips to Getting the Most out of Your Cutting Mats
- Using Silhouette Studio Tools to Create Templates for Sizing Designs
Supplies Used:
- Falling for Fall by Megan Hardy – Design #328205
- Wood blank sign
- Silhouette Cameo 5 (or other cutting machine model)
- Silhouette Cutting Mat
- Silhouette Autoblade
- Oracal 651 Adhesive Vinyl
- Weeding tool
- Transfer Tape
- Spatula
- Acrylic Paint
Project #3 – Sketched Place Cards

I love how these turned out! This place card was designed in the Silhouette software, using a rectangle, dashed line for scoring, and the pumpkin design from the Falling for Fall design.

Let’s not talk about the fact that I created these for Thanksgiving dinner and then totally forgot to use them. There is always next year!
But, they turned out looking awesome! I love the painted liked texture that the sketch fill with the white pen gave it. Each one turned out just a bit different in the way the ink laid down and moved.
After creating these, I did a LIVE tutorial on the Silhouette Secrets+ YouTube channel sharing more on sketching tips and a demo using the Silhouette Electrostatic Mat as well.

Watch that Sketching tutorial video HERE.
Additional Resources:
- Sketching Supplies for Silhouette
- How to Sketch with Silhouette
- Silhouette Sketch Pen & Sketch Pen Design Class
- More on Sketching with Silhouette
Supplies Used:
- Falling for Fall by Megan Hardy – Design #328205
- Recollections Cardstock
- Sakura Gelly Roll White Pen
- Silhouette Type B Pen Holder – Silhouette America or Amazon
- Silhouette Cameo 5 (or other cutting machine model)
- Silhouette Electrostatic Mat
- Silhouette Autoblade
Project #4 – Custom Apron with Artesprix Sublimation Markers and Paints

Artesprix sublimation products are a great way to test and investigate if you want to go deeper into the sublimation side of things. I used the Artesprix black sublimation marker to sketch out the design with my Silhouette.

With Artesprix sublimation products, you don’t need any special paper! Plain ordinary copy paper is all that’s needed and if you don’t like what you’ve made, you aren’t out much. I love playing with the Artesprix products and seeing what can happen.
Once the main design was sketched, then I sponged on some paint in 2 shades of orange around the design to complete the custom apron.
Check out more details in the blog post HERE.

Additional Resources:
- Make, Wear, Wash: DIY Holiday Apron with Artesprix video
- Sketch Supplies for Silhouette
- Live Silhouette Sketching Tutorial with EllyMae – Expert Tips from Silhouette Secrets+
- Sketching with Silhouette tutorials
- Silhouette Sketch Pen & Sketch Pen Design step-by-step class
- More projects with Artesprix Sublimation products
Supplies Used:
- Falling for Fall by Megan Hardy – Design #328205
- Silhouette Cameo 5 – use any machine that can sketch or hand draw designs too!
- Silhouette Type B Pen Holder
- Artesprix Apron
- Artesprix Sublimation Markers – Fine Tip Black
- Artesprix Sublimation Acrylic Paints
- Artesprix Protective Paper
- Artesprix Heat Tape
- Artesprix Protective Pad
- Mixed Media Paper
- Silicone mat
- Heat source – I used a Siser Heat Press
- Other supplies: pencil, scissors, paper towels, copy paper, ruler, sponges or paint brush, paint palette
Project #5 – Foiled Card Design with the Triple Mat Stacked Technique

Make your cards pop with the Triple Mat Stacked technique and add heat foil to that for even more wow factor. I love combining things to make unique projects!
This was completed using a digital pattern in Silhouette Studio, setting it up for a print and cut, then using the setup for foiling the design before cutting.

Foiling can really add a unique touch to your projects! It does take extra time in creating, but can definitely be worth it.

You can see this in action in this video – Quick Foil Card Design: Silhouette Cameo 5, Heat Pen, and Print and Cut video on the Silhouette Secrets+ YouTube channel.

Additional Resources:
- Triple Mat Stacked Card Written Tutorial
- Triple Mat Stacked Video Tutorial
- Silhouette Heat Foil Pen Tutorial
- Beginner Foil Quill Tutorial – for older Silhouette models
- Print and Cut with Foil Embellishments Tutorial
- Print and Cut Basics Tutorial
- Print Bleed
- Silhouette Electrostatic Mat
Supplies Used:
- Falling for Fall by Megan Hardy – Design #328205
- Silhouette Cameo 5 (or other cutting machine model)
- Silhouette Heat Pen
- Silhouette Electrostatic Mat (optional) or Silhouette Cutting Mat
- Silhouette Autoblade
- Recollections Cardstock
Find more designs by Megan Hardy at the Silhouette Design Store or on Etsy.
Follow along with Megan Hardy here:
Facebook: https://www.facebook.com/MeganHardyDesigns
Instagram: https://www.instagram.com/meganhardydesigns/
I love exploring how one design can inspire multiple creative projects! The Crafting Creativity blog series is your go-to source for endless inspiration, packed with innovative ideas, practical tips, and expert techniques to elevate your crafting. Whether you’re reimagining a favorite design, experimenting with new materials, or mastering advanced skills, these posts are here to ignite your imagination and help you bring your creative visions to life. Head over to the Crafting Creativity series HERE and discover where your creativity can take you!
Save this for future reference by pinning the image below.

Enjoy !
THANK YOU for your support! How can you help? Click HERE & buy a coffee.
Every little bit helps with the cost of running the site.

Silhouette Classes
Never stop learning! Let me help you take the anxiety out of learning with Silhouette and get to creating faster! My Silhouette classes are heavily focused on software, so you can take the skills & techniques taught and apply them to many future projects!


**This post may contain affiliate links. What that means is that I may receive compensation if you purchase through the links I have provided. The price you pay for the product or service is not higher but I may get compensated for sharing.
Discover more from Silhouette Secrets-Swift Creek Customs
Subscribe to get the latest posts sent to your email.









