If you love creating interactive cards, this JOY Spinner Card is a must-try holiday project! In this tutorial, I’ll walk you through how to design and assemble this layered spinner card using Silhouette Studio, along with a complete supply list and helpful tips and additional resources. Watch the full video, grab the supplies below, and let’s create a festive card that’s sure to impress!
Affiliate links may be present in the following blog post and as an Amazon Associate, I earn from qualifying purchases.
This card design was first shared in my Silhouette Secrets+ Facebook group and my admin did a bit of sleuth work and found who we believe is the original designer for this spinner card idea. This card design was inspired by Dress My Craft. Make sure to grab the Dress My Craft spinners linked in the supply list below.
One thing leads to another… down the rabbit hole I went and Dress My Craft has so many neat ideas to create with the spinners.
Watch the full design tutorial below.
Create the layered look with the same colors of cardstock or mix it up and do multiple colors. I cut both to see what it would look like, but I think I prefer the white layered on top of each other with the offset. I am so glad I saw my admin (Teresa’s) card ideas and included that into the video tutorial. I think it really makes it stand out.
I love being able to create designs in the Silhouette software, and projects like this JOY Spinner Card truly show how versatile it can be! If you haven’t already, be sure to watch the full video tutorial on the Silhouette Secrets+ YouTube channel for step-by-step instructions and extra tips. I hope this inspires you to create your own interactive card and continue learning even more about what Silhouette can do!
Save this for future reference by pinning the image below.
Enjoy !
THANK YOU for your support! How can you help? Click HERE & buy a coffee. Every little bit helps with the cost of running the site.
Silhouette Classes
Never stop learning! Let me help you take the anxiety out of learning with Silhouette and get to creating faster! My Silhouette classes are heavily focused on software, so you can take the skills & techniques taught and apply them to many future projects!
**This post may contain affiliate links. What that means is that I may receive compensation if you purchase through the links I have provided. The price you pay for the product or service is not higher but I may get compensated for sharing.
New Silhouette tutorial step-by-step to creating a Pop Out Top Card & Mastering Print and Cut in Silhouette Studio on the Silhouette Secrets+ YouTube channel.
Just a quick note to share the link for the Live Silhouette tutorial that happened this month.
Save this for future reference by pinning the image below.
Enjoy !
THANK YOU for your support! How can you help? Click HERE & buy a coffee. Every little bit helps with the cost of running the site.
Silhouette Classes
Never stop learning! Let me help you take the anxiety out of learning with Silhouette and get to creating faster! My Silhouette classes are heavily focused on software, so you can take the skills & techniques taught and apply them to many future projects!
**This post may contain affiliate links. What that means is that I may receive compensation if you purchase through the links I have provided. The price you pay for the product or service is not higher but I may get compensated for sharing.
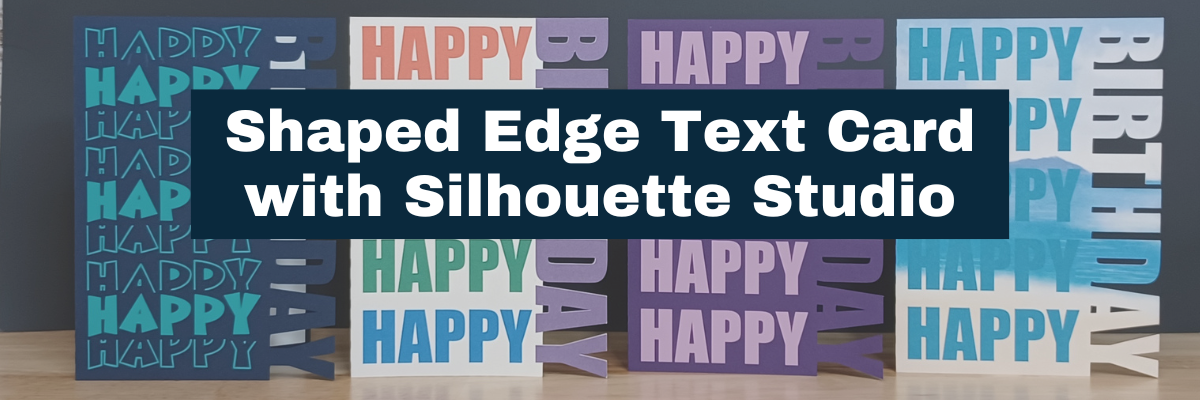
This week I released a new video tutorial on the Silhouette Secrets+ YouTube channel on how to create a shaped edge text card. This was inspired by my Silhouette Secrets+ with EllyMae group admin, Teresa. She is an amazing crafter and I love seeing all the projects she creates. Such an inspiration to myself and other group members!
Affiliate links may be present in the following blog post and as an Amazon Associate I earn from qualifying purchases.
As I started in the Silhouette software, the project took on a life of it’s own. Let’s take a look at each card I created and I’ll share how they are different. I am also sharing a supply list for this project below the project photos.
All of these cards are created at a 5″ x 7″ size. I used the Project Wizard in this tutorial for creating the card base quickly, however, you can create this in any size that suits your needs. Check out this tutorial – Create a Card Base with Silhouette
I created this card by filling in the text with color as I showed in the video tutorial. Then used print and cut with a sheet of 12″ x 12″ cardstock to print and cut the 5″ x 7″ card. So quick to do! And with print and cut, you don’t have the individual letters to glue down, but you definitely can cut from any colors of cardstock that you would like and piece it together too! So many options.
For more information on Print and Cut check out this section on the blog HERE.
For this card, I took a sheet of 8.5″ x 11″ dark purple cardstock and cut the base out. Then I cut light purple adhesive vinyl and added that to the front of the card. I also drew a rectangle that fit inside one side of the card base and then cut that from white and added that to the inside of the card for an area to write on.
In this card I used the same technique as the second card, I cut the card base from an 8.5″ x 11″ sheet of cardstock and then used a teal adhesive vinyl, but I used a stacked font called BFC Mean Ones Stacked Font to give it a little bit different look.
And I just noticed a weeding error on my part in the card. It happens to us all!
Now this one I think is my favorite!
I used print and cut again for this card and added a pattern fill called Tropical Beach Pattern to the entire card base. Then I picked up a blue color from the water in the pattern and made it a bit darker to add to the Happy text on the card.
Want to see more Shaped Edge Card ideas or paper craft ideas? Check out the Card section on the Silhouette Secrets website HERE.
Save this for future reference by pinning the image below.
Enjoy !
THANK YOU for your support! How can you help? Click HERE & buy a coffee. Every little bit helps with the cost of running the site.
Silhouette Classes
Never stop learning! Let me help you take the anxiety out of learning with Silhouette and get to creating faster! My Silhouette classes are heavily focused on software, so you can take the skills & techniques taught and apply them to many future projects!
**This post may contain affiliate links. What that means is that I may receive compensation if you purchase through the links I have provided. The price you pay for the product or service is not higher but I may get compensated for sharing.
Eclipse cards – have you seen them? This is a technique that has been around the card making community for quite some time and seems to be making a comeback lately.
In April, I released a video tutorial on the Swift Creek Customs YouTube channel sharing how you can create these cards in the Siser Leonardo Design Studio software and now am sharing the new video tutorial showing step-by-step in the Silhouette Studio software. Not just 1 card though, I have 4 (well, actually I made more than that) eclipse cards to share with you. You’ll see in the video why I ended up with more.
I have to say that these cards are definitely better in person than a photo can capture, so I recommend you give it a try and see what you think.
Let’s take a closer look at some photos and I’ll share the supply list below too!
Affiliate links may be present in the following blog post and as an Amazon Associate I earn from qualifying purchases.
This is the first style of eclipse cards I share how to create in the tutorial. I share some tips for working with print and cut graphic files in Silhouette too!
Photographing the cards from an angle gives you an idea of the dimension of the card. Some cards can be difficult to see the effect when looking straight at the card.
In this card, I used circles to give it a new dimensional look. You could use any shape you want. I’ve seen many variations out there and it gives it a unique look. My husband saw this one and said, “That would look good with a bubble pattern.” So guess what I bought? Watch for some new cards coming soon!
And you can also use text. In the tutorial, I show how you can use text in 2 ways to give each card a different look. Again, photos do not do these justice, especially looking straight on.
But coming at it from the side, you can see the dimension in the card. I share some tips and tricks to working with the text to create these 2 opposite effects of the cards with text.
I think this one might photograph the best from this angle, so you can really see the dimension.
Make sure to like, subscribe, and click that bell for notifications of future content on the Silhouette Secrets+ YouTube channel! Thanks for your support! I’d love to hear what you thought in the comments on the video tutorial too! Thanks for your feedback and engagement on the video!
Save this for future reference by pinning the image below.
Enjoy !
THANK YOU for your support! How can you help? Click HERE & buy a coffee. Every little bit helps with the cost of running the site.
Silhouette Classes
Never stop learning! Let me help you take the anxiety out of learning with Silhouette and get to creating faster! My Silhouette classes are heavily focused on software, so you can take the skills & techniques taught and apply them to many future projects!
**This post may contain affiliate links. What that means is that I may receive compensation if you purchase through the links I have provided. The price you pay for the product or service is not higher but I may get compensated for sharing.
Creating unique designs in the Silhouette Studio software does not have to be hard. The more that you do it, the more comfortable you will get in the Silhouette software and before long you will be using the tools without a second thought. Find out how easy it is to create a shaped edge card. I have created both a video tutorial and below is the written tutorial.
Create the card base. I used the the Project Wizard in this tutorial, which is found under File > Open in the top left corner.
Check out how to create a card base in 2 different ways in this post – Create A Card Base Tutorial HERE This will allow you to create any size card that you would like to create in the future.
The Project Wizard – Card is a 5″ x 7″ card base.
Right click on the card base and choose Ungroup, this will ungroup the middle score line from the card base.
I change the score line to a wider perforated line so it doesn’t tear the card when folded in half. Open the Line Style Panel on the right side, select the score line, and change the Style to a wider dashed line.
The score line needs to be ungrouped from the card base in this tutorial, so it doesn’t disappear as we build the shaped edge card.
Right click on the heart and choose Convert to Path.
Position the heart on the right side of the card base. Resize the heart as desired by grabbing the corner bounding box and moving it in.
Make copies of the heart, resize as desired, rotate, and position on the right side of the card base the full length of the card base. Make sure to position the hearts on the right side, but not over the right edge of the card base.
Select all the hearts, then use the Align Tools to center align and space horizontal as desired.
The card base is a very specific side to fit in an envelope. Make sure not to move the score line or have the hearts extend past the right side to keep the card base dimensions.
With all of the hearts selected, open the Offset Panel on the right side. Select a distance of the Offset that does not extend past the card base, but that does overlap each heart, so the offset is welded together when Apply is selected.
Select the right edge of the card base and move it in about half way across the hearts. We are creating the shaped edge of the card.
Select the card edge, hold the Shift key down, click on the Offset to select it. Right click and choose Weld. This creates the shaped edge of the card base.
If you end up with an interior bits from the offset. Right click on the card edge, select Release Compound Path, click off to deselect and then back on the little bit and press Delete.
Select the card base and all of the hearts, right click and choose Make Compound Path. Do not select the score line. Then fill it with a light color to see the Shaped Edge card that you’ve created.
Right click on the card base and choose Send to Back. This puts the score line back on top. Select everything, right click and choose Group.
You’ve now created a shaped edge card design! You can do this technique with all kinds of shapes. Cut from cardstock and send to friends and family.
I also have another tutorial on creating a little bit different shaped edge – check that out HERE.
Save this for future reference by pinning the image below.
Enjoy !
THANK YOU for your support! How can you help? Click HERE & buy a coffee. Every little bit helps with the cost of running the site.
Silhouette Classes
Never stop learning! Let me help you take the anxiety out of learning with Silhouette and get to creating faster! My Silhouette classes are heavily focused on software, so you can take the skills & techniques taught and apply them to many future projects!
**This post may contain affiliate links. What that means is that I may receive compensation if you purchase through the links I have provided. The price you pay for the product or service is not higher but I may get compensated for sharing.
Affiliate links may be present in the below and as an Amazon Associate I earn from qualifying purchases.What that means is that I may receive compensation if you purchase through the links I have provided. The price you pay for the product or service is not higher but I may get compensated for sharing.
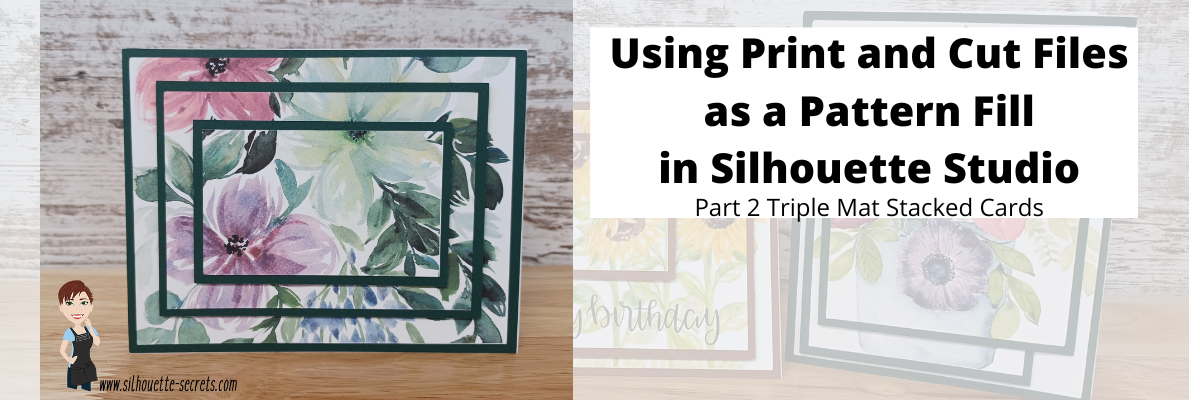
In Part 2, I am sharing how you can use a print and cut file and use it as a pattern fill.
I hope you get into the Silhouette software and play today!
I would love to see what you are creating with your Silhouette software or machines! Feel free to post on my Facebook group at Silhouette Secrets with EllyMae.
Save this for future reference by pinning the image below.
Enjoy !
THANK YOU for your support! How can you help? Click HERE & buy a coffee. Every little bit helps with the cost of running the site.
Or if you are looking for more in-depth, step-by-step classes, check out all of my online Silhouette classes on my Teachable site HERE.
**This post may contain affiliate links. What that means is that I may receive compensation if you purchase through the links I have provided. The price you pay for the product or service is not higher but I may get compensated for sharing.
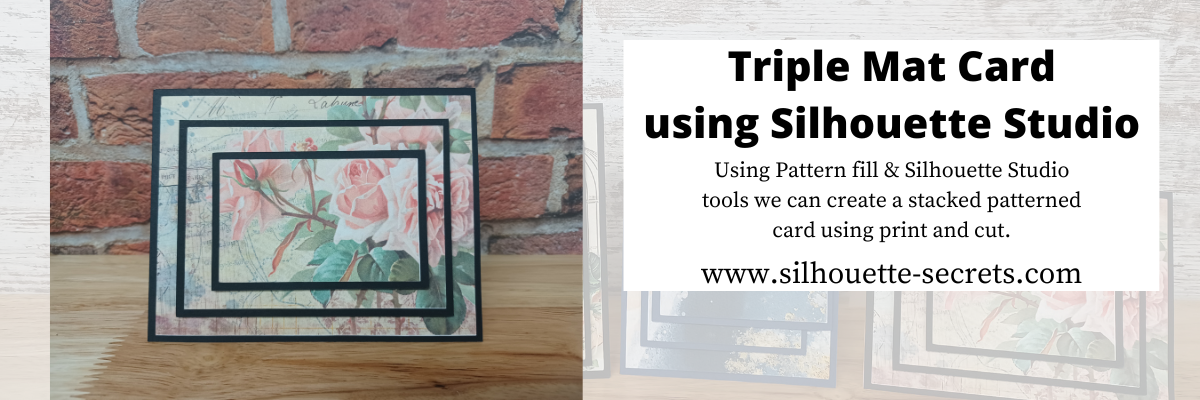
I love being able to recreate just about anything in the Silhouette Studio software!
I’ve seen the triple mat technique in the stamping community for many, many years and even created cards with stamps using this same effect. Today we are going to take a look at how we can easily recreate this look with any pattern in the Silhouette Studio software.
First, a great big Thank You to Teresa P. for inspiring and helping with this tutorial.
I also have a video tutorial on my YouTube channel HERE.
Blue words in this tutorial are linked to more information on that particular topic. Click on the word and it will open a new window with a tutorial on that subject.
Creating a Triple Mat Card with Silhouette Studio
Open Silhouette Studio and set up the Page Setup Panel. Select Letter size media or the size page you will be printing on. Select Portrait Orientation. I have the best results with print and cut on Portrait orientation.
I will be using a standard U.S. card size in the tutorial, however, you can adjust this to your desired card size. Create along with me for the technique and then play around with the sizes you normally create a card in.
Using the Drawing Tools on the left side, draw a rectangle any size.
Make a copy of the rectangle. There are about 10 different ways (or more) to copy and paste in the Silhouette Studio software. A couple are Ctrl+C and Ctrl+V, right click choose copy & paste, or right click and choose duplicate. My favorite shortcut is to hold down the Alt key (Option on a MAC) then move the mouse over the red cut line and the cursor changes to a +. Left click on the mouse and drag a copy away.
Resize the 2nd rectangle to 5.25″ W x 4″ H.
Do this 4 more times and resize each rectangle as shown below.
Rectangle Copy 3 – 4.5″ W x 3.25″ H Rectangle Copy 4 – 4.25″ W x 3″ H Rectangle Copy 5 – 3.5″ W x 2.25″ H Rectangle Copy 6 – 3.25″ W x 2″ H
You should end up with 6 rectangles all at different sizes that will make up the stacked technique.
Select Rectangle #1, hold the Shift key down and click Rectangle #3 & #5 to select them all at once. Move those off the design mat area to the gray holding area. Next, with all 3 selected, fill those with black using the Fill Color in the QAT or the Fill Color Panel on the right side. These are the mats that will be cut out of black cardstock or any other color you desire.
With the 3 rectangles centered and selected, right click and choose Make Compound Path. Compound paths are one of the most difficult concepts for a Silhouette user to understand. However, in this case, we are using the Compound Path option in a little bit different way. Check it out below.
Next, click on the Show/Hide Library option in the bottom left corner.
This opens up a split screen of the Library and the Design tab.
Click on the Patterns folder in the library.
Affiliate links may be present in the below and as an Amazon Associate I earn from qualifying purchases.What that means is that I may receive compensation if you purchase through the links I have provided. The price you pay for the product or service is not higher but I may get compensated for sharing.
Now, it may look a bit odd right now, but hang tight and you’ll see the magic happen on the screen.
Click the Show/Hide library button to close the split screen library.
Now, we can adjust the pattern a bit before we move on. Open the Fill Color Panel and click on the 3rd tab at the top. Then click on the Advanced section to open up more options.
Under the Advanced section, you can Scale the pattern up and also Pan the pattern around. Just be careful to watch for white lines to appear as the pattern is “tiled”. The white lines indicate the edge of the pattern page. If you see those on the screen, it will print that way as well.
Adjust the settings to your liking.
Now, are you ready for the magic?
Right click on the rectangles and choose Release Compound Path.
Ta-da! Move the rectangles away and you can see that the pattern fill is now in all 3 rectangles in the exact location that it was when it was stacked together.
What a nifty little trick!
Now that we have our card design, it’s time to set up the print and cut.
Open the Page Setup Panel & make sure the page is setup properly if needed. Choose Letter size (or the size you are printing on). Choose Portrait Orientation.
Then click on the Tab 3 at the top of the Page Setup Panel for the Registration Marks. Choose On. Click the Restore Defaults button. *This is an important step if you have ever had issues with print and cut or are just getting started. The default registration marks are where the machine can read the most accurately.
Arrange the designs on the page within the red cut border and stay away from the cross-hatched area. If needed, use the Transform Panel – Rotate Tab to rotate the design to fit within the red cut border of the print and cut page.
The cross-hatched area is very, very important in the success of the accuracy in the print and cut! The optical eye is a laser eye that turns on when registration marks are on the project. This eye searches for those black registration marks and any part of the design that is in the cross-hatched area can interfere with an accurate reading. It may look like it read the marks, but if it picked up part of the design instead of the edge of the registration mark, it can affect where it cuts. Dark colors in, near, or between the cross-hatched areas can interfere with the reading. If you have every had an issue, look at where your design is placed and are you using the defaults to give the machine the best chance to read?
Some users can successfully adjust the print and cut boundaries, but NOT ALL! The most accurate results with print and cut are with the default registration marks. Once you have established a baseline with the defaults, then you can start changing things and see what works. It does NOT work for all users to adjust.
Print and Cut is an amazing feature on the Silhouette software! Here are some tips on how to set up a basic print and cut Let’s Explore v4 – Print and Cut Basics Starting with the basics will give you the most accurate print and cut results.
Once your page is ready, send it to print using File > Print.
Printed on a Canon TS9521C Craft Printer
I am often asked what printer to buy for print and cut. Any good quality printer will work. Start with the one you have and start with the Basics of Print and Cut, test it and see how it does.
Place the printed page on the cutting mat, exactly as it shows on the Silhouette Design screen in the top left corner and covering the grid lines on the mat.
Using a Silhouette cutting mat will also be the greatest chance of an accurate print and cut. Other 3rd party cutting mats are not the same dimensions and can affect the accuracy of a print and cut project.
Load the cutting mat in the Silhouette machine. On a Cameo, the left edge of the cutting mat should be next to the line on the left and not over top of it. Hold the cutting mat flat as it registers the marks for best results.
Click on the Send tab in the top right corner. Select the material type and adjust the cut settings as needed for your material. Click the Send button in the bottom right corner when ready to cut.
After it’s cut, unload the cutting mat, flip the mat over and carefully peel the mat away from the cardstock.
Add the black cardstock (or other color) to the cutting mat. Click on the Design tab again in Silhouette Studio. Select all 3 of the black rectangles, copy and paste to a new design mat and arrange to cut.
Send to cut.
After it’s cut, unload the cutting mat, flip the mat over and carefully peel the mat away from the cardstock.
Now that the pieces are cut, gather the supplies for assembly.
And since you are already setting up a print and cut, you can also add a sentiment that could either be added directly to the pattern area or create your own shape as well. Print it right along with your pattern pieces.
I would love to see what you are creating with your Silhouette software or machines! Feel free to post on my Facebook group at Silhouette Secrets with EllyMae.
Save this for future reference by pinning the image below.
Enjoy !
THANK YOU for your support! How can you help? Click HERE & buy a coffee. Every little bit helps with the cost of running the site.
Or if you are looking for more in-depth, step-by-step classes, check out all of my online Silhouette classes on my Teachable site HERE.
**This post may contain affiliate links. What that means is that I may receive compensation if you purchase through the links I have provided. The price you pay for the product or service is not higher but I may get compensated for sharing.
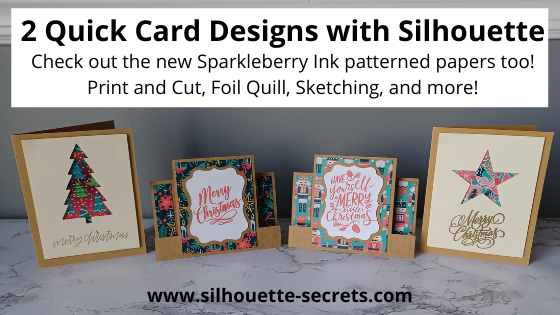
I cannot believe it is December already! I have been trying to get some projects done that have been on my list. And time just seems to evaporate. So today I’m going to share 2 quick cards that I’ve been working on.
And the best part about these 2 card designs is that they can be used all year long and for all occasions. Simply change the patterned paper, shapes used, and sentiments and you have birthday, wedding, anniversary, congratulations, or just because cards too!
Affiliate links may be present in the following blog post and as an Amazon Associate I earn from qualifying purchases.
I’ve been playing with the new Sparkleberry Ink patterned papers and I love them! Now all of the fantastic Sparkleberry patterns are available in a cardstock media. These are printed directly at the Sparkleberry Ink shop as they are ordered and I’d recommend having a paper trimmer on hand to square up the edges. Check them out HERE and use my code SILSECRETS to save 10% on your order anytime.
I had hoped to have the full written tutorial on how I created this file, but time just escapes. In most cases, it takes longer to write the tutorial up than it does to create the project. So I’m sharing the cut file with you, so you can just get to cutting.
For the sentiment on the card, you can use any combination of things.
In the photo above, I used the Merry Christmas Vintage sentiment by Chameleon Cuttables – Design #390094 and then did a print and cut onto Kraft Cardstock. I follow the same steps every single time I do a print and cut and it’s one of my favorite things to do. Check out this post “Let’s Explore v4 – Print and Cut Basics” for setup and tips to getting a successful Print and Cut.
You could also use the Foil Quill and add the sentiments.
For this set I added different sentiments to each card front.
Sketch designs like Design #299750 or #301185 will be quicker to sketch out and are ready to go. In order to fill in text for the Foil Quill or when Sketching, you would use the Line Effects (Sketch) panel to create the fill. Keep in mind the tighter the Sketch fill, the longer it takes to complete the design as it has to sketch all the lines. I used a crosshatched sketch fill with a 0.020 spacing.
Sketching can be so much fun to create unique projects with. For more in-depth training and a step-by-step class covering the aspects of Sketching, check out the Sketch Pen & Sketch Pen Design Class on my Teachable site HERE
You could also use stamps and stamp the sentiment on the front of the card front too!
There are so many options with Silhouette!
The second card design is a quick card that any user could cut from beginner to advanced and put together. So it’s perfect for a new user or anyone who is just looking for a neat, quick card to cut and assemble.
Mix and match the patterned papers and sentiments and you have several different designs.
I added the sentiments to a print and cut page and had them done in no time.
Again, I use the same steps each time I set up a print and cut project and I rarely have any issues with it cutting properly. Check out those tips HERE.
I hope that has given you a few ideas of how you could quickly complete a project. You may even have all the supplies on hand.
I’d love seeing what you are creating with your Silhouette machines or software. Feel free to post photos or questions on my Facebook group at Silhouette Secrets with EllyMae.
Save this for future reference by pinning the image below.
Enjoy!
THANK YOU for your support! How can you help? Click HERE & buy a coffee. Every little bit helps with the cost of running the site.
Or if you are looking for more in-depth, step-by-step classes, check out all of my online Silhouette classes on my Teachable site HERE.
**This post may contain affiliate links. What that means is that I may receive compensation if you purchase through the links I have provided. The price you pay for the product or service is not higher but I may get compensated for sharing.
September happens to be my Mom’s birthday month and I wanted to make her a special card.
Affiliate links may be present in the following blog post and as an Amazon Associate I earn from qualifying purchases.
I found this Unicorn Hug Gift Card holder from the Silhouette Design store that I had acquired at some time and I thought it would be perfect. I had purchased a couple pairs of earrings from Mags Bonham at our TJC Curio Intensive Retreat last weekend and thought I could slip them inside the gift card pocket.
I created this card using the following supplies: Unicorn Hug Gift Card Holder by Jennifer Rush from the Silhouette Design Store CTMH Cardstock – White & Pixie CTMH Pink Glitter Cardstock – retired (but they have other new colors) CTMH Dual Action Glue Pen Z553 CTMH Stamp sets: Birthday Sparkles (B1537) and Happy Heart (A1192) CTMH Bitty Sparkles Z1263 CTMH Archival Black Ink, Bashful Ink, Raspberry Ink, Blossom Ink CTMH Clear Shimmer Brush Z3293
This was a very simple card to cut & put together. You can read more of the instructions on how to put it together on the designer, Jennifer Rush’s blog HERE.
This is definitely a card that I could create again!
Enjoy !
THANK YOU for your support! How can you help? Click HERE & buy a coffee.
Every little bit helps with the cost of running the site.
Looking for more in-depth, step-by-step classes, check out all of my online Silhouette classes on my Teachable site HERE.
**This post may contain affiliate links. What that means is that I may receive compensation if you purchase through the links I have provided. The price you pay for the product or service is not higher but I may get compensated for sharing.
I love being able to create these customized cards for friends, especially for special occasions…
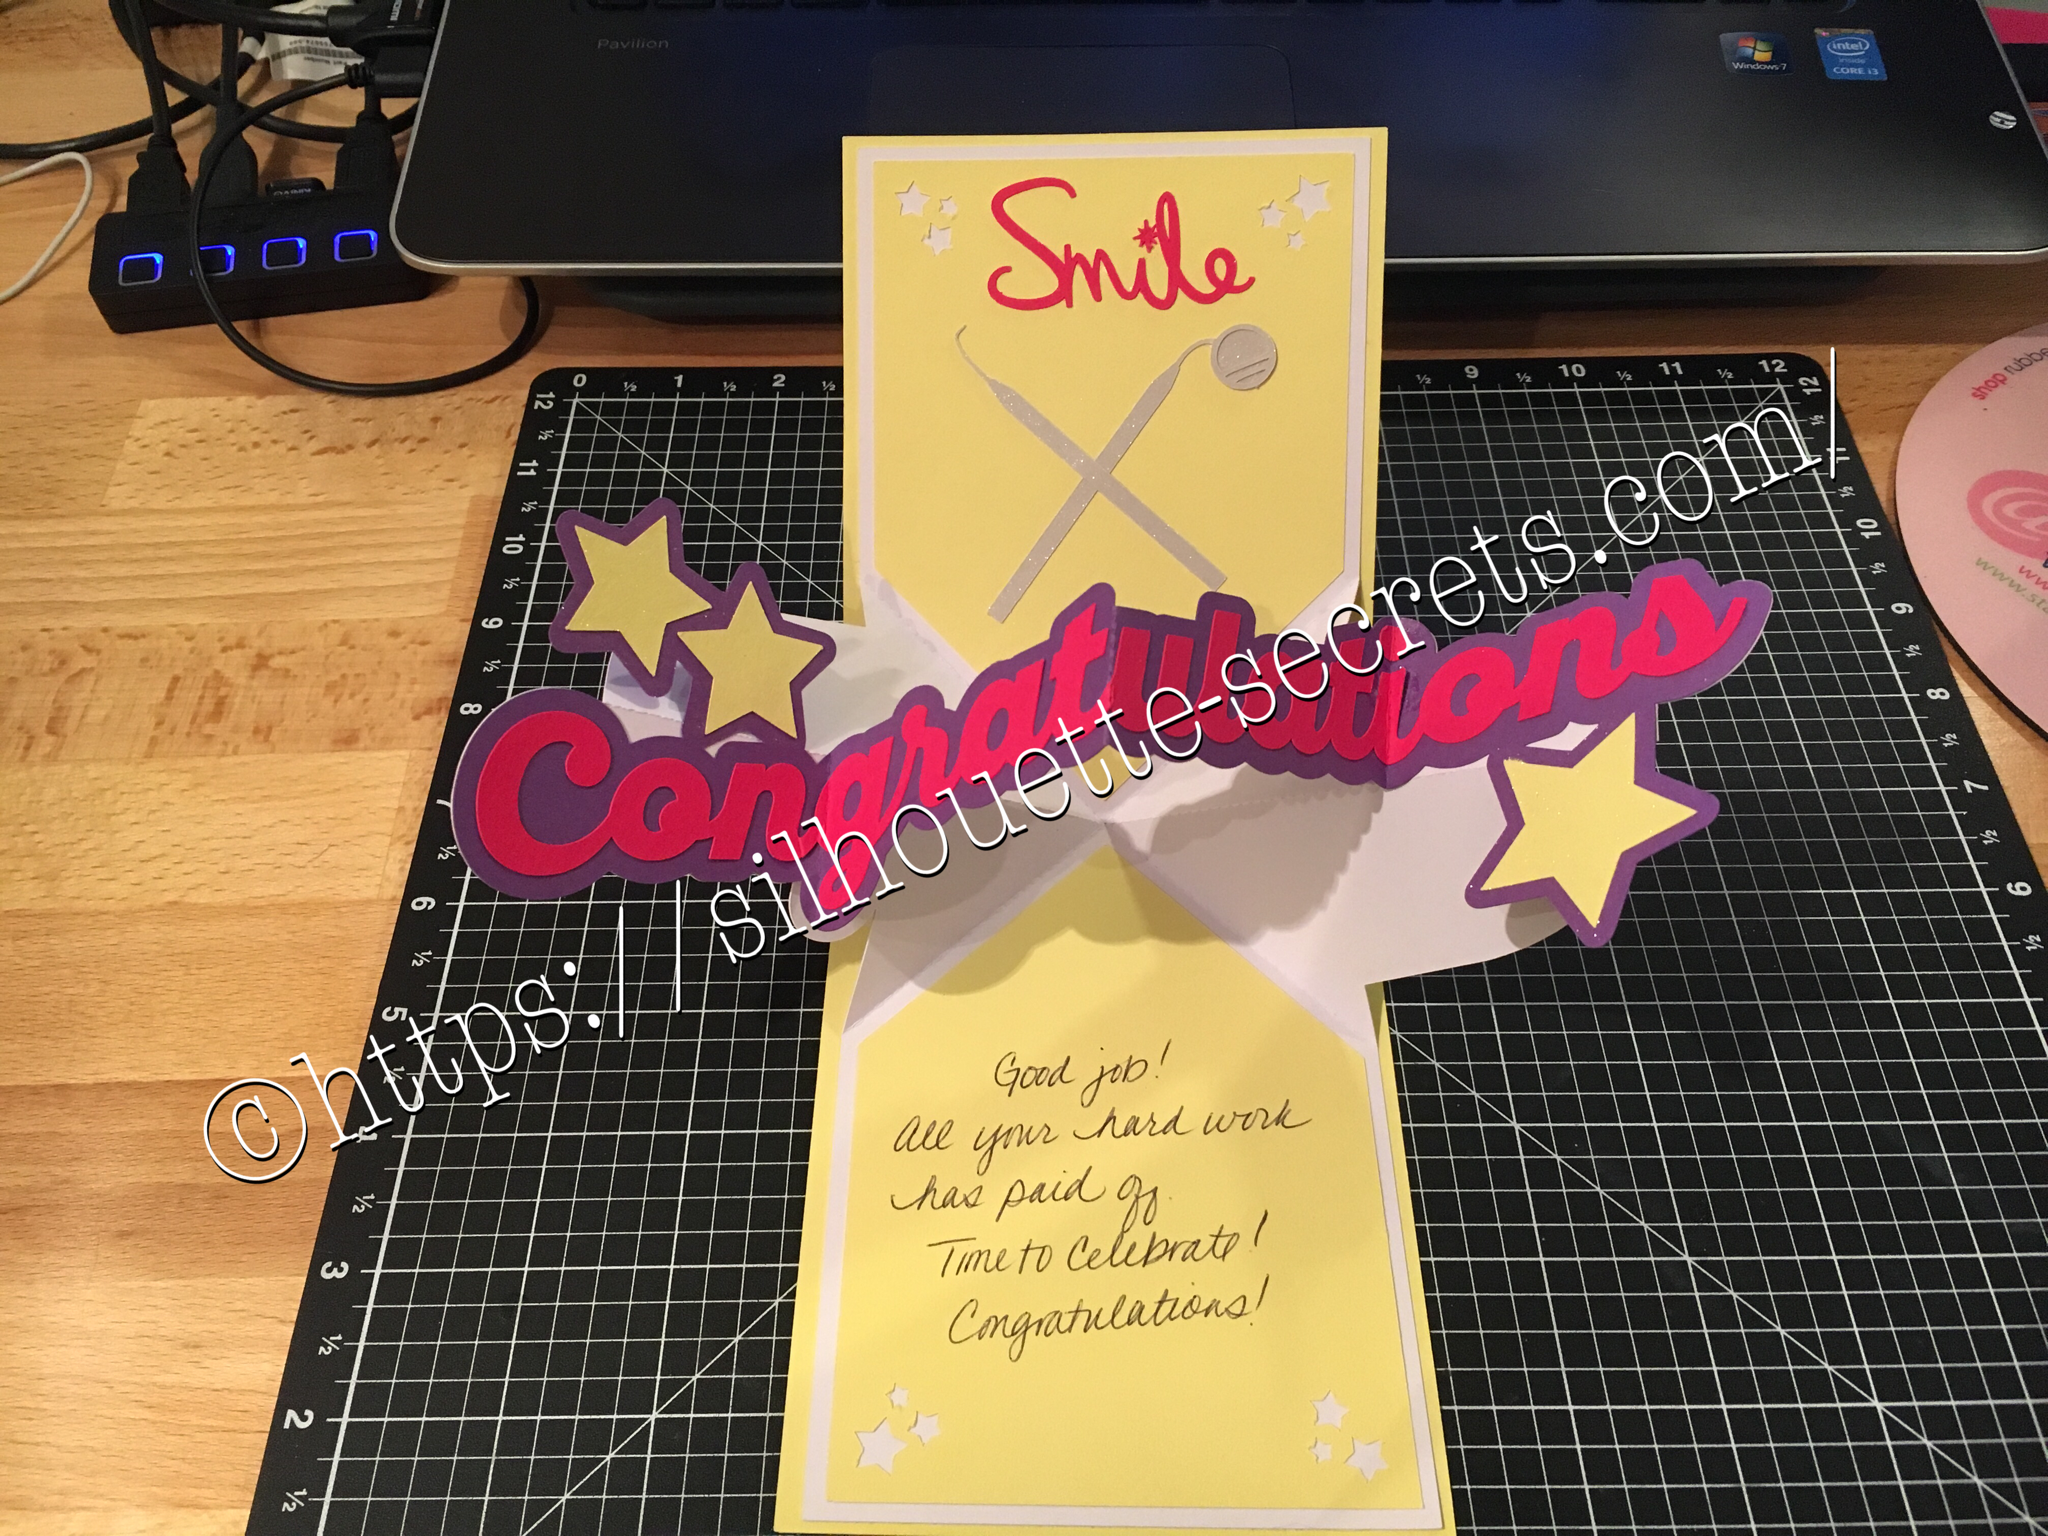
A friend of mine just received the results of her dental hygiene exam and I thought I would create a unique card for her.
I found all the designs in the Silhouette Store and loved that I could just click buy and then get to cutting.
You can find the Congratulations Pop & Twist card file HERE.
Find the Tooth file HERE.
Find the Dentist tools HERE.
You can see a short video of how this card works HERE.
I took the tooth cut file and resized it down to make a bunch of teeth confetti to include inside the pop & twist card. And then I stuffed it into the envelope.
Just a tip… I even measured this card and it was under the weight limit but U.S.P.S still returned it for more postage. You just never know.
Sometimes with these fancy fold cards they can get to be a bit thick and you need to allow for extra postage.
I thought I was good this time, but guess not!
Now while you can find instructions on how to create these fancy cards such as Twist & Pop or Cards in a Box, I still prefer to use my Cameo machine and let it do the work for me.
What kind of fancy cards will you try with your Cameo?
Enjoy !
THANK YOU for your support! How can you help? Click HERE & buy a coffee.
Every little bit helps with the cost of running the site.
Looking for more in-depth, step-by-step classes, check out all of my online Silhouette classes on my Teachable site HERE.
**This post may contain affiliate links. What that means is that I may receive compensation if you purchase through the links I have provided. The price you pay for the product or service is not higher but I may get compensated for sharing.
THANK YOU for your support! How can you help? Click the link to buy a coffee. Every little bit helps in the cost of running the site.


