
I love being able to recreate just about anything in the Silhouette Studio software!

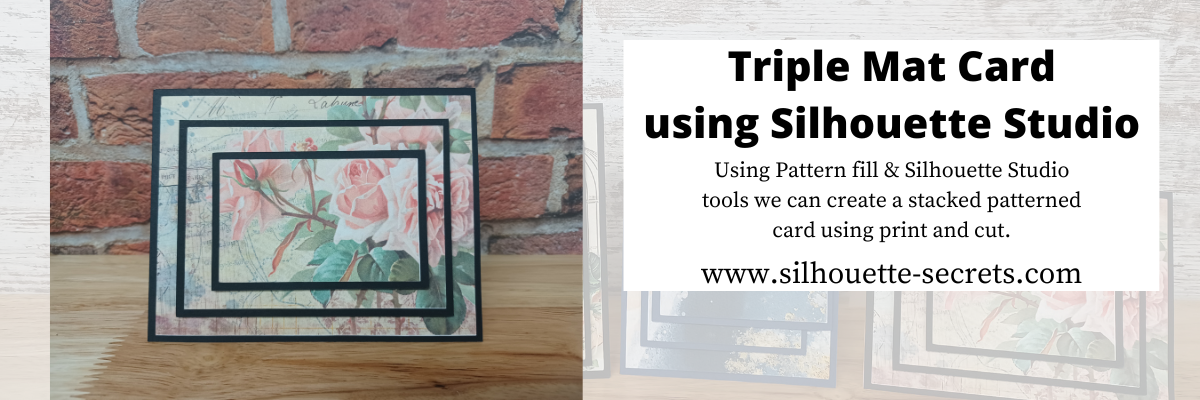
I’ve seen the triple mat technique in the stamping community for many, many years and even created cards with stamps using this same effect. Today we are going to take a look at how we can easily recreate this look with any pattern in the Silhouette Studio software.
First, a great big Thank You to Teresa P. for inspiring and helping with this tutorial.
I also have a video tutorial on my YouTube channel HERE.
Blue words in this tutorial are linked to more information on that particular topic. Click on the word and it will open a new window with a tutorial on that subject.
Creating a Triple Mat Card with Silhouette Studio
Open Silhouette Studio and set up the Page Setup Panel.
Select Letter size media or the size page you will be printing on.
Select Portrait Orientation.
I have the best results with print and cut on Portrait orientation.

I will be using a standard U.S. card size in the tutorial, however, you can adjust this to your desired card size. Create along with me for the technique and then play around with the sizes you normally create a card in.
Using the Drawing Tools on the left side, draw a rectangle any size.

Using the Scale Tools in Quick Access Toolbar (QAT) or
under the Transform Panel – Tab 2, resize the rectangle to 5.5″ W x 4.25″ H.
Hit enter after typing in the number for the design to adjust.

Make a copy of the rectangle.
There are about 10 different ways (or more) to copy and paste in the Silhouette Studio software. A couple are Ctrl+C and Ctrl+V, right click choose copy & paste, or right click and choose duplicate.
My favorite shortcut is to hold down the Alt key (Option on a MAC) then move the mouse over the red cut line and the cursor changes to a +. Left click on the mouse and drag a copy away.
Resize the 2nd rectangle to 5.25″ W x 4″ H.

Do this 4 more times and resize each rectangle as shown below.
Rectangle Copy 3 – 4.5″ W x 3.25″ H
Rectangle Copy 4 – 4.25″ W x 3″ H
Rectangle Copy 5 – 3.5″ W x 2.25″ H
Rectangle Copy 6 – 3.25″ W x 2″ H
You should end up with 6 rectangles all at different sizes that will make up the stacked technique.

Select Rectangle #1, hold the Shift key down and click Rectangle #3 & #5 to select them all at once. Move those off the design mat area to the gray holding area.
Next, with all 3 selected, fill those with black using the Fill Color in the QAT or the Fill Color Panel on the right side. These are the mats that will be cut out of black cardstock or any other color you desire.

Select the 3 rectangles on the design mat and choose the Center option in the top QAT Toolbar or use the Transform Panel – Align Tools and Center.
With the 3 rectangles centered and selected, right click and choose
Make Compound Path.
Compound paths are one of the most difficult concepts for a Silhouette user to understand. However, in this case, we are using the Compound Path option in a little bit different way. Check it out below.

Next, click on the Show/Hide Library option in the bottom left corner.

This opens up a split screen of the Library and the Design tab.
Click on the Patterns folder in the library.

Affiliate links may be present in the below and as an Amazon Associate I earn from qualifying purchases. What that means is that I may receive compensation if you purchase through the links I have provided. The price you pay for the product or service is not higher but I may get compensated for sharing.
With the design selected, choose a pattern.
I am using Vintage Pink Rose and French Ephemera Collage Pattern by Traci Vanover – Design #401636

Now, it may look a bit odd right now, but hang tight and you’ll see the magic happen on the screen.
Click the Show/Hide library button to close the split screen library.
Now, we can adjust the pattern a bit before we move on.
Open the Fill Color Panel and click on the 3rd tab at the top.
Then click on the Advanced section to open up more options.

Under the Advanced section, you can Scale the pattern up and also Pan the pattern around. Just be careful to watch for white lines to appear as the pattern is “tiled”. The white lines indicate the edge of the pattern page. If you see those on the screen, it will print that way as well.
Adjust the settings to your liking.
Now, are you ready for the magic?
Right click on the rectangles and choose Release Compound Path.

Ta-da! Move the rectangles away and you can see that the pattern fill is now in all 3 rectangles in the exact location that it was when it was stacked together.

What a nifty little trick!
Now that we have our card design, it’s time to set up the print and cut.
Open the Page Setup Panel & make sure the page is setup properly if needed.
Choose Letter size (or the size you are printing on).
Choose Portrait Orientation.

Then click on the Tab 3 at the top of the Page Setup Panel for the Registration Marks.
Choose On.
Click the Restore Defaults button.
*This is an important step if you have ever had issues with print and cut or are just getting started. The default registration marks are where the machine can read the most accurately.
Arrange the designs on the page within the red cut border and stay away from the cross-hatched area.
If needed, use the Transform Panel – Rotate Tab to rotate the design to fit within the red cut border of the print and cut page.

The cross-hatched area is very, very important in the success of the accuracy in the print and cut! The optical eye is a laser eye that turns on when registration marks are on the project. This eye searches for those black registration marks and any part of the design that is in the cross-hatched area can interfere with an accurate reading.
It may look like it read the marks, but if it picked up part of the design instead of the edge of the registration mark, it can affect where it cuts.
Dark colors in, near, or between the cross-hatched areas can interfere with the reading.
If you have every had an issue, look at where your design is placed and are you using the defaults to give the machine the best chance to read?

Some users can successfully adjust the print and cut boundaries, but NOT ALL! The most accurate results with print and cut are with the default registration marks. Once you have established a baseline with the defaults, then you can start changing things and see what works. It does NOT work for all users to adjust.
Print and Cut is an amazing feature on the Silhouette software!
Here are some tips on how to set up a basic print and cut
Let’s Explore v4 – Print and Cut Basics
Starting with the basics will give you the most accurate print and cut results.
Once your page is ready, send it to print using File > Print.

I am often asked what printer to buy for print and cut.
Any good quality printer will work.
Start with the one you have and start with the Basics of Print and Cut, test it and see how it does.
Place the printed page on the cutting mat, exactly as it shows on the Silhouette Design screen in the top left corner and covering the grid lines on the mat.

Using a Silhouette cutting mat will also be the greatest chance of an accurate print and cut. Other 3rd party cutting mats are not the same dimensions and can affect the accuracy of a print and cut project.
Load the cutting mat in the Silhouette machine. On a Cameo, the left edge of the cutting mat should be next to the line on the left and not over top of it.
Hold the cutting mat flat as it registers the marks for best results.

Click on the Send tab in the top right corner.
Select the material type and adjust the cut settings as needed for your material.
Click the Send button in the bottom right corner when ready to cut.

For additional tips on Cut Settings check out this post
Perfect Cut Settings in Silhouette HERE
After it’s cut, unload the cutting mat, flip the mat over and carefully peel the mat away from the cardstock.

Add the black cardstock (or other color) to the cutting mat.
Click on the Design tab again in Silhouette Studio.
Select all 3 of the black rectangles, copy and paste to a new design mat and arrange to cut.

Send to cut.
After it’s cut, unload the cutting mat, flip the mat over and carefully peel the mat away from the cardstock.
Now that the pieces are cut, gather the supplies for assembly.

Supplies used:
Recollections White & Black Cardstock from Michaels – https://bit.ly/3bkIlS5 affil
Scrapbook Adhesives Tape Runner 3L – https://shrsl.com/3aeol affil
Foam Tape – https://amzn.to/3b9gHHu affil
Check out how to make your own card base HERE and size it as needed
Start by using the tape runner to secure the pattern to the black cardstock mat.

Secure the largest piece to the front of the card base using the tape runner.
Then add foam tape on the backside of the black cardstock mats to give it dimension.

Line up the pieces on top of the large rectangle, lining it up as you designed it. In this case, we centered the stacked mats.

And you have created a triple matted card using the Silhouette Studio software and pattern fill.
As you get familiar with it, you can start experimenting with different designs, patterns, and placement.

Patterns used:
Vintage Pink Rose and French Ephemera Collage Pattern by Traci Vanover – Design #401636
Wildflower Watercolor Pattern by Angie Makes – Design #187189
Carte Postal Bird by Glitz Design – Design #33715
Golden and Blue Abstract Pattern by Nilmara Quintela – Design #318594

It is hard to see in this photo, but I added a bit of detail with a gold pen to this pattern.

And since you are already setting up a print and cut, you can also add a sentiment that could either be added directly to the pattern area or create your own shape as well. Print it right along with your pattern pieces.

Thank you sentiment by Dresden Carrie – Design #171127
I hope you get a chance to get into the Silhouette Studio software and create today!
Check out the full video tutorial on my YouTube channel HERE too!
I would love to see what you are creating with your Silhouette software or machines!
Feel free to post on my Facebook group at
Silhouette Secrets with EllyMae.
Save this for future reference by pinning the image below.

Enjoy !
THANK YOU for your support! How can you help? Click HERE & buy a coffee.
Every little bit helps with the cost of running the site.
Or if you are looking for more in-depth, step-by-step classes, check out all of my online Silhouette classes on my Teachable site HERE.


 The bottom line is the score line for the center of the card. Match the score line up with the Guide created at 4.25″When the design is selected, a directional arrow in the center appears & that can be used to move and adjust the design and pop up features and vary the length of the design to pop out of the base.
 The farther down you pull the arrow, the more the features adjust.
 Pull the red dots on either side of the score line out to the edges of the card, so it will score a fold line to the edge of the card.

 Each line will now become it’s own separate piece and can be moved or deleted, as you see fit.
 Here I increased it to 57% to show you how it looks. Each design will vary in how it looks and the look you want to achieve.
 I increased the Min. Strut Width to 0.269″ and it changes so there are only 5 tabs at the top of my design.


