Posted on — 1 Comment

Designing with Rhinestones and Silhouette Class

I have a new Silhouette class that I just released on my Teachable site!!!!

Affiliate links may be present in the following blog post and as an Amazon Associate I earn from qualifying purchases.

This class has been in creation for almost 6 months now and finally is out of my head and finished!
It has grown from just 1 project to 4 projects as I wanted to include several options for you to be able to customize your own projects.

Check out the full description of the class HERE

I’ll share a few photos below, give a brief explanation of what each sessions focuses on, and then share the supply list as well. However, there is also a downloadable supply list when you register for the Rhinestone class.

The class is designed so you can choose what you want to create and I guide you along the way to show you the possibilities and options you have.

This first session we discuss pre-made rhinestone designs and how you can use those in your creations, but the main focus is getting set up with the proper cut settings for your materials and using a small ready made design, so you can make sure it’s going to work first.
This part of the class can be completed with the Basic Silhouette Studio software.

I used a Paw Print rhinestone design by Rivka Wilkins because that is what my daughter selected, but I also show you how to navigate the Silhouette Design store to choose your own design too!

Then I have a brief session where I share some information on the different Silhouette machine models and how they might work with the Rhinestone feature.

The next session is where you really get to “create” your own unique design.
You will need the Silhouette Designer Edition upgrade or higher in order to unlock the Rhinestone Panel and create your own rhinestone designs.

We discuss text, different text styles, editing text to manipulate it how you want, and also how that affects your rhinestone design for the project. We also explore creating a rhinestone design, how your text option might affect that design, and how to edit the rhinestone pattern as needed for your desired outcome.

In this session of the class, we discuss fonts and specifically creating rhinestone designs from fonts. I share what works, what may not work, which font styles I think work the best, and how to manipulate the designs when they don’t turn out quite right.

As you’ll see in supply list below, I am sharing several different font styles in the class for each session so you can see on screen what happens. You do not have to buy all the font styles and I highly recommend you watch the class before you invest in too many font styles.

And this fourth session of the class started out as a “bonus” session and quickly grew a life of it’s own. We discuss turning shapes & designs into rhinestone patterns as well as creating a “faux” rhinestone look too!

And maybe one of the most valuable parts of the entire class is that I had a few things go wrong as I recorded the sessions, but I didn’t edit that out because these things happen to us all. Often times you see movie magic in recorded videos and everything looks 100% perfect and then when a user encounters an issue that didn’t happen in the video, they wonder what they did or why it’s not working for them.
In this class, when I encountered any issues, I share how I troubleshoot those issues, how I fixed them, and what I would do in the future.

As I mentioned at the beginning of this post, the class grew from what I originally intended it to be and I packed it full with tips and tricks that will help you in your future Silhouette projects!

I hope you’ll join me in this new Silhouette class!

Check it out HERE

I have also provided the supply list below, but there is a downloadable one in the class as well.

Supply list

– Silhouette Studio Software
– Silhouette Studio Designer Edition upgrade – Crafter Cuts (use code SECRETS to save 10%)
Check for additional sales at Silhouette America , The Vinyl Spectrum, Swing Design
– Paw Print Rhinestone Design by Rivka Wilkins – Design #5445
– Hot Fix Rhinestones
– Rhinestone Template Material
– Hot Fix Transfer Tape
– Siser Glitter HTV
– Blanks: zipper bag, shirt, bag, etc.
– Trim paint brush
– Tools: Scissors, sharp weeding tool, Silhouette Pick Me Up Tool, Silhouette Spatula
– Optional: Rhinestone scoop, Rhinestone Supplies at The Rhinestone World ,
– Bead Scoop, Larger Trim Paint brush, Paper Trimmer, Lint Roller, Tool Kit
– Silhouette cutting machine (or another cutting machine model)
– Heat Source: Siser Heat Press

Optional Fonts – you DO NOT need all, but I share several examples in the class – I would recommend watching first to see which ones you’d like to use

Project #2 fonts

– Beauford font
– BFC Crafty Clutter by Blush Fonts – Design #423648
– BFC Saturday Garden Bush by Blush Fonts – Design #435182
– BFC Farm Hand Brush by Blush Fonts – Design #416052
– Country Christmas Brush Script by Gina Marshall – Design #42528

Project #3 demos

– Paw Print design by Silhouette – Design #313173
– BFC Craft Table by Blush Fonts – Design #398778
– BFC Honey Bears by Blush Fonts – Design #438560
– LW Coach font by Lori Whitlock – Design #274417
– Bestie CS Font by Cloud Studio – Design #414194
– Dotcirful font by 7nTypes – Design #314551 (faux rhinestone font)
– Sweet Pea Sketch font by Rivka Wilkins – Design #86121

Project #4 supplies

– Siser Holographic HTV
– Rhinestone Butterfly by Tanya Batrak – Design #188929
– Heart Inverted Rhinestones by Samantha Walker – Design #6447
– (demo example only) Rhinestone Filled Flower by Sandi Idleman – Design #82666

Now, that may look like a lot of fonts, but I highly recommend you watch the class before purchasing any. You’ll find that you do not need them all, but you may like some of them for future projects.
I used several examples in each session to give you an idea of how you could customize your projects and show what works better and what might not work too!

Want to learn more?

Check out the full list of Silhouette classes on the
Silhouette Secrets+ Teachable site HERE.

Save this for future reference by pinning the image below.

Don’t miss out on any Silhouette tutorials, classes, or news!
Sign up below to get email notifications every time I publish a new blog post.
My goal is for 1 new post a week, unless there is exciting news to share in between.
I know we are all busy and daily emails are not my thing.

Enjoy !

THANK YOU for your support! How can you help? Click HERE & buy a coffee.
Every little bit helps with the cost of running the site.

Silhouette Classes

Never stop learning! Let me help you take the anxiety out of learning with Silhouette and get to creating faster! My Silhouette classes are heavily focused on software, so you can take the skills & techniques taught and apply them to many future projects!

SS Logo snip it
**This post may contain affiliate links. What that means is that I may receive compensation if you purchase through the links I have provided. The price you pay for the product or service is not higher but I may get compensated for sharing.
Posted on — Leave a comment

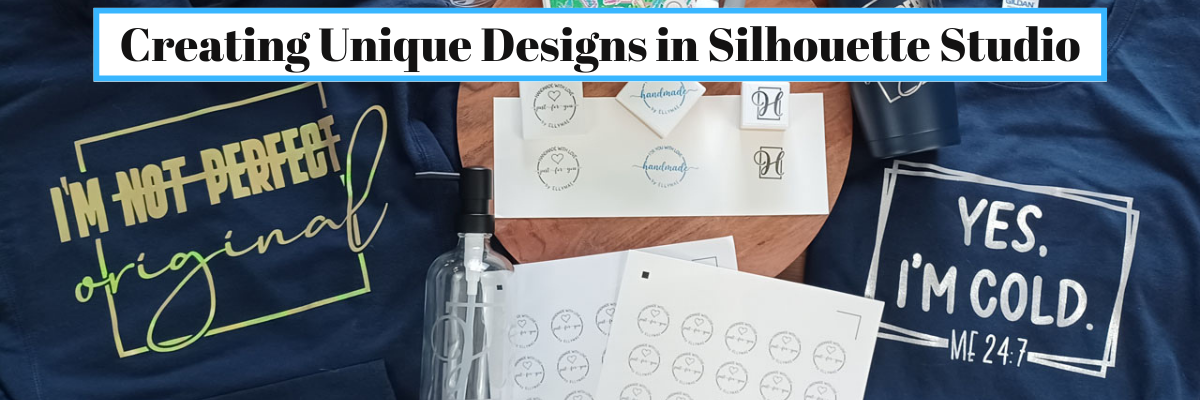
Join me to Create Unique Designs in Silhouette Studio

I have just released a new class and I’m so excited to share with you as we use many tools in the Silhouette Studio software to create unique designs.

New Silhouette Class!!!

Creating Unique Designs in Silhouette Studio – Choose Your Own Project

In this class you will learn how to create all of these designs in the photo above and you can choose what you want to create as a finished project.
Choose to make one or choose them all!

In this step-by-step class, we put the Silhouette Studio tools to work for us! This class is designed for all levels of users to follow along and create. A few of the tools we will discuss and use are: drawing tools, compound paths, text, offset, knife, glyphs, text to path, and more!

This is a custom design created by YOU could be used for all kinds of projects from adhesive vinyl, HTV, Mint stamps, stencils, and more!

I share examples of different finished projects with the techniques used and include optional supplies for additional projects on the class supply list.

As a bonus, I have also included a demonstration of Citristrip etching on a powder coated tumbler using a design created as the stencil.

Check out all of the details for this class HERE

Here are a few closer photos of the projects I created when testing and developing the class.

Affiliate links may be present in the below and as an Amazon Associate I earn from qualifying purchases. What that means is that I may receive compensation if you purchase through the links I have provided. The price you pay for the product or service is not higher but I may get compensated for sharing.

Sweatshirt created with:
Siser Aurora HTV – Goldish
I’m Not Perfect by Tanya Batrak – Design #326840

Long Sleeve Shirt
– Siser Sparkle – Snowstorm White Glitter
– BFC Magic Marker Font by Blush Fonts
– BFC Shiplap Bold font by Blush Fonts

Mint Stamps
– Mint Stamp Machine
– Mint Stamp Kit
– Mint Stamp Ink color of choice

Stickers
– Silhouette Sticker Paper – Silhouette or Amazon
– Staples Sticker Paper

Fonts
– BFC Basically Semi Bold Handwriting Font by Blush Fonts
– Dahlia by Graphix Line Studio

Glass Etching soap dispensers
– Babylone Script font by Almeera Studio

And another Citristrip etched tumbler that turned out AMAZING!
Supplies:
– Powder Coated Tumbler – not all tumblers work
– Oracal 651
– Transfer Tape
– Citristrip Paint Stripper
– Painters Tape
– Gloves, paper towels, water, weeding tool
– Optional:
– Artesprix Project Mat mentioned in the demo video – 2 size available

While those are the projects I created, you could do anything you want! I’ve provided a list of supplies depending on what you would choose to do or you might even have other ideas after working through the class design portion.

CLICK HERE FOR MORE CLASS INFORMATION

Or check out all the Silhouette classes on my Teachable site HERE.

I’d love to see what you create!
Feel free to post on the Silhouette Secrets+ with EllyMae Facebook Group HERE.

I also put out 2 new videos on the Silhouette Secrets+ YouTube channel with supporting information to this class.

Setting up Stickers in Silhouette for Print and Cut

Check it out HERE

Silhouette Mint Stamp Machine – Step-by-step to Creating a Stamp

Check it out HERE

There are so many possibilities that you can do in the Silhouette Software!
Get started today!

Save this for future reference by pinning the image below.

Enjoy !

THANK YOU for your support! How can you help? Click HERE & buy a coffee.
Every little bit helps with the cost of running the site.

Silhouette Classes

Never stop learning! Let me help you take the anxiety out of learning with Silhouette and get to creating faster! My Silhouette classes are heavily focused on software, so you can take the skills & techniques taught and apply them to many future projects!

Silhouette step-by-step Classes by Silhouette Secrets+

Silhouette Secrets+ with EllyMae
**This post may contain affiliate links. What that means is that I may receive compensation if you purchase through the links I have provided. The price you pay for the product or service is not higher, but I may get compensated for sharing.
Posted on — Leave a comment

Creating a Shaped Edge Card in Silhouette Studio

Creating unique designs in the Silhouette Studio software does not have to be hard.
The more that you do it, the more comfortable you will get in the Silhouette software and before long you will be using the tools without a second thought. Find out how easy it is to create a shaped edge card. I have created both a video tutorial and below is the written tutorial.

Heart Shaped Edge Card in Silhouette

Check out the video tutorial on the Silhouette Secrets+ YouTube channel HERE.

Shaped Edge Card Video Tutorial on the Silhouette Secrets+ YouTube channel

Creating a Shaped Edge Card in Silhouette Studio

Create the card base.
I used the the Project Wizard in this tutorial, which is found under File > Open in the top left corner.

Silhouette Studio Project Wizard

Check out how to create a card base in 2 different ways in this post –
Create A Card Base Tutorial HERE
This will allow you to create any size card that you would like to create in the future.

How to Create a Card Base in Silhouette

The Project Wizard – Card is a 5″ x 7″ card base.

Right click on the card base and choose Ungroup, this will ungroup the middle score line from the card base.

Silhouette Studio Ungroup

I change the score line to a wider perforated line so it doesn’t tear the card when folded in half.
Open the Line Style Panel on the right side, select the score line, and change the Style to a wider dashed line.

Silhouette Studio Line Style

The score line needs to be ungrouped from the card base in this tutorial, so it doesn’t disappear as we build the shaped edge card.

On the left side, choose the Flexishapes heart. Click on the design mat and draw down to create a heart.
Flexishapes are a Designer Edition Plus and Business Edition feature.
If you do not have this upgrade, check out this video for a quick way to draw your own heart –
Quick Video on Drawing a Heart in Silhouette Studio HERE

Silhouette Studio Draw Heart for Shaped Edge Card

Right click on the heart and choose Convert to Path.

Silhouette Studio Convert to Path

Position the heart on the right side of the card base. Resize the heart as desired by grabbing the corner bounding box and moving it in.

Silhouette Studio Heart Positioning for Shaped Edge Card

Make copies of the heart, resize as desired, rotate, and position on the right side of the card base the full length of the card base. Make sure to position the hearts on the right side, but not over the right edge of the card base.

Silhouette Studio Heart Design for Shaped Edge Card

Select all the hearts, then use the Align Tools to center align and space horizontal as desired.

Silhouette Studio Align Tools

The card base is a very specific side to fit in an envelope. Make sure not to move the score line or have the hearts extend past the right side to keep the card base dimensions.

With all of the hearts selected, open the Offset Panel on the right side. Select a distance of the Offset that does not extend past the card base, but that does overlap each heart, so the offset is welded together when Apply is selected.

Silhouette Studio Offset for Shaped Edge Card

Select the right edge of the card base and move it in about half way across the hearts. We are creating the shaped edge of the card.

Silhouette Studio Designing

Select the card edge, hold the Shift key down, click on the Offset to select it. Right click and choose Weld.
This creates the shaped edge of the card base.

Silhouette Studio Weld Shape to Shaped Edge Card

If you end up with an interior bits from the offset. Right click on the card edge, select Release Compound Path, click off to deselect and then back on the little bit and press Delete.

Silhouette Studio Shaped Edge Card Design Creation

Select the card base and all of the hearts, right click and choose Make Compound Path.
Do not select the score line.
Then fill it with a light color to see the Shaped Edge card that you’ve created.

Silhouette Studio Fill Color

Right click on the card base and choose Send to Back. This puts the score line back on top. Select everything, right click and choose Group.

Silhouette Studio Send to Back

You’ve now created a shaped edge card design!
You can do this technique with all kinds of shapes.
Cut from cardstock and send to friends and family.

Shaped Edge Card Created in Silhouette Studio

Check out the video on the Silhouette Secrets+ YouTube channel for creating a 2nd shaped edge card with a unique flare.

I also have another tutorial on creating a little bit different shaped edge – check that out HERE.

Gnome Shaped Edge Card Design

Save this for future reference by pinning the image below.

Shaped Edge Card Pinterest

Enjoy !

THANK YOU for your support! How can you help? Click HERE & buy a coffee.
Every little bit helps with the cost of running the site.

Silhouette Classes

Never stop learning! Let me help you take the anxiety out of learning with Silhouette and get to creating faster! My Silhouette classes are heavily focused on software, so you can take the skills & techniques taught and apply them to many future projects!
Silhouette step-by-step Classes by Silhouette Secrets+

Silhouette Secrets+ with EllyMae
**This post may contain affiliate links. What that means is that I may receive compensation if you purchase through the links I have provided. The price you pay for the product or service is not higher but I may get compensated for sharing.


