Posted on Leave a comment

How to Create a Tri-Fold Shaped Edge Card in Silhouette Studio: Step-by-Step Tutorial

Silhouette Secrets+ with EllyMae

Creating custom card designs in Silhouette Studio is easier than you might think, and today I’m excited to share a step-by-step Tri-Fold Shaped Edge Card tutorial now live on the Silhouette Secrets+ YouTube channel! This project is perfect for any occasion, and once you learn the process, you can customize it with your own text, images, and themes. You’ll find the full supply list conveniently located right below the video link, so you can gather everything you need and craft along with me.

Affiliate links may be present in the following blog post and as an Amazon Associate, I earn from qualifying purchases.

Head over to the Silhouette Secrets+ YouTube channel to watch the full step-by-step tutorial. I walk you through each part of creating a Tri-Fold Shaped Edge Card so you can follow along at your own pace and customize it to match any theme or occasion. And while you’re there, I’d love your support—click the Like button, leave a comment to share what design you plan to create, and make sure to subscribe for more Silhouette tips and project inspiration. Don’t forget to tap the bell so you’re notified as soon as new tutorials are released!

A step-by-step tutorial image for creating a tri-fold shaped card, featuring two card designs: one dark with floral patterns and a larger 'thanks' text, and one light with dots and a gold 'thanks' text, with crafting tools in the background.
Custom Card Design in Silhouette

Ready to design your own? Once you’ve watched the tutorial and are inspired to start creating, here are the supplies I used for my Tri-Fold Shaped Edge Card. Feel free to follow along with the same materials or customize your project with what you have on hand—either way, you’ll be crafting a unique card in no time!

Supplies for Custom Card Design:

Additional Resources:

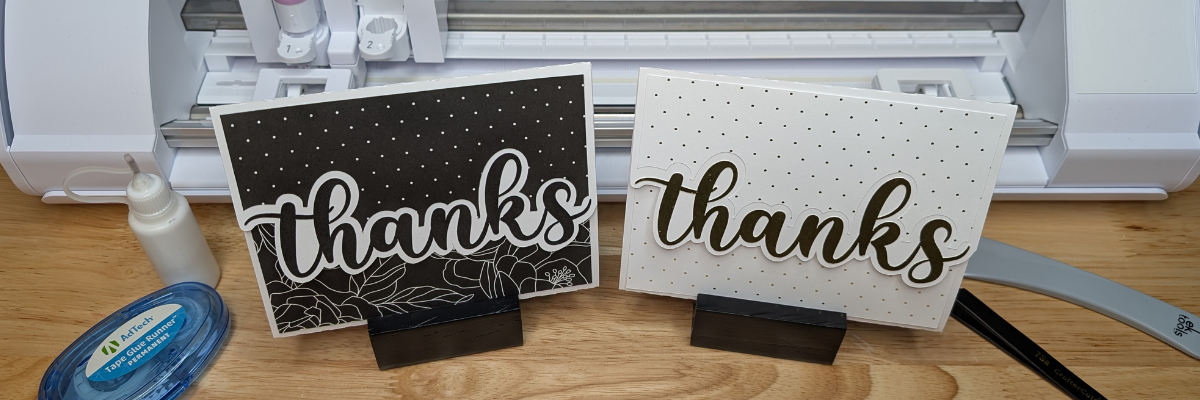
This is a card design that can be used all year long and for many different situations.

Here are a couple more designs that I created too!

Four custom card designs featuring colorful patterns and bold lettering with messages such as 'just for you', 'hello', 'get well soon', and 'Happy Birthday'.

Mix and match different paper patterns with the same designs to create different looks.

A handmade card featuring the word 'thanks' in a playful font, placed on a wooden table with crafting supplies like a glue bottle, tape runner, and tweezers in the background.
Custom Card Design in Silhouette

This is a great way to use up scraps papers or smaller sheets too!

Two crafted cards with the word 'thanks' displayed in bold on a wooden table, alongside a glue runner and scissors, with a Silhouette cutting machine in the background.
Custom Card Design in Silhouette

Save this for future reference by pinning the image below.

An instructional image showcasing two tri-fold shaped edge cards with 'thanks' written on them, positioned in front of a cutting machine on a wooden surface.

Enjoy !

THANK YOU for your support! How can you help? Click HERE & buy a coffee.
Every little bit helps with the cost of running the site.

Silhouette Classes

Never stop learning! Let me help you take the anxiety out of learning with Silhouette and get to creating faster! My Silhouette classes are heavily focused on software, so you can take the skills & techniques taught and apply them to many future projects!

Silhouette step-by-step Classes by Silhouette Secrets+

Silhouette Secrets+ with EllyMae
**This post may contain affiliate links. What that means is that I may receive compensation if you purchase through the links I have provided. The price you pay for the product or service is not higher but I may get compensated for sharing.

Posted on 1 Comment

Shaped Edge Text Card Video Tutorial

This week I released a new video tutorial on the Silhouette Secrets+ YouTube channel on how to create a shaped edge text card. This was inspired by my Silhouette Secrets+ with EllyMae group admin, Teresa. She is an amazing crafter and I love seeing all the projects she creates.
Such an inspiration to myself and other group members!

Shaped Edge Text Card Tutorial

Shaped Edge Text Card in Silhouette Studio

You can check out the new video tutorial HERE.

Affiliate links may be present in the following blog post and as an Amazon Associate I earn from qualifying purchases.

As I started in the Silhouette software, the project took on a life of it’s own. Let’s take a look at each card I created and I’ll share how they are different. I am also sharing a supply list for this project below the project photos.

All of these cards are created at a 5″ x 7″ size.
I used the Project Wizard in this tutorial for creating the card base quickly, however, you can create this in any size that suits your needs.
Check out this tutorial – Create a Card Base with Silhouette

Happy Birthday Shaped Edge Text Card with Silhouette

I created this card by filling in the text with color as I showed in the video tutorial. Then used print and cut with a sheet of 12″ x 12″ cardstock to print and cut the 5″ x 7″ card.
So quick to do! And with print and cut, you don’t have the individual letters to glue down, but you definitely can cut from any colors of cardstock that you would like and piece it together too! So many options.

For more information on Print and Cut check out this section on the blog HERE.

Happy Birthday Card with Silhouette and Adhesive Vinyl

For this card, I took a sheet of 8.5″ x 11″ dark purple cardstock and cut the base out. Then I cut light purple adhesive vinyl and added that to the front of the card.
I also drew a rectangle that fit inside one side of the card base and then cut that from white and added that to the inside of the card for an area to write on.

Happy Birthday stacked font card and shaped edge text card with Silhouette

In this card I used the same technique as the second card, I cut the card base from an 8.5″ x 11″ sheet of cardstock and then used a teal adhesive vinyl, but I used a stacked font called BFC Mean Ones Stacked Font to give it a little bit different look.

And I just noticed a weeding error on my part in the card. It happens to us all!

Now this one I think is my favorite!

Print and Cut Shaped Edge Text Card with Pattern Fill in Silhouette Studio

I used print and cut again for this card and added a pattern fill called Tropical Beach Pattern to the entire card base. Then I picked up a blue color from the water in the pattern and made it a bit darker to add to the Happy text on the card.

Front of Print and Cut Shaped Edge Text Card with Beach scene using a Pattern Fill in Silhouette Studio

Supplies Used for the Project

BFC Mean Ones Stacked Font by Blush Fonts – Design #424262
Tropical Beach Pattern by Sarah Hurley – Design #424332
Oracal Adhesive Vinyl
Recollections Cardstock
Scrapbook Adhesive Tape Runner
Scissors
Weeding Tool

There is so much you can do with this project and all kinds of cards that could be created.

Check out the video tutorial on the Silhouette Secrets+ YouTube channel HERE to see how I created all of these in Silhouette Studio.

What kind of card would you create with it?
We would love to see it on the Silhouette Secrets+ with EllyMae Facebook Group!

Want to see more Shaped Edge Card ideas or paper craft ideas?
Check out the Card section on the Silhouette Secrets website HERE.

Save this for future reference by pinning the image below.

Pinterest Shaped Edge Text Card Creation in Silhouette Studio

Enjoy !

THANK YOU for your support! How can you help? Click HERE & buy a coffee.
Every little bit helps with the cost of running the site.

Silhouette Classes

Never stop learning! Let me help you take the anxiety out of learning with Silhouette and get to creating faster! My Silhouette classes are heavily focused on software, so you can take the skills & techniques taught and apply them to many future projects!

Silhouette step-by-step Classes by Silhouette Secrets+

SS Logo snip it
**This post may contain affiliate links. What that means is that I may receive compensation if you purchase through the links I have provided. The price you pay for the product or service is not higher but I may get compensated for sharing.
Posted on Leave a comment

Creating a Shaped Edge Card in Silhouette Studio

Creating unique designs in the Silhouette Studio software does not have to be hard.
The more that you do it, the more comfortable you will get in the Silhouette software and before long you will be using the tools without a second thought. Find out how easy it is to create a shaped edge card. I have created both a video tutorial and below is the written tutorial.

Heart Shaped Edge Card in Silhouette

Check out the video tutorial on the Silhouette Secrets+ YouTube channel HERE.

Shaped Edge Card Video Tutorial on the Silhouette Secrets+ YouTube channel

Creating a Shaped Edge Card in Silhouette Studio

Create the card base.
I used the the Project Wizard in this tutorial, which is found under File > Open in the top left corner.

Silhouette Studio Project Wizard

Check out how to create a card base in 2 different ways in this post –
Create A Card Base Tutorial HERE
This will allow you to create any size card that you would like to create in the future.

How to Create a Card Base in Silhouette

The Project Wizard – Card is a 5″ x 7″ card base.

Right click on the card base and choose Ungroup, this will ungroup the middle score line from the card base.

Silhouette Studio Ungroup

I change the score line to a wider perforated line so it doesn’t tear the card when folded in half.
Open the Line Style Panel on the right side, select the score line, and change the Style to a wider dashed line.

Silhouette Studio Line Style

The score line needs to be ungrouped from the card base in this tutorial, so it doesn’t disappear as we build the shaped edge card.

On the left side, choose the Flexishapes heart. Click on the design mat and draw down to create a heart.
Flexishapes are a Designer Edition Plus and Business Edition feature.
If you do not have this upgrade, check out this video for a quick way to draw your own heart –
Quick Video on Drawing a Heart in Silhouette Studio HERE

Silhouette Studio Draw Heart for Shaped Edge Card

Right click on the heart and choose Convert to Path.

Silhouette Studio Convert to Path

Position the heart on the right side of the card base. Resize the heart as desired by grabbing the corner bounding box and moving it in.

Silhouette Studio Heart Positioning for Shaped Edge Card

Make copies of the heart, resize as desired, rotate, and position on the right side of the card base the full length of the card base. Make sure to position the hearts on the right side, but not over the right edge of the card base.

Silhouette Studio Heart Design for Shaped Edge Card

Select all the hearts, then use the Align Tools to center align and space horizontal as desired.

Silhouette Studio Align Tools

The card base is a very specific side to fit in an envelope. Make sure not to move the score line or have the hearts extend past the right side to keep the card base dimensions.

With all of the hearts selected, open the Offset Panel on the right side. Select a distance of the Offset that does not extend past the card base, but that does overlap each heart, so the offset is welded together when Apply is selected.

Silhouette Studio Offset for Shaped Edge Card

Select the right edge of the card base and move it in about half way across the hearts. We are creating the shaped edge of the card.

Silhouette Studio Designing

Select the card edge, hold the Shift key down, click on the Offset to select it. Right click and choose Weld.
This creates the shaped edge of the card base.

Silhouette Studio Weld Shape to Shaped Edge Card

If you end up with an interior bits from the offset. Right click on the card edge, select Release Compound Path, click off to deselect and then back on the little bit and press Delete.

Silhouette Studio Shaped Edge Card Design Creation

Select the card base and all of the hearts, right click and choose Make Compound Path.
Do not select the score line.
Then fill it with a light color to see the Shaped Edge card that you’ve created.

Silhouette Studio Fill Color

Right click on the card base and choose Send to Back. This puts the score line back on top. Select everything, right click and choose Group.

Silhouette Studio Send to Back

You’ve now created a shaped edge card design!
You can do this technique with all kinds of shapes.
Cut from cardstock and send to friends and family.

Shaped Edge Card Created in Silhouette Studio

Check out the video on the Silhouette Secrets+ YouTube channel for creating a 2nd shaped edge card with a unique flare.

I also have another tutorial on creating a little bit different shaped edge – check that out HERE.

Gnome Shaped Edge Card Design

Save this for future reference by pinning the image below.

Shaped Edge Card Pinterest

Enjoy !

THANK YOU for your support! How can you help? Click HERE & buy a coffee.
Every little bit helps with the cost of running the site.

Silhouette Classes

Never stop learning! Let me help you take the anxiety out of learning with Silhouette and get to creating faster! My Silhouette classes are heavily focused on software, so you can take the skills & techniques taught and apply them to many future projects!

Silhouette step-by-step Classes by Silhouette Secrets+

Silhouette Secrets+ with EllyMae
**This post may contain affiliate links. What that means is that I may receive compensation if you purchase through the links I have provided. The price you pay for the product or service is not higher but I may get compensated for sharing.