
Lori Whitlock’s designs are a treasure trove of inspiration for crafters of all skill levels. Whether you’re a seasoned maker or just starting out, her versatile and beautifully crafted files can transform any project into something truly special. In this blog post, we’ll explore four unique ways to bring Lori Whitlock’s designs to life, showcasing a mix of techniques and ideas that highlight their creative potential. From cards to home décor, these projects will not only spark your imagination but also help you get the most out of your crafting tools.
Affiliate links may be present in the following blog post and as an Amazon Associate, I earn from qualifying purchases.
Crafting Creativity with Lori Whitlock
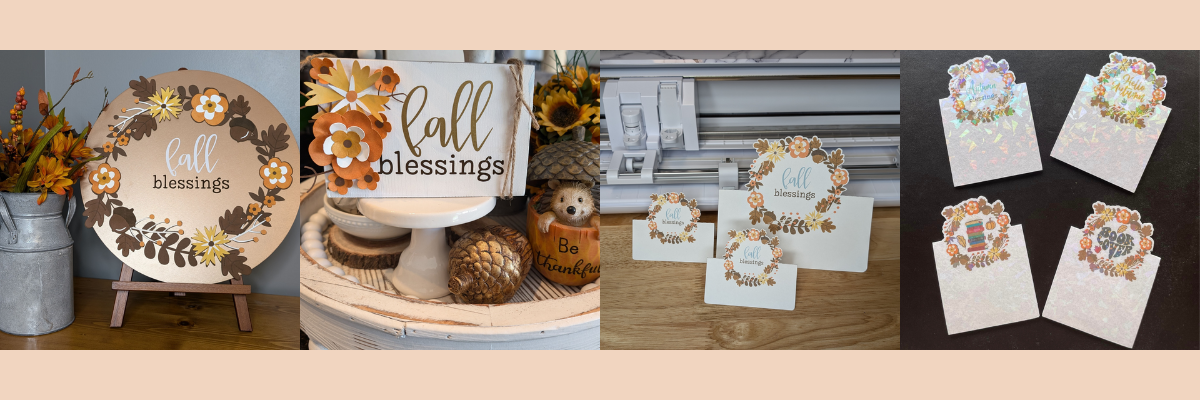
Project #1 – Fall Blessing Wreath Sign

I cut all of the cardstock pieces for the wreath using the Silhouette Electrostatic Bed along with my Cameo 5 . Once everything was cut, I started gluing the pieces of the wreath together and then added it onto a wood round that I’ve had in my stash for awhile.
I am loving the Silhouette Electrostatic Bed and not having to peel the cardstock off the adhesive sticky mat. I’ve cut lots of cardstock in the last year and it has saved me time.
Additional Resources:
- Master Perfect Cuts with the Silhouette Electrostatic Mat: Expert Tips & Tricks!
- Silhouette Electrostatic Bed
- More Cardstock Projects
- Adhesive I Use
Supplies Used:
- Fall Blessings by Lori Whitlock – Design #304735
- Recollections Cardstock
- SUPERTite Precision Craft Glue
- Precision tip application bottle
- 3L Tape runner
- Wood round
- Oracal 651 Adhesive vinyl
- Silhouette Cameo 5 (or other cutting machine model)
- Silhouette Electrostatic Bed
- Silhouette Autoblade
Project #2 – Tiered Tray Wood Sign Decor

While I was cutting the cardstock for the wreath shown above, I cut extra flowers and branches. Then added some ink to the cardstock pieces and used shaping tools to give the flowers dimension before gluing them together. Once the flowers were assembled, I cut fall blessings from adhesive vinyl and added that to the wood block. Then arranged the flowers and glued them down on the left side. Added a bit of twine wrapped around the wood on the right and had a new sign for my tiered tray.
Supplies Used:
- Fall Blessings by Lori Whitlock – Design #304735
- Recollections Cardstock
- SUPERTite Precision Craft Glue
- Precision tip application bottle
- Wood blank painted white
- Oracal 651 Adhesive vinyl: gold and brown
- Twine
- Stamping ink to add dimension
- Craft Sponge
- Tim Holtz Shaping Set
- Silhouette Cameo 5 (or other cutting machine model)
- Silhouette Electrostatic Bed
- Silhouette Autoblade
Project #3 – Pop Out Top Used for Place Cards, Cards, or Treat Toppers

This is such a fun design to create! For this pop out top card, I used the Fall Blessings design and print and cut. I shared the entire process to create this in a live YouTube tutorial on the Silhouette Secrets+ YouTube channel. In the video tutorial I not only shared how to create the design of the pop out top card, but also gave many tips for successful print and cut projects!
Additional Resources:
- Pop Out Card & Master Print and Cut! Live Tutorial
- DIY Pop Out Top Place Card Tutorial
- Print and Cut Basics Tutorial
- More Print and Cut Tutorials
Supplies Used:
- Fall Blessings by Lori Whitlock – Design #304735
- Recollections Cardstock
- Canon TS9521C printer (any printer will do)
- Silhouette Cameo 5 (or other cutting machine model)
- Silhouette Autoblade
Project #4 – Magnetic Bookmarks by Teresa P.

I love these so much! After the Silhouette Live tutorial where I shared how to create the pop out top, I woke up the next morning to see these beauties posted on my group. My friend Teresa creates amazing things and she combined several of my tutorials to make some new magnetic bookmarks.
She used print and cut and added a holographic overlay on top to make them sparkle. In her region, they don’t use the term “fall” so she swapped it out for a few other designs to make it a better fit.
Additional Resources:
Supplies Used:
- Fall Blessings by Lori Whitlock – Design #304735
- Cardstock
- Holographic Laminate
- Printer
I love taking one design and thinking of several ways to make projects with it!
The Crafting Creativity blog posts are your ultimate source of inspiration, designed to spark new ideas and help you explore the endless possibilities in crafting. Each post is packed with innovative project ideas, practical tips, and expert techniques to help you think outside the box and take your creativity to new heights. Whether you’re looking for fresh ways to use your favorite designs, exploring new materials, or learning advanced techniques, these posts aim to fuel your imagination and empower you to turn your crafting dreams into reality. Check out the Crafting Creativity series HERE and see where your creativity takes you!
Save this for future reference by pinning the image below.

Enjoy !
THANK YOU for your support! How can you help? Click HERE & buy a coffee.
Every little bit helps with the cost of running the site.
Silhouette Classes
Never stop learning! Let me help you take the anxiety out of learning with Silhouette and get to creating faster! My Silhouette classes are heavily focused on software, so you can take the skills & techniques taught and apply them to many future projects!