
Let’s Explore v4 – Print & Cut – Part 2
In Print and Cut – Part 1, I showed how to create a print and cut project from an already existing file that was set up for print and cut. In today’s post, we will create our own text and turn it into a print and cut file.
Print and Cut with Text
First, let’s go through how to set up a Print and Cut Project with text.
- Set up the Page Size on the Page Setup Panel to “Current Printer”.
- Choose Portrait Orientation.
- Check Show Print Border – a gray box turns on around the maximum print edge. This is set by the current printer that your computer recognizes.
- Show Cut Border – a red line turns on around the maximum cut edge of the page size. Anything outside this border will not cut.
 * Note: I choose the Portrait Orientation for Print and Cut projects because I troubleshoot many users with the issue of the registration marks not reading accurately when printed in Landscape Orientation. I believe this varies by the printer it is printed with and how the paper is pulled in to the printer. I suggest printing in the Portrait Orientation for best results.
 - Click the Page Setup Panel – Tab 3 – Registration Marks.
- Choose Type 1 Registration marks if you have a Cameo, Portrait or Curio machine.
- Click Restore Defaults. This will reset the registration marks to the default location.
I recommend starting your print and cut projects here, especially for a beginner or if you have a new printer. *While the registration marks can be moved out (Registration Marks – Advanced Options), you will need to test how far you can move those and still get an accurate cut. I know may want to increase the area and squeeze as many designs into the print and cut area that they can, but it can come with some frustration. Do some test printing and then cut to see if the accuracy is affected on copy paper before using the more expensive materials. You will find out what the limits of your printer and Silhouette are.
 - Type out the text using the Text tool on the left side. Weld the text if necessary. *Make a copy of the original text if you do and move it to the side, just in case you need to make changes to the design later.
For more information on text and how it works, check out the Let’s Explore v4 – Text Style Panel post here. - Fill the text with color using the Fill Color Panel.
- Choose the font type from the Text Style Panel on the right side of Silhouette Studio.

- Change the Line Style color of the text using the Line Style – Tab 2 – Line Color, so it is the same color as the filled text.
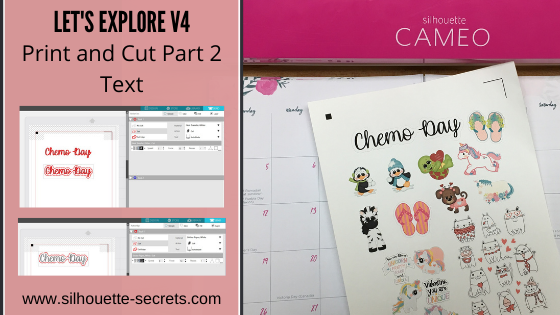
The default line color is red. Since, this text will be printed the line color may show in the printed page. In the photo above, there is a faint red line around the black text, this can show if printed like this. - Choose how you want the text to cut. Do you want just the text cut out or do you want it to have an outline?
To create an outline around the text, use the Offset Panel and adjust the spacing to get the desired effect, then Click Apply. After the Apply button is selected, any overlapping pieces of the offset created, will weld together.
 - Click on the Send tab to see how this will cut.
 The bold red lines indicate cut lines.
If this was sent to cut, the top text would cut out around the text and the bottom text would cut both around the text and the Offset.
For the example today, I only want the Offset to cut.On the Send tab, Select the text cut line and then choose “No cut”, this will turn the bold red cut lines off.

*The key here is that the object you are turning the cut lines on or off for has to be selected. That means you have to click on it and a gray selection box will appear around it. If there is no object selected, the software has nothing to turn on or off.
- Click back on the Design tab. Select the entire design and move it to the location on the page you want it to print. The design cannot be in the cross- hatched area of the page. The Cameo optical eye needs the cross-hatched area of the page to read the registration marks accurately. If the design is in the cross-hatched area, you may get a registration error or an inaccurate cut.

- Do any final adjustments to the text before you send it to print. Once the page is printed, you cannot move anything on the page or you will have either registration errors or get an inaccurate cut.On the Design tab, I selected the Offset, right clicked and chose Release Compound Path.
 Then deleted the small inside pieces of the Offset that I didn’t need to cut.
- Once the file is ready to go. Click on the Printer icon in the top left or File > Print.
For tips on Print Preview – check out the Print and Cut – Part 1 post here.
*Remember – do not move anything on the design mat after the page is printed.

- Click on the Send tab. Select the Material.

- Load the printed page on the Silhouette cutting mat exactly as it shows on the virtual design mat – in the top left corner.
 You will notice that I added several other items to my page. These are other print and cut images that I know will be used, so I added them to fill up the sticker paper area.
 - Load the cutting mat next to the blue arrow on the left side of the Cameo machine.

- Click on the Send button at the bottom of the Send tab.

Perfect print and cut!


I hope that helps get you started on your Print and Cut projects that use text.
Because there are so many details and ways you can use the print and cut feature, I am breaking it up in to several posts.
Print & Cut – Part 1 – Print and Cut with a pre-designed Print and Cut image
Includes Troubleshooting steps
Print & Cut – Part 2 – Print and Cut with Text
Print & Cut – Part 3 – Images

Troubles with print and cut?
Check out my tips for Troubleshooting in Print and Cut – Part 1 here.
I would love to see what you create – feel free to post on my Facebook group at
Silhouette Secrets+ with EllyMae.
Have a suggestion on possible Silhouette topic you would like covered? Add it to this Facebook post on my Silhouette Secrets by EllyMae group HERE or email it to me at silhouettesecretsplus@gmail.com
Enjoy!

![]()
**This post may contain affiliate links. What that means is that I may receive compensation if you purchase through the links I have provided. The price you pay for the product or service is not higher but I may get compensated for sharing.
Discover more from Silhouette Secrets-Swift Creek Customs
Subscribe to get the latest posts sent to your email.


[…] available. The past 2 weeks we have explored using a print and cut file (Part 1) and creating text (Part 2) to use in print and cut. This week we will explore creating a print and cut file from a jpeg or […]
[…] the most out of it. Part 1 – Setting up a pre-designed Print and Cut project Part 2 – Print and Cut – Text Part 3 – Print and Cut – […]
[…] the page for a Print and Cut project. For more details on print and cut – check out Part 1, Part 2 and Part 3 of the Print and Cut series. Print and Cut Part 1 also includes troubleshooting […]
[…] more information on setting up a Print & Cut project check out Print & Cut – Part 1, Part 2 – Text, and Part 3 – […]
[…] are creating your own cut file, you may need to trace or fill with color. Check out these posts on Print & Cut – Part 2 – Text and Print & Cut – Part 3 – Images for exactly how to do […]
[…] out these posts as well Let’s Explore v4 – Print and Cut Basics Print and Cut Part 1 Print and cut Part 2 – Text Print and cut Part 3 – Images Print and cut with Heat Transfer […]
[…] Print and Cut – Part 2 – Text […]