
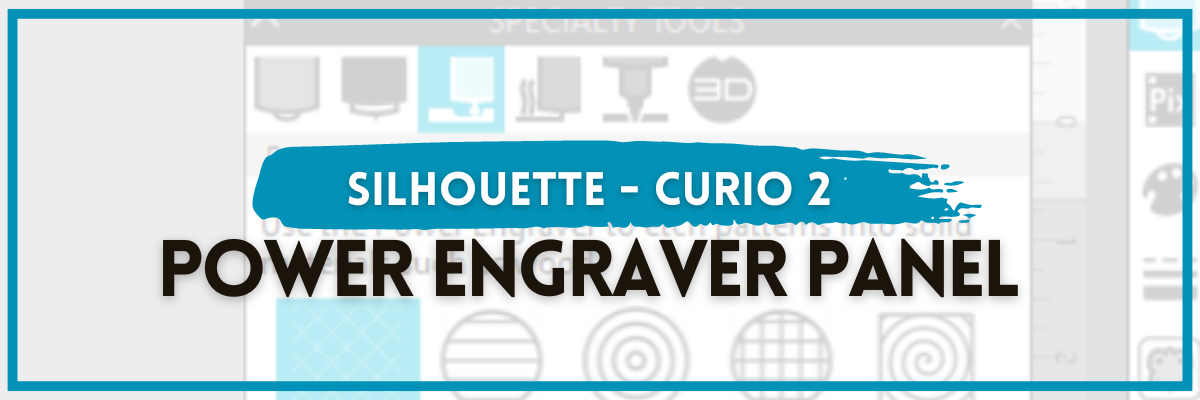

Under the new Specialty Tools Panel on Tab 3 in Silhouette Studio, is the Power Engraver Panel.
This tutorial was written in Silhouette Studio version 4.5.770. The Specialty Tools Panel was released in v4.5+ software versions. If you don’t see it on the right side of the Silhouette Studio, your software version may be older than v4.5.
Affiliate links may be present in the following blog post and as an Amazon Associate, I earn from qualifying purchases.
The Power Engraver is specific to the Silhouette Curio 2 and is one of the new powered tools that was announced and released in September 2023.

The Silhouette Power Engraver is designed to be used along with the Curio 2 Debris Tray, which helps to contain any debris from the materials being etching.

The backside of the Power Engraver features a power plug that sits in the Carriage 2 housing and powers the device through the Silhouette Curio 2 machine. The end of the tool is a router tip that spins to perform the engrave process. It functions like a Dremel tool and sounds like one too. The sound changes depending on the materials being used.
And I’ll just say – I love it!
Specialty Tools Panel – Power Engraver – Tab 3
Here is a look at the details of the Power Engraver Panel in Silhouette Studio.

1 – Power Engraver Etch Fill Patterns – choose from None, Lined, Concentric, Cross-hatched, and Spiral

2 – Spacing – Increase or decrease the grid spacing between the lines of the pattern. The dark red star shows a 0.004″ spacing – a really tight etch fill

This is another area where you are changing a lot of data at one time, so be patient with your computer if it is thinking.
3 – Angle – Change the angle of the etch pattern.
4 – Release Engraving Fill – selecting this option will take the fill from an editable fill pattern and makes it a vector design.
This can be helpful if you are trying to stack multiple layers of etch for engraving on harder materials. It is not necessary to do this with simple etch designs or softer materials such as acrylic.
When using this feature, be aware that once the fill has been released and file saved and closed, it is a permanent change to that file. If the design needs to be adjusted, you would need to start over.
Silhouette Curio 2 Power Engraver
Here are a few examples of etching on acrylic with the Silhouette Power Engraver.

I’ve had a lot of fun creating with the Silhouette Curio 2 and Power Engraver!
Find more details on etching with the Curio 2 in this post Beginner Acrylic Engrave/Etch with the Silhouette Curio 2 found HERE.
I share the supply list used for the projects and also details on the Silhouette Curio 2 – Beginner Acrylic Engrave Class that will take you step-by-step through the process. The class aims to quickly help you succeed in etching on the Curio 2.
Additional Resources:
- Silhouette Curio 2 additional resources found HERE
Silhouette Studio Specialty Tools Panel Tabs (coming soon)
- Specialty Tools Panel – Tab 1 – Emboss Panel details HERE
- Specialty Tools Panel – Tab 2 – Score & Emboss – details HERE
- Specialty Tools Panel – Tab 3 – Power Engraver – details above
Find the Silhouette Curio 2, Power Engraver Tool, and the Curio Debris Tray at either CrafterCuts, Silhouette America, or Amazon.
CrafterCuts has free shipping on orders over $35 and use code SECRETS to save 10% on supplies & accessories (not valid on machines).
Silhouette America has free shipping on orders over $50 if you are a Silhouette Club member.
Save this for future reference by pinning the image below.

Enjoy !
THANK YOU for your support! How can you help? Click HERE & buy a coffee.
Every little bit helps with the cost of running the site.
Silhouette Classes
Never stop learning! Let me help you take the anxiety out of learning with Silhouette and get to creating faster! My Silhouette classes are heavily focused on software, so you can take the skills & techniques taught and apply them to many future projects!


**This post may contain affiliate links. What that means is that I may receive compensation if you purchase through the links I have provided. The price you pay for the product or service is not higher but I may get compensated for sharing.
Discover more from Silhouette Secrets-Swift Creek Customs
Subscribe to get the latest posts sent to your email.


[…] Specialty Tools Panel – Tab 3 – Power Engraver – details HERE […]