
Test Cuts
Test cut – VERY IMPORTANT feature that can save you materials & time.
Any time I am cutting a new material, I will use the test cut to make sure that I will get a good cut.
There is nothing like cutting a full design, unloading the cutting mat, and finding out it didn’t cut well. It’s a great learning opportunity but let’s save some time & materials and get the habit of a test cut.
I promise it will help.
Test Cut Methods
There are 2 ways I’ll share on how to do a test cut.
Make your own Test Cut.
I use a capital ‘B’ as my test cut object often. The biggest thing you want is something that has both corners and curves to it. This will give you a good indication of how it’s going to cut.

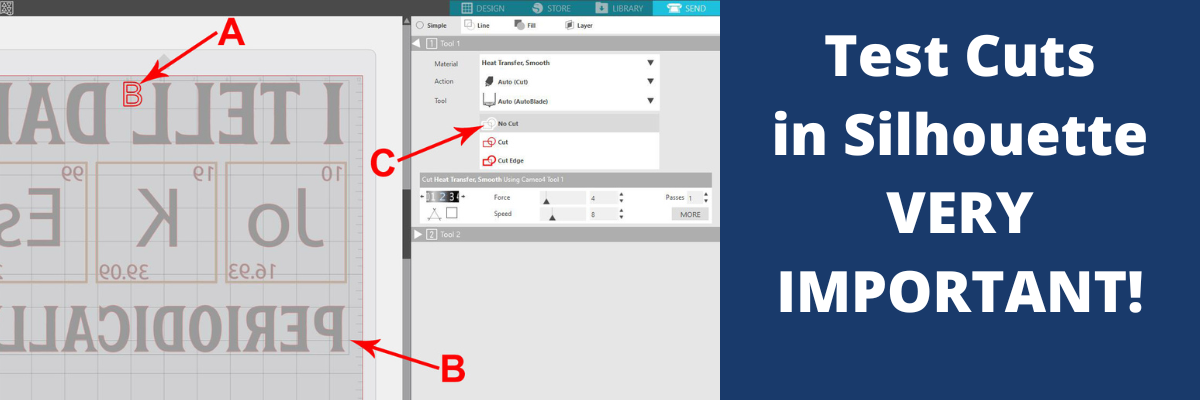
Place the test cut object – the letter ‘B’ in a space on the material that will not be cut with the design, as shown by the bold red A above.
Next, select the design by clicking on it. This is very important. You will see a gray selection box appear around the object on the screen that is selected, as shown by the bold red B. If there is no object on the screen selected, it will not change the Action.
With the design selected, choose No Cut next the bold red C above. This will turn the cut lines OFF for the design and it will only cut the letter ‘B’ as the test cut.
If it cuts well the first time, you can either move the ‘B’ off the design mat or delete it. Then turn the cut lines back on for the design by selecting it again & choosing Cut.
If it doesn’t cut well, move the ‘B’ to a different free space on the HTV and adjust the cut settings to get a good cut.
Test Cut in the Silhouette Software
In the bottom right corner of the Send tab is a little button that says Test. This will cut a small square with a triangle out of it in the top left corner of the cutting grid.

If the first test cut doesn’t work, you can move it by using the directional arrows next to the Test cut button.
You will need to move the test cut 2 to the exact location you want it to be cut at, where ever you leave the blade housing, that is where it will cut. So if you only move it over to the right, it will cut the top of your mat.

You can also change which Tool does the Test cut by choosing 1 or 2.
On software versions prior to v4.3, it will show as a red circle (Tool 1) or a blue circle (Tool 2). This is for the Cameo 3, Cameo 4, and Curio machines only.
Troubleshooting
If the test cut is not cutting well after trying the above, did the blade adjust properly?
Watch the blade as it adjusts and cuts, is it set to the proper blade depth?
If the test cuts still are not coming out correctly, follow this video step-by-step

These steps when followed properly, solve 98% of cutting issues.
Hope this helps!
Save this for future reference by pinning the image below.

Enjoy !
THANK YOU for your support! How can you help? Click HERE & buy a coffee.
Every little bit helps with the cost of running the site.
Or if you are looking for more in-depth, step-by-step classes, check out all of my online Silhouette classes on my Teachable site HERE.

**This post may contain affiliate links. What that means is that I may receive compensation if you purchase through the links I have provided. The price you pay for the product or service is not higher but I may get compensated for sharing.
Discover more from Silhouette Secrets-Swift Creek Customs
Subscribe to get the latest posts sent to your email.


Hi EllyMae,
<
div>I really live your tops emails. You always say
[…] See more on test cuts HERE […]