

Creativity truly blooms when you learn how to stretch a single design into multiple handmade projects. In this Crafting Creativity blog post, I’m sharing how one flower design by Flavir Design can be transformed into five stunning Silhouette flower projects using a cutting machine and paper crafting techniques. From a layered paper flower bouquet and custom greeting cards to a paper flower box topper, custom bookmarks with patterned backgrounds, and even miniature flowers, this project series is all about getting more value, versatility, and inspiration from one cut file. If you love Silhouette crafting, paper flowers, and creative ways to maximize your digital designs, this post will spark new ideas for your next crafting session.
Affiliate links may be present in the following blog post and as an Amazon Associate, I earn from qualifying purchases.

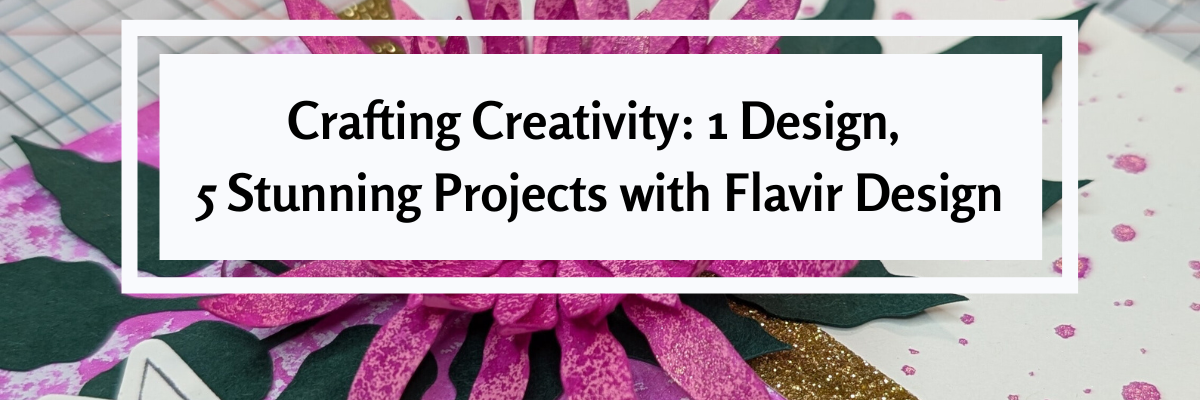
Crafting Creativity Flowers & Greenery by Flavir Design
Daniela Moscone is the creative artist behind Flavir Designs and can be found in the Silhouette Design Store or on their website HERE. Make sure to check out their YouTube channel HERE for assembly videos too!
Project #1 – Flower Bouquet
I typically start out each month creating the file in the way it is shown. I decided at the last minute to take the pieces and add them to wire to create a bouquet to add to a vase. The best part about this is, if I change my mind, I can easily clip off the wires and add it to a wreath as the original image.

I love all the layers of these flowers and you can change it up however you want. And, with flowers, there is no wrong way because flowers are not perfect in nature, so if one petal has a chunk out of it, perfect! A bug took a bite. When was the last time you saw a flower in nature that didn’t have an imperfection?
I grabbed some Bazzill smooth cardstock to cut these bright colored flowers. Now, typically I’ve shied away from thicker cardstock like Bazzill and in some cases, Bazzill can be difficult to cut. I knew my blade and my cutting mat were on the older side, so I increase my settings just a bit and then used 3 passes and I had perfect, crisp cuts.

Since my mat is older and starting to lose it’s stick, I did secure it down really well with a squeegee. Or you can use a brayer. I was lazy and didn’t go grab it in the other room. Now, if the paper had started to shift, I would have gotten up and gotten the brayer or grabbed a new cutting mat.
I sponged on color to the flowers and the leaves and then shaped them before assembling all together. It can make a big difference in the final results of the project with just a few simple touches.

Supplies Used:
- Flowers by Daniela Moscone – FlavirDesign – Design #344757
- Bazzill Smooth Cardstock
- Precision Glue Press by My Sweet Petunia
- Hot Glue Gun
- Glue Sticks
- Floral Wire
- Wire Cutters
- Various colors of stamping ink pads
- Sponge
- Fiskars Curling Tool
- Sizzix Tim Holtz Sculpting Tools
- Squeegee
- Silhouette Cameo 5
- Silhouette Autoblade
- Silhouette Cutting Mat
Watch the video sharing the process called Behind the Scenes: Creating Shaped & Layered Paper Flowers with a Silhouette Cameo on the Silhouette Secrets+ channel HERE.

Project #2 – Custom Card Creation
This project started out totally different than a card design. I love it and it’s a good thing I can create more otherwise it might never leave my studio.

I was playing around with a Two-Tone Metallic Spray – Fuchsia & Gold by Hero Arts and now I feel like using it on all my projects. Everything needs to be bright pink with gold flecks right! Well, maybe not everything. Hero Arts has other colors too!

The idea started out with spraying the flower layers to add coloring to the solid pink cardstock. I sprayed it on top of my Glassboard mat and then used a sheet of mixed media paper and picked up excess ink to create a background paper that I cut up for the bottom half of the card. The Glassboard mat is so easy to clean up that I find myself working with more mixed media and messy things.
The flowers and greenery were scaled down to fit this 4.25″ x 5.5″ card design. I added a few splatters of the Two-Tone Metallic Spray – Fuchsia & Gold to the card base. Instead of spraying it on, I took the cap off and splattered it to give it a different look.

I used a paper curling tool to give the flower layers dimension and next reached for my shaping kit to hand embossed the greenery to add more texture to it too. After that I curled the leaves a bit with a curling tool too. Then grabbed an extra Happy Birthday sentiment from a previous project and popped that up with some foam tape. For this card, I also used 2 other adhesives – an adhesive tape runner for the large piece adhered to the bottom of the card base and the Precision Glue Press with the glue it came with to adhere the flower layers together, the greenery to the card, and the flower on top.
I added some gold shimmer trim that is adhesive backed in the middle of the card base. Unfortunately, this is a Close to My Heart product that is no longer made, but I’m using my stash.
Supplies Used:
- Flowers by Daniela Moscone – FlavirDesign – Design #344757
- Doodled Happy Birthday Banners Sentiments by Clikchic Designs – Design #375342
- Neenah 110 lb white cardstock
- Recollections cardstock
- Mixed Media Paper
- Two-Tone Metallic Spray – Fuschsia & Gold by Hero Arts
- Precision Glue Press by My Sweet Petunia
- Adhesive Tape Runner (tape runner refills)
- Double sided Adhesive Foam Tape
- Adhesive Gold Glitter Tape
- Fiskars Curling Tool
- Sizzix Tim Holtz Sculpting Tools
- Silhouette Cameo 5
- Silhouette Autoblade
- Glassboard Craft Mat
Project #3 – Box Topper Flowers
Add flowers on top of a box to create a unique gift box or decoration. I used both flower shapes in the flower design to create these box toppers.

This box is originally designed with a cherry flower top, but why stop there! Swap out the flowers and watch it change the look of this Silhouette flower project.

This box is a unique design and easy to put together too! But if needed, there is an assembly video too – find that HERE.
I used several patterns and printed my own pattern paper for the boxes.

For this one, I didn’t even use the registration marks to print it. I added an offset of the box only and then filled the offset design with the pattern. Using a Silhouette mat and loading the mat next to the load line, I sent it to cut. With the manual print bleed, even if it was off by just a little bit, you won’t be able to notice.

I don’t recommend this method if you are needing completely accurate cuts, but it can work for some designs and projects such as this one.

By adding the print bleed around the entire design, I gave myself a better chance that it wouldn’t matter if the cut was off by a little bit.
And of course, I had to make the cherry flower box design too!

Additional Resources:
- Master Print and Cut step-by-step Class
- Silhouette Print and Cut Resources
- Pattern Fill
- Offset
- Print Bleed
Supplies Used:
- Flowers by Daniela Moscone – FlavirDesign – Design #344757
- Pink Polka Digital Paper by Danela Moscone Flavir Design – Design #1300867
- Digital Paper Squared by Daniela Moscone Flavir Design – Design #413194
- Japan Cherry Flower Pink Digital Paper by Daniela Moscone Flavir Design – Design #367799
- Neenah 110 lb white cardstock
- Recollections cardstock
- Precision Glue Press by My Sweet Petunia
- Adhesive Tape Runner (tape runner refills)
- Two-Tone Metallic Spray – Fuschsia & Gold by Hero Arts
- Silhouette Cameo 5
- Silhouette Autoblade
- Canon TS9521C Printer
Project #4 – Bookmarks with Background Patterns
3-D Flower file as a background pattern – say what! Yes! I took the flower and a leaf design and added a pattern fill to both, then used it as a background to create bookmarks.

Here is a look at the file in Silhouette. I set up the bottom 2 bookmarks to use foil on, even though it looks the same in the software as the print and cut, the bottom 2 have a sketch fill added to them, so when I go to print, it is not going to print that design.

I will say, it is much faster to just simply print and cut a design. Foiling does add setup and completion time, but sometimes it can be so worth it!
However, any time you add another factor into a project, you also increase the chances of something going wrong. I should have known better and either test foiled or not trusted Silhouette settings. In this version of Silhouette Studio 5 that I am using, it does not have a material preset for foiling on cardstock, so I had to add that in. And then the preset for force is 15 set by Silhouette. We have told them many, many times that it is too much and I should have decreased it even more. I changed it down to a 10 and that was still too much.

I just let it finish – it was ruined anyhow. If this happens to you – you are perfectly normal. Well, at least we are in the same boat together – I’m not sure I’d say I’m “normal”. LOL!

Let’s just say – HOT MESS!

But, don’t give up! I adjusted the force down to a 2, which is still probably too high and I sent the second design to foil.

Once the foiling was done, I added a holographic overlay sheet on top of the bookmarks and sent that to cut.

In the end, I have 5 new bookmarks created with the flower design from this month’s collaboration. And one design that’s got some blank foiled areas and extra glitter on it where it shouldn’t. But it could still be used as a bookmark.
Additional Resources:
- Silhouette Heat Pen Setup & Foiling
- Print and Cut with Foil Embellishments
- Master Print and Cut step-by-step Class
- Silhouette Print and Cut Resources
- Foil Quill with older model Silhouette machines
- How to Print from Silhouette Studio
- Print Bleed
- Offset
Supplies Used:
- Flowers by Daniela Moscone – FlavirDesign – Design #344757
- Just One More Page design created with Anderson Font Style – I am not sure where I acquired this font style
- Your Only Limit is Your Mind by Jillibean Soup – Design #473368
- Live Your Dream by Sarah Hurley – Design #389039
- You are Stronger Than You Think by Print and Cut Makers – Design #357481
- Neenah 110 lb white cardstock
- Holographic Overlay
- Silhouette Heat Pen
- Silhouette Heat Foil
- Silhouette Cameo 5
- Silhouette Autoblade
- Canon TS9521C Printer
Project #5 – Miniature Flower Embellishments
These little pink flowers started out much bigger. I cut the flower shape from Silhouette Shrink plastic and then watched it transform under a heat gun. Instead of letting the shrink plastic flatten out, like you would with charms, I shaped them instead. Once they curled up, I stopped applying heat and pushed the end of the Silhouette spatula into the center to form the middle of the flower. Then I glued in a yellow bead. And the finishing touch was painting on Mod Podge Sparkle to give it a bit more fairy touch.

I wanted to maximize the space I could on using the Silhouette Shrink Plastic. Since I was cutting a flower shape out of the material and did not need accurate placement, I added a fill pattern to a 8.5″ x 11″ rectangle and centered that on the letter size media page. I used a Pastel Pink Bokeh Background pattern by Sarah Hurley – Design #469254 in my final print.

I then printed out the entire page. I checked the “Show Print Border” so that I knew where the edges of the print out would be on my printed page and I could then place the designs within that gray border.
Then I simply filled the page with different sizes of the flowers and cut out the shapes from the printed page. No registration marks needed.

I didn’t need the entire page of flowers, so I added in some hearts with another project in mind. Here is a look before adding heat to shrink them down.

I would recommend cutting extras of whatever you are working with and playing with the shrink plastic. It can be a bit unpredictable when you add that heat and take a few practice runs to get it to mold how you want.

This was actually the second sheet of flowers I had cut because I wasn’t quite thrilled with the first color pattern I’d chosen. I didn’t feel it was a bright enough pink for the project and the vision in my head.
A few tips for working with shrink plastic:
- colors can change & darken as it shrinks – keep this in mind when choosing a pattern or color palette. The color gets condensed when it shrinks down. If you have dark colors, it can look black after shrinking.
- any type of plastic can dull the blade quicker than other materials. The settings may need to be adjusted or a new blade needed the more you cut. It’s always a good idea to have an extra blade on hand.
- carefully remove the shrink plastic from the backing layer after it’s cut. It can tear or break off during this process if handled too rough or if the design is too intricate.
Printing an entire page with a background can be an option for some projects. If you do need exact placement around a printed design, then I would recommend using registration marks so the machine knows where the design is.
Supplies Used:
- Flowers by Daniela Moscone – FlavirDesign – Design #344757
- Pastel Pink Bokeh Background pattern by Sarah Hurley – Design #469254
- Silhouette Shrink Plastic
- Silhouette Cameo 5
- Silhouette Autoblade
- Canon TS9521C Printer
Featured Designer – Daniela Moscone – Flavir Design
Find designs by Daniela Moscone – Flavir Design at:
Follow along with Daniela Moscone – Flavir Design on Facebook, YouTube, Instagram.
A great big thank you to Daniela at Flavir Design for contributing the free file for the Silhouette Secrets+ newsletter for the month of January! If you missed grabbing the free design in January, grab it HERE and start creating!
This year I started offering a free file each month for Silhouette Secrets+ newsletter subscribers. I love designing in the Silhouette Studio software and have shared some of my creations as well as look forward to collaborating with more artists in the future too!

Silhouette Secrets+ Newsletter
Never miss out on the news, tips, “secrets”, deals, classes, and more that I share on Silhouette Secrets+. Sign up for the newsletter and get information delivered to your inbox every Friday.
Unsubscribe at anytime.
Sign up for the weekly newsletter HERE to have information delivered direct to your inbox and grab each month’s new freebie.
Did this spark some new creative ideas for you? It’s always inspiring to see how a single flower and greenery design can bloom into so many completely different projects! I had so much fun reimagining this one design across five unique creations and showing just how versatile a single file can be. If you’re looking for even more inspiration, tips, and creative project ideas, be sure to browse the Crafting Creativity section on the Silhouette Secrets+ website — click HERE to explore!
Save this for future reference by pinning the image below.

Enjoy !
THANK YOU for your support! How can you help? Click HERE & buy a coffee.
Every little bit helps with the cost of running the site.
Silhouette Classes
Never stop learning! Let me help you take the anxiety out of learning with Silhouette and get to creating faster! My Silhouette classes are heavily focused on software, so you can take the skills & techniques taught and apply them to many future projects!


**This post may contain affiliate links. What that means is that I may receive compensation if you purchase through the links I have provided. The price you pay for the product or service is not higher but I may get compensated for sharing.
Discover more from Silhouette Secrets-Swift Creek Customs
Subscribe to get the latest posts sent to your email.


