Posted on 47 Comments

Let’s Explore v4 – Fill Color Panel

Today we are going to explore the Fill Color Panel located on the right side of Silhouette Studio v4.

Fill Color Panel copy

I use this feature a lot when I design in the Silhouette software for many reasons. Now, understand that by filling a design with color, it does not cut in that color. The color you fill it with will be a visual reference only, unless you are making a Print and Cut project. If you are creating a Print and Cut project, then the colors will be a representation of what colors will print on your printer.

I fill my designs and fonts with color so I can visualize the design better. Typically, I just fill it with black, but if I’m creating a multi-color image, I can then choose the colors that will best match my design. Another reason to fill it with color is to be able to select the design or font easier. When an image is transparent, you have to click on the red outline of the image to select it, which can sometimes be difficult. However, if you fill it with a color, you can click anywhere on that color to select the object.

For today’s example, I am using a font from the new SoFontsy site called Wine Not and will be creating my own design.

Wine not design2

You can see in my photo above that when I use the Text tool and type in my font, that it comes in transparent. Also, notice that the font name has a few extra letters in front of it, this is the Designer’s signature and something to keep in mind when you download fonts. You may need to pay close attention to the full font name to find it in your Text Style list.

Something else to point out here is the extra space around the font, as you can see my text selection box is 2.218″ in height but if you look at the grid spaces, the font is really less than 2″ in height. Check out this guest post I wrote at the Silhouette School blog on Forcing Accurate Text Sizes for more information on that.

So, how do you fill something with color? First, make sure your object is selected. You will see the selection box around it when it is selected. Then, you can click on the Fill Color Panel on the right side of your Silhouette software or it can also be found in the top left corner of the QAT (Quick Access Toolbar).

Fill Color demo copy

Now let’s Explore the Fill Color Panel.

Fill Color Panel1 copy

  1. Color Palette Selection – In this area click on one of the blocks of color and the design selected will change to that color.
  2. Eyedropper color selection – Click on this and then click on another color on your design mat to pick up that color and use it.
  3. Color Selection – This is the color that is currently chosen as the Fill color with the Eyedropper tool.Transparency copy
  4. Transparency – This changes the transparency of the Fill color chosen. In the above photo, the design at the top has my website placed over the top as you would place a watermark and the Transparency is decreased to 71% versus the design on the bottom that is still at 100%.
  5. Advanced Options – Opens up a panel where you can move the color selection around manually or under the color graph you can input the specific numbers for a certain color that you would like.
  6. Fill Gradient – Here you have many options to change the color and the gradient fill and change the properties of how the design looks. You can also decrease the transparency of the gradient, adjust the color even more, and change the angle of the gradient.Gradient fill copy
  7. Fill Pattern – Here there are many patterns for you choose from or you can add new patterns into the library and those will show up here. You also have the ability to change the Transparency of the pattern and under Advanced Options can choose to mirror, change the aspect ratio, rotate, change the angle, scale, and pan the pattern.
In the photos above, on the left, you can see I just clicked on the Fill Pattern option and chose a polka dot pattern, I did not change anything else. On the right, I changed the mirror, angle of the pattern, increased the scale, and panned the pattern so that it was a bit different.

As you can see, you have many options available when you are designing and using the Fill Color Panel. Keep in mind, that while you can change the color, gradient and pattern fills on the screen, the Cameo will still cut the color that you place on your mat. If you want the design to be how you have filled it on the screen, you need to look at creating a Print & Cut project. Check out more information here on last weeks exploration of Registration Marks for Print and Cut projects.

For our project today, I have used a font called Wine Not by Design Shark available on the new SoFontsy site. All the designs on the site come with a 100% Commercial Use license and are cuttable files.

And I’ve included the design used in the post as a freebie!

SS_winenot_freebie2

You can download this free Studio cut file HERE. Personal Use Only.

The graphics I used also came from the font file and I accessed them through the Glyphs Panel in my Silhouette Studio software. The Glyphs Panel is available in the Silhouette software for those who have the Designer Edition upgrade and higher than v4.1.197 of the Silhouette software. You can find great prices on the software upgrades at Swing Design if you need to purchase it. I highly recommend upgrading to at least the Designer Edition upgrade.

I hope you learned a bit about the Fill Color Panel and how useful it can be when you are creating in your Silhouette software.

Check out the entire “Let’s Explore v4” series HERE.

Check out my Silhouette Instructions and Events tab for more information on Personalized Silhouette Instruction.

Enjoy !

THANK YOU for your support! How can you help? Click HERE & buy a coffee. Every little bit helps with the cost of running the site.

Looking for more in-depth, step-by-step classes, check out all of my online Silhouette classes on my Teachable site HERE.

Enjoy !

THANK YOU for your support! How can you help? Click HERE & buy a coffee. Every little bit helps with the cost of running the site.

Looking for more in-depth, step-by-step classes, check out all of my online Silhouette classes on my Teachable site HERE.

SS Logo snip it

**This post may contain affiliate links. What that means is that I may receive compensation if you purchase through the links I have provided. The price you pay for the product

Posted on 28 Comments

Let’s Explore v4 – Registration Marks

Welcome back! Today we are talking something that I love to do – Print & Cut.

We have explored Tab 1 – Page Setting and Tab 2 – Grid setting the last two weeks and now it’s time to talk Tab 3 – Registration Marks. On the Page Setting Panel, the 3rd tab over is your Registration marks tab and you only use these when doing a Print and Cut project.

Tutorial written in v4.1.206

For software version v4.3+ check out this post HERE for updated information.

Registration Marks

Affiliate links may be present in the following blog post and as an Amazon Associate I earn from qualifying purchases.

First you will need to set your page size. If you have a printer that will only print Letter Size, then you need to change your Page Size to “Current Printer” (check out the Page Settings post on changing Page Size). This will adjust your page size down to the exact area that you can print. Turn your Orientation to the Portrait Orientation and it also helps to check the box next to ‘Show Print border’ and ‘Show Cut Border’.

Page Setup page size copy

Now, we are ready to click on the 3rd tab on the Page Setup Panel.

I first want to start out with a warning. While you can change a lot of the options on the Print and Cut, I highly recommend that you try cutting at the Default settings first and get to know the Print and Cut features before you go changing too many things.
I have great success with just the default settings and find I don’t have to change them, even though it is possible.

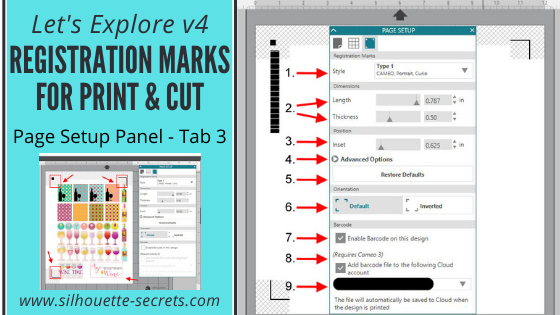
1 – Style – Under Style you have 3 options: Off, Type 1 & Type 2. Almost all users will choose the Type 1 option. Type 2 is only used for the Original or SD machines which are rare, they do still exist and are still going strong, but only a few users.
Choose Type 1 – Cameo, Portrait, Curio.
Style copy

2 – Length & Thickness – You can change the length and thickness of the Registration marks. Below I have shown 2 examples of changing the measurements and you can see the marks in the bottom left & top right change.

3 – Inset – Here you can change the placement of the Registration marks. The higher the number, the closer it moves to the Center of your page.
Inset

4 – Advanced Options – If you click on this, it will open up more options for you to change the Inset dimensions.
Advanced copy

5 – Restore Defaults – This is probably my favorite. This will reset anything you have changed to the Defaults of the original Print and Cut. Length at 0.787 in, Thickness at 0.50 in and Inset at 0.625 in. So if you get a wild hair to change things, you can always go back to basics and click on ‘Restore Defaults’ to change it back.

6 – Default vs Inverted – This will change the direction of where the Print and Cut is placed on your mat. Notice the direction of the arrow on the cutting mat, Inverted places it on the opposite corner of the mat & moves the registration marks on the page.

7 – Enable Barcode on this Design – This adds a barcode to the side of your page and it stores all of the cut settings data in the bar code that the Cameo 3 will read.
This is a Business Edition upgrade feature only.
Barcode copy

8 – Add Barcode file to the following Cloud account – Check this and the information will be saved to your Cloud account.

9 – Email address – this is the cloud account email address that the file will be saved to when you print it.

Some tips for Print and Cut: 

Start with the default settings and print the file from there first.

The design cannot be in any of the cross hatched areas of the Print and Cut screen. This is the area that the Optical scanner needs to read on the paper and if the design is in that area, then you may get a registration error.

You only need the Registration marks on if you are doing a true Print and Cut project, by printing first through your printer and then cutting the image with your Cameo.

The ‘M’ key on the keyboard toggles the Registration marks on and off. You can turn them on very easily without realizing it.

Feed the paper into the printer one sheet at a time.
If you have a tray or feed multiple sheets into the printer and print multiple copies of the page at once, the printer can pull it in too early or too late compared to the first print and this can affect where the print is on the page. This can give you a registration mark error.

So let’s check out my example. This is a design I purchased from the Silhouette store called Wine Themed Planner Stickers by Sandi Idleman Design #205613.

I can tell right away that if I sent this to print there will be issues.

PNC Example copy

I opened the file and know that I have to turn my registration marks on.
As you can see the alignment is off. There are areas of the design that are in the cross-hatched areas of my print and cut and the entire design is a bit too large for my print and cut area. So I will need to Select All and resize everything.

Final PNC

I have some Silhouette Clear Sticker paper so I’m going to load that in my printer and then click on the Printer icon in the top left tool bar.

Printer icon copy

Here is my printed page.

PNC page

And I am ready to place my design on my mat and click on the Send tab. When you place your printed image on the cutting mat, you want to make sure that you place it in the exact same location that you have it on your Design screen, in the top left corner.
Choose Sticker paper – Clear in my Cut settings & double check that all my cut lines are how I want them. And then load my mat, do a test cut to make sure my settings are correct and then click Send.

PNC2

And it cut beautifully!

Sticker final

Now I have some wine sticker for my planner.

Have you used the Print and Cut feature?
Tell me what you have used it for below in the comments.

Hope you enjoyed today’s overview of the Page Settings – Registration Marks tab!

Check out the entire “Let’s Explore v4” series HERE.

I would love to see what you are creating! Feel free to post on my Facebook group at Silhouette Secrets with EllyMae.

Save this for future reference by pinning the image below.

Enjoy !

THANK YOU for your support! How can you help? Click HERE & buy a coffee.
Every little bit helps with the cost of running the site.

Looking for more in-depth, step-by-step classes, check out all of my online Silhouette classes on my Teachable site HERE.
SS Logo snip it
**This post may contain affiliate links. What that means is that I may receive compensation if you purchase through the links I have provided. The price you pay for the product or service is not higher but I may get compensated for sharing.


