
Offset Panel – Silhouette Studio v4
The offset panel in Silhouette Studio is a really useful and functional tool that can be used in many project designs from creating frames, thickening fonts, making layers, and more! This tutorial will show the details of the offset panel and then examples of how an offset can be used several ways.

Affiliate links may be present in the following blog post and as an Amazon Associate, I earn from qualifying purchases.
This tool can be very useful for many things such as creating a background layer for a decal, creating a shadow, thickening fonts, making frames, etc.

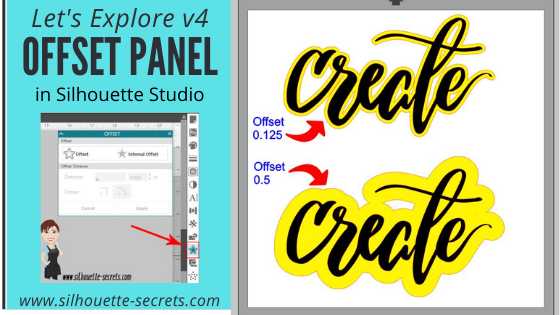
- Offset – This tool creates a copy of the design on the outside edge of the original shape. The default distance is 0.125 inches in older software versions and that is what shows when Offset button is chosen, it can then be adjusted. Select your design and click on the Offset button.
*The default distance was updated in later versions of 4 and will be the last used distance number.

*the offset is filled with yellow for you to see it better
*Create by Cali Arroyo – Design #215617Once the Offset is applied, it will automatically weld together and any parts that are overlapping will now be welded. Keep in mind that if there is a part of the design, such as a dot of an i, that is not overlapping, it will not be welded and it will need to be grouped after you create your Offset.
- Internal Offset – This will apply the offset inside of the design. The default is set for 0.125 inches here too and most likely you won’t see any offset created, if that is left. Once you decrease the offset distance, you can see a change happen.
*The default distance was updated in later versions of 4 and will be the last used distance number.
This is one way to fill a font that you want to use the sketch pens with. By creating multiple internal offsets, the sketch pen will “fill” the font in by drawing all the internal offsets.Here is an example of creating multiple internal offsets to “fill” in a font to sketch.
This was many internal offsets, so many I lost track of how many I created.
First, I will say that it took a lot of ink to fill this in. I was using the Silhouette sketch pens and your results will vary depending on the pen you use and the tip it has on it.

You can see above that even with multiple internal offsets, it did not fill in completely with the Silhouette sketch pen.In some cases, it is not worth the ink or the time to use the sketch pens like this and would be easier to use the Print and Cut feature instead.
- Offset Distance – Change the Distance of the offset to achieve the look you want.
- Offset Corner – Change the look of the offset created by changing the corner shape.

- Cancel or Apply – Choose whether to Apply the Offset (can also hit Enter key) or Cancel.
Let’s take a look at some examples of using Offsets.
Creating an offset as a background to layer a decal:

Check out how I created this and then used layering marks to line up the decal exactly HERE.

Using a Offset to create a space when subtracting and layering HTV:


See details on how I created this shirt HERE.

Using an Offset to thicken fonts for cleaner cutting:

The Samantha font is very popular but it can sometimes be a pain to cut for small projects, a small offset can make a big difference without changing the look too much.
Using an Offset to make a frame:

Make an Offset of the original design, select the offset & original, then right click and choose Make Compound path or use the Modify Panel and choose Make Compound path. Now, you have a frame.
There are many ways to use the Offset and these are just a few examples.
How do you use the Offset feature?
Save this for future reference by pinning the image below.

Enjoy !
THANK YOU for your support! How can you help? Click HERE & buy a coffee.
Every little bit helps with the cost of running the site.
Silhouette Classes
Never stop learning! Let me help you take the anxiety out of learning with Silhouette and get to creating faster! My Silhouette classes are heavily focused on software, so you can take the skills & techniques taught and apply them to many future projects!