Recently there has been a new update rolled out by Silhouette America for the Silhouette Studio software. This is version 4.5 of the software and if your program is set to check for updates, you may have already received a little notification that a new update is available to install.
The great part is that you have a choice on if you install the update or not. Silhouette never forces you to update the software. However, there are times that you may need to update in order to access new features – like the new Silhouette Auto Sheet Feeder for instance.
I did a quick video this week to share one of the current changes in the software. I have reported this issue and stressed to them how big of a change this is. They are investigating it and I will update this post and my video description if/when it is changed.
In the v4.5 software, unfilled svg files are saving with a transparent line color. This means when you open them back up in Silhouette Studio and a few other programs such as Google Chrome, Siser Leonardo Design Studio, Affinity, etc. that it looks like it is a blank file. I understand that this is not ideal and is more steps when you save as a svg. But, for now, I am providing 3 ways you can work with this issue.
Find this video on my Silhouette Secrets+ YouTube channel HERE or click the photo below.
If you do not want to deal with any of these steps, you can install a Legacy version of v4.4.554 and it will work as we’ve been used to.
HERE is how to install a Legacy Version of the Silhouette Studio software
This change only affects users who have updated to a v4.5 version of the software or higher. I wanted to bring it to your attention in case you have noticed when you test your own files or if a customer were to mention it to you after a purchase.
If this changes in future updates to the Silhouette Studio software I will update this post and the description on my YouTube video.
THANK YOU for your support! How can you help? Click HERE & buy a coffee. Every little bit helps with the cost of running the site.
Or if you are looking for more in-depth, step-by-step classes, check out all of my online Silhouette classes on my Teachable site HERE.
**This post may contain affiliate links. What that means is that I may receive compensation if you purchase through the links I have provided. The price you pay for the product or service is not higher but I may get compensated for sharing.
Let’s Explore v4 – Saving a file as a svg from Silhouette
Did you know that you can save a file as an svg file directly from the Silhouette Studio software if you have the Business Edition upgrade?
So first, what is a svg file?
A .svg is a Scalable Vector Graphic. This means that it is an image that can be scaled up or down without losing image quality.
In general, it is a common cut file that can be used by many different programs and platforms.
Affiliate links may be present in the following blog post and as an Amazon Associate, I earn from qualifying purchases.
There are a couple of things that have to be considered before you can save as a svg file.
1 – You must be using a software version of v4.1.197 or higher. This was the version released in August 2017, so it’s been available for quite some time.
2 – You must have the Business Edition upgrade in order to export from the Silhouette Studio as a svg file. For more information and specifics on software upgrades check out this post HERE.
3 – The design cannot contain any pieces or parts of a file from the Silhouette Design Store. If you try to export as a svg file with a part from the Design Store, it will give you an error message.
But, you can purchase the svg file from the Silhouette Design Store if it is an option and then download it direct to your computer and use it. This can be opened in Silhouette Studio to be added to and then exported as a svg or used direct in another program. If you have already purchased the .studio file for a design, you are only charged the difference from the .studio to .svg price when you checkout in the Silhouette Design Store for that svg.
How do you save as a svg?
Well, this is the easy part. As long as you meet the #1-3 above, then it’s as simple as File > Save As in the Silhouette software.
Design the file or open the file that you may have previously designed. Then choose File > Save As > Save to Hard Drive in the top left corner of the Silhouette Studio software.
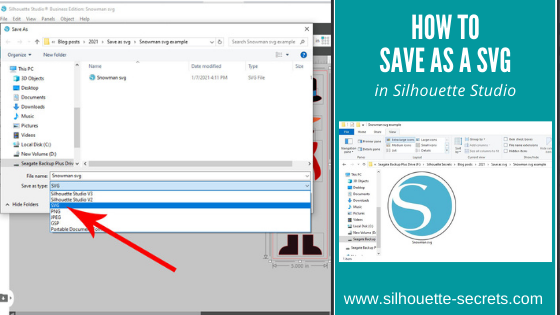
Then choose the location to save the svg file to. Choose the File Name and then change the File Type to whatever you want to save it as. In this case, choose svg.
And you are done! View the svg in the folder where you saved it as.
If your svg files are showing with a different icon than a Silhouette icon, it is most likely that your computer’s default program is not set to open a svg file direct with Silhouette. You can change that! Find step-by-step instructions on how to change that here in this post – Reasons svg files are not opening in Silhouette Studio.
Now, something to note here is that a user may need to turn the cut lines on when they open a svg file if they are using some versions of the Silhouette software. This is normal and not that the file has been saved wrong. It is just how it is and a simple step to turn them on.
Select the object by clicking directly on it or the red cut line.
Note: I’ve moved the pieces around to cut out of each color.
You can tell an object is selected because a gray selection box will appear around all selected objects.
Then click on the Send tab in the top right corner. If the cut lines are off, you will not see bold red cut lines around the design. The cut line designation is set to No Cut or they are turned off.
With the object selected, choose Cut and the bold red cut lines will turn on.
The BIGGEST factor here is that the object has to be selected in order to change the cut lines on or off. If nothing on the screen is selected you will not be able to change the Cut Action setting.
Make sure the object is selected by clicking on it first.
And you have created your own svg file that could be used in many other programs. I am seeing more and more users get the Silhouette Studio Business Edition to be able to design and save using the features of the Silhouette software, but use the files in other ways, such as with a Glowforge as an example.
I would love to see what you are creating! Feel free to post on my Silhouette Secrets+ Facebook group! Have questions? That is the best place to start troubleshooting too!
Save this for future reference by pinning the image below.
Enjoy!
THANK YOU for your support! How can you help? Click HERE & buy a coffee. Every little bit helps with the cost of running the site.
Or if you are looking for more in-depth, step-by-step classes, check out all of my online Silhouette classes on my Teachable site HERE.
**This post may contain affiliate links. What that means is that I may receive compensation if you purchase through the links I have provided. The price you pay for the product or service is not higher but I may get compensated for sharing.
THANK YOU for your support! How can you help? Click the link to buy a coffee. Every little bit helps in the cost of running the site.