
While the title could mean many things, this week it’s in reference to Spring Break at my house. I thought it would be a fun idea to try out this “Hot Mess” technique with the kids for a crafting project on Spring Break….
Now, I don’t know if it was a good idea to do this on Day 1 of Spring Break or not – would it have been better on Day 5? Who knows…. but I’m going to show you our results.
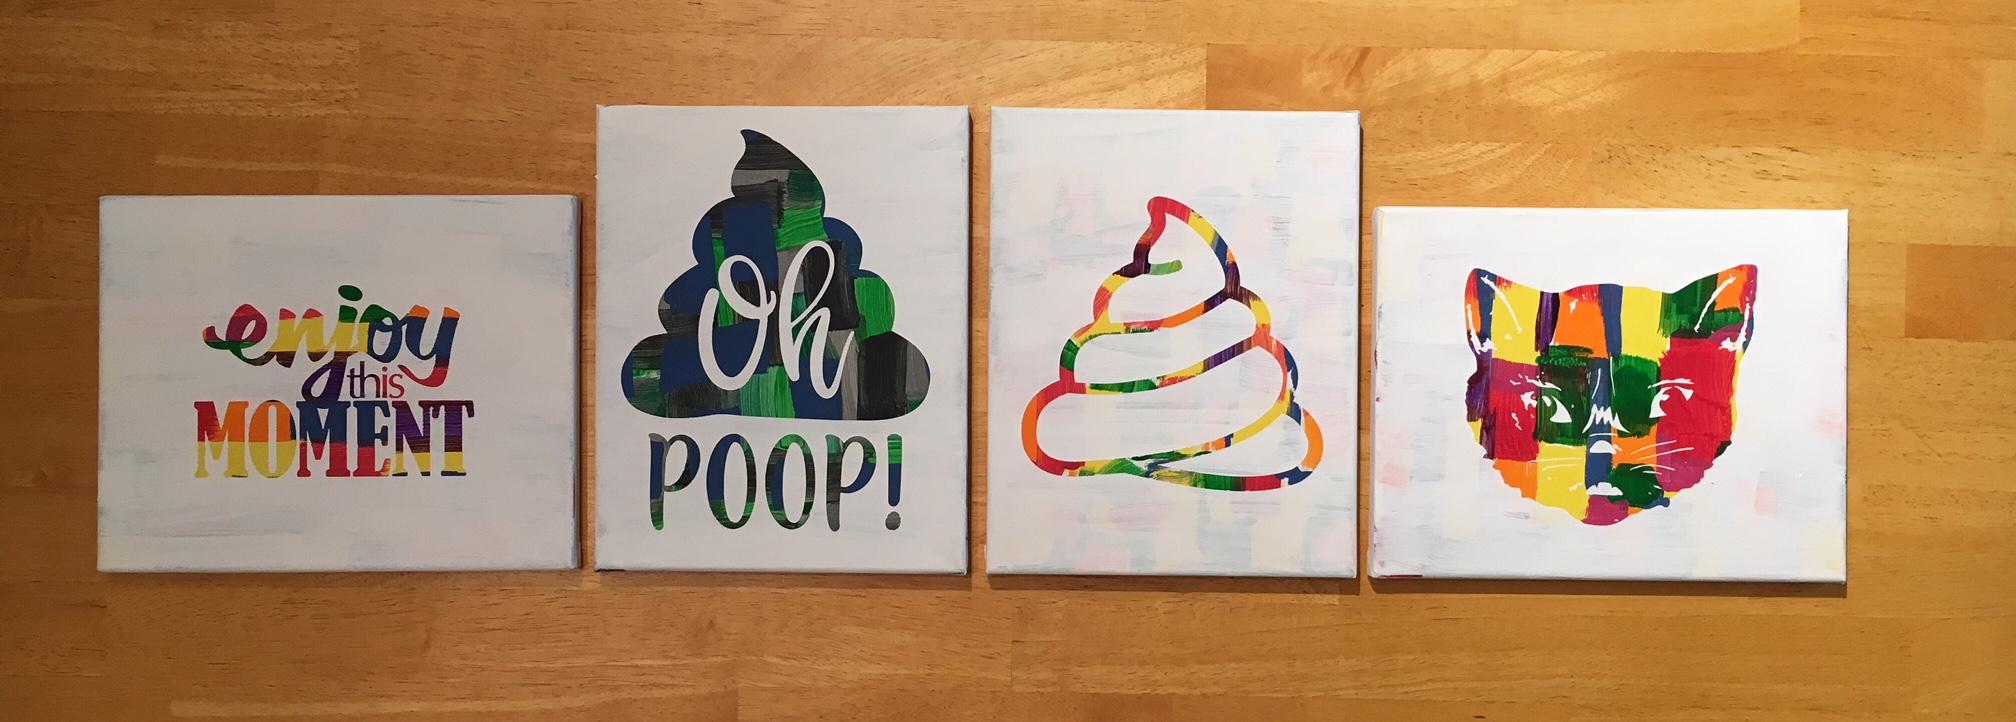
First, what is a Hot Mess? On some days, that could be my title but today I’m talking about a new crafting project that has everyone rushing out to pick up canvas from the craft store.

How do you create these pieces of art?
- Grab a canvas and the paints you want to use.

- Paint any sort of pattern you so desire onto your canvas. Let it dry thoroughly.


- Cut a stencil using your Silhouette machine and some vinyl – I used Oracal 631 and 651. As you can see, this is what you get when you let an 8, 6 and almost 5 year old pick out their own stencil.

- Apply the stencil using transfer tape – I recommend Oracal transfer tape. You may need to help the vinyl stick to the canvas at first. Just be patient and go slow.

- And now paint your top layer of paint. You can choose any color you’d like, but we stuck with white on top.

- Let that dry for a bit and then carefully peel off the vinyl stencil. You don’t want it to be too wet when you peel it and you don’t want the vinyl to sit on the canvas too long either as it may start to cure to the canvas.


- Let your works of art dry completely.
And there you have the “Hot Mess” technique.
I am so glad I did not start with the 12″ x 24″ canvas that jumped into my cart at Michael’s, as the kids were done after the first 30-40 minutes. And I can say it is a one and done crafting project for Spring Break 2018.
If you have any desire to use these same designs in your works of art, here is where I found them: – Enjoy this Moment by Kolette Hall Design #36196 from the Silhouette Design Store – Oh Poop! Quote by Sarah Hurley Design #209510 from the Silhouette Design Store – Cat by Basic Grey Design #65180 from the Silhouette Design Store – Other poo design created using tracing and point editing.
Next week we will be back to our “Let’s Explore v4” series, continuing through the different tools available to you in the Silhouette Studio v4 software.
In the meantime, check out the other posts in the Let’s Explore v4 Series HERE.
I would love to see what projects you create! Feel free to post on my Facebook group at Silhouette Secrets with EllyMae.
Enjoy !
THANK YOU for your support! How can you help? Click HERE & buy a coffee. Every little bit helps with the cost of running the site.
Looking for more in-depth, step-by-step classes, check out all of my online Silhouette classes on my Teachable site HERE.


 The first one I applied the vinyl to was the one on the left in the photo above…. it was a bit trickier due to the curve and the varied size of the jar. I grumbling a bit when I went to apply the vinyl to the jar on the right and then it went on like a dream.
The biggest factor when applying your vinyl stencil to a glass item to etch is you want the edges of your design to have a great seal on them, so the etching creme doesn’t sneak up under the vinyl.
The flatter you can get the decal on your object the better, any creases are areas that the etching creme might sneak in to.
The first one I applied the vinyl to was the one on the left in the photo above…. it was a bit trickier due to the curve and the varied size of the jar. I grumbling a bit when I went to apply the vinyl to the jar on the right and then it went on like a dream.
The biggest factor when applying your vinyl stencil to a glass item to etch is you want the edges of your design to have a great seal on them, so the etching creme doesn’t sneak up under the vinyl.
The flatter you can get the decal on your object the better, any creases are areas that the etching creme might sneak in to.
 I love how they turned out but I do have to confess that after over a month of it sitting on my counter, it’s still empty…..
I don’t bake that often because then I end up eating them…..
One of these days, I’ll put something in it.
I love how they turned out but I do have to confess that after over a month of it sitting on my counter, it’s still empty…..
I don’t bake that often because then I end up eating them…..
One of these days, I’ll put something in it.


