
Opening a PDF file with Silhouette
Affiliate links may be present in the following blog post and as an Amazon Associate I earn from qualifying purchases.
Tutorial written in Silhouette Studio v4.4.472
With the Designer Edition upgrade or higher, a PDF file can be opened directly in the Silhouette software.

This is a great option to expand the file types that you can use in Silhouette. Most users are familiar with PDF files, but it isn’t a common cut file when referencing Silhouette. We typically use programs like Adobe Reader to open a PDF document to read it as they are usually text files. However, you may find things like patterns and designs in PDF format as well. This was one of the ways that we “hand-cut” templates prior to cutting machines. The file came as a PDF that you printed and then cut around with scissors.
This is a great option now for the cutting machines too! With the Designer Edition upgrade (or higher) you can open a PDF direct in the Silhouette software. Depending on the data that is included in the PDF document will depend on if it’s ready to cut or if it might need to be traced to get cut lines.
For today’s tutorial, I am using a Leather card holder pattern by
Make Supply Leather Craft Company found HERE.
I downloaded the 8.5″ x 11″ template as I work with Letter size most often.
I suggest downloading the file and go through the steps to see how it works in Silhouette.
For a PDF document, the best way to open is to use File > Open in the Silhouette software.
Locate the file and then click Open.

By using the File > Open method, the software then brings up a window on how you want to treat this file.
Note: the drag and drop method for opening files may not prompt this PDF window to appear

If the PDF document is multiple pages, you can choose which page you want to open on the design mat. The Silhouette software can only open 1 page of the PDF file on each design mat at a time.

What if you want multiple pages on the same design mat?
Open each page on separate design mats and then copy and paste all into one file.
Just keep in mind the more you add to one file, the more data is involved.
Depending on how the PDF was created, they can be heavy in data.
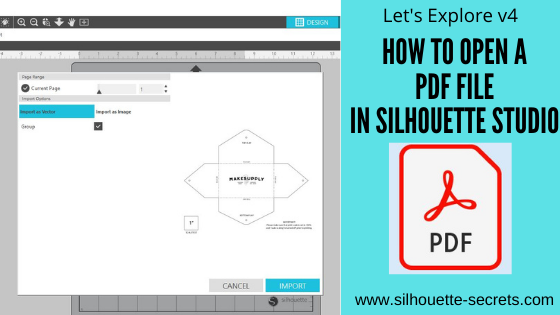
Next, you will choose how you want to Import the PDF – as a vector or as an image.
Depending on the selection you choose, the options will also change on this window.
Open as a Vector
This will ultimately depend on the PDF you are working with, but I always start with the vector option. This is because some PDF files contain cut data already and by importing as a vector you can see if that is the case with the file you are working with.
This is dependent on how the PDF was created on whether it has cut data or not.

When opening as a vector you can choose to have it open “grouped” or not by checking or unchecking the box. This means that the cut lines will be grouped together or if they will all be separate pieces that can be moved individually.
Select Import in the bottom right corner.

The document will open onto a new design mat.
Now, how do we know if it contains cut data or not?
Click on the Send tab and if it has cut data, bold red cut lines will appear around the images.

Each document is going to vary in what you see next. Most times it will place bold red cut lines around all the objects on the PDF document as you see here. If you send this to cut, it will attempt to cut every single bold red cut line, including that small text.

Most times you do not need that, you only need the file outline itself.
Click back on the Design tab.
I then move the file off the cutting mat to work with it. Since I chose to open as “grouped” the entire file moves as one piece. If you unchecked Grouped, then make sure to selected everything prior to moving or it will move individual pieces.

Right click and choose Ungroup.
Now, I can select individual parts that I want to keep. Each file will be different.

In this case, when I grab the outline, it only moved the top section of the file. This is all in how the document was created. Since it was created as a file that was meant to be printed and used as a template, the files may need a little bit of work to make them a good cut.
If it only moves individual parts, make sure to click Undo to send it back to it’s position.
Ctrl+z is the keyboard shortcut for Undo.

To select multiple parts together, click on one and hold the Shift key down and click on the next piece. This will select more than one piece at a time.
Move those pieces on to the design mat.
With both parts selected you will see a gray selection box around each piece
The next steps may vary depending on your design.
In this case, I have 2 separate line designs that need to be combined into one.
With both selected, right click and choose Make Compound Path.

Double click on the outline and it will bring up the Edit Points.

Red edit points mean that there is a broken line. Just choosing make compound path does not completely “join” the design together. We have to also close the path as well.
Click on the red dots to close the path.

If the edit points are not close together, you may need to move them to “connect the dots”.
For more information on Edit points, check out this post HERE.
Edit points are a great tool to have in your toolbox and understand how they work.

Click on Send and the bold red cut lines will now show around the outline of the design.
Each file is going to vary in what it might need to get to the point of being ready to cut. In this case, I was using it to cut leather with the Cameo 4 and 3 mm Kraft blade, so all I needed was the outline of the card case.
When a PDF file is opened as a vector, if there was cut data it will open like this. However, not all PDF files are created with that cut data. But, the only way to know is to open it as a vector to find out.
If the file does not have bold red cut lines when the Send tab is activated, then the file would need to be traced to get cut lines.
For more information on the Trace Panel, check out the
Let’s Explore v4 – Trace Panel HERE.
Import as Image
The other option for opening a PDF document is to import as an image.

When this option is selected, you can choose the DPI settings that it opens as. This option may be a better option if you are opening a PDF document that is heavy on graphic images.
Again, each file is just going to vary on what works best.
Also keep in mind that the file can only open with the data that the file was saved as. For instance, if an image is low resolution and low quality, no matter what you choose under dpi, it can only open with the data it was saved with. It cannot generate new data to make it higher quality.
Click Import to open as an image.

When a PDF is opened as an image, it is a photo of the file.
So in this case, it is a photo of the 8.5″ x 11″ because that is the size of the PDF file.

This is easier seen by moving the image off the cutting mat. You can see it is a white page that is 8.5″ x 11″.
Also something to mention is the yellow triangle that may appear in the top left corner. This means that it is saying that the image may be low resolution to print as is.
Since I left it at the default of 72 dpi, it is low resolution.
If I change the dpi to 300, the yellow triangle does not appear when the file is opened.
The image quality could affect the trace, but you will just have to test with each file.
The next step is that the image will need to be traced to get a cut line.
Open the Trace Panel on the right side and draw the trace box around the design.

The trace options may need to be adjusted to get the best trace. The entire design that you want to be trace should be as solid, smooth yellow as possible. I start with the threshold and increase that first and it usually gives me the best trace.

You may need to zoom in on the image to see how the yellow is showing up, this can depend on the screen size you are using.

Once everything is as yellow as possible, click the Trace option at the bottom of the panel and then move the trace back onto the design mat.

Now here is where the next steps can vary depending on what you need for the file. Since we traced it, it will trace the inside and outside of the black lines. In this case, I only need the outer edge of the design.

Right click on the trace and choose Release Compound Path.

This will break the design up into pieces.
Click off the design to deselect it and then click back on the outer edge to move it away.
All the other pieces of this file could be deleted as they are not needed for my project.
But, each design will vary. If you were to cut this out of cardstock, you may want to keep the score lines or to draw new ones.
Double click on the trace line and take a look at the edit points. Since it is a trace, it may have a lot.

Simplify the design as needed in the Edit Points panel.

The file may need more cleanup such as these corners with several edit points still in them. You can try Simplify again or start deleting edit points as needed.

Click on the Send tab to see how it will look and cut.
I find I will always start with importing a PDF as a vector file just in case it already contains cut data because it will save me a bit of work to tracing and cleaning up the file.
But, no 2 files are created the same and the more you know how to work with the tools in the Silhouette software, the easier it will be to figure out what is needed for each file.
I love to see what you are creating with your Silhouette machines!
Feel free post on the
Silhouette Secrets+ Facebook Group.
Save this for future reference by pinning the image below.

Enjoy!
THANK YOU for your support! How can you help? Click HERE & buy a coffee.
Every little bit helps with the cost of running the site.
Or if you are looking for more in-depth, step-by-step classes, check out all of my online Silhouette classes on my Teachable site HERE.

**This post may contain affiliate links. What that means is that I may receive compensation if you purchase through the links I have provided. The price you pay for the product or service is not higher but I may get compensated for sharing.
Discover more from Silhouette Secrets-Swift Creek Customs
Subscribe to get the latest posts sent to your email.


[…] PDFs can be opened in the software and depending on how it was created will determine if it has cut data with it or not.The only way to know is to use File > Open and choose Vector, then click on the Send tab and see if it comes in with cut lines.Check out this post on Opening a PDF file in Silhouette HERE […]