Posted on 10 Comments

File Types for Silhouette Studio

Silhouette Studio can open a variety of file types.
This is a list of the most common file types that Silhouette Studio uses, but may not be all inclusive.

Basics of file types Silhouette Studio use

The following is a brief list and basic description of the most common file types you may encounter.
You will notice as you look at the following list, the software upgrades (Designer Edition, Designer Edition Plus, Business Edition) allow additional file types to be opened and used. I have broken it down into those levels so you know exactly what you may have access to.

Affiliate links may be present in the following blog post and as an Amazon Associate I earn from qualifying purchases.

Silhouette Studio Basic Edition (free)

.Studio file type

.Studio files are the Silhouette files that download to the library direct from the Silhouette Design Store or if you download them to your computer direct, they will show like the photo below where ever you have saved them.

File downloaded direct to computer

.Studio are proprietary files and cannot be opened in other programs. This is a cut file and opens directly in the Silhouette Studio software.
If by chance when you click on the Send tab it doesn’t have bold red cut lines, simply click on the design to select it and choose Cut. Bold red cut lines should turn on around the design.

.GST

gst file format example

.gst files are older Silhouette files. These will still open in the Silhouette software and are compatible. You will only see this file type if you do a direct download to your computer of the files in the Silhouette Design Store.
You may or may not see both a .studio or .gst file type in the download. It just depends on when the file was added to the Silhouette Design Store.

PNG

Png files are a photo file that can have a transparent background. This will depend on how the original image was created. It is a single layer graphic file and does not contain cut lines typically.

png file format example

However, in the v4.4 software there is now the option to Autotrace a transparent png. What this means is that it will trace the outer edge of a transparent png. It does not trace individual layers and colors, but only the outside edge of the design.
There are still a few bugs in this Autotrace feature depending on what version of v4.4 you are using.
For more information on Autotrace, check out this post HERE.

If you experience issues with png files taking a long time to open or the software crashing, try turning off the Autotrace option and see if it changes for you.
With Autotrace turned off, you will need to manually trace a png file using the Trace Tools.

JPEG

Jpeg files are also photo files.
They have a white background, are not cut files, and do not contain individual layers.

jpeg file format example

If you want to turn a jpeg into a cut file, it would need to be traced to get cut lines. Each file may take some different trace techniques as each image is composed of different elements.
For more on tracing check out these posts HERE.

Note: Since jpeg and png files are graphic images, they are made up of pixels. They are a flattened graphic image and the resolution is set in how it opens up. Scaling a jpeg or png file up or down can affect the image quality. You may notice this if you enlarge a jpeg or png and the edges become blurry or you get a little yellow triangle in the top left corner of the Silhouette design mat that indicates a low quality print.

DXF

Dxf files are a file type that was created in 1982 for AutoCad program. Which just means computer assisted design. So basically a computer drawing program.
It really wasn’t designed as a “cut” file.
While the Silhouette software can open a dxf file, the file itself can be larger, which can cause delayed responses when opening and working with the file. Or it can cause the software to crash as the processor on the computer cannot handle the data in the file. Dxf files can be very data heavy.
For more information on dxf file, check out this post HERE.

I would always recommend choosing a svg file over the dxf file for better cut results.

Silhouette Studio Designer Edition Upgrade

All of the file types listed below can be accessed with a Silhouette Studio upgrade of Designer Edition or higher.
For more information on software upgrades, check out the
Software Upgrades – My Favorite Features post HERE

SVG

SVG stands for scalable vector graphic. This means that they are a file type that can be scaled up or down without losing image quality.

If you are using files from outside the Silhouette Design Store, this is the file type I would recommend using. It is the higher quality cut file – Designer dependent of course.

For more information on svg files – check out these posts:
How to Open a SVG file
Reasons SVG Files Are Not Opening

Note: if a SVG file is opening in a web browser first, it is losing the svg properties. Computers default to a web browser for opening the SVG file type. Check out either post linked above on how to change the default on your computer to open a SVG file directly in the Silhouette Software. Or use File > Open in the software to open it direct.

PDF

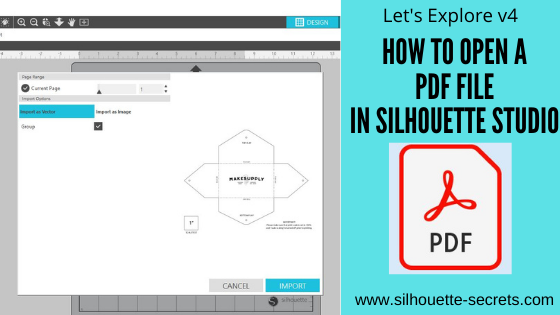
PDFs are a common file type that we are used to seeing in other aspects of our lives, but they can also be cut files.

PDFs can be opened in the software and depending on how it was created will determine if it has cut data with it or not.
The only way to know is to use File > Open and choose Vector, then click on the Send tab and see if it comes in with cut lines.
Check out this post on Opening a PDF file in Silhouette HERE

Silhouette Studio Designer Edition Plus Upgrade

Embroidery file types – PES, DST, EXP, JEF, and XXX

Embroidery files can be fun to play with for certain projects. When opening embroidery files, keep in mind that every stitch opens as a cut line, which means that the file may need some clean up in order to be a good cut file. It can also mean that it takes your computer longer to process and open the file. This is due to every single stitch is now a cut line which equals more data on the file.
Each embroidery file may require different aspects to clean up or make it the cut file that you would like since they are all designed differently.

Silhouette Studio Business Edition

Ai/CDR/EPS

Ai/CDR/EPS Files are files designed in other graphic design programs such Illustrator or Corel Draw. One thing to keep in mind these file types can be data heavy and it may depend on your computer on how long it take to process, open, and work with these file types.

Personally, I have only used the EPS file if I do not have the SVG option for a cut file. Even my computer which is higher specs that the average Silhouette user, takes a bit longer to process those data heavy files. Be patient with your computer if opening these graphic files.

I hope now you understand a little bit more about the different file types that the Silhouette Studio software can utilize.

Have questions?
Feel free post on the
Silhouette Secrets+ Facebook Group.

Save this for future reference by pinning the image below.

Enjoy!

This image has an empty alt attribute; its file name is logo.jpg

THANK YOU for your support! How can you help? Click HERE & buy a coffee.
Every little bit helps with the cost of running the site.

Or if you are looking for more in-depth, step-by-step classes, check out all of my online Silhouette classes on my Teachable site HERE.

SS Logo snip it
**This post may contain affiliate links. What that means is that I may receive compensation if you purchase through the links I have provided. The price you pay for the product or service is not higher but I may get compensated for sharing.
Posted on 1 Comment

Let’s Explore v4 – Opening a PDF

Opening a PDF file with Silhouette

Affiliate links may be present in the following blog post and as an Amazon Associate I earn from qualifying purchases.

Tutorial written in Silhouette Studio v4.4.472

With the Designer Edition upgrade or higher, a PDF file can be opened directly in the Silhouette software.

This is a great option to expand the file types that you can use in Silhouette. Most users are familiar with PDF files, but it isn’t a common cut file when referencing Silhouette. We typically use programs like Adobe Reader to open a PDF document to read it as they are usually text files. However, you may find things like patterns and designs in PDF format as well. This was one of the ways that we “hand-cut” templates prior to cutting machines. The file came as a PDF that you printed and then cut around with scissors.

This is a great option now for the cutting machines too! With the Designer Edition upgrade (or higher) you can open a PDF direct in the Silhouette software. Depending on the data that is included in the PDF document will depend on if it’s ready to cut or if it might need to be traced to get cut lines.

For today’s tutorial, I am using a Leather card holder pattern by
Make Supply Leather Craft Company found HERE.
I downloaded the 8.5″ x 11″ template as I work with Letter size most often.
I suggest downloading the file and go through the steps to see how it works in Silhouette.

For a PDF document, the best way to open is to use File > Open in the Silhouette software.
Locate the file and then click Open.

By using the File > Open method, the software then brings up a window on how you want to treat this file.
Note: the drag and drop method for opening files may not prompt this PDF window to appear

If the PDF document is multiple pages, you can choose which page you want to open on the design mat. The Silhouette software can only open 1 page of the PDF file on each design mat at a time.

What if you want multiple pages on the same design mat?
Open each page on separate design mats and then copy and paste all into one file.
Just keep in mind the more you add to one file, the more data is involved.
Depending on how the PDF was created, they can be heavy in data.

Next, you will choose how you want to Import the PDF – as a vector or as an image.
Depending on the selection you choose, the options will also change on this window.

Open as a Vector

This will ultimately depend on the PDF you are working with, but I always start with the vector option. This is because some PDF files contain cut data already and by importing as a vector you can see if that is the case with the file you are working with.
This is dependent on how the PDF was created on whether it has cut data or not.

When opening as a vector you can choose to have it open “grouped” or not by checking or unchecking the box. This means that the cut lines will be grouped together or if they will all be separate pieces that can be moved individually.

Select Import in the bottom right corner.

The document will open onto a new design mat.

Now, how do we know if it contains cut data or not?
Click on the Send tab and if it has cut data, bold red cut lines will appear around the images.

Each document is going to vary in what you see next. Most times it will place bold red cut lines around all the objects on the PDF document as you see here. If you send this to cut, it will attempt to cut every single bold red cut line, including that small text.

Most times you do not need that, you only need the file outline itself.

Click back on the Design tab.

I then move the file off the cutting mat to work with it. Since I chose to open as “grouped” the entire file moves as one piece. If you unchecked Grouped, then make sure to selected everything prior to moving or it will move individual pieces.

Right click and choose Ungroup.

Now, I can select individual parts that I want to keep. Each file will be different.

In this case, when I grab the outline, it only moved the top section of the file. This is all in how the document was created. Since it was created as a file that was meant to be printed and used as a template, the files may need a little bit of work to make them a good cut.
If it only moves individual parts, make sure to click Undo to send it back to it’s position.
Ctrl+z is the keyboard shortcut for Undo.

To select multiple parts together, click on one and hold the Shift key down and click on the next piece. This will select more than one piece at a time.
Move those pieces on to the design mat.
With both parts selected you will see a gray selection box around each piece

The next steps may vary depending on your design.

In this case, I have 2 separate line designs that need to be combined into one.
With both selected, right click and choose Make Compound Path.

Double click on the outline and it will bring up the Edit Points.

Red edit points mean that there is a broken line. Just choosing make compound path does not completely “join” the design together. We have to also close the path as well.
Click on the red dots to close the path.

If the edit points are not close together, you may need to move them to “connect the dots”.

For more information on Edit points, check out this post HERE.
Edit points are a great tool to have in your toolbox and understand how they work.

Click on Send and the bold red cut lines will now show around the outline of the design.

Each file is going to vary in what it might need to get to the point of being ready to cut. In this case, I was using it to cut leather with the Cameo 4 and 3 mm Kraft blade, so all I needed was the outline of the card case.

When a PDF file is opened as a vector, if there was cut data it will open like this. However, not all PDF files are created with that cut data. But, the only way to know is to open it as a vector to find out.

If the file does not have bold red cut lines when the Send tab is activated, then the file would need to be traced to get cut lines.

For more information on the Trace Panel, check out the
Let’s Explore v4 – Trace Panel HERE.

Import as Image

The other option for opening a PDF document is to import as an image.

When this option is selected, you can choose the DPI settings that it opens as. This option may be a better option if you are opening a PDF document that is heavy on graphic images.
Again, each file is just going to vary on what works best.
Also keep in mind that the file can only open with the data that the file was saved as. For instance, if an image is low resolution and low quality, no matter what you choose under dpi, it can only open with the data it was saved with. It cannot generate new data to make it higher quality.

Click Import to open as an image.

When a PDF is opened as an image, it is a photo of the file.
So in this case, it is a photo of the 8.5″ x 11″ because that is the size of the PDF file.

This is easier seen by moving the image off the cutting mat. You can see it is a white page that is 8.5″ x 11″.

Also something to mention is the yellow triangle that may appear in the top left corner. This means that it is saying that the image may be low resolution to print as is.
Since I left it at the default of 72 dpi, it is low resolution.
If I change the dpi to 300, the yellow triangle does not appear when the file is opened.
The image quality could affect the trace, but you will just have to test with each file.

The next step is that the image will need to be traced to get a cut line.

Open the Trace Panel on the right side and draw the trace box around the design.

The trace options may need to be adjusted to get the best trace. The entire design that you want to be trace should be as solid, smooth yellow as possible. I start with the threshold and increase that first and it usually gives me the best trace.

You may need to zoom in on the image to see how the yellow is showing up, this can depend on the screen size you are using.

Once everything is as yellow as possible, click the Trace option at the bottom of the panel and then move the trace back onto the design mat.

Now here is where the next steps can vary depending on what you need for the file. Since we traced it, it will trace the inside and outside of the black lines. In this case, I only need the outer edge of the design.

Right click on the trace and choose Release Compound Path.

This will break the design up into pieces.
Click off the design to deselect it and then click back on the outer edge to move it away.
All the other pieces of this file could be deleted as they are not needed for my project.
But, each design will vary. If you were to cut this out of cardstock, you may want to keep the score lines or to draw new ones.

Double click on the trace line and take a look at the edit points. Since it is a trace, it may have a lot.

Simplify the design as needed in the Edit Points panel.

The file may need more cleanup such as these corners with several edit points still in them. You can try Simplify again or start deleting edit points as needed.

Click on the Send tab to see how it will look and cut.

I find I will always start with importing a PDF as a vector file just in case it already contains cut data because it will save me a bit of work to tracing and cleaning up the file.

But, no 2 files are created the same and the more you know how to work with the tools in the Silhouette software, the easier it will be to figure out what is needed for each file.

I love to see what you are creating with your Silhouette machines!
Feel free post on the
Silhouette Secrets+ Facebook Group.

Save this for future reference by pinning the image below.

Enjoy!

This image has an empty alt attribute; its file name is logo.jpg

THANK YOU for your support! How can you help? Click HERE & buy a coffee.
Every little bit helps with the cost of running the site.

Or if you are looking for more in-depth, step-by-step classes, check out all of my online Silhouette classes on my Teachable site HERE.

SS Logo snip it
**This post may contain affiliate links. What that means is that I may receive compensation if you purchase through the links I have provided. The price you pay for the product or service is not higher but I may get compensated for sharing.
Posted on Leave a comment

Butcher print painted sign

I do not usually get in to the painted sign projects, but I needed a bit of kitchen decor and thought I would make one. You may be asking…. “Well, why doesn’t she paint signs?”

Well, I know I can do it and my hubby has a shop full of woodworking tools. But, honestly, it takes too long for me…. I like to slap a vinyl decal on something & call it good. That is what works for me.

I found the images here at The Mountain View Cottage’s blog.

I do want to note that these files are for personal use only and using them to sell items you make is illegal. The designer has provided the free printable files for personal use only and I ask that you keep that in mind when using. You can find out more information on Personal Use vs Commercial Use licenses on Cutting For Business‘ blog, which is a great resource.

Now on to how I did it. First, I pulled the printable file in to the Silhouette Studio program. It was a PDF file and in order to open that file type you need to have the Designer Edition Upgrade or higher of the Studio program. When I opened the PDF, I chose the option to import “As an image”.Next, was to trace my images. Since these were black printable files, they traced really nicely. I am using Silhouette Studio v4.1.201 and chose the Trace Panel on the right side of the Studio.

  Trace Panel copy

Then you choose “Select Trace Area” and draw a rectangle around your object. Your object will then turn yellow and you want it to be as solid yellow where ever you want it to trace.  For some objects, you may need to play with the settings in the Trace Panel to get the highest level possible for a good trace. I then clicked on the Trace option at the bottom of the Trace Panel.

Trace options copy

There are 3 Trace options at the bottom and the one I use the most is the top trace button that has the inner & outer butterfly shape. It will trace around the areas that have yellow on them, inside and outside of the object.

Once I had all of my objects traced, I then click on them to Select and use the Fill Color Panel to fill them all with color. This helps to visualize your design and makes it easier to move them around the software. I then measured my board and decided how big I wanted to make the design.

Silhouettesecrets_Fridgesign

I decide to give it a go cutting my vinyl without a mat. This is one of the perks of using a Silhouette machine, you do not have to use a mat if you are cutting a material that has a backing attached, such as adhesive vinyl or HTV. One thing to note when you are cutting without a mat is that you cannot cut as wide as you can with a mat. If you look at my photo above you can make out my red cut border around the edge of the white area, this is the software telling me it will not cut outside of that range. If you have a piece of 12″ vinyl, then it will take about 1/2″ of cutting area off of each side. You will also notice that it starts the cutting area on the edge of the vinyl on the left where the arrow is, this means it will start cutting almost immediately on your vinyl if that is where your image is. This differs from using a mat because the machine has to account for the edges around the grid area on the mat. So it makes a big difference if you tell the software you are cutting with or without a mat. You will also notice the Cut border on the right side of the design ends about an inch before my page size ends. This is the software telling me that it will stop cutting before it reaches the end of my material because the machine needs the space to grip the material & keep it in the machine.

Now, I will tell you that I highly recommend using a mat when you can for several reasons. The mat provides support for your material and gives it a solid surface to use when cutting. It also helps to hold your vinyl in place and there is less of a chance that it will move around and ruin your cut. However, the Silhouette does give you the ability to cut without a mat and it is a great feature, especially if you are cutting a lot of decals at once or one long decal. This ability to cut up to 10′ long sets it apart from other cutting machines.

On my Cameo 3, I needed to move my right roller in to the left just a bit to grip the vinyl. To do this, you unlock your roller and move it and then make sure to lock it back in place. The lock on the roller is very hard to see and is right next to the white roller, you twist to lock it back in. If you do not, then your vinyl will slide all over the place. You then line your vinyl up with the blue line & arrows on the left side and press load. After it cut, I then weeded out the parts of my design that would be my stencil and applied transfer paper.

Silhouettesecretsplus_vinylnomat

I painted my board with Black Chalkboard paint from my stash and let it dry a full 24 hours…. again, this is why I say I don’t paint boards often….. time involved.. watching paint dry. While it dried, I gathered my supplies and worked on other projects.

Silhouette-secrets001

I then applied my stencil using the hinged method, so I could get it as straight as I possibly could and not have it shift during application since it was so large.

Silhouette-secrets002

After I applied my stencil, it occurred to me that using black vinyl as a stencil on a black board was probably not the best idea. But, you go with it at this point. I then added a border of painters tape around the edges of my vinyl and board, so I would not accidentally paint an area I didn’t want to.

Silhouette-secrets003

I then sponged on my DecoArt Chalky Finish white paint. And let it dry for a couple hours. I had read a lot of posts that said to peel your stencil off while it was still wet, so I just kept coming back to check on it. You don’t want to do it while it’s too wet or it will smear and if you wait too long, then the vinyl could peel up more paint than you want.

Silhouette-secrets004

Now, after removing my big piece of stencil, came the task of weeding out all the little pieces inside of each animal……

Silhouette-secrets005

After I finished weeding out the inner pieces of vinyl, I let the entire piece dry for a good 48 hours. Once dry, I took a white piece of chalk and turned it sideways and “seasoned” the entire board to make it look more realistic.

Silhouette-secrets006

And here is my finished kitchen decor board… well, almost finished. It still needs a frame, which will require more time.

Silhouette-secrets007

The supplies I used for this project are:

Silhouette Studio Designer Edition software Cameo 3 cutting machine Oracal vinyl Transfer paper a board from my husband’s woodshop Craftsmart Black chalkboard paint from craft store DecoArt White Americana Decor Chalky Finish in white from craft store White Chalk

I am happy with how this sign turned out for my kitchen. The end result was exactly what I wanted, but it was no simple, quick project.

While I know that painting wood signs is not my preferred method…… I still encourage you to try a project out at least once. I may not paint a new sign every week, but I may have a few more in my future.

Enjoy !

THANK YOU for your support! How can you help? Click HERE & buy a coffee. Every little bit helps with the cost of running the site.

Looking for more in-depth, step-by-step classes, check out all of my online Silhouette classes on my Teachable site HERE.

SS Logo snip it

**This post may contain affiliate links. What that means is that I may receive compensation if you purchase through the links I have provided. The price you pay for the product or service is not higher but I may get compensated for sharing.