

Looking for a creative way to use those gorgeous wood sign designs without needing a laser cutter? In this tutorial, I’m sharing how you can create a stunning door hanger using just cardstock and vinyl—no laser required! I’m using a design by Diva Watts Designs and showing step-by-step how to bring it to life with your Silhouette machine. Whether you’re a beginner or just looking for a new way to use your cutting machine, this is a great project that proves you can make high-impact decor with tools you already have.
Affiliate links may be present in the following blog post and as an Amazon Associate, I earn from qualifying purchases.

Quick Steps to Create Your Cardstock & Vinyl Door Hanger
Want the quick version? Here’s a fast rundown of how I created this layered door hanger using my Silhouette and a design by Diva Watts Designs:
- Choose Your Design – I used the Oh Hello design from Diva Watts Designs that’s originally intended for laser cutting.
- Resize & Prep in Silhouette Studio – Open the file in Silhouette Studio, resize as needed, and ungroup the layers for cutting.
- Cut Cardstock Layers – Cut each of the design’s base layers from cardstock.
- Cut Vinyl Details – Use adhesive vinyl for the detailed elements like the lettering or small accents.
- Assemble the Layers – Stack and glue the cardstock layers together.
- Add Vinyl Elements – Carefully apply the vinyl details on top using transfer tape.
- Finish with a Hanger – Punch a hole or attach a twine loop to hang your finished piece.
That’s it! A beautiful, layered sign using just cardstock and vinyl—no laser required. Keep reading for more in-depth details and helpful tips!
Supplies for DIY Door Hanger Sign with Cardstock & Vinyl
- Oh Hello by Diva Watts Design – Design #1252716
- Recollections cardstock
- SuperTite Precision Craft Glue
- Fine Tip Applicator Bottle
- Wood Sign Blank
- Maker’s Magic Gloss by Scorch Marker
- Adhesive Vinyl
- Transfer Tape
- Silhouette Cameo 5
- Silhouette Autoblade
- Squeegee
- Weeding Tool
- Washi Tape
DIY Door Hanger with Cardstock & Vinyl Project Details
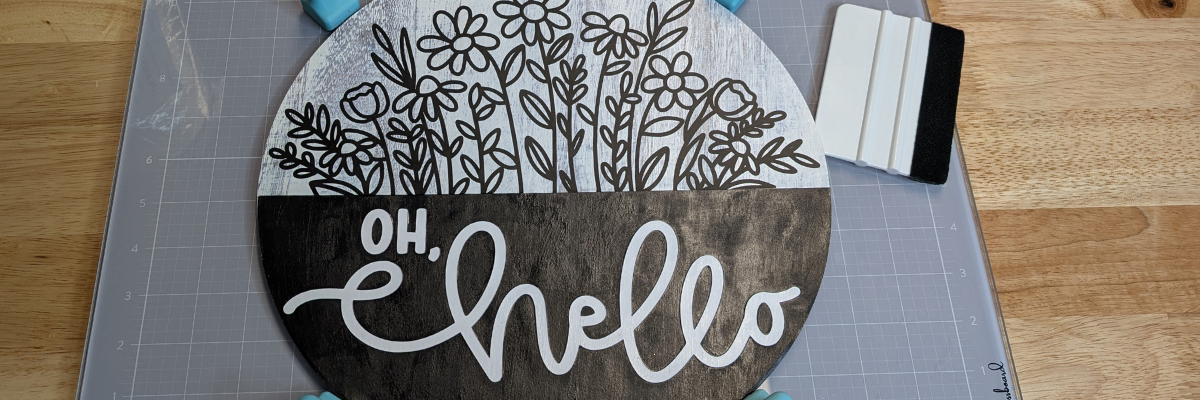
First, I started by measuring my wood sign backer. Then, I grouped the Oh Hello design and scaled it up to 11.8″. Next, rather than paint, I printed a Wood White Texture Digital Pattern by Daniela Moscone onto a 12″ x 12″ sheet of cardstock and then cut the background out of the printed paper. I played around with many different color combinations and finally settled on basic black and white.

I added the digital pattern paper to the background to get a feel for how it would look before I printed the page.
If you are printing a large pattern or filling almost the entire sheet of material with a pattern design, skip the print and cut limits and print the entire page or as much as your printer will allow and then simply cut the design from the printed page. If I had used registration marks on this page, I may not have gotten the size circle I needed with my pattern.
I could then simply place the entire sheet on my cutting mat and cut the size circle I needed.

I cut the black piece from a sheet of black cardstock and the “OH, Hello” from white cardstock.
Now here is my next “secret”. I used the negative of the white cardstock as my placement template for the words on top of the black section. I used a couple pieces of washi tape to hold it in place so nothing moved.

Then I could easily add glue and every piece was placed lined up as the original design showed.

To adhere the background paper to the wood sign, I used Maker’s Magic glue and spread it all over the wood sign and on the backside of the printed cardstock. Then smoothed it down onto the wood backing. I’ve had this Maker’s Magic glue in my stash for a while. The first time I used it, I had a few issues, but I think it was me and just like many things, it takes practice. It worked great for this project, and I knew I wanted to not only protect the cardstock but also add it to the top of the entire sign before I applied the adhesive vinyl flowers so the transfer tape wouldn’t tear up my printed design. I did let the Maker’s Magic dry overnight before adding the adhesive vinyl flowers.

Next it was time to apply the adhesive vinyl flower design. I enlisted the help of my new magnetic glass craft mat & magnets helped to hold this sign in place to easily apply the adhesive vinyl in the exact location I needed.

Instead of using the magnets on top of the material, I placed them in 4 places around the edge of the wood sign and it held it securely in place.

I love how this DIY door hanger turned out with cardstock and vinyl!
Think outside the box! Even if a design is shown in a project photo a certain way, start brainstorming how else you can use it. What other materials could you use to create it? Cardstock and vinyl instead of wood cut pieces? This design is so much more than just a wood sign!
Additional Resources:
Save this for future reference by pinning the image below.

Enjoy !
THANK YOU for your support! How can you help? Click HERE & buy a coffee.
Every little bit helps with the cost of running the site.
Silhouette Classes
Never stop learning! Let me help you take the anxiety out of learning with Silhouette and get to creating faster! My Silhouette classes are heavily focused on software, so you can take the skills & techniques taught and apply them to many future projects!


**This post may contain affiliate links. What that means is that I may receive compensation if you purchase through the links I have provided. The price you pay for the product or service is not higher but I may get compensated for sharing.
Discover more from Silhouette Secrets-Swift Creek Customs
Subscribe to get the latest posts sent to your email.


[…] out this post – How to Make a DIY Door Hanger Sign with Cardstock & Vinyl Using Silhouette HERE for more […]