

If you’ve ever spotted a hidden gem at a thrift store and talked yourself out of it… this project is your reminder to turn back and grab it! That’s exactly how this Etched Tiered Tray came to life. I found a gorgeous three-tiered glass tray tucked behind a stack of dishes, walked away, and then thankfully circled back to bring it home. Today I’m sharing how I transformed that thrifted treasure using custom-designed stencils created in Silhouette Studio and Etchall etching creme. With the right design setup and a few simple steps, you can get beautifully crisp results that make any glass piece look high-end and completely personalized.

Affiliate links may be present in the following blog post and as an Amazon Associate, I earn from qualifying purchases.
If you have a cutting machine, you have unlimited possibilities of custom designs at your fingertips.
Supplies Used for Custom Etched Tiered Tray:
- Silhouette cutting machine
- Cherry Blossom Branch by Tanya Batrak – Design #293455
- Oracal 651 adhesive vinyl – scraps work great!
- AT65 transfer tape
- Painters Tape
- Etchall Etching Creme
- Craft stick
- Glassware – from thrift store
- Heat Gun (optional but handy)
- Disposable Gloves
- Paper Towels
I started by measuring each level of the tiered tray. This gives me a starting point to draw out a template in Silhouette Studio to design within. If the tiered tray has a curve to it, then you’ll want to make sure to account for that. Adding a stencil onto a curved area can get a bit tricky to lay it straight and flat. I created my stencils so the design would be on the flat area before the curve starts.

Here is a look at my working file in Silhouette Studio.

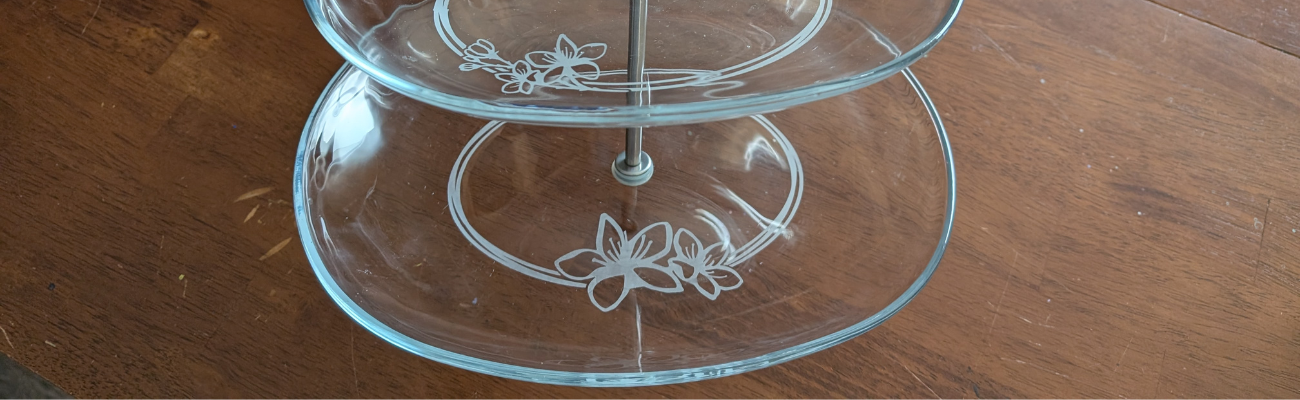
On the left side are some designs I was playing around with to decide what I wanted to work with. I settled on using the Cherry Blossom Design by Tanya Batrak. On the right you can see the design for each level of the tiered tray. The outer oval is the template from my measurements and then I was able to design within the template for each level.
I knew I wanted something that went all the way around and I designed an oval frame using the same technique that I shared in the video tutorial on the Silhouette Secrets+ channel – Creating a Circle Frame in Silhouette Studio with Basic Tools.

Then I brought in the Cherry Blossom Design and scaled it to the size I wanted and placed it on top of the oval frame.
I modified the design a bit by cutting off the branch on one side and then for the largest tiered tray, I cut off the top 3rd flower and used edit points to make the design smooth. So each layer of this tiered tray is a bit different. Here is a close up look at my final designs.

I then made an offset of the entire design and subtracted the offset from the circle frame to give the design some space and set it apart.
Here is a look at my stencil file on the Send tab in Silhouette. I used the Cut by Line Color tab so I could set up 2 different settings and have it kiss cut around the stencil and then cut the red cut line all the way through on the offset around the entire design. This way the center of the design was cut out for me by the Silhouette machine.

Then I grabbed a color of Oracal 651 adhesive vinyl that has been in my stash for awhile and not used. Scraps or colors that you don’t use often are great for stencils.
Once the designs were cut, then carefully weed out the design. And if you mess up in the weeding or application process, grab another sheet of vinyl and cut another one. I messed up along the way on one decal and ended up cutting another stencil. So glad I have this option with owning a cutting machine!

If your tiered tray comes apart easily, it may be easier to apply the stencils and etch by taking it apart. My husband suggested I do this, but with the rubber rings separating each layer, I didn’t want to mess something up taking it apart or putting it back together, so I worked with it fully assembled.
This meant that I needed to cut the stencil apart for 2 of the layers to wrap it around and apply to the bottom of the tier.

I looked for a good section of the design to slice it apart at that would be easy to line up and get connected again when I was applying.
Find some way to set up so your glass is secure and is as flat as possible for the stencil application and while the etching creme is on the glass.
Since I left my tiered tray assembled, I propped it up using my bulk roll of AT65 Transfer Tape.

This was actually a really sturdy way to hold my tiered tray and it was stable, secure, and level the entire time.
Make sure to clean the area where you’ll be applying the adhesive vinyl with alcohol first to remove any dirt and debris so you get a good adhesion. And then let it dry completely.
The bottom layer was the easiest since it was the most accessible and that is where I started. I applied the Oracal 651 adhesive vinyl stencil and then I applied a bit of heat to help the adhesive vinyl to adhere well. I have some intricate areas and I wanted to give myself the best chance of success and not have any bleed. While this is step is not mandatory for glass etching, I do think whatever you can do to set yourself up for success saves your time and money.
Not all glass etches too! And I wasn’t sure if this would work or not on the tiered tray. Starting with the bottom layer first, this was my test. I heated it a bit and then carefully smoothed down the vinyl edges all along. Be careful as hot glass looks the same as cold glass. I then waited for the glass to cool completely before applying the Etching creme so that the adhesive could set up and less likely to move around on the smooth surface.

The next step isn’t mandatory either, but I do feel it will help you be successful! Tape off the edges around the stencil in case any etching creme gets outside of where you want it to be. It never fails that if the etching creme even touches an area you don’t want it to etch, it will.

Use painter’s tape or in this case, I had lots of excess transfer tape and since it was an oval object on a curved surface, I ended up cutting smaller sections of the AT65 transfer tape and applying it around the outer edge and the inside edge of my stencil.
For flat objects, you can simply make your stencil larger to cover a larger area of the object. However, on a curved object that can be more difficult to lay the adhesive vinyl completely flat, so I chose this method.
Next, I applied the Etchall etching creme around the entire design. And set my timer for 20 minutes.

The next steps are very important! After 20 minutes, carefully remove any excess Etchall etching creme and put it back in the bottle. It can be reused over and over again. Then I take a paper towel and wipe away any excess. And once all the excess has been removed, I will run water in my sink and then washed the entire design and remove the stencil while under running water.
It worked!!! So I dried it off and then repeated the same steps on the other 2 layers of the tiered tray.

As you can see I have 2 different colors of adhesive vinyl as I messed up weeding the top layer stencil. Easily remedied by cutting another stencil with my Silhouette machine.

All the extra steps to secure with heat and taping off the design paid off!

This etched tiered tray project turned out fantastic!!!

The hardest part about glass etching is getting a good photo and in this case, getting a good photo that shows all 3 levels off well.

I love being able to create custom and unique projects. This one was quickly claimed by my youngest, who put it to work immediately. I asked if she could to a “lifestyle” photo for me to use and this is what she did.

It is definitely being put to good use and she loves it.
Check out more information for even more creative ideas and tips to take your crafting to the next level HERE!
Additional Resources:
- Creating a Circle Frame in Silhouette Studio with Basic Tools
- Edit Points
- Offset
- Subtract
- Designing in Silhouette – tutorial on using Offset & Subtract to create custom designs
- Subtracting Text from a Design – custom name shirts
- Cutting by Line Color
- A to Z Silhouette Resource
Save this for future reference by pinning the image below.

Enjoy !
THANK YOU for your support! How can you help? Click HERE & buy a coffee.
Every little bit helps with the cost of running the site.
Silhouette Classes
Never stop learning! Let me help you take the anxiety out of learning with Silhouette and get to creating faster! My Silhouette classes are heavily focused on software, so you can take the skills & techniques taught and apply them to many future projects!


**This post may contain affiliate links. What that means is that I may receive compensation if you purchase through the links I have provided. The price you pay for the product or service is not higher but I may get compensated for sharing.
Discover more from Silhouette Secrets-Swift Creek Customs
Subscribe to get the latest posts sent to your email.


What a great find and I really like what you did with the etching. Thanks for the great tutorial. Looks like something even I could do! The way your daughter styled it works really well. I will be on the lookout for something similar. 😃