Posted on 1 Comment

DIY Etched Glass Tiered Tray Using Etchall and Silhouette

Silhouette Secrets+ with EllyMae

If you’ve ever spotted a hidden gem at a thrift store and talked yourself out of it… this project is your reminder to turn back and grab it! That’s exactly how this Etched Tiered Tray came to life. I found a gorgeous three-tiered glass tray tucked behind a stack of dishes, walked away, and then thankfully circled back to bring it home. Today I’m sharing how I transformed that thrifted treasure using custom-designed stencils created in Silhouette Studio and Etchall etching creme. With the right design setup and a few simple steps, you can get beautifully crisp results that make any glass piece look high-end and completely personalized.

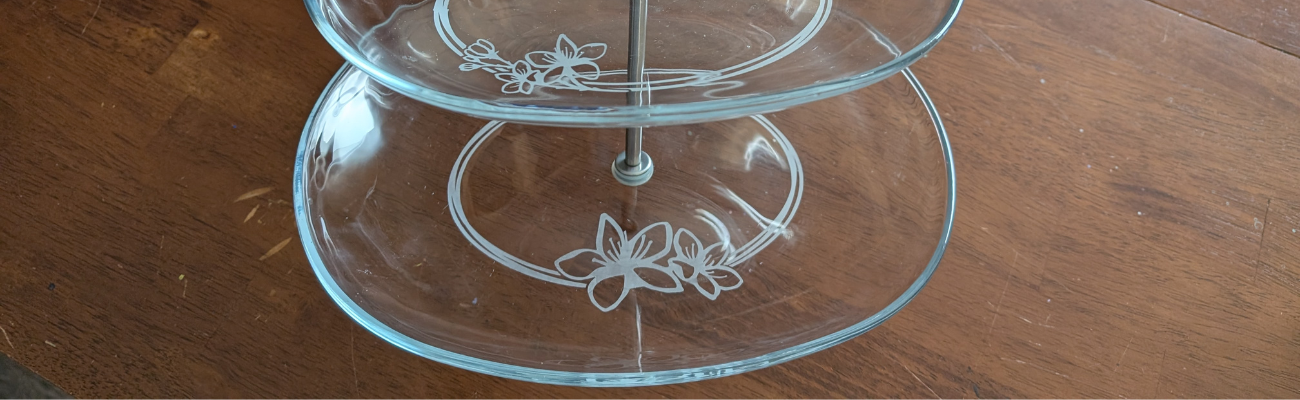
A three-tiered glass tray with floral etchings on the plates, showcasing a decorative design.

Affiliate links may be present in the following blog post and as an Amazon Associate, I earn from qualifying purchases.

If you have a cutting machine, you have unlimited possibilities of custom designs at your fingertips.

Supplies Used for Custom Etched Tiered Tray:

I started by measuring each level of the tiered tray. This gives me a starting point to draw out a template in Silhouette Studio to design within. If the tiered tray has a curve to it, then you’ll want to make sure to account for that. Adding a stencil onto a curved area can get a bit tricky to lay it straight and flat. I created my stencils so the design would be on the flat area before the curve starts.

Three-tiered glass tray with a metal handle, resting on a wooden surface.

Here is a look at my working file in Silhouette Studio.

Screenshot of the Silhouette Studio software showcasing various floral designs and templates for crafting projects.

On the left side are some designs I was playing around with to decide what I wanted to work with. I settled on using the Cherry Blossom Design by Tanya Batrak. On the right you can see the design for each level of the tiered tray. The outer oval is the template from my measurements and then I was able to design within the template for each level.

I knew I wanted something that went all the way around and I designed an oval frame using the same technique that I shared in the video tutorial on the Silhouette Secrets+ channel – Creating a Circle Frame in Silhouette Studio with Basic Tools.

Screenshot of the Silhouette Studio interface showing various circle frame designs and a tutorial title 'Creating a Circle Frame in Silhouette Studio'.

Then I brought in the Cherry Blossom Design and scaled it to the size I wanted and placed it on top of the oval frame.

I modified the design a bit by cutting off the branch on one side and then for the largest tiered tray, I cut off the top 3rd flower and used edit points to make the design smooth. So each layer of this tiered tray is a bit different. Here is a close up look at my final designs.

A design layout in Silhouette Studio showcasing three oval templates featuring hibiscus flowers, with a focus on creating custom stencils for crafting projects.

I then made an offset of the entire design and subtracted the offset from the circle frame to give the design some space and set it apart.

Here is a look at my stencil file on the Send tab in Silhouette. I used the Cut by Line Color tab so I could set up 2 different settings and have it kiss cut around the stencil and then cut the red cut line all the way through on the offset around the entire design. This way the center of the design was cut out for me by the Silhouette machine.

Screenshot of the Silhouette Studio software showing a design with three oval frames adorned with floral elements, intended for use in crafting.

Then I grabbed a color of Oracal 651 adhesive vinyl that has been in my stash for awhile and not used. Scraps or colors that you don’t use often are great for stencils.

Once the designs were cut, then carefully weed out the design. And if you mess up in the weeding or application process, grab another sheet of vinyl and cut another one. I messed up along the way on one decal and ended up cutting another stencil. So glad I have this option with owning a cutting machine!

A close-up of a hand using a crafting tool to weed an intricate stencil design featuring cherry blossoms, with a grid cutting mat in the background.

If your tiered tray comes apart easily, it may be easier to apply the stencils and etch by taking it apart. My husband suggested I do this, but with the rubber rings separating each layer, I didn’t want to mess something up taking it apart or putting it back together, so I worked with it fully assembled.

This meant that I needed to cut the stencil apart for 2 of the layers to wrap it around and apply to the bottom of the tier.

A person's hand holding a craft knife over an orange stencil design featuring cherry blossoms on a cutting mat.

I looked for a good section of the design to slice it apart at that would be easy to line up and get connected again when I was applying.

Find some way to set up so your glass is secure and is as flat as possible for the stencil application and while the etching creme is on the glass.

Since I left my tiered tray assembled, I propped it up using my bulk roll of AT65 Transfer Tape.

A tiered glass tray sits on a table surrounded by crafting supplies, including etching cream, a cutting machine, and various tools.

This was actually a really sturdy way to hold my tiered tray and it was stable, secure, and level the entire time.

Make sure to clean the area where you’ll be applying the adhesive vinyl with alcohol first to remove any dirt and debris so you get a good adhesion. And then let it dry completely.

The bottom layer was the easiest since it was the most accessible and that is where I started. I applied the Oracal 651 adhesive vinyl stencil and then I applied a bit of heat to help the adhesive vinyl to adhere well. I have some intricate areas and I wanted to give myself the best chance of success and not have any bleed. While this is step is not mandatory for glass etching, I do think whatever you can do to set yourself up for success saves your time and money.

Not all glass etches too! And I wasn’t sure if this would work or not on the tiered tray. Starting with the bottom layer first, this was my test. I heated it a bit and then carefully smoothed down the vinyl edges all along. Be careful as hot glass looks the same as cold glass. I then waited for the glass to cool completely before applying the Etching creme so that the adhesive could set up and less likely to move around on the smooth surface.

A person using a heat gun to apply a stencil on a glass tiered tray, featuring a Cherry Blossom design, in a home crafting setting.

The next step isn’t mandatory either, but I do feel it will help you be successful! Tape off the edges around the stencil in case any etching creme gets outside of where you want it to be. It never fails that if the etching creme even touches an area you don’t want it to etch, it will.

A close-up view of a glass tiered tray with a stencil design featuring cherry blossoms being prepared for etching, surrounded by crafting tools.

Use painter’s tape or in this case, I had lots of excess transfer tape and since it was an oval object on a curved surface, I ended up cutting smaller sections of the AT65 transfer tape and applying it around the outer edge and the inside edge of my stencil.

For flat objects, you can simply make your stencil larger to cover a larger area of the object. However, on a curved object that can be more difficult to lay the adhesive vinyl completely flat, so I chose this method.

Next, I applied the Etchall etching creme around the entire design. And set my timer for 20 minutes.

Close-up view of a glass tiered tray with a stencil applied, surrounded by painter's tape and etching creme, showcasing the crafting process.

The next steps are very important! After 20 minutes, carefully remove any excess Etchall etching creme and put it back in the bottle. It can be reused over and over again. Then I take a paper towel and wipe away any excess. And once all the excess has been removed, I will run water in my sink and then washed the entire design and remove the stencil while under running water.

It worked!!! So I dried it off and then repeated the same steps on the other 2 layers of the tiered tray.

A close-up view of a glass tiered tray being prepared for etching, with tape securing an oval stencil around the rim and etching creme applied within the stencil area.

As you can see I have 2 different colors of adhesive vinyl as I messed up weeding the top layer stencil. Easily remedied by cutting another stencil with my Silhouette machine.

A close-up view of a tiered glass tray with an intricate design being applied, featuring painter's tape and etching creme around the edges.

All the extra steps to secure with heat and taping off the design paid off!

A close-up of an etched glass tray featuring a floral design, with a metal stand in the center and a towel nearby.

This etched tiered tray project turned out fantastic!!!

A three-tiered glass tray with etched cherry blossom designs on each layer, displayed on a wooden table.

The hardest part about glass etching is getting a good photo and in this case, getting a good photo that shows all 3 levels off well.

A three-tiered glass tray with floral etchings and a metallic handle, showcasing a DIY glass etching project.

I love being able to create custom and unique projects. This one was quickly claimed by my youngest, who put it to work immediately. I asked if she could to a “lifestyle” photo for me to use and this is what she did.

A three-tiered glass tray displaying various pieces of jewelry and accessories, including earrings, bracelets, and decorative items.

It is definitely being put to good use and she loves it.

Check out more information for even more creative ideas and tips to take your crafting to the next level HERE!

Additional Resources:

Save this for future reference by pinning the image below.

A beautifully etched three-tiered glass tray featuring a floral design, showcasing the effect of glass etching with the Etchall etching creme.

Enjoy !

THANK YOU for your support! How can you help? Click HERE & buy a coffee.
Every little bit helps with the cost of running the site.

Silhouette Classes

Never stop learning! Let me help you take the anxiety out of learning with Silhouette and get to creating faster! My Silhouette classes are heavily focused on software, so you can take the skills & techniques taught and apply them to many future projects!

Silhouette step-by-step Classes by Silhouette Secrets+

Silhouette Secrets+ with EllyMae
**This post may contain affiliate links. What that means is that I may receive compensation if you purchase through the links I have provided. The price you pay for the product or service is not higher but I may get compensated for sharing.

Posted on Leave a comment

Custom Etched Decanter Set: A Personalized Gift Made with Etchall

Silhouette Secrets+ with EllyMae

Looking for a unique and elegant gift idea? This custom glass etched decanter set is the perfect project to showcase both creativity and craftsmanship! Using Silhouette Studio to design the stencil and cutting it from Oracal 651 adhesive vinyl with the Silhouette Cameo 5, I created crisp, intricate, and detailed stencils that made the etching process a breeze. With a little help from Etchall etching creme, each piece transformed into a beautifully personalized set — perfect for gifting or adding a touch of class to your own home bar. Keep reading for a full supply list, a look at the step-by-step process, and plenty of inspiration photos of the finished project!

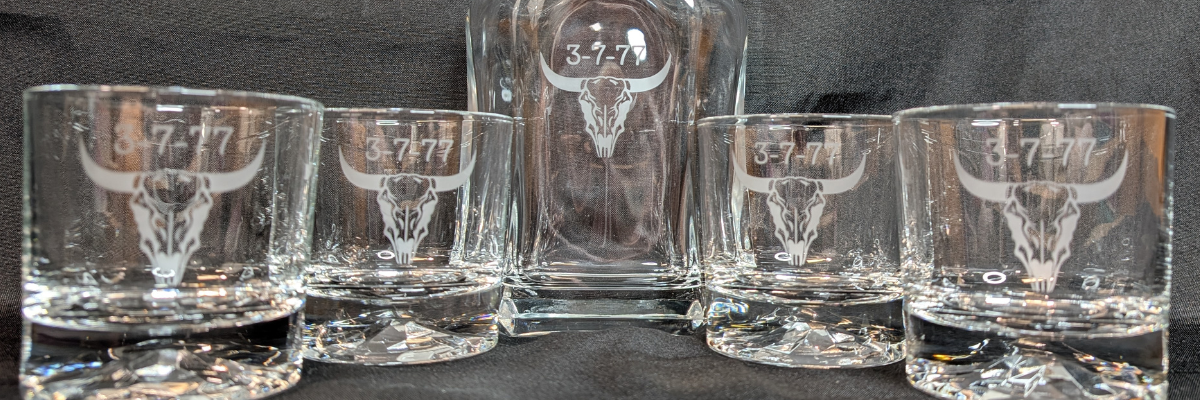
Custom etched glass decanter set featuring a bull skull design with the numbers '3-7-77' on each glass and the decanter.

Affiliate links may be present in the following blog post and as an Amazon Associate, I earn from qualifying purchases.

The best part about this project is that it came together for less than $20! I found the perfect glassware and decanter set during a quick trip to Goodwill, and I couldn’t pass it up. It was a very successful shopping trip to Goodwill for glassware.

A top view of a grocery cart filled with various glassware and a book, showcasing a collection of clear drinking glasses and jars.

After a good cleaning, the glass pieces were like new and ready for a makeover. My husband had the idea to create our own custom etched decanter set, and it turned out even better than we imagined. It just goes to show — with a little creativity (and a great thrift store find!), you can create something beautiful, personal, and completely unique without spending a fortune.

Ready to make your own custom etched decanter set? Here’s a look at the supplies and tools I used to bring this project to life — from the thrifted glassware to the vinyl stencil and etching cream that made the magic happen!

Supplies Used for Custom Etched Decanter Set:

Now that you’ve got your supplies ready, let’s take a look at how this custom etched decanter set came together! I snapped a few photos along the way to show each step — from creating the stencil in Silhouette Studio to applying the Etchall etching creme and revealing the final design.

I started by using a file I purchased on Etsy and then did some clean up on the file to make it more suitable for the glass etching project. I did not need all of the fine, intricate details of the original design at the size I was creating with. On the left is the original design I purchased, and on the right is the file I used for my stencil.

Digital design of a buffalo skull with intricate details, displayed in Silhouette Studio software.

Creating a clean cutting stencil can take some test cut attempts just to make sure that the details you want will remain and you won’t have any cutting issues. I started with one stencil, adjusted my design a bit after seeing how it cut, and then cut the rest of the stencils I needed.

Design interface of Silhouette Studio displaying multiple buffalo skull designs with the text '3-7-77'.

I used scraps of Oracal 651 adhesive vinyl for this project. Or if you have a color in your stash that isn’t your favorite, this is the perfect project for it!

A Silhouette cutting machine with adhesive vinyl designs featuring a bull skull and the text '3-7-77' on a workspace.

I applied the stencils using AT65 Transfer Tape and then I highly recommend adding painters tape around the edges of your stencil design, especially on a curved object. Etching cream is awesome and can work super quick, especially if it gets onto a spot of the glassware that you do not want to be etched. It seems like those mistakes always seem to etch the fastest.

A hand holding a heat gun next to a custom glass decanter and etched glasses, with vinyl stencils and etching cream visible on a work surface.

The next step I took is optional, but since I knew my stencils were detailed, I thought it was worth the extra step to apply a bit of heat to the adhesive vinyl and make sure it had a really good adhesion. I grabbed my Heat It Gun by Ranger and applied it for a few seconds all around. Be careful as hot glass looks like cold glass. I let it cool completely so the adhesive vinyl would be well stuck.

I really like this Heat Gun by Ranger as it has more of a direct heat towards your project and doesn’t blow the hot air out around as much. I know that sounds odd, but it’s one of those things that you don’t really “get” until you have used the tool. I used it in a class at Creativation 2025 and came home and bought myself one even though I have several embossing guns already in my tool box.

Close-up of glassware with a stencil applied using painters tape, Etchall etching cream nearby, showcasing the glass etching process.

Here is a close up look at the etching cream as it sneaked off my stencil and why I highly recommend using the painters tape. With curved objects, it’s not always easy to simply make the stencil bigger. That can be more difficult to get a smooth application on the glass object, so the painters tape is a great way to help add an additional barrier.

I leave the etching cream on for 20 minutes and then this is IMPORTANT! Scrape off any excess etching cream and put it back in the bottle!!! It can be reused over and over again. I’ve had bottles of Etchall Etching Creme for many years, and it is still good to use, no matter what color it turns into.

Then I take a paper towel and wipe off any excess etching cream before rinsing it thoroughly in the sink.

They turned out FANTASTIC! And I was doing a happy dance. I do believe that taking the extra time to heat the adhesive vinyl and let it cool before applying the etching cream helped to seal the edges of the stencil to prevent any seepage of the etching cream and give it crisp, smooth lines.

A custom etched glass decanter set, featuring a decanter and four matching glasses, each engraved with the number '3-7-77' and a decorative bull skull design.

The next step – put them to the test & enjoy our new custom decanter set.

A custom etched glass decanter set featuring a bull skull design with the numbers '3-7-77' on the decanter and two glasses, placed on a dark background.

For our project, we thought that Buffalo Trace fit it perfectly and filled the decanter well.
(*not sponsored or a promotion for Buffalo Trace – please enjoy responsibly)

Custom etched decanter set featuring a glass decanter and matching glass with a bull skull design, accompanied by a bottle of Buffalo Trace bourbon.

Whether you’re creating a special gift or adding a custom touch to your own space, glass etching is a simple way to make something truly unforgettable. With your cutting machine, Oracal 651 vinyl, and a little Etchall etching creme, you can personalize glassware, mirrors, and so much more! I hope this project inspires you to give etching a try and see just how easy it is to get professional-looking results at home. Check out more information for even more creative ideas and tips to take your crafting to the next level HERE!

Save this for future reference by pinning the image below.

A DIY custom etched decanter set featuring a glass decanter and matching glasses, all engraved with the same design. The decanter holds a dark liquid and is placed on a light background, showcasing the intricate details of the etching.

Enjoy !

THANK YOU for your support! How can you help? Click HERE & buy a coffee.
Every little bit helps with the cost of running the site.

Silhouette Classes

Never stop learning! Let me help you take the anxiety out of learning with Silhouette and get to creating faster! My Silhouette classes are heavily focused on software, so you can take the skills & techniques taught and apply them to many future projects!

Silhouette step-by-step Classes by Silhouette Secrets+

Silhouette Secrets+ with EllyMae
**This post may contain affiliate links. What that means is that I may receive compensation if you purchase through the links I have provided. The price you pay for the product or service is not higher but I may get compensated for sharing.

Posted on 1 Comment

Creating a shadow box with Silhouette

Everyone starts out with one material or another, mine was paper. I started with my Silhouette as a paper-crafter and it has grown from there.

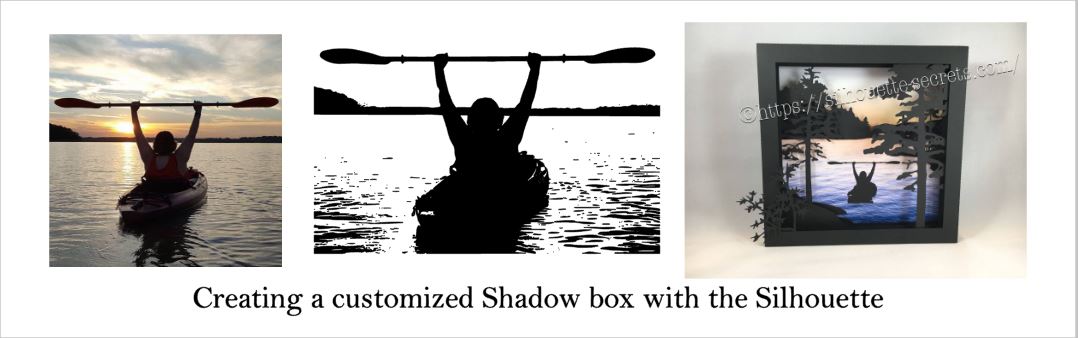
A while back I was visiting friends in Kansas and playing with the Silhouette and my friend asked if I could trace a photo for her that a friend took. Now, photo tracing can be tricky. Each photo can yield different results tracing in the Silhouette Studio and you just never know until you try to see what will happen.

In this case, it was a great photo to trace.

Bobbi's photo

Here is how the trace came out. I used Basic Trace panel to achieve this. Check out the Trace Panel HERE.

Photo trace

Then I released the compound path and deleted the water areas and used the point editing and deleting points to clean up edges and take out the skyline.

Cleaned up

Now, like I said above, each photo is going to vary in how it traces and this one turned out to be pretty simple with a little time for editing.

Then when I saw this Canoe at Sunrise shadow box in the Silhouette Design Store, I knew it was perfect for a gift that I could incorporate this trace into.

Design Store file

Instead of adding the canoe, I cut and added my traced image of my friend on her kayak. It was perfect!

Shadow box

I am one of those people who has to do a project pretty much exactly like the demo, at least the first time. So I did go to the designer’s website and purchase the file again – yes, sounds crazy – but I wanted the backgrounds for this particular project. However, you can use any background that you want and add it to your project.

What are you creating today? Feel free to post your project photos & questions on my Facebook group at Silhouette Secrets+ with EllyMae.

Shadow box

Enjoy !

THANK YOU for your support! How can you help? Click HERE & buy a coffee. Every little bit helps with the cost of running the site.

Looking for more in-depth, step-by-step classes, check out all of my online Silhouette classes on my Teachable site HERE.

SS Logo snip it

**This post may contain affiliate links. What that means is that I may receive compensation if you purchase through the links I have provided. The price you pay for the product or service is not higher but I may get compensated for sharing.

Posted on 10 Comments

Subtracting Text for HTV in Silhouette Studio v4

These designs have been a big hit for Mother’s Day and we will walk through how to created one.

temp_1

First click on the Text Tool on the left side of the Silhouette Software. Click on the design mat & type out the words. Click off of the words to deselect it and then click back on the text once to select it. Fill the text with color to make it easier to see & work with. Click on the Text Style Panel on the right side.

Text Style copy

Now, click on a Font Style Name, the text will change to that font style. You can then either click on each font, use the text search bar if you know what you are looking for or use the arrow keys to scroll through the text list and as you do the words will change to each font – this is my favorite method if I don’t know what font I want.

Text Style Panel copy

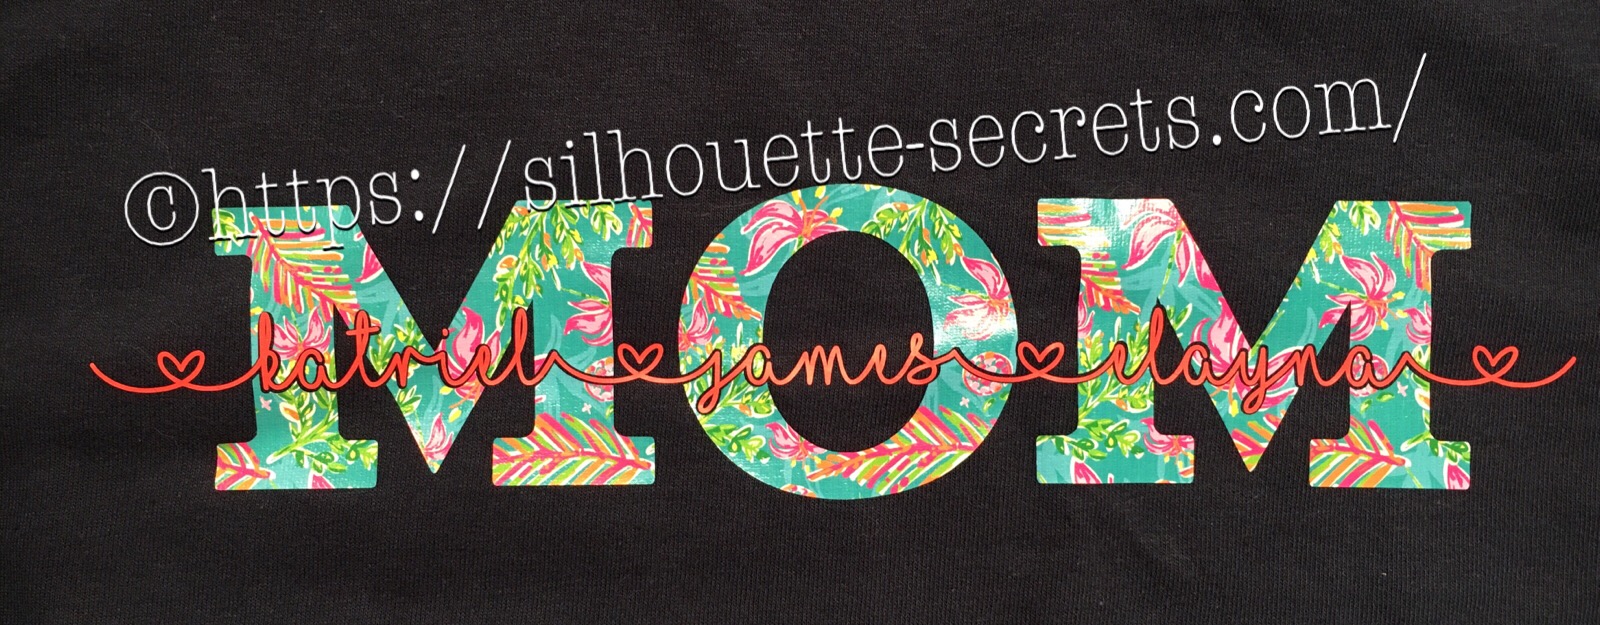
For Mom, I chose a font called Gulana – I chose this one by just scrolling through my font list and seeing what I liked best. Now, resize it how you like it.

Next using the same text tools, type out your second layer.

Names text.JPG

I used the font MF I Love Glitter by Misti Fonts in this example. The swirl hearts are called Glyphs and are special characters within the font that you can add. Check out this post for more on the Glyphs feature HERE.

Since this font overlaps make sure to weld the letters together before you cut.

Now position your name design over the top of the Mom design and align it how you want it.

Mom aligned

We are going to Subtract the top layer (names) from the bottom layer (Mom).

First, I’d suggest creating an offset. When you are using HTV and pressing individual layers, the HTV can shrink as it’s applied with heat. To help with that we will create an offset, so we don’t have unwanted gaps in our design.

First, make a copy of your design and pull it off to the side in the holding area of the design space. Any time you are working with text, it’s a good idea to make a copy and pull the original off, just in case you need to go back. Once you edit text, it is no longer text and is now treated as a vector image – so the text is no longer editable.

Next, select your name text and click on the Offset Panel on the right side of Silhouette Studio v4.

Offset copy

Then next to the Distance highlight the numbers and type in 0.040, then click on Apply or hit Enter. The Distance of the offset will vary depending on the design you are using. Enter some larger or smaller offsets and see what you like – the Undo button will be your best friend.

The offset option gives you an outline around your text. It can also be used to make text thicker when you are using a very fine line font.

Offset zoom

Once you Apply the offset, it will weld any parts that are overlapping. Parts of the design that are not overlapping (like dots of an i) will not be welded together, so you will need to group the offset before you move it, so it all moves as one.

Now move your original text off of the Mom design.

Offset2.JPG

To create this design, we are going to use the Mom and the offset of our name text.

Select both Mom and the offset and under the Modify Panel, choose Subtract.

Mom knock out copy

This will Subtract the top layer (offset) from the bottom layer (Mom) and any pieces that are not connected will now be individual. I would group these together before anything gets moved.

Offset group copy

The Group option can be found in the QAT (Quick Access Toolbar) at the top of the software, right click and choose Group or under the Object menu at the top left of the software.

Now, we can move our original text back on top of our Mom design.

Knockout

You can see when we zoom in that we have created a gap in our layering. This is done with the purpose of allowing for the shrinkage of the HTV and not getting unwanted gaps in our design.

Knockout zoom

Do you have to do an offset before you use the Subtract option? No, but it can save some frustration when the HTV does shrink.

Now, you are ready to set it up to cut out the material.

I used this awesome Sparkleberry Vaca HTV by Sparkleberry Ink on the Mom design. This is a patterned vinyl and you do not have to mirror or flip your image when you cut their patterned vinyl.

For the name text, I am using Siser Easyweed HTV in Hibiscus from Swing Design. Since this is regular HTV, I will flip (mirror) the text prior to cutting.

Flip name text copy

Next, prepare your materials. Cut them down to the size you need or place each one on the mat individually, however you like to cut.

Click on the Send tab in the top right corner. Select your Material. Heat Transfer – Smooth is what I used for both the pieces I cut.

Send tab copy

Once your mat is loaded, I always suggest doing a Test Cut before cutting the full design. This can save you a lot of frustration in the long run.

Click on the Send button at the bottom and once it’s cut you can weed your designs.

Layer & press the designs on your t-shirt or tote bag and you have a custom made design.

temp_2

Subtracting text

What will you create with this technique today?

Enjoy !

THANK YOU for your support! How can you help? Click HERE & buy a coffee. Every little bit helps with the cost of running the site.

Looking for more in-depth, step-by-step classes, check out all of my online Silhouette classes on my Teachable site HERE.

SS Logo snip it

**This post may contain affiliate links. What that means is that I may receive compensation if you purchase through the links I have provided. The price you pay for the product or service is not higher but I may get compensated for sharing.