I hope that this helps you in your design journey in Silhouette Studio. I’ll be honest and most times I just click the buttons until it does what I want it to do as each design can vary. The Undo function is your BEST FRIEND in any software program!
Make sure to follow us on all the social media sites! You never know which one is going to show you the new content that is released. Algorithms are funny and complicated.
Save this for future reference by pinning the image below.
Enjoy !
THANK YOU for your support! How can you help? Click HERE & buy a coffee. Every little bit helps with the cost of running the site.
Silhouette Classes
Never stop learning! Let me help you take the anxiety out of learning with Silhouette and get to creating faster! My Silhouette classes are heavily focused on software, so you can take the skills & techniques taught and apply them to many future projects!
**This post may contain affiliate links. What that means is that I may receive compensation if you purchase through the links I have provided. The price you pay for the product or service is not higher but I may get compensated for sharing.
So last week we talked about the differences in welding, subtract, subtract all, intersect, divide and crop in the Modify Panel – Tab 1. This week we are moving on to something that I think is very often more confusing than it should be – Modify Panel – Part 2 – Compound Paths.
First, if you are just joining us, the Modify Panel is on the right side of the Silhouette Studio v4 software.
Last week we dove into the top section of the panel under the Modify header and this week we are going to look at the bottom section – Compound Paths and Detach Lines.
So first, what is a compound path?
A compound path is a way 2 shapes interact with each other.
For example – let’s look at the letter ‘O’.
The letter ‘O’ is made up of 2 ovals on top of each other that are a compound path (left). If you release the compound path, then you have 2 ovals stacked on top of each other (right).
Both of these will still cut the same, but a compound path design when filled with color, will look more like the end result of what you are cutting.
Let’s take another look:
I have used the USA State Dingbat Font by Sandi Idleman in the Silhouette Design Store, to create my state shape. Then I used the Text Tool to write out Montana and placed it across the design.
On the top, the 2 designs are layered on top of each other, they are treated as 2 designs. The middle design is still just 2 designs that have been filled with a color. And the bottom design I selected both shapes and choose Make Compound path. This has taken and cut the Montana out of the bottom state shape, now they are one design.
Now, let’s look at them on the Send Panel.
They all have the same bold cut lines. All of them will cut the same, the difference is how they look in the software when you are designing.
Now that we know a little more about how the Compound path works, let’s finish the Modify Panel.
7. Make Compound Path – This will take 2 or more designs and combine the paths making them 1 design.
For instance, some files from the Silhouette Design Store will open and you will notice if you fill it will color, that it looks odd. This is a Camera design by Amy Tangerine – Design #181402.
All of these camera designs will cut the same, but how they look on the design screen is affected by choosing Making Compound Path.
8. Release Compound Path – This will take 1 design and releasing it into multiple shapes.
For example, if I wanted to use this Fish Mandala design by Zigi Design Studio but I just want the outline of it, I can choose Release Compound Path.
This will take the design from 1 layer and release all the layers. You may need to Ungroup the Design at this point, it just depends on how the Designer created and saved the file.
Now, you can see all the selection boxes that are highlighted. The Compound Paths have been released and it is now in many layers.
Note: When you do this on such a complex design, it increased the amount of data in that file because each piece is now an individual layer. So keep that in mind when you do this, in case your computer seems sluggish or with a really complex design, you may get a Not Responding message. It’s a lot of date, so be patient.
There are many reasons why you would want to do this and it can be helpful to know how to “break up” a design by releasing the compound paths.
With these tools, you can make the designs you have go farther.
For example, after I released the Compound Path and moved the outline away, then I could add text in the middle of the design, select both and choose Make Compound Path and it would then cut the Montana text out of the center of the fish.
9. Detach Lines – If the image is filled with color, this option will separate the colored parts of the design from the lines of the design.
This is a Spring Butterfly Set by Sophie Gallo – Design #56994.
You could use this option when doing a Print and Cut project versus changing the line color on each design.
If you click on the Send tab, you will see that they both have Cut lines on the design, but one is the lines and one is the image with the fill.
Here is the same idea but the Butterflies were filled with a pattern and then detach lines was chosen.
And there you have all the tools in the Modify Panel. Check out Part 1 of the Modify Panel HERE.
Now, the best way to learn is to play, play, play. Go find a design and see what compound paths do!
THANK YOU for your support! How can you help? Click HERE & buy a coffee.
Every little bit helps with the cost of running the site.
Looking for more in-depth, step-by-step classes, check out all of my online Silhouette classes on my Teachable site HERE.
**This post may contain affiliate links. What that means is that I may receive compensation if you purchase through the links I have provided. The price you pay for the product or service is not higher but I may get compensated for sharing.
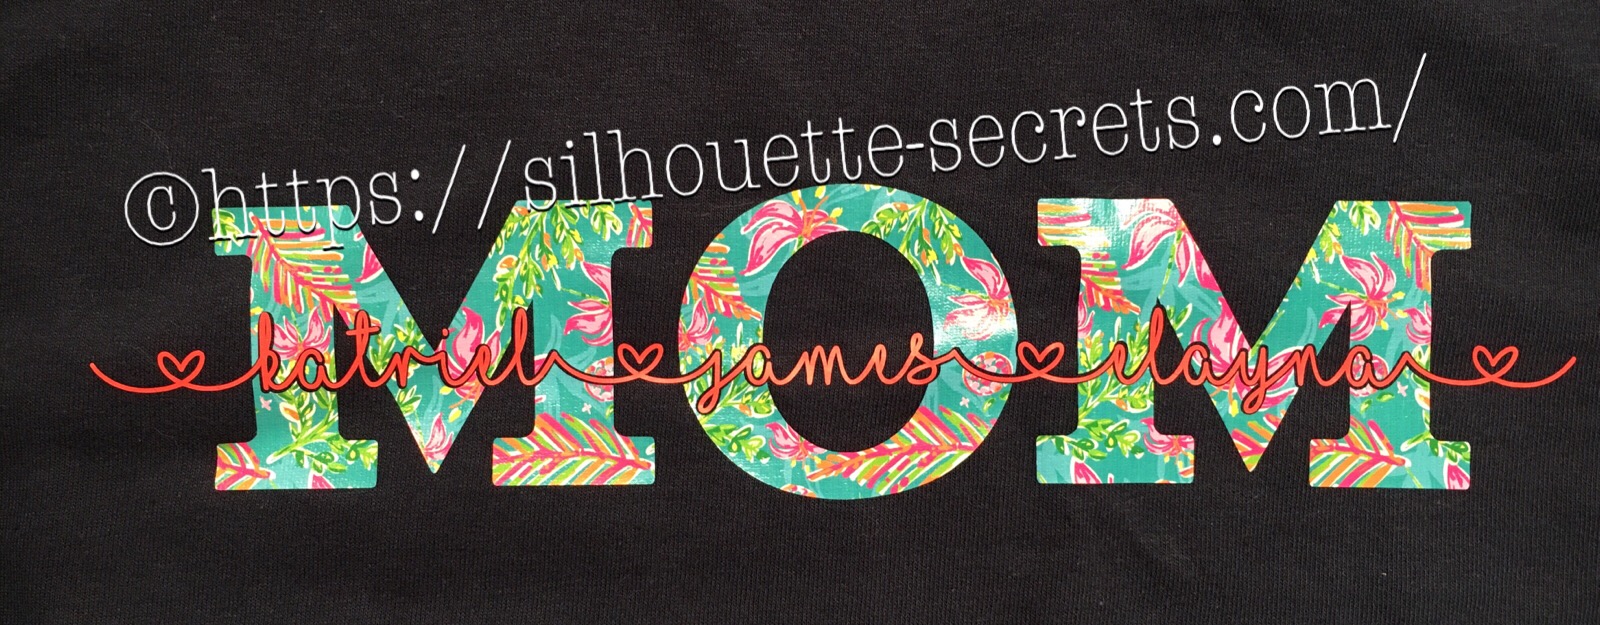
If you’ve ever wanted to turn a simple word into meaningful, personalized word art, the “subtract the name from Mom” technique is one of the most popular and impactful designs you can create in Silhouette Studio. By using basic subtract, weld, and text tools, you can carve a child’s name directly out of the word “Mom,” transforming it into a custom design that feels both modern and deeply personal. In this tutorial-style project, I’ll show you how to build this custom MOM shirt word art and then bring it to life by cutting it from HTV to create beautiful, custom apparel that’s perfect for gifts, family matching shirts, or keepsakes.
These designs have been a big hit for Mother’s Day and we will walk through how to created one.
Affiliate links may be present in the following blog post and as an Amazon Associate, I earn from qualifying purchases.
Create a Custom MOM Shirt with Silhouette & HTV
First click on the Text Tool on the left side of the Silhouette Software.
Click on the design mat & type out the words.
Click off of the words to deselect it and then click back on the text once to select it.
Fill the text with color to make it easier to see & work with.
Now, click on a Font Style Name, the text will change to that font style.
You can then either click on each font, use the text search bar if you know what you are looking for or use the arrow keys to scroll through the text list and as you do the words will change to each font – this is my favorite method if I don’t know what font I want.
For Mom, I chose a font called Gulana – I chose this one by just scrolling through my font list and seeing what I liked best.
Now, resize it how you like it.
Next using the same text tools, type out your second layer.
I used the font MF I Love Glitter by Misti Fonts in this example. The swirl hearts are called Glyphs and are special characters within the font that you can add.
Since this font overlaps make sure to weld the letters together before you cut.
Now position your name design over the top of the Mom design and align it how you want it.
We are going to Subtract the top layer (names) from the bottom layer (Mom).
First, I’d suggest creating an offset. When you are using HTV and pressing individual layers, the HTV can shrink as it’s applied with heat. To help with that we will create an offset, so we don’t have unwanted gaps in our design.
First, make a copy of your design and pull it off to the side in the holding area of the design space. Any time you are working with text, it’s a good idea to make a copy and pull the original off, just in case you need to go back. Once you edit text, it is no longer text and is now treated as a vector image – so the text is no longer editable.
Next, select your name text and click on the Offset Panel on the right side of Silhouette Studio v4.
Then next to the Distance highlight the numbers and type in 0.040, then click on Apply or hit Enter. The Distance of the offset will vary depending on the design you are using. Enter some larger or smaller offsets and see what you like – the Undo button will be your best friend.
The offset option gives you an outline around your text. It can also be used to make text thicker when you are using a very fine line font.
Once you Apply the offset, it will weld any parts that are overlapping. Parts of the design that are not overlapping (like dots of an i) will not be welded together, so you will need to group the offset before you move it, so it all moves as one.
Now move your original text off of the Mom design.
To create this design, we are going to use the Mom and the offset of our name text.
Select both Mom and the offset and under the Modify Panel, choose Subtract.
This will Subtract the top layer (offset) from the bottom layer (Mom) and any pieces that are not connected will now be individual. I would group these together before anything gets moved.
The Group option can be found in the QAT (Quick Access Toolbar) at the top of the software, right click and choose Group or under the Object menu at the top left of the software.
Now, we can move our original text back on top of our Mom design.
You can see when we zoom in that we have created a gap in our layering. This is done with the purpose of allowing for the shrinkage of the HTV and not getting unwanted gaps in our design.
Do you have to do an offset before you use the Subtract option? No, but it can save some frustration when the HTV does shrink.
Now, you are ready to set it up to cut out the material.
I used this awesome Sparkleberry Vaca HTV by Sparkleberry Ink on the Mom design. This is a patterned vinyl and you do not have to mirror or flip your image when you cut their patterned vinyl.
For the name text, I am using Siser Easyweed HTV in Hibiscus. Since this is regular HTV, I will flip (mirror) the text prior to cutting.
Next, prepare your materials. Cut them down to the size you need or place each one on the mat individually, however you like to cut.
Click on the Send tab in the top right corner. Select your Material. Heat Transfer – Smooth is what I used for both the pieces I cut.
Once your mat is loaded, I always suggest doing a Test Cut before cutting the full design. This can save you a lot of frustration in the long run.
Click on the Send button at the bottom and once it’s cut you can weed your designs.
Layer & press the designs on your t-shirt or tote bag and you have a custom made design.
This MOM shirt technique could be used to create many different custom designs such as DAD, NANA, GRANNY, etc.
Save this for future reference by pinning the image below.
Enjoy !
THANK YOU for your support! How can you help? Click HERE & buy a coffee. Every little bit helps with the cost of running the site.
Silhouette Classes
Never stop learning! Let me help you take the anxiety out of learning with Silhouette and get to creating faster! My Silhouette classes are heavily focused on software, so you can take the skills & techniques taught and apply them to many future projects!
**This post may contain affiliate links. What that means is that I may receive compensation if you purchase through the links I have provided. The price you pay for the product or service is not higher, but I may get compensated for sharing.
THANK YOU for your support! How can you help? Click the link to buy a coffee. Every little bit helps in the cost of running the site.